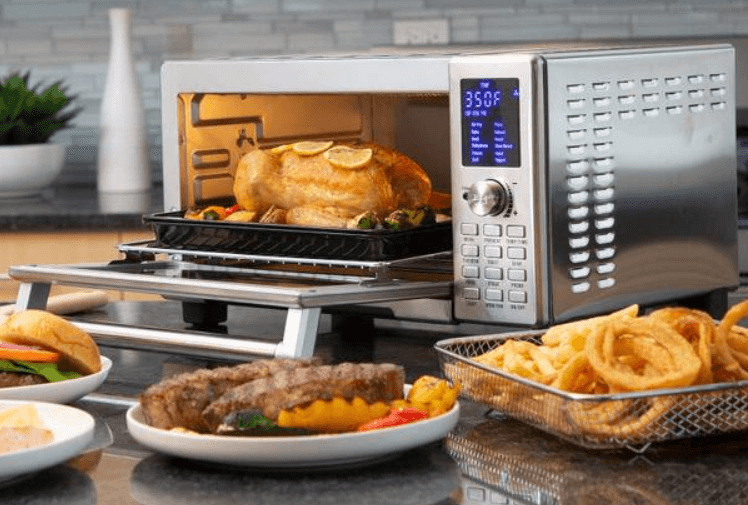
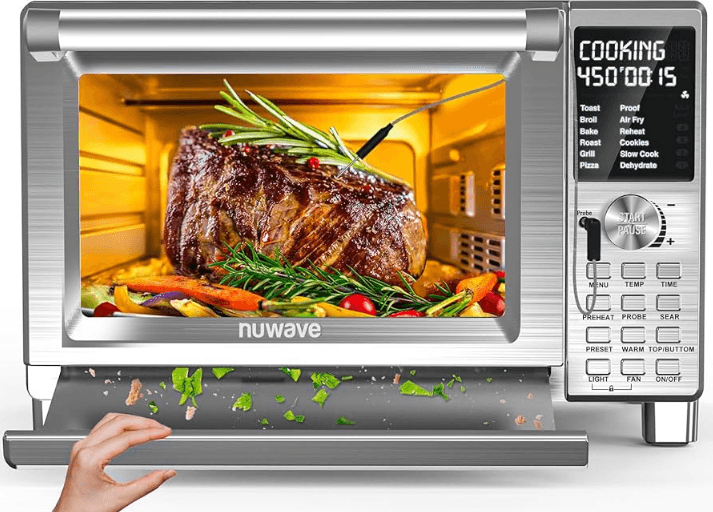
Nuwave Bravo XL Air Fryer Toaster Oven
IMPORTANT SAFEGUARDS
READ ALL INSTRUCTIONS
WARNING: When using the Bravo Smart Oven, basic safety precautions should always be followed:
- Do not touch hot surfaces. Use handles and oven gloves when removing items from the Bravo.
- Do not use the Bravo together with other high-power electric appliances with high-power, in case of overload.
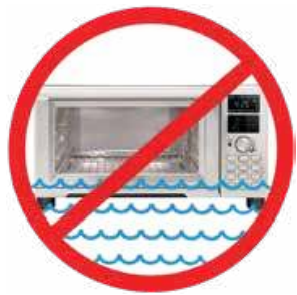
- To protect against the risk of electrical shock, do not immerse the cord, plug, or any part of the Bravo’s main unit in water or any other liquids, or touch the plug when your hands are wet.
- Always wear protective, insulated oven gloves when inserting or removing items from the hot oven.
- Do not place any cookware or dishes in the Bravo that are not oven-safe.
- Do not clean with metal pads.
- Do not operate the Bravo with a damaged cord or plug. If the appliance malfunctions, is dropped, or is damaged in any manner. Contact Customer Service at 1-877-689-2838 or email [email protected] for information on examination, repair, or adjustment.
- Close supervision is necessary when any appliance is used near children. The Bravo is not intended for use by children, persons with reduced physical, sensory, or mental capabilities, or those with a lack of expertise or knowledge of this unit.
- Do not let the cord hang over the edge of the table or counter.
- Do not let the cord contact hot surfaces, including the stovetop.
- Place the Bravo on a surface that is horizontal, even, and stable.
- Do not place on or near a hot gas or electric burner or on a heated oven.
- Do not place the unit close to flammable materials, heating units, or wet environments.
- Do not place airtight containers in the Bravo.
- Do not place plastic or rubber containers in the unit. Avoid using containers made of any material other than ceramic, glass, or metal in the unit.
- Do not place paper, cardboard, plastic, or any other flammable materials on the Bravo during use.
- Use tinfoil to enwrap foods that produce oil or juice when operating and put them on the bake tray to prevent fire.
- Make sure tinfoil does not touch the heating elements to prevent fire.
- Do not cover the crumb tray or any part of the oven with metal foil. This will cause overheating of the oven and may cause a fire.
- Do not alter or modify any part of the Bravo or use attachments or accessories not recommended by the manufacturer.
- Do not cover any part of the oven with metal foil.
- If excess smoke is escaping from the air vent during operation, unplug the unit immediately and contact Customer Service at 1-877-689-2838 or email [email protected].
- Do not overfill the Bravo such that the contents are touching the heating elements or blocking the fan.
- During use, steam may be released from the air outlet vents. Keep your hands and face away from the air outlet openings. Be careful of hot steam escaping when opening the Bravo.
- Avoid placing your face and eyes near the glass door during use.
- Never touch the insides of the Bravo while it is operating.
- Never leave the Bravo unattended during use.
- The Bravo is intended for normal, household use. It is not intended to be used in environments such as staff kitchens, shops, offices, or other work environments. It is not intended for outdoor use.
- Do not use the Bravo for anything other than its intended use.
- Never put the Bravo against the wall or other appliances. There should be at least 5 inches of free space behind, to the sides of, and on top of the Bravo.
- Do not disassemble the unit.
- Unplug the Bravo from the outlet when not in use or before cleaning.
- Allow the Bravo to cool before putting on, taking off parts, or before cleaning.
PARTS DESCRIPTION
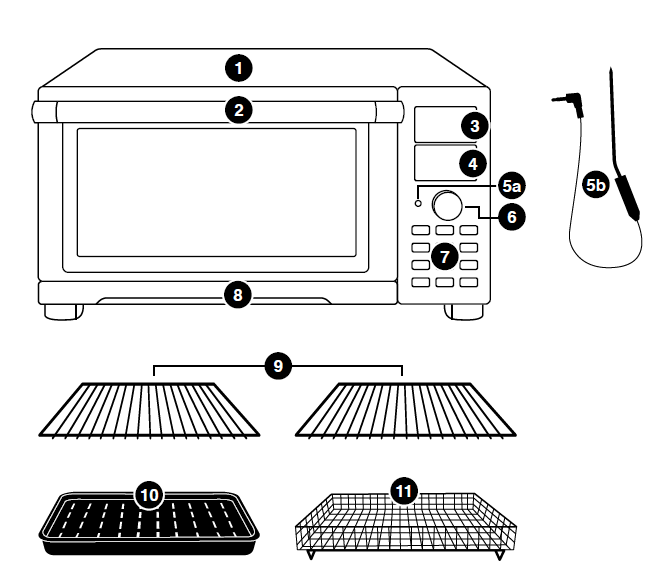
- Base
- Handle
- Digital Display Menu
- Menu
- Probe Input
- Temperature Probe
Part #: 26808
- Temperature Probe
- Dial
- Functions
- Pull-Out Crumb Tray
Part #: 26801 - 2 Heavy-Duty Cooking Racks
Part #: 26802 - Enamel Baking Pan and Enamel Broiler Rack
Part #: 26804 - Chrome-Plated Air Fry Basket
Part #: 26806 - Oven Light
Part#: 26807 (inside Oven)
ASSEMBLY GUIDE
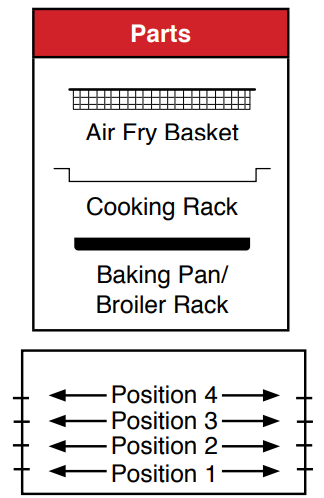
- Place the Bravo on a level, even, and stable heat-resistant surface.
- Slide the Cooking Rack(s) into either Position 1, 2, 3, or 4 of the Bravo.
- Place the Baking Pan with Broiler Rack on the Cooking Rack in Position 1.
- Place the Air Fry Basket on top of the Baking Pan. It is recommended to use the Air Fry Basket with the Baking Pan to optimize cooking results.
- Place the Crumb Tray into position by sliding it into the slot at the bottom of the Oven. To remove, push down slightly and pull out.
- Plug the appliance into a standard wall socket. The power plug is located in the rear of the unit.
NOTE: Do not cover or block the intake air vents located in the back and sides of the Bravo, as doing so can prevent proper ventilation.
OPERATING INSTRUCTIONS
ON/OFF & START/PAUSE:
- Press “ON/OFF” once to turn the Bravo on. The unit will beep, the LED display will show “350F” (default), TEMP, TOP, BTM, and the fan icon will be displayed solid.
- Press “START/PAUSE” to begin cooking. The unit will cook at 350°F for 10 minutes. This is the default setting.
- The LED display will show “00:10” and begin a countdown. TIME, TOP, BTM, and fan icon will be backlit, and “:” will flash.
- To adjust cooking temperature, turn the “START/PAUSE” knob toward “+” (clockwise) to increase, or toward “-” (counterclockwise) to decrease temperature in 5°F increments. Quickly turn the dial to adjust in larger increments.
- To adjust cooking time, press “TEMP/TIME”. The LED screen will display “00:10” and the TIME, TOP, BTM, and fan icon will be solid. Turn the “START/PAUSE” knob toward the “+” (clockwise) to increase, or toward “- (counterclockwise) to decrease time in 1-minute increments. Quickly turn the dial to adjust in larger increments.
- Press “TEMP/TIME” to switch the LED screen display between the current cooking temperature and time.
- Press “START/PAUSE” once during cooking to pause.
- If the LED display is on cooking time when paused, it will show remaining cooking time, and TIME and “:” will be solid.
- If the LED display is showing cooking temperature, it will show TIME, and “:” will be solid.
- During the pause, only “START/PAUSE”, “ON/OFF”, and “LIGHT” buttons will function.
- Press “START/PAUSE” a second time to resume cooking. All symbols in the LED display will be solid.
- The LED display will show the remaining cooking time and continue the countdown. TIME, TOP, BTM, and the fan icon will be backlit, and “:” will flash.
- Both the cooking temperature and time can be adjusted during cooking by pressing “TEMP/TIME” then turning the “START/PAUSE” knob to adjust.
CLOCK:
- Setting the Clock:
- Press “LIGHT” and “DELAY” at the same time. The LED display will show “00:00,” and the “:” will flash.
- Turn the “START/PAUSE” knob to set the clock. When the LED display reaches “12:00”, PM will be backlit.
- Displaying Clock During Cooking:
- Press “LIGHT” and “DELAY” at the same time. The LED display will show the current time.
- Time can be adjusted at this time.
- The clock time will remain on the LED display until the “START/PAUSE” knob or any other button is pressed.
LIGHT:
Default – Light Off
- Press “LIGHT” once to turn the light on.
- Press “LIGHT” a second time to turn the light off.
FAN:
Default – Level 3, Full Speed
- Press “FAN”. The LED display will show “3” above STG, and the FAN icon will be solid.
- Press “FAN” to change fan speed.
- Fan speed can be adjusted during cooking by pressing “FAN”.
- To turn the fan off, press “FAN” until the FAN icon is no longer backlit. This indicates the fan is no longer running.
- Level of fan speed:
- Level 1 – 33.33% speed
- Level 2 – 66.67% speed
- Level 3 – 100% speed
TOP/BTM:
Default – Top 100%, Bottom 100%. This refers to the amount of heat coming from the top and bottom heating elements.
- Press “ON/OFF”.
- Press “TOP/BTM”. The LED display will show “100” and TOP will be solid. Adjust the amount of heat coming from Top heating elements by turning the “START/PAUSE” knob. The percentage will change in 10% increments.
- Press “TOP/BTM” again. The LED display will show “100,” and BTM will be solid. Again, adjust heat with “START/PAUSE”.
- When Top and Bottom heat are chosen, press “START/PAUSE”. The Bravo will cook at the programmed power.
NOTE: While using the Menu feature “Broil”, the BTM power is not adjustable, as the Broil function only uses the top heating elements.
TEMP/TIME:
Default – 350°F, 10 minutes
- Press “TEMP/TIME” once, the LED display will show “00:10” and TIME. Press “START/PAUSE” to start cooking.
- Turn the “START/PAUSE” knob toward “+” (clockwise) to increase time in 1-minute increments. Quickly turn the dial to adjust in larger increments.
- Turn the “START/PAUSE” knob toward “-” (counterclockwise) to decrease time in 1-minute increments.
- Quickly turn the dial to adjust in larger increments.
- Press “TEMP/TIME” once. The LED display will show “350F” and TEMP. Press “START/PAUSE” to start cooking.
- Turn the “START/PAUSE” knob toward “+” (clockwise) to increase temperature in 5°F increments. Quickly turn the dial to adjust in larger increments.
- Turn the “START/PAUSE” knob toward “-” (counterclockwise) to decrease temperature in 5°F increments.
- Quickly turn the dial to adjust in larger increments.
- Press “START/PAUSE” to begin cooking.
- The Bravo will beep 3 times, and the LED display will show “End” when cooking is finished.
NOTE:
- “TEMP/TIME” can be pressed to see the current cooking temperature and current remaining cooking time.
- “START/PAUSE” knob can be turned in conjunction with pressing “TEMP/TIME” to change cooking temperature and time during cooking.
- Cooking Time range for 100F~395F is 00:00 to 99:59, and 400F~450F is 00:00 to 01:00.
STAGE: A Maximum of 5 stages can be programmed.
- Press “ON/OFF”. The LED display will show “350F”.
- Press “STAGE”.
- The LED display will show TEMP and STG 2.
- Press “TEMP/TIME”. Turn “START/PAUSE” to adjust this stage’s cooking temperature and time.
- Press “STAGE” again to program another stage of cooking.
- The LED display will show TEMP and STG and “3” will be displayed above STG.
- Press “TEMP/TIME”. Turn “START/PAUSE” to adjust this stage’s cooking temperature and time.
- Press “START/PAUSE” to begin cooking following the stages programmed.
WARM:
Default 140°F, 1 hour.
- Press “ON/OFF”. The LED display will show “350F”.
- Press “WARM”. “140F” (default) will appear on the LED display along with TEMP and WRM.
- Adjust warm temperature by turning “START/PAUSE” toward “+” (clockwise) to increase, or toward “-” (counterclockwise) to decrease temperature in 5°F increments. Quickly turn the dial to adjust in larger increments. The temperature range is 100°F~450°F.
- Adjust warm time by turning “START/PAUSE” toward “+” (clockwise) to increase, or toward “-” (counterclockwise) to decrease time in 1-minute increments. Quickly turn the dial to adjust in larger increments.
- 100F~395F, selectable time is 00:00 to 99:59.
- 400F~450F, selectable time is 00:00 to 01:00.
- WRM will appear on the LED display whenever the warm function is used.
- Press “START/PAUSE” to begin cooking.
NOTE: Warm will always be the last cooking function executed by the Bravo. The fan is not on during the warm-up function.
NOTE: The order of cooking function is as follows: PREHEAT,» SEAR 1 » COOKING,» SEAR 2 » WARM, END
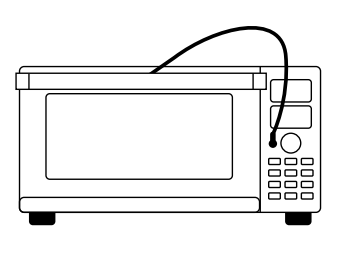
PROBE: Insert the Temperature Probe into the food. Place food into the oven, leaving enough of the wire to exit the oven over the top of the door. (see diagram). Insert the Temperature Probe Jack into the Probe Input.
Default 140°F, 10 minutes.
- Press “ON/OFF”. Adjust to the desired cooking temperature.
- Press “PROBE”. “140F” (default) will appear on the LED display along with TEMP and PRB.
- Adjust the temperature to the desired internal cooked temperature. The temperature range is 100°F~210°F. Adjust cooking time. Time range is 1 minute to 99 hours, 59 minutes (00:01–99:59).
NOTE: The Bravo will cook until the Probe temperature is reached. If time runs out before the Probe temperature is reached, the unit will continue to cook until the Probe temperature is achieved.
- Adjust the temperature to the desired internal cooked temperature. The temperature range is 100°F~210°F. Adjust cooking time. Time range is 1 minute to 99 hours, 59 minutes (00:01–99:59).
- Press “START/PAUSE”. The LED display will show the Current Internal Probe Temperature, TEMP, TOP, BTM, and PRB.
- Press “TEMP/TIME” to display the set cooking temperature (default is 350°F).
- Press “PROBE” & “STAGE” together to display the set temperature of the Probe. This can be adjusted during cooking by turning the “START/PAUSE”.
- Press “PROBE” to display the current Internal Probe temperature.
- Once the Internal Probe reaches the set temperature, the Bravo will stop cooking, and “End” will be displayed on the LED screen.
NOTE:
- When the Probe is unplugged and “PROBE” is pressed, “Prob” (error) will be displayed, followed by 3 short beeps. This indicates “PROBE” was pressed, but that the probe was not inserted into the Probe Jack Input.
- If the cooking temperature is set lower than the set Probe Temperature, “Prob” (error) will be displayed,d followed by 3 short beeps once the user presses “START/PAUSE”.
- If the Probe temperature was not reached after the preset cooking time has finished, the unit will continue cooking. Meanwhile, if the user presses “TEMP/TIME” twice to see remaining cooking time, it will display “00:00” and stay at “00:00”, indicating that the preset cooking time has run out.
- To cancel any function or stage during the cooking cycle, simply press “TEMP/TIME” (if not in cooking time countdown) and turn “START/PAUSE” until time reads “00:00”. This will stop that function and move to the next function in the cooking cycle.
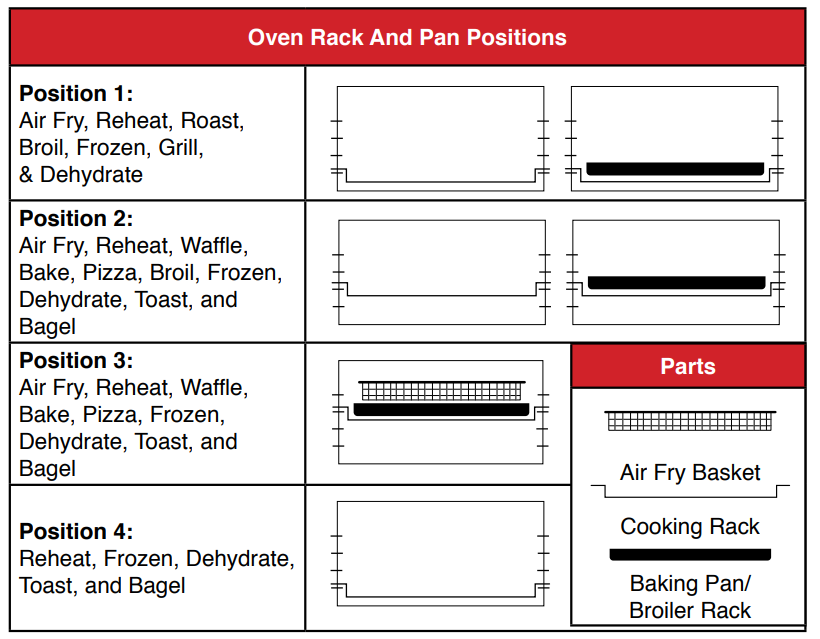 NOTE: For chicken or other large items, use Position 1 as shown above.
Helpful Hints
- To add more time during current cooking cycle, turn the “START/PAUSE” clockwise. Monitor food to ensure it doesn’t overcook.
- Some moisture may appear on the door during certain cooking cycles.
- When air-frying, food can be lightly coated with oil to boost crispness and browning.
CARE & MAINTENANCE
Before First Use:
Wash all removable parts1 in warm, soapy water or in the dishwasher, top rack only.
- Remove all the packaging materials.
- Remove the glue and labels on the appliance.
- Clean the Cooking Racks, Baking Pan, Broiler Rack, Air Fry Basket, and Crumb Tray thoroughly with hot water, a nonabrasive sponge, and mild dish detergent, or in the dishwasher, top rack only.
- Rinse the Pizza Stone with hot water before use. Allow the stone to dry at least 30 minutes, then place it in a very hot oven for 30-45 minutes. Turn off the oven and allow the Pizza Stone to completely cool before touching.
- Wipe the insides and outside of the appliance with a damp dishcloth or wet cloth and dry thoroughly.
CAUTION: Do not immerse the Bravo in water.
CAUTION: Do not immerse the unit in water or attempt to cycle through the dishwasher.
Clean After Each Use:
- Allow the unit to cool completely before cleaning.
- Always unplug the Bravo from the electrical outlet. NEVER clean the unit while it is plugged in.
- Never use harsh, abrasive, or corrosive product cleaners, as they may damage the finish or oven surface. Wipe the exterior with a clean, damp cloth and dry thoroughly.
- Apply the cleaning agent directly to a cloth towel, not directly to the unit, before cleaning.
- To clean the interior, use a damp cloth, mild liquid soap solution, and a clean cloth.
- Never use steel wool pads, etc., on the interior or exterior of the oven.
- NEVER HANDLE A HOT PIZZA STONE. Allow the pizza stone to completely cool before cleaning. Once cooled, wipe the stone with a clean, damp towel, then rinse in a sink with cool water and dry completely. WARNING: NEVER submerge or rinse a hot pizza stone in water. The hot stone may crack and break underwater, causing injury.
- When the glass window is completely cool, spray glass cleaner on a clean cloth. Clean both inside and outside of the window. Use a damp cloth to rinse the window, then dry completely with a clean, dry towel.
- To remove crumbs, slide out the Crumb Tray and discard crumbs. Wipe clean and replace. Crumb Tray should be emptied and cleaned after each use.
- To remove baked-on grease, soak the Tray in hot, soapy water. Never operate the oven without the Crumb Tray in place.
- Never wrap the cord around the Bravo.
Storage- Unplug the Bravo and let the unit cool down completely.
- Make sure that all parts are cleaned and dry.
TROUBLESHOOTING
The Bravo was engineered with an automatic shut-off feature to prevent overheating during use. If the Bravo shuts off to cool itself down, an odor may be detected. Unplug the unit and wait for it to completely cool down. To prevent the Bravo from overheating, do not cook foods at higher temperatures or longer times than recommended.
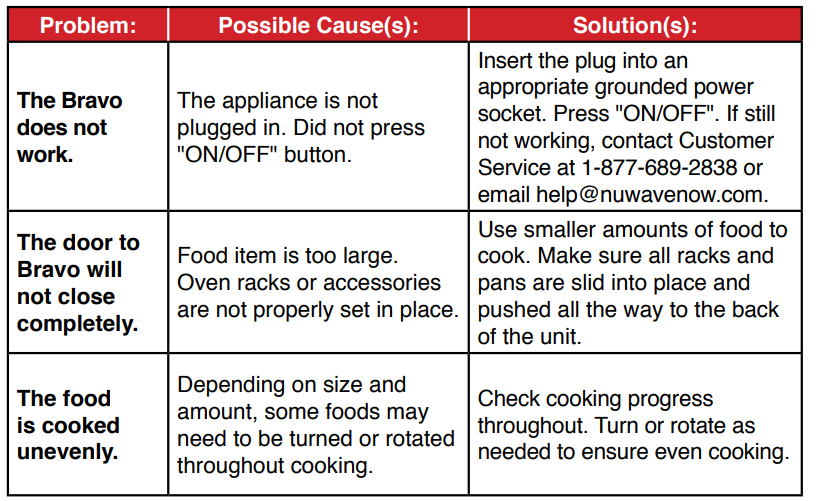
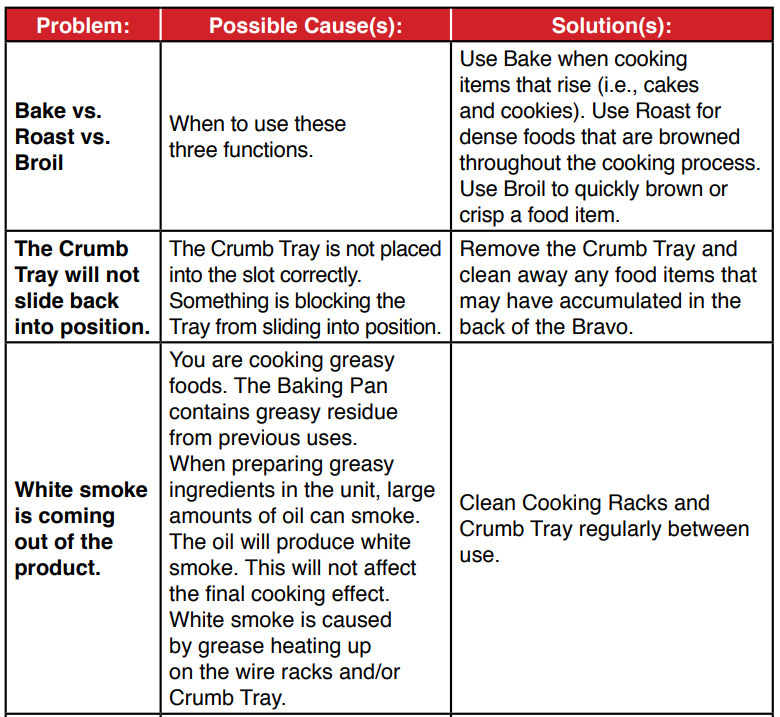
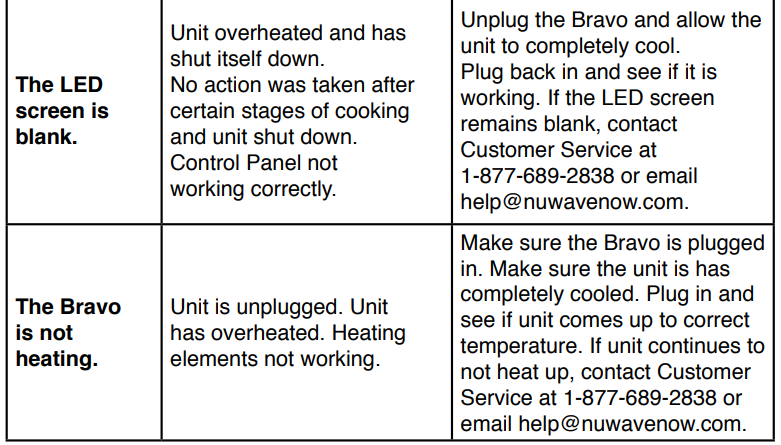
If the Bravo needs to be replaced or returned to the manufacturer, contact Customer Service at 1-877-689-2838 or email: [email protected]

LIMITED WARRANTY
The Bravo XL Smart Oven
THE MANUFACTURER WARRANTS
The Bravo, including the Power Base, Heavy-Duty Cooking Racks, Enamel Baking Pan, Enamel Broiler Rack, Chrome-Plated Air Fry Basket, Pull-Out Crumb Tray, Temperature Probe, and all electrical components are warrantied for 3 years from the date of purchase, under normal household use, and when operated under the Manufacturer’s written instructions. The Manufacturer will provide the necessary parts and labor to repair any part of the Bravo at the NuWave, LLC Service Department. After the expiration of the warranty, the cost of the labor and parts will be the responsibility of the owner.
THE WARRANTY DOES NOT COVER
The Limited Warranty is voided if repairs are made by an unauthorized dealer and/or the serial number data plate is removed and/or defaced. Normal deterioration of finish due to use or exposure is not covered by this Warranty. This Limited Warranty does not cover failure, damages or inadequate performance due to accident, acts of God (such as lightning), fluctuations in electric power, alterations, abuse, misuse, misapplications, corrosive-type atmospheres, improper installation, failure to operate in accordance with the Manufacturer’s written instructions, abnormal use or commercial use. NuWave, LLC reserves the right to void the Limited Warranty, where allowable by law, for products purchased from an unauthorized dealer.
For more manuals by Nuwave, visit ManualsLibraryy
Nuwave Bravo XL Air Fryer Toaster Oven- FAQs
How do I adjust the power level on the Nuwave Bravo XL?
Press a number from 1 to 9 to select a power level (10% to 90%). To reset it to high (100%), press 0.
How should I set the temperature for air frying?
Reduce the original oven recipe temperature by 25°F and cut the cook time by about 20% for best air fryer results.
How does the Nuwave Bravo XL cook food?
It uses a combination of conduction, convection, infrared, and contact heat to cook food evenly inside and out.
What size pan fits in the Bravo XL?
A 13″ x 9″ x 3″ dish or pan fits comfortably inside the cooking area.
Can I use aluminum foil in the air fryer oven?
Yes, as long as the foil doesn’t touch the heating elements, is secured to avoid blowing around, and isn’t used with acidic foods.
What is the highest temperature setting available?
The Bravo XL can be set between 50°F and 500°F, adjustable in 5°F increments.
How do I preheat the Bravo XL?
Press the power button, set your desired temperature, and then set the time to 3 minutes. The unit will begin preheating automatically.
Can I add oil when using the air fryer?
Don’t pour oil directly into the appliance. You may lightly spray or coat your food with oil if desired.

