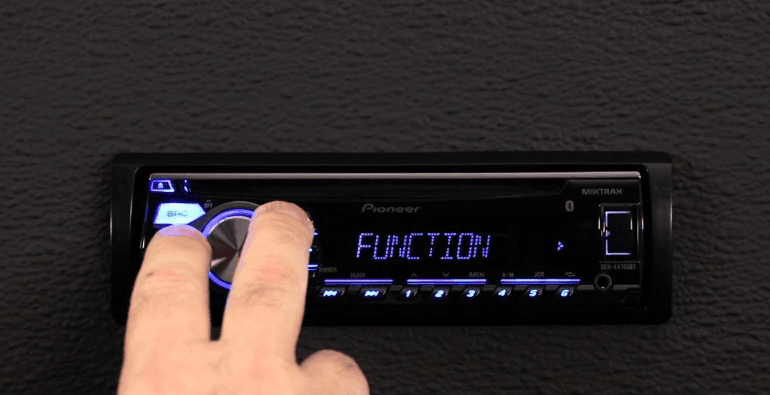
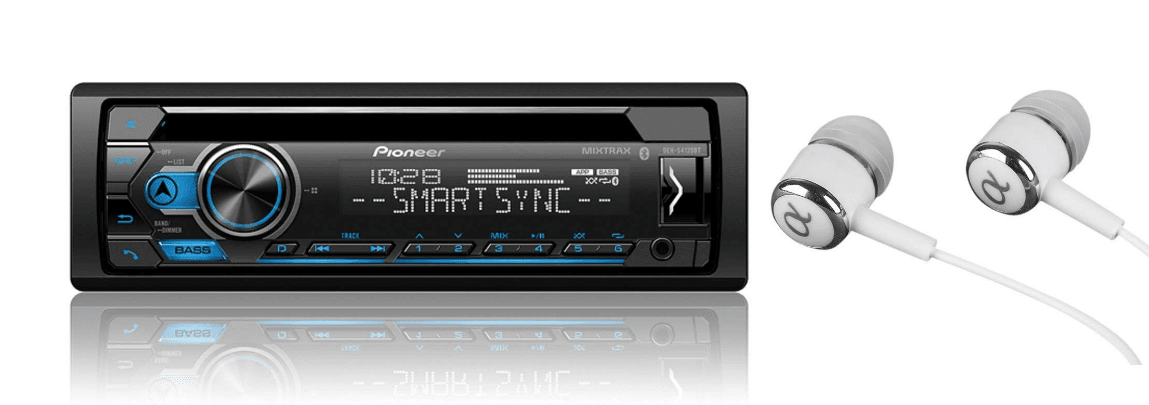
Pioneer DEH X4700BT CD Receiver
Before You Start
The Safety of Your Ears is in Your Hands
Get the most out of your equipment by playing it at a safe level—a level that lets the sound come through clearly without annoying blaring or distortion and, most importantly, without affecting your sensitive hearing. Sound can be deceiving.
Over time, your hearing “comfort level” adapts to higher volumes of sound, so what sounds “normal” can actually be loud and harmful to your hearing. Guard against this by setting your equipment at a safe level BEFORE your hearing adapts.
ESTABLISH A SAFE LEVEL:
- Set your volume control at a low setting.
- Slowly increase the sound until you can hear it comfortably and clearly, without distortion.
- Once you have established a comfortable sound level, set the dial and leave it there.
BE SURE TO OBSERVE THE FOLLOWING GUIDELINES:
- Do not turn up the volume so high that you can’t hear what’s around you.
- Use caution or temporarily discontinue use in potentially hazardous situations.
- Do not use headphones while operating a motorized vehicle; the use of headphones may create a traffic hazard and is illegal in many areas.
WARNING
- Do not attempt to install or service this product by yourself. Installation or servicing of this product by persons without training and experience in electronic equipment and automotive accessories may be dangerous and could expose you to the risk of electric shock, injury, or other hazards.
- Do not attempt to operate the unit while driving. Make sure to pull off the road and park your vehicle in a safe location before attempting to use the controls on the device.
- Handling the cord on this product or cords associated with accessories sold with the product may expose you to chemicals listed on Proposition 65 known to the State of California and other governmental entities to cause cancer and birth defects, or other reproductive harm. Wash your hands after handling.
Getting Started
Basic operation
DEH-X6700BS/X6700BT/X6710BT/X3700S
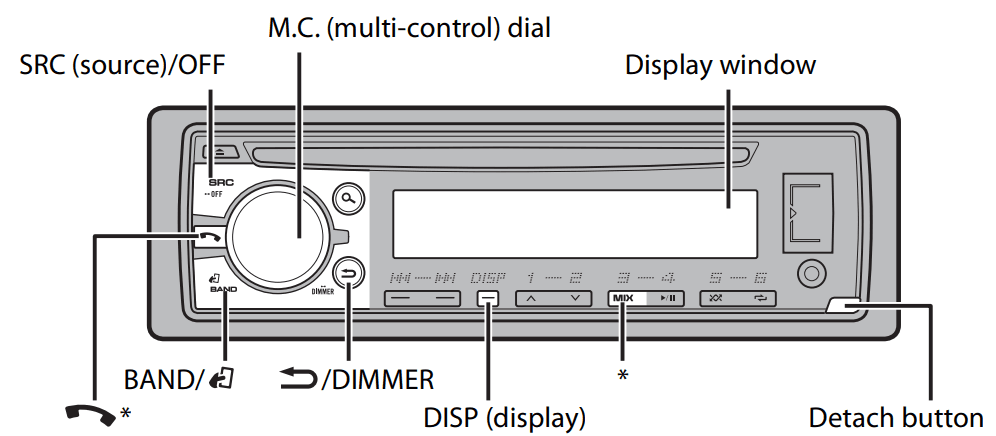
* DEH-X3700S has different indications for these buttons.
DEH-X4700BT
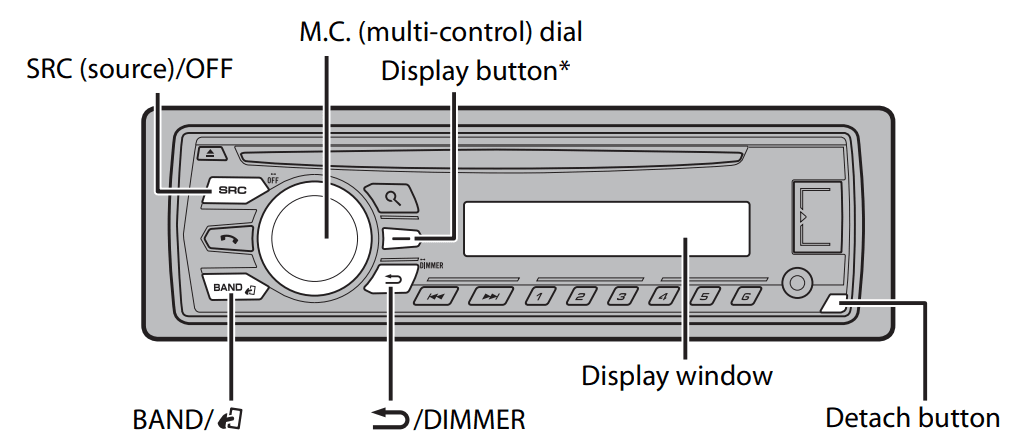
* This button is referred to as DISP in the manual.
Remote Control
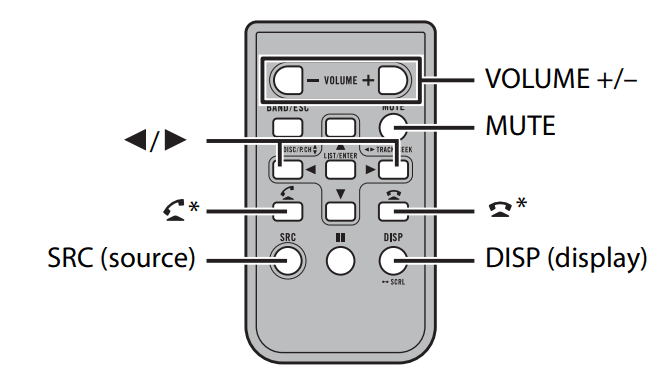
* DEH-X3700S has different indications for these buttons.
Frequently used operations
The available buttons vary depending on the unit.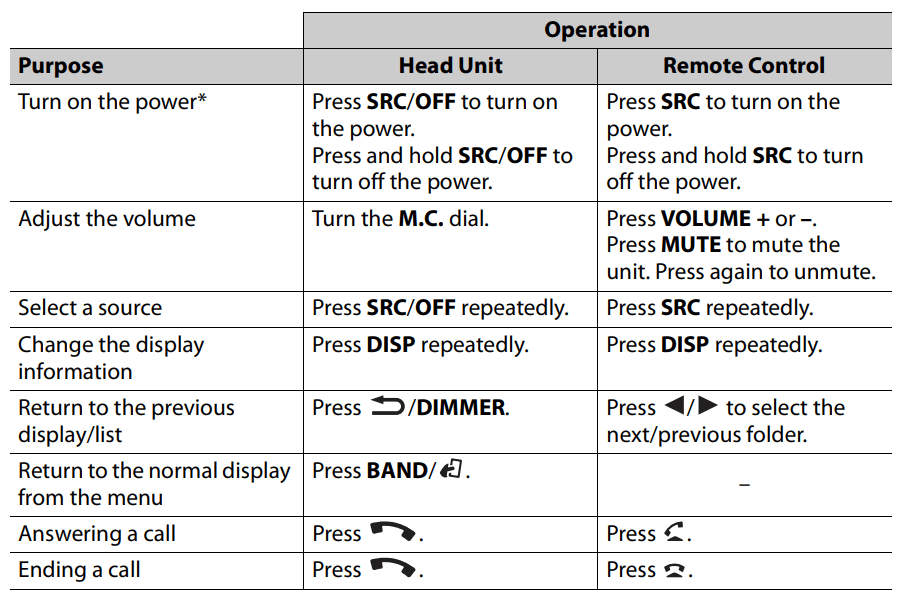
* When this unit’s blue/white lead is connected to the vehicle’s auto-antenna relay control terminal, the vehicle’s antenna extends when this unit’s source is turned on. To retract the antenna, turn the source off.
Detaching the front panel
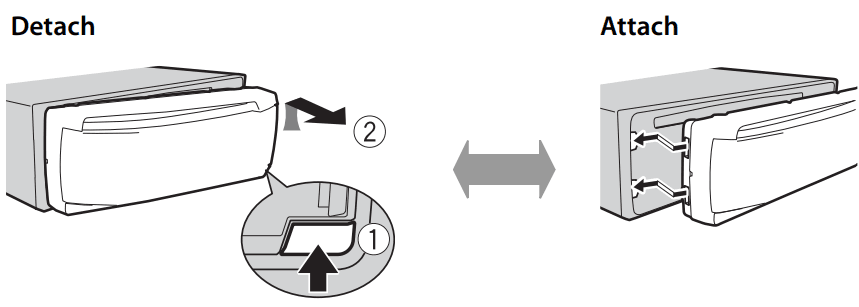
Detach the front panel to prevent theft. Remove any cables and devices attached to the front panel and turn off the unit before detaching it.
Important
- Avoid subjecting the front panel to excessive shock.
- Keep the front panel out of direct sunlight and high temperatures.
- Always store the detached front panel in a protective case or bag.
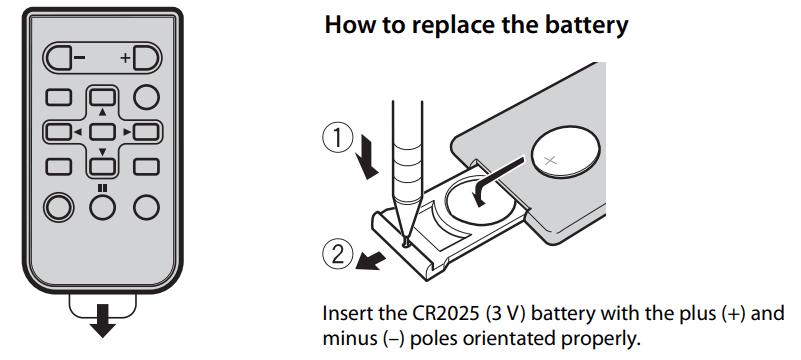
Preparing the remote control
Remove the insulation sheet before use.
WARNING
- Keep the battery out of the reach of children. Should the battery be swallowed, consult a doctor immediately.
- Do not expose the battery or remote control to excessive heat, such as direct sunlight or fire.
CAUTION
- There is a potential danger of explosion if the battery is incorrectly replaced. When replacing the battery, replace it with the same type.
- Do not handle or store the battery with metallic tools or objects.
- If the battery leaks, remove the battery and wipe the remote control completely clean. Then install a new battery.
- When disposing of used batteries, compliance with governmental regulations or environmental institutions’ rules that apply in your country/area must be followed, which pertain to any special handling needed for disposal.
- “Perchlorate Material – special handling may apply. See www.dtsc.ca.gov/hazardouswaste/perchlorate. (Applicable to California, U.S.A.)”
Important
- Do not store the remote control in high temperatures or direct sunlight.
- Do not let the remote control fall onto the floor, where it may become jammed under the brake or accelerator pedal.
Setting the clock (CLOCK SET)
When you turn the ignition switch to ON after installation, [SET UP: YES] appears in the display.
- Press the M.C. dial.
The setup menu disappears after 30 seconds of no operation. If you prefer not to sit at this time, turn the M.C. dial to select [NO], then press to confirm. - Turn the M.C. dial to adjust the hour, then press to confirm.
The indicator moves to the minute setting automatically. - Turn the M.C. dial to adjust the minute, then press to confirm.
[QUIT] appears. - Turn the M.C. dial to select [YES], then press to confirm.
NOTES- You can cancel the menu setting by pressing SRC/OFF.
- This setting can be made at any time. See page 17 for more details.
Canceling the demonstration display (DEMO OFF)
- Press the M.C. dial to display the main menu.
- Turn the M.C. dial to select [SYSTEM], then press to confirm.
- Turn the M.C. dial to select [DEMO OFF], then press to confirm.
- Turn the M.C. dial to select [YES], then press to confirm.
INITIAL settings
- Press and hold SRC/OFF until the unit turns off.
- Press the M.C. dial to display the main menu.
- Turn the M.C. dial to select [INITIAL], then press to confirm.
- Turn the M.C. dial to select an option, then press to confirm.
NOTE: The options vary depending on the unit.
CD/USB/iPod/AUX
Playing back
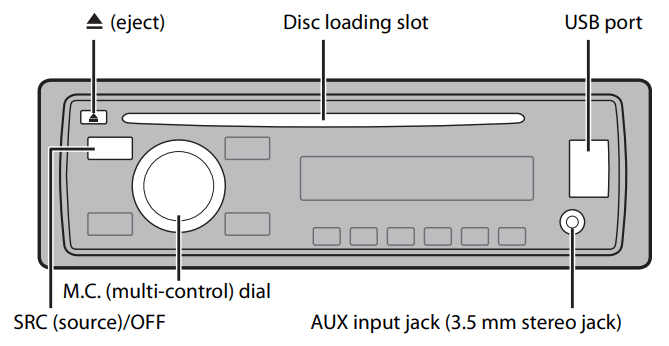
USB device/iPod
- Open the USB port cover.
- Plug in the USB device/iPod using an appropriate cable.
CAUTION
Use an optional Pioneer USB cable (CD-U50E) to connect the USB device as any device connected directly to the unit will protrude out from the unit, which could be dangerous. Before removing the device, stop playback.
MTP connection
A device installed with Android OS 4.0 or later can be connected to the unit via MTP, using the cable supplied with the device. However, depending on the connected device and the number of files in the device, audio files/songs may not be able to be played back via MTP. Note that MTP connection is not compatible with WAV file formats, and cannot be used with the MIXTRAX function.
AUX
- Insert the stereo mini plug into the AUX input jack.
- Press SRC/OFF to select [AUX] as the source.
NOTE
If [AUX] is set to [OFF] in the SYSTEM settings, [AUX] cannot be selected as a source (page 17).
Operations
You can make various adjustments in the FUNCTION settings. Note that the following operations do not work for an AUX device. To operate an AUX device, use the device itself.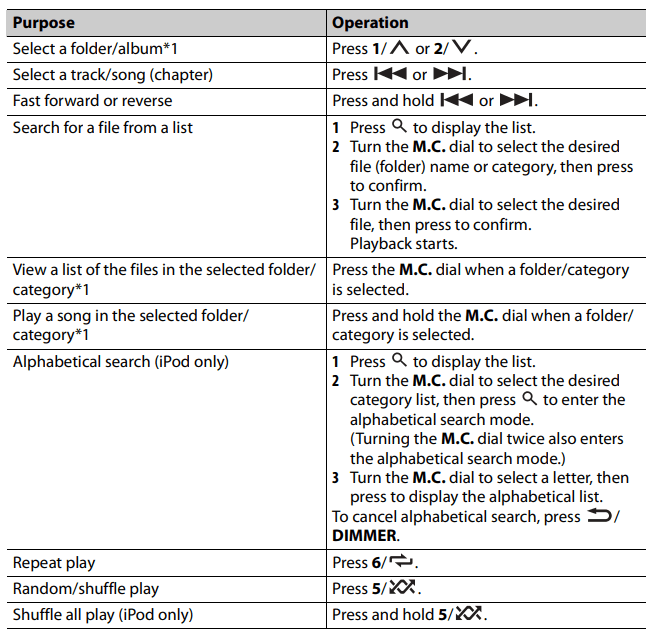
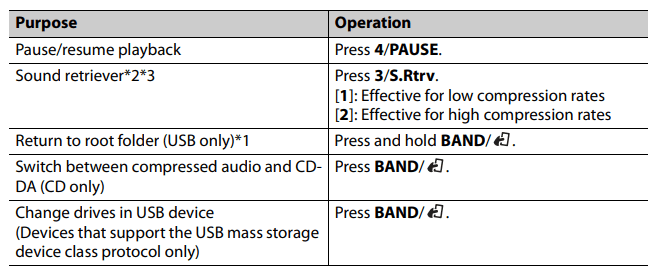
*1 Compressed audio files only
*2 This function is disabled when USB is selected as a source and the MIXTRAX function is on.
*3 When there is no 3/S.Rtrv. button on the unit, the sound retriever function can be set by the FUNCTION settings.
Useful functions for iPod
Link play mode
You can access songs based on the artist, album, or genre currently playing.
- While listening to a song, press and hold search to enter the link play mode.
- Turn the M.C. dial to select the mode ([ARTIST], [ALBUM], [GENRE]), then press to confirm. The selected song/album will be played after the currently playing song.
NOTE
The selected song/album may be canceled if you use functions other than those from the link play mode (e.g. fast forward and reverse).
iPod control
You can control the unit via a connected iPod.
The following iPod models are not compatible with this function.
- iPod nano 1st generation, iPod with video
- Press BAND/ during playback, then select the control mode.
[CONTROL iPod/CTRL iPod]: The unit’s iPod function can be operated from the connected iPod.
[CONTROL AUDIO/CTRL AUDIO]: The unit’s iPod function can only be operated by the buttons on the unit or the supplied remote control. In this mode, the connected iPod cannot be turned on or off.
NOTES
- Switching the control mode to [CONTROL iPod/CTRL iPod] pauses song playback. Use the connected iPod to resume playback.
- The following operations are still accessible from the unit, even if the control mode is set to [CONTROL iPod/CTRL iPod].
- Pause, fast forward/reverse, song/chapter selection
- The volume can only be adjusted from the unit.
About MIXTRAX (USB/iPod only)
The MIXTRAX function creates a non-stop mix of your music library, accompanied by illumination effects. For details on MIXTRAX settings, see page 18.
NOTES
- This function is not compatible with an Android device connected via MTP.
- When USB is selected as a source and the MIXTRAX function is in use, the sound retriever function is disabled.
- Depending on the file/song, sound effects may not be available.
- Turn the MIXTRAX function off if the illumination effects it produces interfere with driving.
- Press 3/MIX or MIX to turn MIXTRAX on/off. The button varies depending on the unit.
Bluetooth
Bluetooth connection
Important
If three or more Bluetooth devices (e.g. a phone and a separate audio player) are connected, they may not work properly.
- Turn on the Bluetooth function of the device.
- Press and hold
 to display the connection menu.
 - Turn the M.C. dial to select [ADD DEVICE], then press to confirm.
The unit starts to search for available devices, then displays them in the device list.- To cancel searching, press the M.C. dial.
- If the desired device is not in the list, select [RESEARCH].
- If there is no device available, [NOT FOUND] appears in the display.
- Turn the M.C. dial to select a device from the device list, then press to confirm. Press and hold the M.C. dial to switch the displayed device information between the Bluetooth device address and device name.
- Select [Pioneer BT Unit] shown in the device display.
- Make sure the same 6-digit number appears on this unit and the device, then select “Yes” on the device.
NOTES
- [DEVICE FULL] appears if the unit has already been paired with three other devices. In this case, delete one of the paired devices. See [DEL DEVICE] or [GUEST MODE] in the connection menu (page 10).
- Depending on the device, the PIN code is required in step 6. In this case, input [0000].
TIP
The Bluetooth connection can also be made by detecting the unit from the Bluetooth device. To do so, [VISIBLE] in the connection menu needs to be set to [ON]. For details on Bluetooth device operations, refer to the operating instructions supplied with the Bluetooth device.
Bluetooth telephone
First, make a Bluetooth connection with the Bluetooth telephone (page 9). Up to two Bluetooth telephones can be connected simultaneously.
Important
- Leaving the unit on standby to connect to your phone via Bluetooth while the engine is not running can drain the vehicle’s battery.
- Be sure to park your vehicle in a safe place and apply the parking brake before operation.
To make a phone call
- Press
 to display the phone menu. When two phones are connected, the phone name appears first, then a phone menu will display. To switch to another phone, press
 again.
 - Turn the M.C. dial to select [MISSED], [DIALED], [RECEIVED], or [PHONE BOOK], then press to confirm. The phone number list appears.
- Turn the M.C. dial to select a name or phone number, then press to confirm. The phone call starts.
To answer an incoming call
- Press
 when a call is received.
TIP
When two phones are connected to the unit via Bluetooth and there is an incoming call while one phone is being used for a call, a message will appear on the display. To answer that incoming call, you need to end the existing call.
App Mode
You can enjoy listening to an application on an iPhone/Android device via the unit. In some cases, you can control an application by using the unit. For details on compatible devices, visit our website.
Important
Use of third-party apps may involve or require the provision of personally identifiable information, whether through the creation of a user account or otherwise, and for certain applications, the provision of geolocation data.
ALL THIRD-PARTY APPS ARE THE SOLE RESPONSIBILITY OF THE PROVIDERS, INCLUDING WITHOUT LIMITATION, COLLECTION AND SECURITY OF USER DATA AND PRIVACY PRACTICES. BY ACCESSING THIRD-PARTY APPS, YOU AGREE TO REVIEW THE TERMS OF SERVICE AND PRIVACY POLICIES OF THE PROVIDERS. IF YOU DO NOT AGREE WITH THE TERMS OR POLICIES OF ANY PROVIDER OR DO NOT CONSENT TO THE USE OF GEOLOCATION DATA WHERE APPLICABLE, DO NOT USE THAT THIRD-PARTY APP.
For iPhone users
This function is compatible with iPhones and iPod touches installed with iOS 5.0 or later.
For Android device users
This function is compatible with devices that have Android OS 2.3 or later installed and also support Bluetooth SPP (Serial Port Profile) and A2DP (Advanced Audio Distribution Profile).
NOTE
PIONEER IS NOT LIABLE FOR ANY THIRD-PARTY APPS OR CONTENT, INCLUDING WITHOUT LIMITATION THEIR ACCURACY OR COMPLETENESS. THE CONTENT AND FUNCTIONALITY OF SUCH APPS ARE THE SOLE RESPONSIBILITY OF THE APP PROVIDER.
Playback of an application via the unit
The Bluetooth connection is available for all units except the DEH-X3700S.
- Connect this unit with the mobile device.
- iPhone via USB (page 8)
- Android device via Bluetooth (page 9)
- Press the M.C. dial to display the main menu.
- Turn the M.C. dial to select [SYSTEM], then press to confirm.
- Turn the M.C. dial to select [APP CONN.SET], then press to confirm.
- Turn the M.C. dial to select one of the below, then press to confirm.
- Select [WIRED] for iPhone.
- Select [BLUETOOTH] for an Android device.
- Press SRC/OFF to select [APP].
- Operate the mobile device to start up the application.
Basic operations
You can make various adjustments in the FUNCTION settings (page 15).
Pandora®
Pandora Internet Radio is a music service not affiliated with Pioneer. More information is available at http://www.pandora.com.
The Pandora mobile application is available for iPhone and Android phones. Please visit www.pandora.com/everywhere/mobile for the latest compatibility information.
Listening to Pandora
Update the firmware of the Pandora application to the latest version before use. The Bluetooth connection is available for all units except the DEH-X3700S.
- Connect this unit with the mobile device.
- iPhone via USB (page 8)
- Android device via Bluetooth (page 9)
- Press the M.C. dial to display the main menu.
- Turn the M.C. dial to select [SYSTEM], then press to confirm.
- Turn the M.C. dial to select [APP CONN.SET], then press to confirm.
- Turn the M.C. dial to select one of the below, then press to confirm.
- Select [WIRED] for iPhone.
- Select [BLUETOOTH] for an Android device.
- Press SRC/OFF to select [PANDORA].
- Launch the Pandora application on the mobile device and start playback.
Basic operations
You can make various adjustments in the FUNCTION settings (page 15).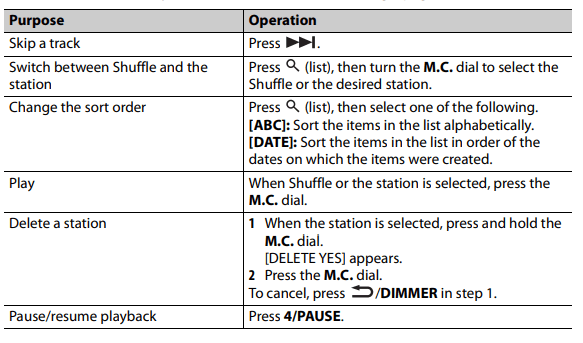
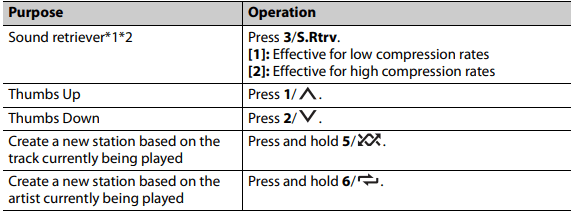
*1 This function is disabled when the MIXTRAX function is on.
*2 When there is no 3/S.Rtrv button on the unit, the sound retriever function can be set by the FUNCTION settings.
NOTE
Some functions of Pandora may not be operated from the unit.
SiriusXM Satellite Radio
(Only for DEH-X6700BS/X3700S)
Only SiriusXM® brings you more of what you love to listen to, all in one place. Get over 140 channels, including commercial-free music plus the best sports, news, talk, comedy and entertainment. Welcome to the world of satellite radio. A SiriusXM Vehicle Tuner and Subscription are required. For more information, visit www.siriusxm.com
Replay™
You can pause, rewind or replay the channel you are currently listening to.
TuneStart™
Automatically start songs from the beginning when you tune to one of your preset music channels stored on the current band of presets. For details, refer to TUNE START on page 16.
NOTE
TuneStart is compatible with SXV200 or later tuner models. Not compatible with SXV100.
TuneScan™
Scan through short previews of songs you may have missed on music channels stored on the current band of presets. Each song in the current channel plays for six seconds at a time. For details, refer to TUNE SCAN (scanning the songs) on page 16.
NOTE
TuneScan is compatible with SXV200 or later tuner models. Not compatible with SXV100.
TuneMix™
Create a music channel that’s a blend of songs made up from the music channels stored on the current band of presets. For details, refer to TUNEMIX on page 16.
NOTE
TuneMix™ is compatible with the SXV300 or later tuner models. Not compatible with the SXV200 or SXV100.
Connections/Installation
WARNING
- Use speakers over 50 W (output value) and between 4 Ω to 8 Ω (impedance value). Do not use 1 Ω to 3 Ω speakers for this unit.
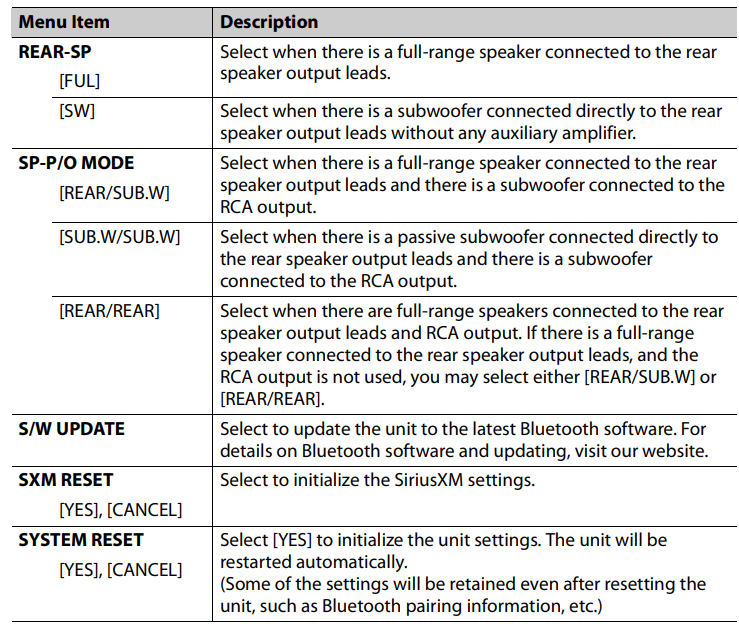
- The black cable is ground. When installing this unit or power amp (sold separately), make sure to connect the ground wire first. Ensure that the ground wire is properly connected to metal parts of the car’s body. The ground wire of the power amp and the one of this unit or any other device must be connected to the car separately with different screws. If the screw for the ground wire loosens or falls out, it could result in fire, generation of smoke or malfunction.
*1 Not supplied for this unit
Important
- When installing this unit in a vehicle without an ACC (accessory) position on the ignition switch, failure to connect the red cable to the terminal that detects operation of the ignition key may result in battery drain.
- Use this unit with a 12-volt battery and negative grounding only. Failure to do so may result in a fire or malfunction.
- To prevent a short-circuit, overheating or malfunction, be sure to follow the directions below.
- Disconnect the negative terminal of the battery before installation.
- Secure the wiring with cable clamps or adhesive tape. Wrap adhesive tape around wiring that comes into contact with metal parts to protect the wiring.
- Place all cables away from moving parts, such as the shift lever and seat rails.
- Place all cables away from hot places, such as near the heater outlet
- Do not connect the yellow cable to the battery by passing it through the hole to the engine compartment.
- Cover any disconnected cable connectors with insulating tape
- Do not shorten any cables.
- Never cut the insulation of the power cable of this unit in order to share the power with other devices. The current capacity of the cable is limited.
- Use a fuse of the rating prescribed.
- Never wire the negative speaker cable directly to ground
- Never band together negative cables of multiple speakers.
- When this unit is on, control signals are sent through the blue/white cable. Connect this cable to the system remote control of an external power amp or the vehicle’s auto-antenna relay control terminal (max. 300mA 12V DC). If the vehicle is equipped with a glass antenna, connect it to the antenna booster power supply terminal.
- Never connect the blue/white cable to the power terminal of an external power amp. Also, never connect it to the power terminal of the auto antenna. Doing so may result in battery drain or a malfunction.
For more manuals by Pioneer, visit ManualsLibraryy
Pioneer DEH X4700BT CD Receiver-FAQs
How do I reset my Pioneer account password?
If your email is registered with Pioneer, you’ll receive a password reset link in your inbox to create a new password.
Can I connect Pioneer DJ equipment to Bluetooth?
Yes, you can connect the Pioneer DDJ-200 using Bluetooth or a USB cable. Refer to the DDJ-200 instruction manual for step-by-step guidance.
What should I do if my Pioneer radio screen is black?
Try turning off the DC Electric rocker switch for a few seconds and then turning it back on. This often resolves black screen issues.
How can I enhance the bass from my subwoofer?
Adjust the crossover frequency—starting around 80 Hz is recommended. Fine-tune it depending on your speaker setup and room acoustics for smoother bass performance.
What is Demo Mode on a car radio?
Demo Mode is a feature used in retail displays. It showcases the unit’s features and can usually be turned off by pressing a specific key combination or using system settings.
What does it mean to reset a password?
Resetting a password involves recovering or changing a forgotten login password to regain access to your account.
How do I restart my Pioneer stereo?
Find the reset pinhole button on the front of the unit. Press and hold it using a paper clip for about five seconds, then release. The system will reboot to factory settings.
How do I activate the AUX input?
Press the ‘Source’ button until you see AUX on the display. Then press the cursor key to activate it.

