Razer Goliathus Extended Chroma Gaming Mousepad
PACKAGE CONTENTS/ SYSTEM REQUIREMENTS
PACKAGE CONTENTS
- Razer Goliathus Extended Chroma
- Important Product Information Guide
SYSTEM REQUIREMENTS
HARDWARE REQUIREMENTS
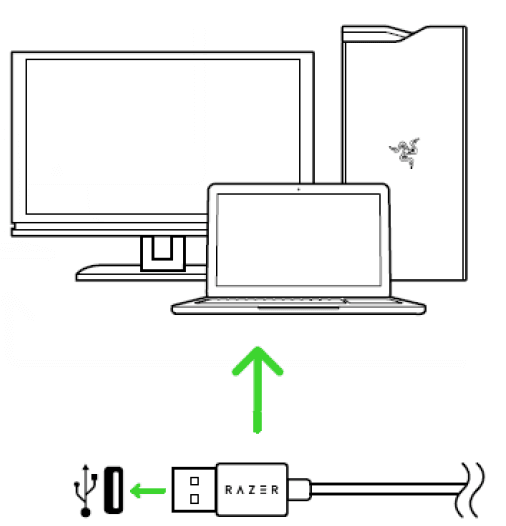
PC with a free USB port
RAZER SYNAPSE 3 REQUIREMENTS
- Windows® 7 64-bit (or higher)
- Internet connection
- 500 MB of free hard disk space
REGISTRATION / TECHNICAL SUPPORT
REGISTRATION
Register your product online at razerid.razer.com/warranty to get real-time information on your product’s warranty status.
If you haven’t registered for a Razer ID yet, register now at razerid.razer.com to get a wide range of Razer benefits.
TECHNICAL SUPPORT
- 6 months limited manufacturer’s warranty.
- Free online technical support at support.razor.com
TECHNICAL SPECIFICATIONS
- Powered by Razer Chroma lighting with 16.8 million customizable color options
- Micro-textured surface balanced for speed and control
- Razer Synapse 3 (Beta) enabled
- Non-slip rubber base
APPROXIMATE SIZE & WEIGHT
- Length: 294 mm / 11.57 in
- Width: 920 mm / 36.22 in
- Height: 3 mm / 0.12 in
- Weight: 560 g / 1.23 lbs
- Cable Length: 2.1 m / 6.89 ft
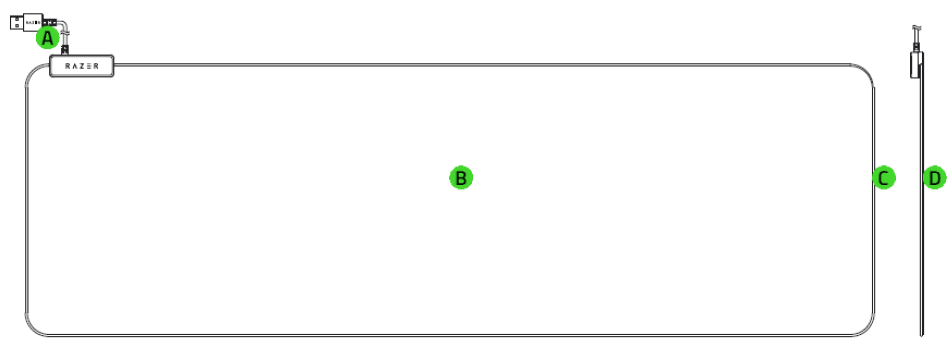
Device Layout
- USB cable connector
- Cloth surface
- Chroma light tube
- Non-slip rubber base
Installing Razer Synapse 3 For Your Razer Goliathus Extended Chroma
Step 1: Make sure your Razer device is connected to the USB port of your computer.
Step 2: Install Razer Synapse 3 when prompted or download the installer from razer.com/synapse
Step 3: Create your Razer ID or log in using an existing account.
Configuring Razer Goliathus Extended Chroma Via Razer Synapse 3
Disclaimer: The features listed here require you to log in to Razer Synapse. These features are also subject to change based on the current software version and your Operating system.
SYNAPSE
The Synapse tab is your default tab when you first launch Razer Synapse 3. This tab allows you to navigate the Dashboard subtab.
DASHBOARD
The Dashboard subtab is an overview of your Razer Synapse 3, where you can access all your Razer devices, modules, and online services.
MOUSE MAT
The Mouse Mat tab is the main tab for your Razer Goliathus Extended Chroma. From here, you can change your device’s settings, such as Profiles and lighting. Changes made under this tab are automatically saved to your system and cloud storage.
LIGHTING
The Lighting subtab enables you to modify your Razer device’s profile and light settings.
Profile
Profile is a data storage for keeping all your Razer peripherals’ settings. By default, the profile name is based on your system’s name. To add, rename, duplicate, or delete a profile, simply press the Miscellaneous button ( • • • ).
Brightness
You can turn off your Razer device’s lighting by toggling the Brightness option or increasing/decreasing the luminance using the slider.
Switch Off Lighting
This is a power saving tool which allows you to disable your device’s lighting in response to your system’s display turning off and/or automatically power down when your Razer Goliathus Extended Chroma has been idle for a set amount of time.
Quick Effects
A number of Quick Effects can be selected and applied to your mouse mat’s lightning, as listed here:
| Name | Description | How to set up |
| Breathing | The mouse mat lighting fades in and out of the selected color(s) | Select up to 2 colors for this setting |
| Reactive | The mouse mat will light up when you click your mouse. Note that this is only supported when using a Razer mouse | Select either the desired lighting color or choose to use the same color as the Razer mouse’s LED |
| Spectrum cycling | The lighting on the mouse mat will cycle between 16.8 million colors indefinitely | No further customization is required |
| Static | The mouse mat will remain lit in the selected color | Select the desired lighting color |
PROFILES
The Profiles tab is a convenient way of managing all your profiles and linking them to your games and applications.
DEVICES
View which Razer device is using a specific profile using the Devices subtab. To create a new profile within the selected device, simply click the add button (+).To rename, duplicate, or delete a profile, simply press the Miscellaneous button ( ••• ). Each profile can be set to automatically activate when you run an application using the Link Games option.
LINKED GAMES
The Linked Games subtab gives you the flexibility to add games, view peripherals that are linked to games, or search for added games. You can also sort games based on alphabetical order, last played, or most played. Added games will still be listed here even if it is not linked to a Razer device.
CHROMA
The Chroma tab enables you to either create advanced lighting effects through the Studio subtab or enable/disable third party integrated apps to all Razer Chroma-enabled devices for a truly immersive lighting and gaming experience.
STUDIO
The Studio subtab enables you to create and edit your own Chroma Effects which you can apply to all supported Razer Chroma enabled devices. This tab can also be accessed under the Dashboard’s Chroma module.
To add, rename, duplicate, or delete a Chroma Effect, simply click the Miscellaneous button. To revert the selected layer to its original setting, click the Reset button. To apply and save a modified layer, click the Save button.
Quick Selections
The Quick Selections menu are a preset of lighting regions which you can use to easily customize your Razer device. Alternatively, you can individually select an LED by clicking on the area or select multiple LEDs by using click and drag.
Effect Layer
Lighting effects are arranged in layers, wherein the topmost layer takes priority. You can group multiple lighting effects by clicking the Add Group button and dragging the layers you want to group to the newly added folder, duplicate a layer by clicking the Copy button, or delete a layer by clicking the Trash button. Some layers may have overlapping effects, so you may need to arrange layers in a specific order.
Add Effect
All supported quick effects are listed under the Add Effect option, which you can click to insert onto the Effect Layer. Quick Effects can be edited on the Chroma Studio by allowing you to change its preset color, properties, and playback options.
APPS
The Apps subtab is where you can enable or disable third-party integrated apps for your Razer Chroma-enabled peripherals. The Apps tab can also direct you to the Chroma Workshop, where you can download these third-party apps.
SAFETY AND MAINTENANCE
SAFETY GUIDELINES
In order to achieve maximum safety while using your Razer Goliathus Extended Chroma, we suggest that you adopt the following guidelines:
Should you have trouble operating the device properly and troubleshooting does not work, unplug the device and contact the Razer hotline or go to support.razer.com for support.
Do not take apart the device (doing so will void your warranty), and do not attempt to operate it under abnormal current loads.
Keep the device away from liquid, humidity, or moisture. Operate the device only within the specific temperature range of 0 ° C (32 ° F) to 40 ° C (104 ° F). Should the temperature exceed this range, unplug and/or switch off the device in order to let the temperature stabilize to an optimal level.
MAINTENANCE AND USE
The Razer Goliathus Extended Chroma requires minimal maintenance to keep it in optimum condition. Once a month we recommend you unplug the device from the computer and clean it using a soft cloth or cotton swab to prevent dirt buildup. Do not use soap or harsh cleaning agents.
CAUTION: Do not fold, roll, or compress the mouse mat as doing so may damage the product and void the warranty.
For more Manuals by Razer, visit ManualsLibraryy
Razer Goliathus Extended Chroma Gaming Mousepad-FAQs
How do I connect the Razer Goliathus Extended Chroma to my PC?
Simply plug the mousepad into a USB port on your computer. Then install Razer Synapse 3 when prompted or download it from razer.com/synapse. Log in or create a Razer ID to begin customizing settings.
Is the Razer Goliathus a good gaming mousepad?
Yes, especially the Mobile Stealth Edition, which is praised for its precision, comfort, durability, and portability—ideal for gamers on the go.
How thick is the Razer Goliathus mousepad?
The thickness varies by size:
1. 3mm for Medium and Large
2. 4mm for XXL and 3XL
This ensures a flat surface and grip stability even on uneven desks.
How do I turn off the RGB lighting on the mousepad?
Open Razer Synapse, select the device, go to the Lighting tab, and choose options to switch off lighting:
1. When the display is turned off
2. After a set idle time
What’s the largest mousepad available?
The Pad-Zilla™ holds the title of the world’s biggest mousepad, but for most users, Razer’s extended and 3XL sizes provide ample space.
How do I change mousepad sensitivity settings?
Mousepad sensitivity itself isn’t adjustable, but you can adjust touchpad or mouse sensitivity in:
1. Windows 10: Settings > Devices > Touchpad
2. Windows 11: Settings > Bluetooth & Devices > Touchpad > Taps
How do I add a new device to Razer Chroma?
Connect your Chroma-supported device, open Razer Synapse, and go to Modules > Chroma Connect. From there, enable or disable the device for synchronized lighting effects.
What size mousepad is best for FPS games?
For general FPS, MOBA, and RPG games, a minimum of 12″x12″ is recommended. For games requiring wide mouse movements, like racing or flying sims, go for a larger surface area.

