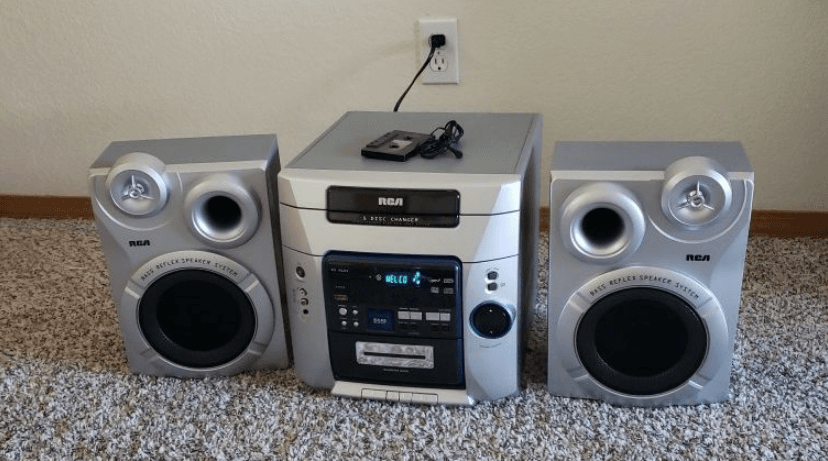
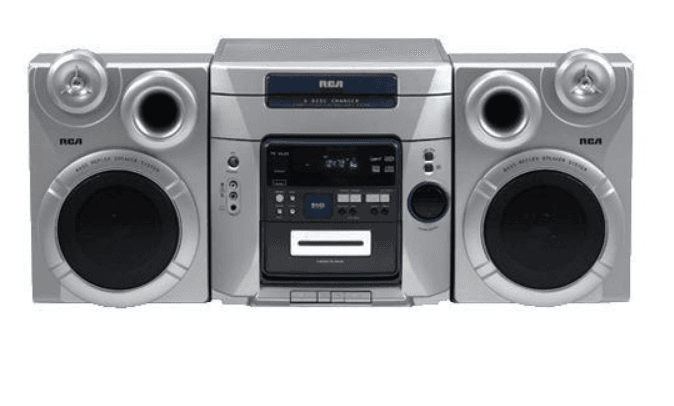
RCA RS1285 Stereo System
INSTALLATION
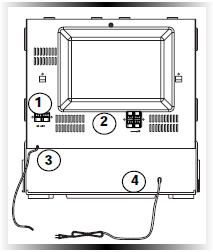
RS1285/VTCD350
- AM Loop Antenna Connector
- Main Speaker Jacks
- FM Antenna
- Power Cord
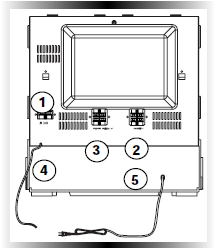
RS1287/RS1289/RS3287
- AM Loop Antenna Connector
- Main Speaker Jacks
- Surround Speaker Jacks
- FM Antenna
- Power Cord
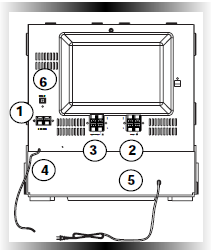
VTCD850/VTCD855
- AM Loop Antenna Connector
- Main Speaker Jacks
- Surround Speaker Jacks
- FM Antenna
- Power Cord
- Optical Output
To ensure sufficient ventilation, keep the spacings shown below free from other surfaces: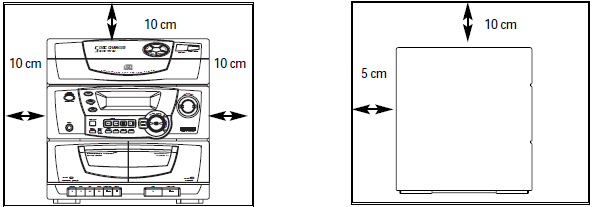
CONTROLS & INDICATORS
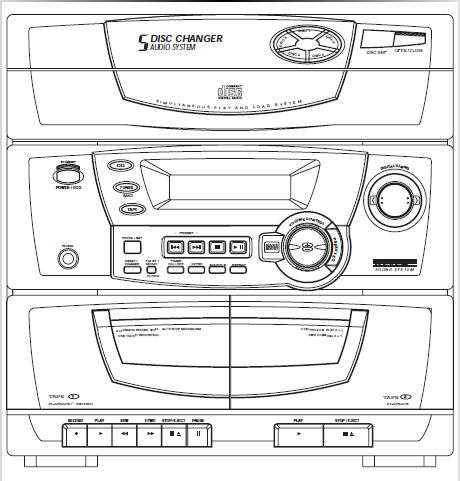
CD Player
OPEN/CLOSE
Opens or closes the disc tray.
DISC 1 – DISC 5
Select disc 1, 2, 3, 4, or 5
DISC SKIP
Skips to the next CD in the tray
POWER/ECO
Turns power on or off (STANDBY mode). Hold in STANDBY mode to enter ECO (power saving) mode.
PHONES
Jack for connecting headphones.
CD
Selects the CD player.
TUNER
Selects the tuner/ frequency band
TAPE
Selects the tape player
PROG/SET
Enters CD program mode/ tuner preset station mode
DEMO/DIMMER
Turns the feature demonstration on or off (DEMO/DIMMER for RCA models, RDS DEMO/DIMMER for Thomson models)
STOP
Stops CD playback and clears programmed tracks
SKIP FORWARD/ PRESET UP
Increment tuner preset station, CD track, or numerical values
SKIP BACKWARD/ PRESET DOWN
Decrements tuner preset station, CD track, or numerical values
PLAY/PAUSE
Plays or pauses a CD
FM STEREO/ CLOCK
Toggles between FM stereo/ mono and shows clock time.
TIMER
Enters timer setting mode and turns the mode on/off
INTRO
Turns INTRO mode on or off to play the first 10 seconds of each track. (RDSTIME/INTRO on Thomson models)
SHUFFLE
Turns SHUFFLE mode on or off to play CDs randomly. (PTY/MIX for Thomson series)
REPEAT
Turns REPEAT mode on or off to repeat a track, a disc, or all discs
BASS BOOST
Turns bass boost among different bass boost levels
PRESET EQ
Toggles among FLAT, JAZZ, ROCK, POP & CUSTOM mode.
VOLUME
Increases/ decreases volume.
DIGITAL TUNING
Searches up/down frequency to the next station
Tip: In STANDBY mode (press POWER off), the system displays the time. Press POWER to turn the system on in the previously
used mode. Press CD, TAPE, TUNER, or A U X to select the corresponding mode. Look at the display icons to identify the current mode.
Tape Player
Tape 1:
- RECORD
- PLAY
- REWIND
- FAST-FORWARD
- STOP/EJECT
- PAUSE
Tape 2:
- PLAY
- STOP/EJECT
POWER
Turns the system on/off (STANDBY mode)
TUNER
Selects tuner
CD
Selects a CD player
TAPE
Select ta ape player
MUTE
Mutes volume
VOL+ or VOL-
Increases/decreases volume
EQ PRESET
Select equalizer presets
PLAY
Plays current CD
STOP
Stop playing the CD
TRACK/ +
Increment CD track; searches CD
– / TRACK
Decrements CD track; searches CD
DISC SKIP
Skips to next CD
REPEAT
(REPEAT/RDS —Thomson models) Repeats a track, CD, or all CDs. When the radio is active, it displays RDS information.
PAUSE
Pauses the CD or tape (logical decks)
SHUFFLE
(MIX/PTY SEARCH — Thomson models). Turns on/off random listening
BASS B.
Turns on or off Bass Boost
SLEEP
Press to select the time interval in minutes before the unit turns off.
DEMO
Selects dimmer levers and activates the demo display when pressed for 2 seconds
PRESET UP/DOWN
Selects the next/ previous preset station
AUX & RECORD
Do not function in this unit
Display
Showing the Demonstration
Not operational in TUNER mode for Thomson models.
Press DEMO/DIMMER to turn on/off demonstration mode. The demonstration scrolls through all display operations.
DISPLAY CLOCK/CLOCK
Setting the Time
- Press CLOCK until the time flashes on the display (12-hour clock for RCS, 24-hour clock for Thomson).
- Press TUNING UP or DOWN to set the hour, and then press PRESET UP/ DOWN to shift to minute digits.
- Press TUNING UP or DOWN to set the minute.
- Press SET to save settings and STOP to quit settings.
Note: When the system is ON, you can press the CLOCK to display the current time for about 2 seconds.
Setting the Timer
- Press TIMER until the ON, OF, or VOL flashes on the display ( ON – timer on time, OF – timer off time, VOL- volume ) (12-hour clock for RCA, 24-hour clock for Thomson).
- For setting time (ON& OF), press TUNING UP or DOWN to set the hour and then press PRESET UP/DOWN to shift to minute digits.
- Press TUNING UP or DOWN to set the minute.
- For setting volume, press VOLUME.
- Press SET to save settings and STOP to quit settings.
Activating the Timer
Press and release the TIMER to turn on/off the alarm. The alarm is active when the clock icon indicator is lit. Note: If the real-time clock is not set, the timer cannot be activated.
Adjusting the Display Brightness
- Press and hold DEMO/DIMMER for more than 2 seconds.
- While the dimmer is displayed, press DEMO/DIMMER to select the desired level (DIMM 1 – 3).
Sleep Mode
You can select the time interval in minutes before the unit turns off automatically. Press SLEEP on the remote to select among 15, 30, 45, 60, 90 & 120 minutes.
Tip: DEMO Mode does not affect the current system operation. When the system is initially plugged in, DEMO mode is activated.
Sound Features
Using Preset Equalizer Curves
PRESET EQ is are toggle for preset equalizer levels. Press to toggle among them.
The display momentarily shows the selection.
Creating a Custom Curve
- Press PRESET EQ to select CUSTOM mode.
- While “CUSTOM” is displayed, press PRESET UP or DOWN repeatedly to cycle among displayed bass-, mid-, and treble-range levels.
- While BAS, MID, or TRE is displayed, adjust VOLUME to set the associated gain between -10 – +10.
Boosting the Bass
Press BASS BOOST to turn on/off boosting the bass frequency.
Muting Audio
Press MUTE on the remote to cut the sound.
Tip: While playing a CD, press and hold SKIP-FORWARD or BACKWARD for more than 2 seconds to search through the CD.
CD PLAYER
Loading Discs
- Press the CD to select CD mode.
- Press OPEN/CLOSE to open the drawer.
- Insert up to five discs with the label face up. (Press DISC SKIP to rotate the disc carrier.)
- Press OPEN/CLOSE to close the drawer. Lights the loaded discs.
Playing Discs
Press PLAY/PAUSE to begin or pause play, and STOP to stop play.
Select a specific disc by pressing DISC 1 – DISC 5.
Press SKIP FORWARD/ BACKWARD to select a specific track.
Play and load simultaneously by:
- Press OPEN/CLOSE to open the tray. While a CD is playing
- Load/change discs for available trays by pressing DISC SKIP.
- Press OPEN/CLOSE to close the tray.
Shuffling the Play Order
Press SHUFFLE to turn on/off the playing of tracks in random order. (PTY/MIX for Thomson models.)
Sampling Tracks
Press INTRO to play the first 10 seconds of each track on the current disc, all discs in the tray, or turn INTRO mode off.
Repeating the Play Order
Press REPEAT to repeat the current track, current disc, all discs, or turn REPEAT mode off.
Setting Up a CD Program
You can program the CD player to play up to 32 tracks on the CDs in the tray.
- While the CD player is stopped, press SET to enter PROGRAM mode. The system displays the next available program number: “- – P:01,” with “- -” flashing, prompts you for the first track in the program list.
- Press SKIP FORWARD/BACKWARD to select a track (press DISC SKIP or DISK 1 – DISK 5 to select a track from a different disc).
- Immediately press SET to assign the selected track to the program number. After 3 seconds, you are prompted for the next track in the program list.
Playing a Program List
While in PROGRAM mode, press PLAY.
Displaying the Program List
- While the CD player is stopped, press SET to enter PROGRAM mode.
- Press SET repeatedly to list each track assignment in the program list.
Deleting a Track from a Program List
While in PROGRAM mode, display the programmed track to be deleted (press SET if necessary to cycle through the list) and immediately press STOP. To clear the whole programmed list, press and hold STOP for 5 seconds. The system displays the message CLEAR.
Skipping a Disk
Press DISC SKIP.
Searching Through a CD
Press and hold SKIP FORWARD/ BACKWARD to search through a CD as it is playing.
Tip: You can create a program of up to 32 tracks.
- Press TUNER to select the radio.
- Press TUNER to select the next radio band. Choices are:
AM/FM (RCA models)
FM/MW/LW, RDS (Thomson models)
The tuner can be either TUNE or PRESET mode. When in PRESET mode, the PROG light is on.
Tip: Your audio system has 32 preset stations.
Tuning to a Station
Press TUNING UP/ DOWN to select frequencies.
Using Presets
Press TUNING UP/ DOWN to access the previous or next preset station. The display first shows the preset program number, and after a few seconds, the frequency, and then the preset program number again. (FMPR:01 is FM preset 1)
Auto Preset Programming
Press and hold the TUNER button for 2 seconds to scan stations in the selected band. The stations will then be stored as preset channels. A maximum of 32 stations can be stored. Beware of your preset channels being erased accidentally because the scanning and storing process is automatic upon pressing the TUNER button.
You can stop the automatic scan by pressing the TUNER button, but the erased stations cannot be recovered.
Setting Presets
- Press TUNING UP/ DOWN to access the desired frequency.
- Press the SET button once.
- The most recently accessed program location will be displayed together with a blinking program icon (AMPR, FMPR, or LWPR.)
- If a different program location is preferred, press PRESET UP/ DOWN to move to the desired preset number (1-32).
- Press SET to store the selected frequency at that preset.
Suppressing Stereo Signal
Press FM STEREO to toggle between FM mono and stereo for stereo FM stations.
Tip: Press DIGITAL TUNING UP/DOWN for more than 1 second to automatically tune up/down the band for the next station.
For more Manuals by RCA, visit ManualsLibraryy
RCA RS1285 Stereo System-FAQs

