SAMSUNG HW-B57C B-Series Soundbar

Important Safety Instructions
Read these operating instructions carefully before using the unit. Follow all the safety instructions listed below. Keep these operating instructions handy for future reference
- Read these instructions.
- Keep these Instructions.
- Heed all warnings.
- Follow all instructions.
- Do not use this apparatus near water.
- Clean only with dry cloth.
- Do not block any ventilation openings. Install in accordance with the manufacturer’s instructions.
- Do not install near any heat sources such as radiators, heat registers, stoves, or other apparatus (including amplifiers) that produce heat.
- Do not defeat the safety purpose of the polarized or grounding-type plug. A polarized plug has two blades, with one wider than the other. A grounding-type plug
has two blades and a third grounding prong. The wide blade or the third prong is provided for your safety. If the provided plug does not fit into your outlet, consult an electrician for replacement of the obsolete outlet. - Protect the power cord from being walked on or pinched, particularly at plugs, convenience receptacles, and the point where they exit from the apparatus.
- Only use attachments/accessories specified by the manufacturer.
- Use only with the cart, stand, tripod, bracket, or table specified by the manufacturer, or sold with the apparatus. When a cart is used, use caution when moving the cart/apparatus combination to avoid injury from tip-over.
- Unplug this apparatus during lightning storms or when unused for long periods of time.
- Refer all servicing to qualified service personnel. Servicing is required when the apparatus has been damaged in any way, such as the power-supply cord or plug is
damaged, liquid has been spilled or objects have fallen into the apparatus, the apparatus has been exposed to rain or moisture, does not operate normally, or has been dropped.
PRECAUTIONS
- Ensure that the AC power supply in your house complies with the power requirements listed on the identification sticker located on the bottom of your product. Install your product horizontally, on a suitable base (furniture), with enough space around it for ventilation (3~4 inches). Make sure the ventilation slots are not covered. Do not place the unit on amplifiers or other equipment that may become hot. This unit is designed for continuous use. To fully turn off the unit, disconnect the AC plug from the wall outlet. Unplug the unit if you intend to leave it unused for a long period of time.
- During thunderstorms, disconnect the AC plug from the wall outlet. Voltage peaks due to lightning could damage the unit
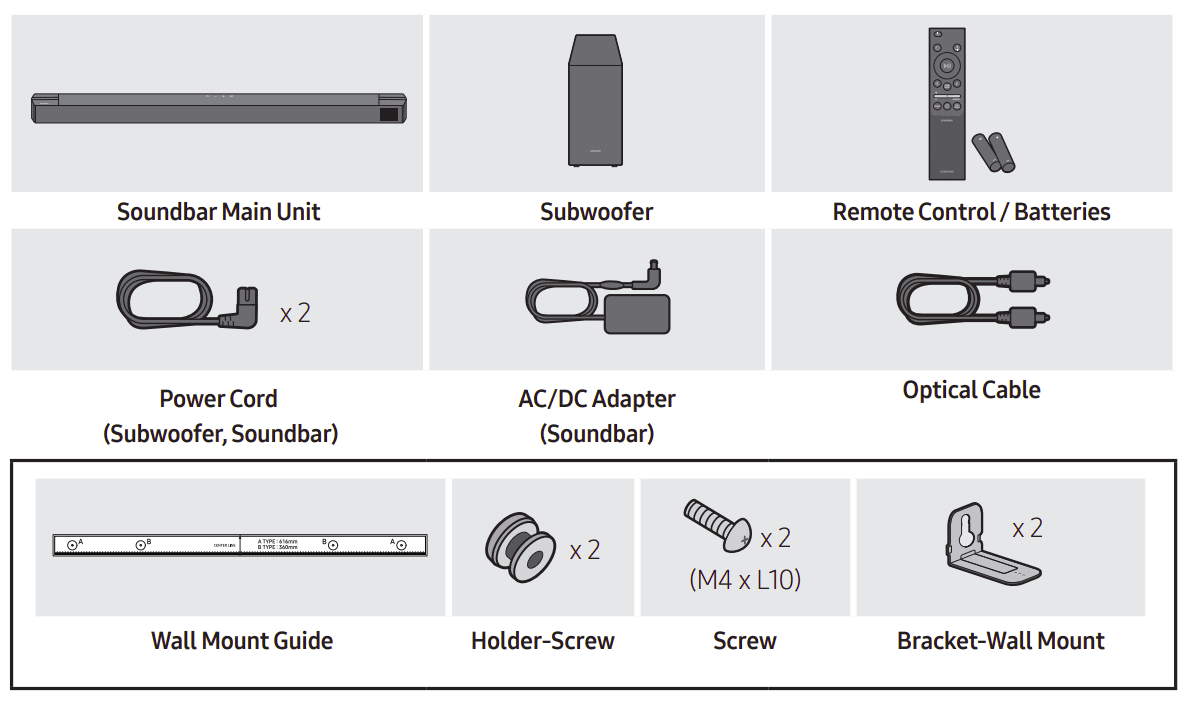
CHECKING THE COMPONENTS
Wireless Surround Speaker SET (SWA-9100)
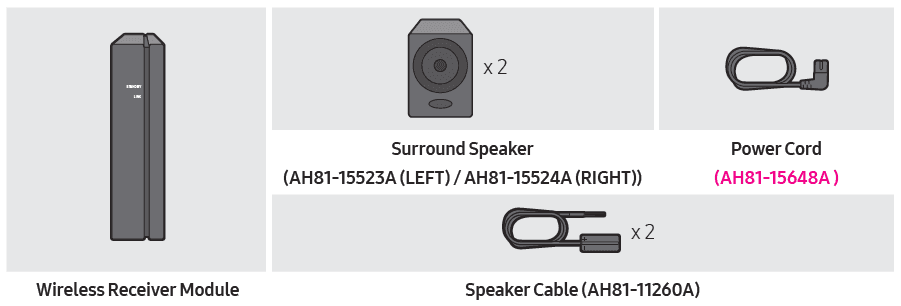
- For more information about the power supply and power consumption, refer to the label attached to the product. (Label: Bottom of the Soundbar Main Unit)
- To purchase additional components or optional cables, contact a Samsung Service Center or Samsung Customer Care.
- Depending on the region, the appearance of the AC plug may differ from the plug displayed above, or it may be supplied integrated with the AC/DC adapter.
- The appearance of the accessories may differ slightly from the illustrations above.
- Design and specifications are subject to change without prior notice.
PRODUCT OVERVIEW
Front Panel / Top Panel of the Soundbar


- When you plug in the AC cord, the power button will begin working in 4 to 6 seconds.
- When you turn on this unit, there will be a 4 to 5-second delay before it produces sound.
- If you want to enjoy sound only from the Soundbar, you must turn off the TV’s speakers in the Audio Setup menu of your TV. Refer to the owner’s manual supplied with your TV
Bottom Panel of the Soundbar
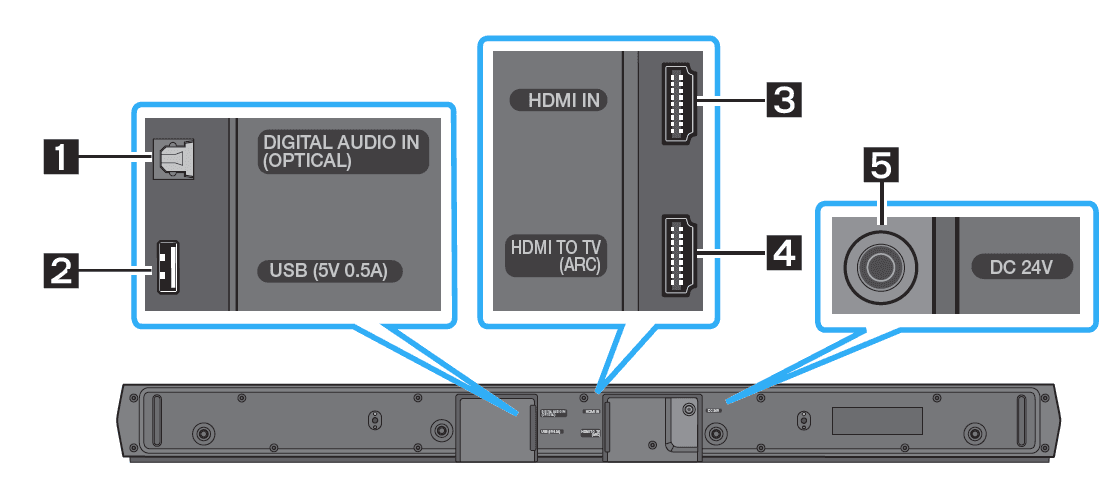
- When disconnecting the power cable of the AC/DC power adapter from a wall outlet, pull the plug. Do not pull the cable.
- Do not connect this unit or other components to an AC outlet until all connections between components are complete
USING THE REMOTE CONTROL
Inserting Batteries before using the Remote Control (AAA batteries X 2)
- Slide the back cover in the direction of the arrow until it is completely removed. Insert 2 AAA batteries (1.5V) oriented so that their polarity is correct. Slide the back cover back into position

How to Use the Remote Control


Using the Hidden Buttons (Buttons with more than one function)

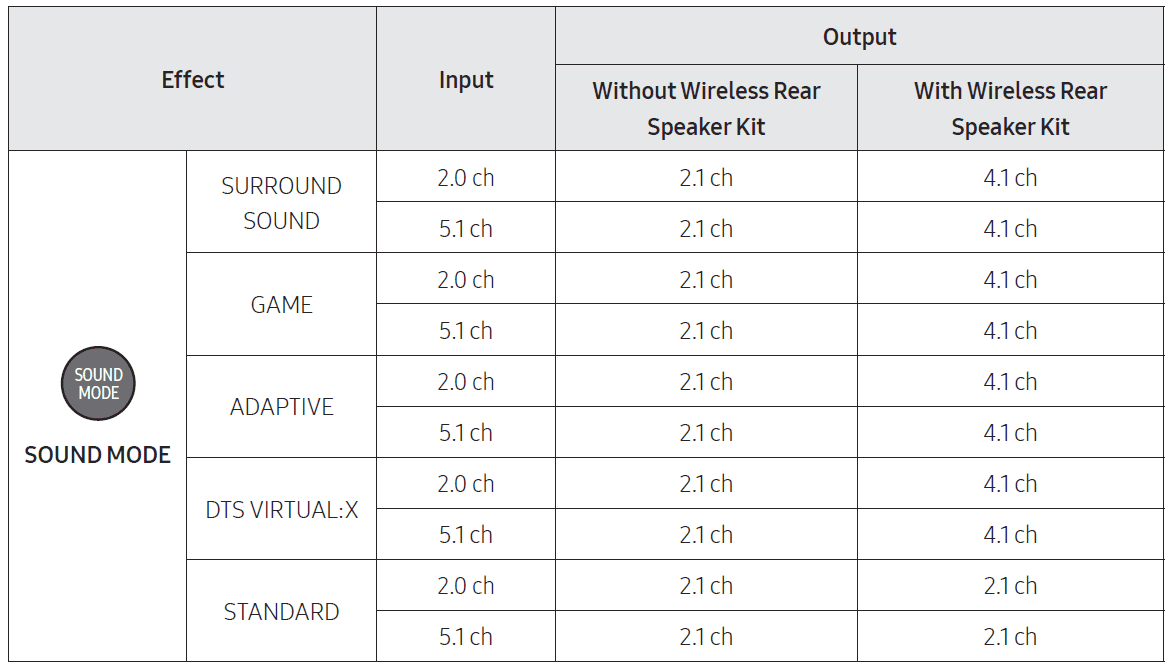
Output specifications for the different sound effect modes
Adjusting the Soundbar volume with a TV remote control
Adjust the Soundbar volume using the TV’s remote control.
- This function can be used with IR remote controls only. Bluetooth remote controls (remote controls that require pairing) are not supported.
- Set the TV speaker to External Speaker to use this function.
- Manufacturers supporting this function
- Samsung, VIZIO, LG, Sony, Sharp, PHILIPS, PANASONIC, TOSHIBA, Hisense, RCA
- Turn Off the Soundbar.
- Push up and hold the WOOFER button for 5 seconds. Each time you push the WOOFER button up and hold it for 5 seconds, the mode switches in the
following order: “OFF-TV REMOTE” (Default mode), “SAMSUNG-TV REMOTE”, “ALL-TV REMOTE”.
CONNECTING THE SOUNDBAR
Connecting Electrical Power
Use the power components to connect the Subwoofer and Soundbar to an electrical outlet in the following order:
- Connect the power cord to the Subwoofer.
- Connect the power output cable to the power adapter, and then to the Soundbar.
- Connect the power cord to a wall socket.
See the illustrations below.- For more information about the required electrical power and power consumption, refer to the label attached to the product. (Label: Bottom of the Soundbar Main Unit)

- For more information about the required electrical power and power consumption, refer to the label attached to the product. (Label: Bottom of the Soundbar Main Unit)
Connecting the Soundbar to the Subwoofer
- When the subwoofer is connected, you can enjoy rich bass sound
Automatic connection between the Subwoofer and the Soundbar
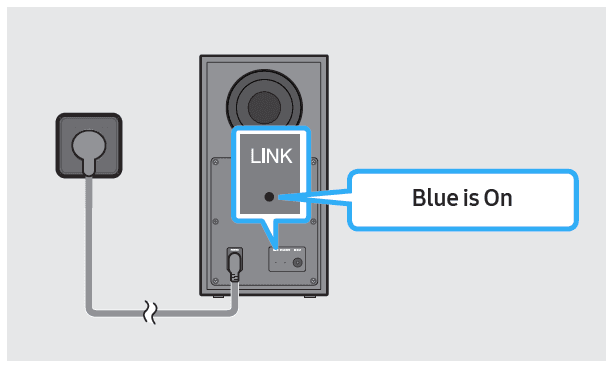
When you turn the power on after connecting the power cables to the Soundbar and subwoofer, the subwoofer is automatically connected to the Soundbar.
- When auto-pairing is complete, the blue indicators at the rear of the subwoofer turn on
LED Indicator Lights on the Rear of Subwoofer

Manually connecting the Subwoofer if the automatic connection fails
Before performing the manual connection procedure below
- Check whether the power cables for the Soundbar and subwoofer are connected properly.
- Make sure that the Soundbar is turned on.
- Press and hold ID SET on the rear of the subwoofer for at least 5 seconds.
- The red indicator on the rear of the subwoofer turns off, and the blue indicator blinks

- The red indicator on the rear of the subwoofer turns off, and the blue indicator blinks
- Press and hold the Up button on the remote control for at least 5 seconds.
- The ID SET message appears on the display of the Soundbar for a moment, and then it disappears.
- The Soundbar will automatically power on when ID SET is complete

- Check if the LINK LED is solid blue (connection complete)

The LINK LED indicator stops blinking and glows a solid blue when a connection is established between the Soundbar and the Wireless Subwoofer.
NOTES
- Do not connect the power cord of this product or your TV to a wall outlet until all connections between components are complete.
- Before moving or installing this product, be sure to turn off the power and disconnect the power cord.
- If the main unit is powered off, the wireless subwoofer will enter standby mode, and the STANDBY LED on the rear of the subwoofer will turn red after blinking blue several times.
- If you use a device that uses the same frequency (5.8GHz) as the Soundbar near the Soundbar, interference may cause some sound interruption.
- The maximum transmission distance of the main unit’s wireless signal is about 32.8 ft (10 m), but it may vary depending on your operating environment. If a steel-concrete or metallic wall is between the main unit and the wireless subwoofer, the system may not operate at all because the wireless signal cannot penetrate metal
PRECAUTIONS
- Wireless receiving antennas are built into the wireless subwoofer. Keep the unit away from water and moisture.
- For optimal listening performance, make sure that the area around the wireless subwoofer and the Wireless Receiver Module is clear of any obstructions
Connecting an SWA-9100 to your Soundbar
Expand to true wireless surround sound by connecting the Samsung Wireless Surround Speaker SET (SWA-9100) to your Soundbar.
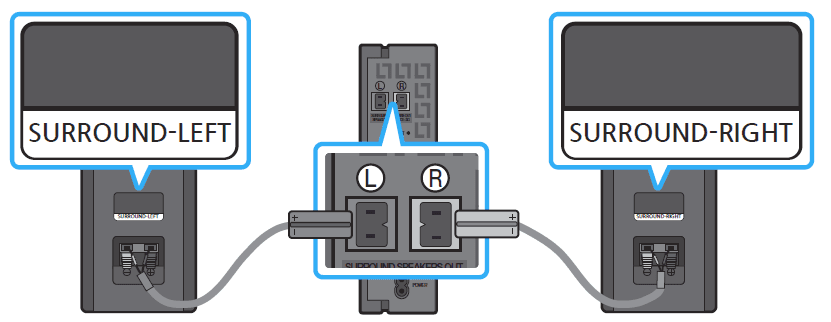
- Connect the Wireless Receiver Module to 2 Surround Speakers
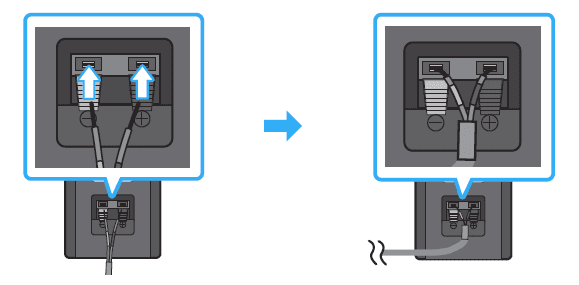
Use the speaker cables to connect the two surround sound speakers to the Wireless Receiver Module.- When connecting the speaker cable, connect the core wire to the speaker

- The speaker cables are color-coded

- When connecting the speaker cables to the Wireless Receiver Module, follow these steps
- Insert the grey plug into the grey jack on the Wireless Receiver.
- Insert the blue plug into the blue jack on the Wireless Receiver.
- When connecting the speaker cables to the surround speakers, follow these steps
- Match the speaker cable connected to the grey jack to the speaker with the grey label.
- Match the speaker cable connected to the blue jack to the speaker with the blue label.
- Insert the red and black colored ends of each speaker cable into the red and black jacks of the appropriate speaker.
- The labels are on the backs of the speakers
- When connecting the speaker cable, connect the core wire to the speaker
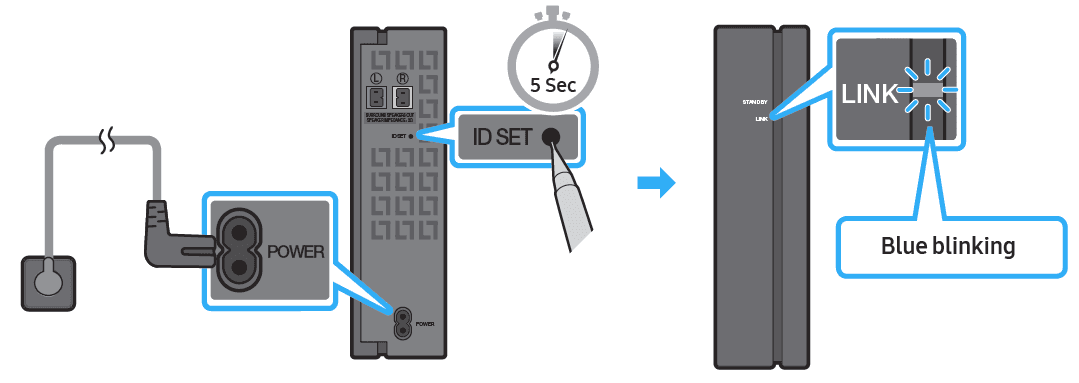
- Check the standby status after plugging into an electrical outlet
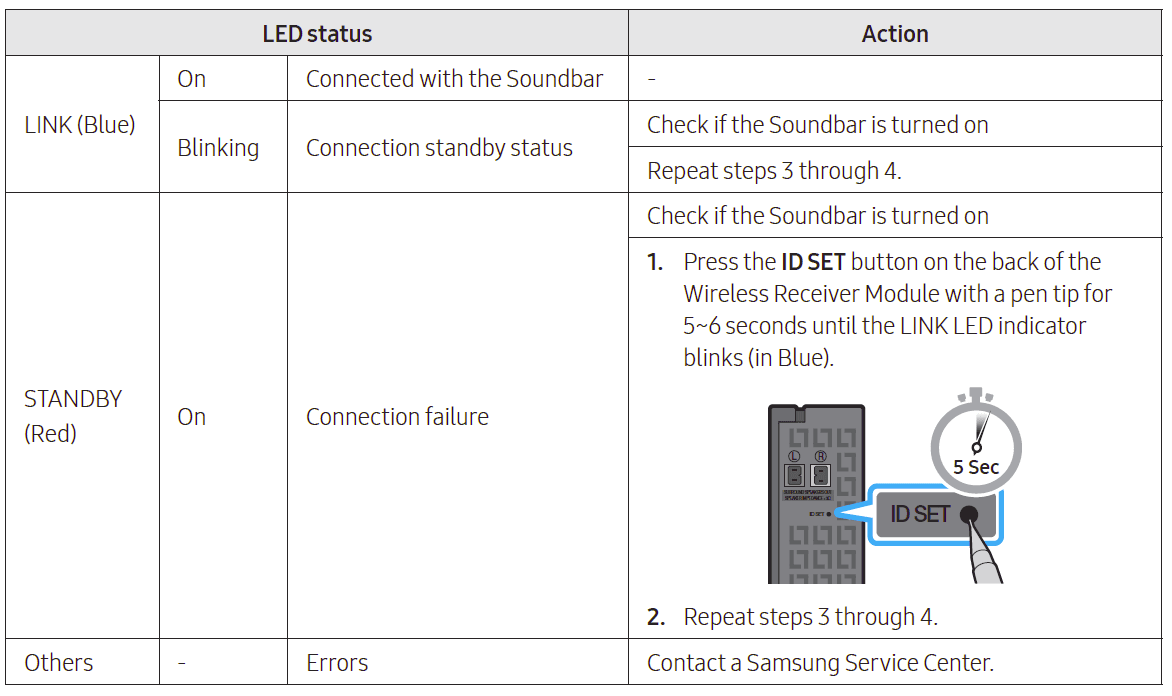
The LINK LED indicator (blue LED) on the Wireless Receiver Module blinks. If the LED does not blink, press the ID SET button on the back of the Wireless Receiver Module with a pen tip for 5~6 seconds until the LINK LED indicator blinks (in Blue)
- Configure “ID SET” using the Soundbar’s remote control
Press and hold the Up button on the remote control for at least 5 seconds.- The ID SET message appears on the display of the Soundbar for a moment, and then it disappears.
- The Soundbar will automatically power on when ID SET is complete

- CAUTION
- If your Soundbar was playing music when it connects to the SWA-9100, you may hear some stuttering from the woofer as the connection finalizes
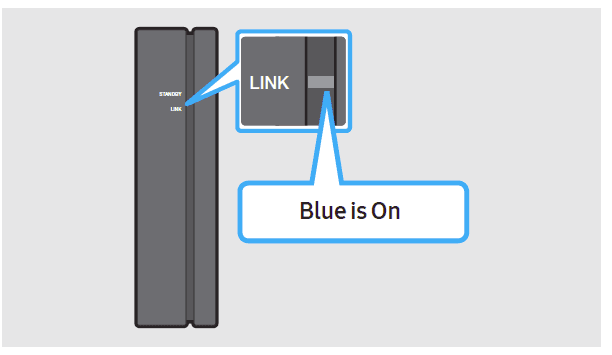
- Check if the LINK LED is solid blue (connection complete)

- The LINK LED indicator stops blinking and glows a solid blue when a connection is established between the Soundbar and the Wireless Receiver Module
- If the SWA-9100 does not connect, take the necessary steps according to the LED Indicator’s status

USING A WIRED CONNECTION TO THE TV
Hear TV sound from your Soundbar through wired or wireless connections.
- When the Soundbar is connected to selected Samsung TVs, the Soundbar can be controlled using the TV’s remote control.
- This feature is supported by 2017 and later Samsung Smart TVs that support Bluetooth when you connect the Soundbar to the TV using an optical cable.
- This function also allows you to use the TV menu to adjust the sound field and various settings as well as the volume and mute
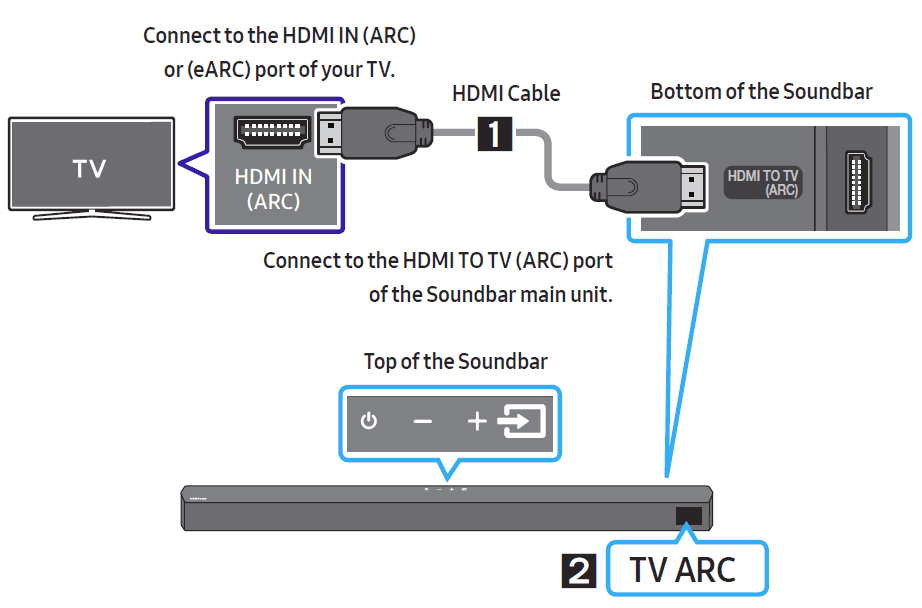
Method 1. Connecting a TV using an HDMI Cable
CAUTION
- When both the HDMI cable and optical cable are connected, the HDMI signal is received first.
- To connect the HDMI cable between the TV and the Soundbar, be sure to connect the terminals marked ARC. Otherwise, the TV sound may not be output.
- The recommended cable is a High-Speed HDMI Cable with Ethernet

- With the Soundbar and TV turned on, connect the HDMI cable as shown in the figure
- “TV ARC” appears in the display window of the Soundbar main unit, and the Soundbar plays TV sound.
- If the TV sound is inaudible, press the
 (Source) button on the remote control or on the top of the Soundbar to switch to “D.IN” mode. The screen displays “D.IN” and “TV ARC” in sequence, andthe TV sound is played.
 - If “TV ARC” does not appear in the display window of the Soundbar main unit, confirm that the HDMI cable is connected to the correct port.
- Use the volume buttons on the TV’s remote control to change the volume on the Soundbar
- If the TV sound is inaudible, press the
NOTES
- HDMI is an interface that enables the digital transmission of video and audio data with just a single connector.
- If the TV provides an ARC port, connect the HDMI cable to the HDMI IN (ARC) port.
- We recommend you use a coreless HDMI cable if possible. If you use a cored HDMI cable, use one whose diameter is less than 0.55 inches (14 mm).
- This function is not available if the HDMI cable does not support ARC.
- When the audio in a broadcast is encoded in Dolby Digital and the “Digital Output Audio Format” on your TV is set to PCM, we recommend that you change the setting to Dolby Digital. When the setting on the TV is changed, you will experience better sound quality. (The TV menu may use different words for Dolby Digital and PCM depending on the TV manufacturer.)
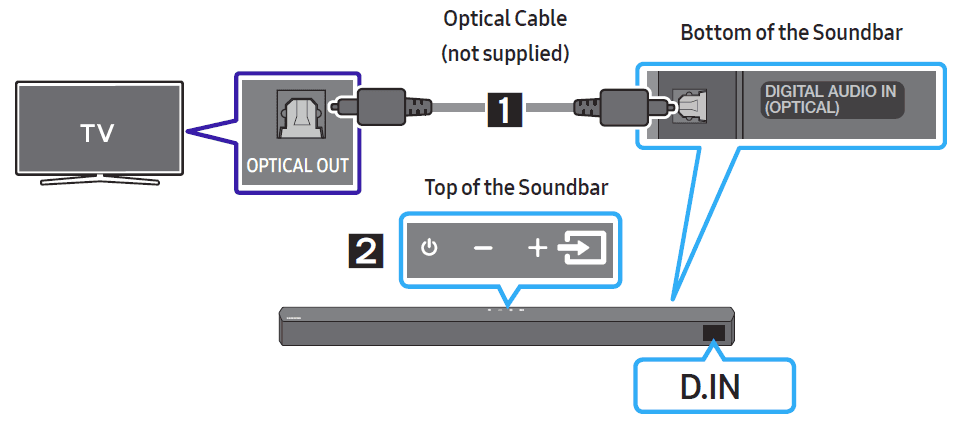
Method 2. Connecting using an Optical Cable
Pre-connection Checklist
- When both the HDMI cable and optical cable are connected, the HDMI signal is received first.
- When you use an optical cable and the terminals have covers, be sure to remove the covers


- Connect the DIGITAL AUDIO IN (OPTICAL) port on the Soundbar to the OPTICAL OUT port of the TV with a digital optical cable (not supplied).
- Press the
 (Source) button on the top panel or remote control, and then select the “D.IN” mode
CONNECTING A USB STORAGE DEVICE
You can play music files located on USB storage devices through the Soundbar
- Connect the USB device to the USB port on the bottom of the product.
- Press the
 (Source) button on the top panel or on the remote control, and then select “USB”.
 - “USB” appears in the display screen.
- Play music files from the USB storage device through the Soundbar.
- The Soundbar automatically turns off (Auto Power Down) if no USB device has been connected for more than 20 minutes.
INSTALLING THE WALL MOUNT
Wallmount Components
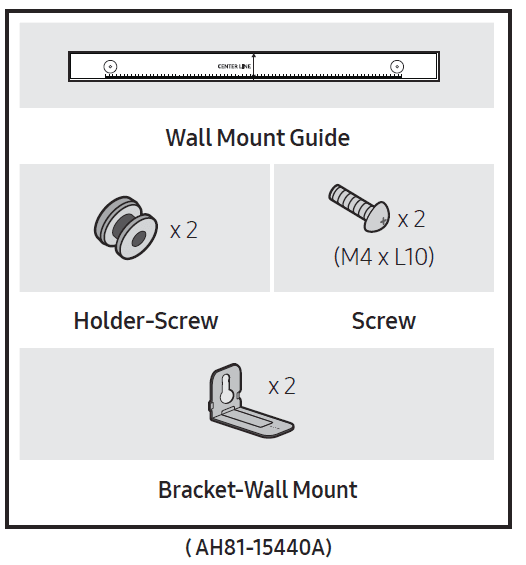
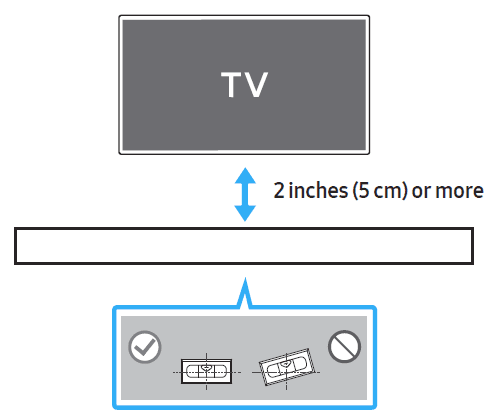
- Place the Wall Mount Guide against the wall surface
- The Wall Mount Guide must be level.
- If your TV is mounted on the wall, install the Soundbar at least 2 inches (5 cm) below the TV

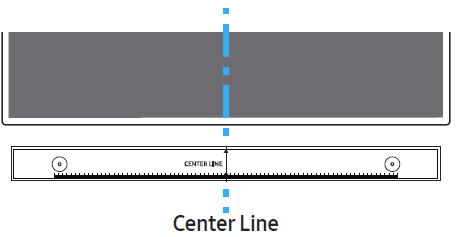
- Align the Wall Mount Guide’s Center Line with the center of your TV (if you are mounting the Soundbar below your TV), and then fix the Wall Mount Guide to the wall using tape.
- If you are not mounting below a TV, place the Center Line in the center of the installation area

- If you are not mounting below a TV, place the Center Line in the center of the installation area
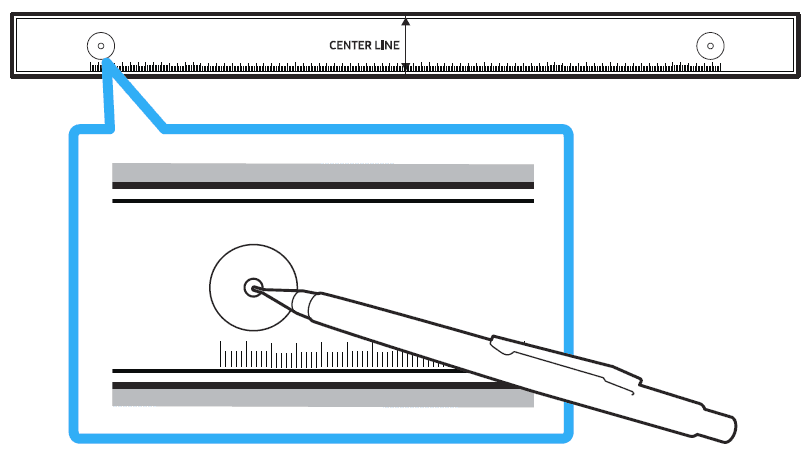
- Use a pen to mark the positions of the holes and remove the Wall Mount Guide

- Using an appropriately sized drill bit, drill a hole in the wall at each marking
- If the markings do not correspond to the positions of the studs, make sure you insert appropriate anchors into the holes before you insert the support screws. If you use anchors, make sure the holes you drill are large enough for the anchors you use.
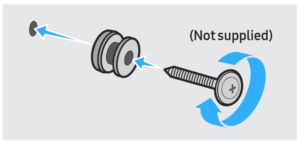
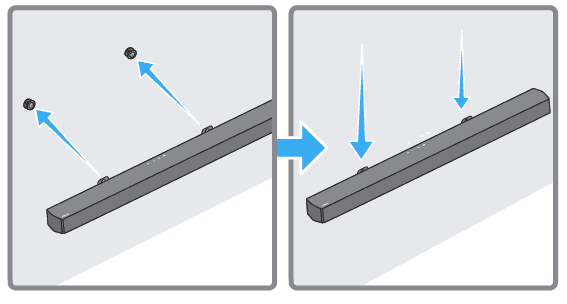
- Push a screw (not supplied) through each Holder-Screw, and then screw each screw firmly into a support screw hole

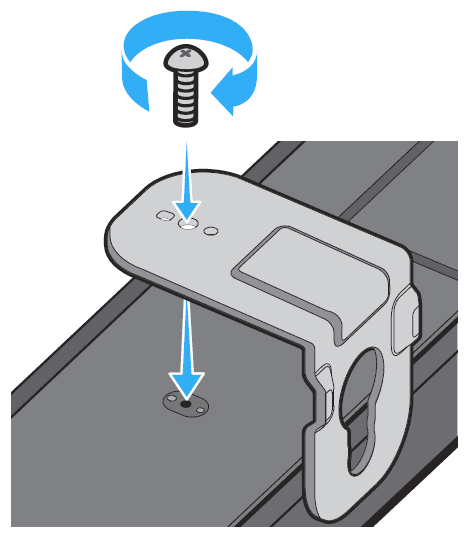
- Install the 2 Bracket-Wall Mounts in the correct orientation on the bottom of the Soundbar using 2 Screws

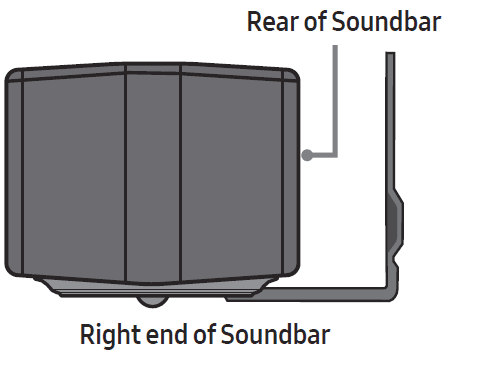
- When assembling, make sure the hanger part of the Bracket-Wall Mounts are located behind the rear of the Soundbar

- When assembling, make sure the hanger part of the Bracket-Wall Mounts are located behind the rear of the Soundbar
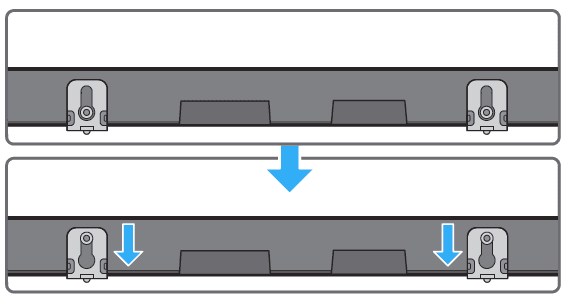
- Install the Soundbar with the attached Bracket-Wall Mounts by hanging the Bracket-Wall Mounts on the Holder-Screws on the wall

- Slide the Soundbar down as shown below so that the Bracket-Wall Mounts rest securely on the Holder-Screws.
- Insert the Holder-Screws into the wide (bottom) part of the Bracket-Wall Mounts, and then slide the Bracket-Wall Mounts down so that the Bracket-Wall
Mounts rest securely on the Holder-Screws.
- Insert the Holder-Screws into the wide (bottom) part of the Bracket-Wall Mounts, and then slide the Bracket-Wall Mounts down so that the Bracket-Wall
TROUBLESHOOTING
- Refer to the instructions below if this product does not function properly. If the problem you are experiencing is not listed below or if the instructions below do not help, turn off the product, disconnect the power cord, and contact Samsung Electronics at 1-800-SAMSUNG (1-800-726-7864).
The soundbar does not turn on
- Check whether the power cord of the Soundbar is correctly inserted into the outlet.
Soundbar works erratically
- After removing the power cord, insert it again.
- Power cycle the external device and try again.
- If there is no signal, the Soundbar automatically turns off after a certain period of time. Turn on the power. (See page 8.)
If the remote control does not work
- Point the remote directly at the Soundbar.
- Replace the batteries with new ones.
The soundbar does not output any sound
- The volume of the Soundbar is too low or muted. Adjust the volume.
- When any external device (STB, Bluetooth device, mobile device, etc.) is connected, adjust the volume of the external device.
- For the sound output of the TV, select Soundbar. (Samsung TV: Home (
 ) → Menu → Settings (
 ) → All Settings (
 ) → Sound → Sound Output → Select Soundbar)
 - The cable connection to the Soundbar may not be loose. Remove the cable and connect it again.
- Remove the power cord completely, reconnect it, and turn the power on.
- Reset the product and try again. (See page 38.)
The subwoofer does not output any sound
- Check whether the LED indicator on the rear of the Subwoofer is on in blue. Reconnect the Soundbar and Subwoofer if the indicator is blinking in blue or turned red. (See page 18.)
- You may experience an issue if there is an obstacle between the Soundbar and the Subwoofer. Move devices to an area away from obstacles.
- Other devices sending radio frequency signals in proximity may interrupt the connection. Keep your speaker away from such devices
SPECIFICATIONS AND GUIDE
Specifications


For more manuals by Samsung, visit ManualsLibraryy
SAMSUNG HW-B57C B-Series Soundbar-FAQs
How do I control the soundbar with my Samsung TV remote?
Connect via HDMI ARC or Optical.
Go to TV Settings → Sound → Sound Output.
Select your soundbar → Close.
Now, your TV remote adjusts volume and power.
Why is there no sound from my soundbar?
✔ Check if the soundbar is set to the correct input (HDMI, D.IN, BT).
✔ Ensure TV sound output is set to the soundbar.
✔ Try unplugging and reconnecting cables.
How do I improve sound quality?
Place the soundbar centered under the TV.
Enable Dolby Atmos (if supported).
Adjust EQ settings (Movie, Voice, Standard modes).
What is HDMI ARC/eARC?
ARC (Audio Return Channel): Sends audio from TV to soundbar via HDMI.
eARC (Enhanced ARC): Supports Dolby Atmos & higher bandwidth.
How do I enable Auto Power Link (soundbar turns on with TV)?
Hold the LEFT button on the soundbar remote for 5 sec until “Auto Power Link” appears.
Works with optical or HDMI ARC.
How do I update my soundbar’s firmware?
Open SmartThings App → Select soundbar → Settings (⋮).
Go to Information → Firmware Update → Update Now.
Why does my soundbar keep turning off?
Auto Power-Off: If no audio plays for 20 min, it shuts down.
Disable in settings if unwanted.
Why is audio out of sync (lip-sync issue)?
Go to TV Settings → Sound → Audio Delay and adjust.
What do the sound modes (D.IN, TV ARC, BT) mean?
D.IN: Optical input.
TV ARC: HDMI ARC connection.
BT: Bluetooth mode.


