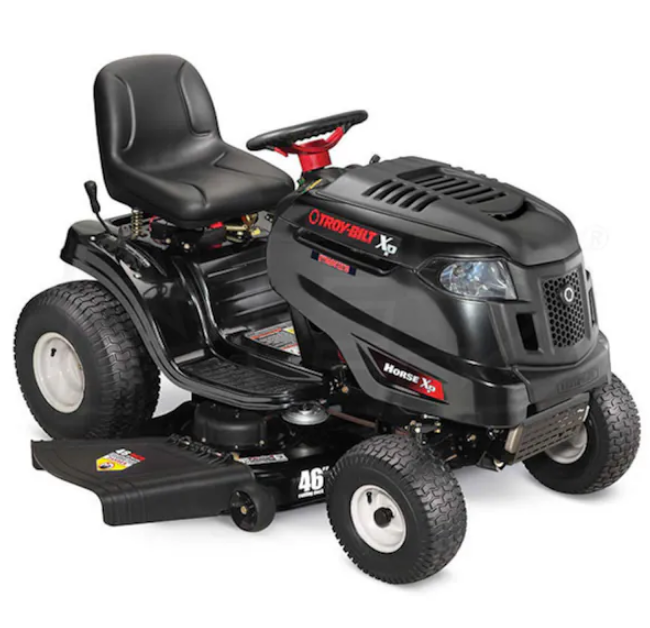
Troy-Bilt LTX-1842 Lawn Tractor
IMPORTANT SAFE OPERATION PRACTICES
General Operation
- Read, understand, and follow all instructions on the machine and in the manual(s) before attempting to assemble and operate. Keep this manual in a safe place for future and regular reference and for ordering replacement parts.
- Be familiar with all controls and their proper operation. Know how to stop the machine and disengage it quickly.
- Never allow children under 14 years old to operate this machine. Children 14 years old and over should read and understand the operation instructions and safety rules in this manual and should be trained and supervised by a parent.
- Never allow adults to operate this machine without proper instruction.
- To help avoid blade contact or a thrown object injury, keep bystanders, helpers, children, and pets at least 75 feet from the machine while it is in
operation. Stop the machine if anyone enters the area. - Thoroughly inspect the area where the equipment is to be used. Remove all stones, sticks, wire, bones, toys, and other foreign objects that could be picked up and thrown by the blade(s). Thrown objects can cause serious personal injury.
- Plan your mowing pattern to avoid discharge of material toward roads, sidewalks, bystanders, and the like. Also, avoid discharging material against a wall or obstruction, which may cause discharged material to ricochet back toward the operator.
- Always wear safety glasses or safety goggles during operation and while performing an adjustment or repair to protect your eyes. Thrown objects that ricochet can cause serious injury to the eyes.
- Wear sturdy, rough-soled work shoes and close-fitting slacks and shirts. Loose-fitting clothes and jewelry can be caught in movable parts. Never operate this machine barefoot or in sandals.
- Be aware of the mower and attachment discharge direction and do not point it at anyone. Do not operate the mower without the discharge cover or the entire grass catcher in its proper place.
- Do not put hands or feet near rotating parts or under the cutting deck. Contact with the blade(s) can amputate hands and feet.
- A missing or damaged discharge cover can cause blade contact or thrown object injuries.
- Stop the blade(s) when crossing gravel drives, walks, or roads and while not cutting grass.
- Watch for traffic when operating near or crossing roadways. This machine is not intended for use on any public roadway.
- Do not operate the machine while under the influence of alcohol or drugs.
- Mow only in daylight or good artificial light.
- Never carry passengers.
- Disengage blade(s) before shifting into reverse. Back up slowly. Always look down and behind before and while backing to avoid a back-over
accident. - Slow down before turning. Operate the machine smoothly. Avoid erratic operation and excessive speed.
- Disengage blade(s), set parking brake, stop engine, and wait until the blade(s) come to a complete stop before removing the grass catcher, emptying the grass, unclogging the chute, removing any grass or debris, or making any adjustments.
- Never leave a running machine unattended. Always turn off blade(s), place transmission in neutral, set the parking brake, stop the engine, and remove the key before dismounting.
- Use extra care when loading or unloading the machine into a trailer or truck. This unit should not be driven up or down ramp(s), because the unit could tip over, causing serious personal injury. The unit must be pushed manually on ramp(s) to load or unload properly.
SLOPE GAUGE
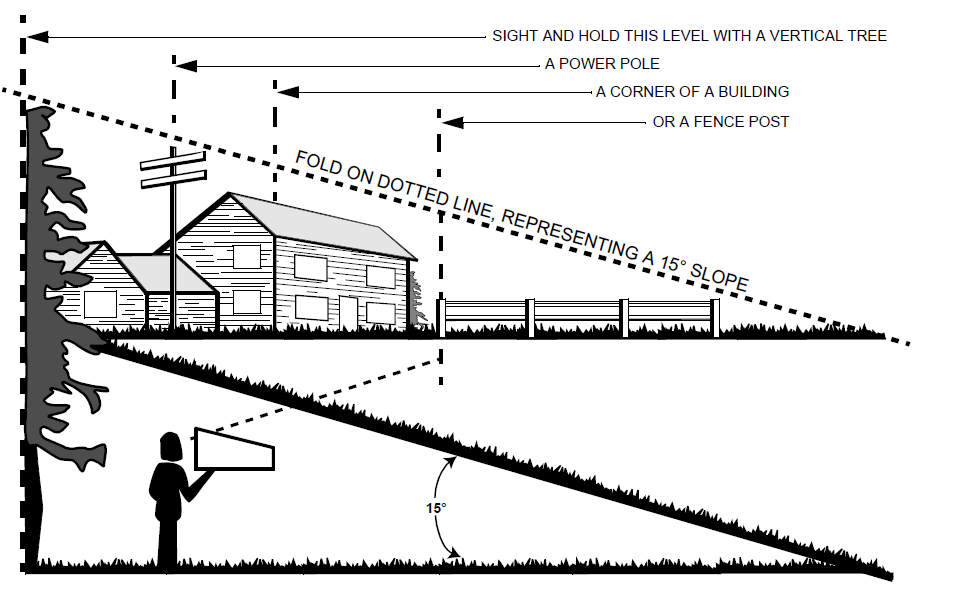
WARNING: Do not mow on inclines with a slope in excess of 15 degrees (a rise of approximately 2-1/2 feet every 10 feet). A riding mower could overturn and cause serious injury. If operating a walk-behind mower on such a slope, it is extremely difficult to maintain your footing, and you could slip, resulting in serious injury. Operate RIDING mowers up and down slopes, never across the face of slopes.
TRACTOR SET-UP
IMPORTANT: Your tractor is shipped with motor oil in the engine. However, you MUST check the oil level before starting the engine and operating. Refer to the separate Briggs & Stratton Operator/Owner Manual packed with your tractor. Read instructions carefully.
NOTE: Any reference in this manual to the RIGHT or LEFT side of the tractor is observed from the operator’s position.
Attaching the Battery Cables
NOTE: The positive battery terminal is marked Pos. (+). The negative battery terminal is marked Neg. (–).
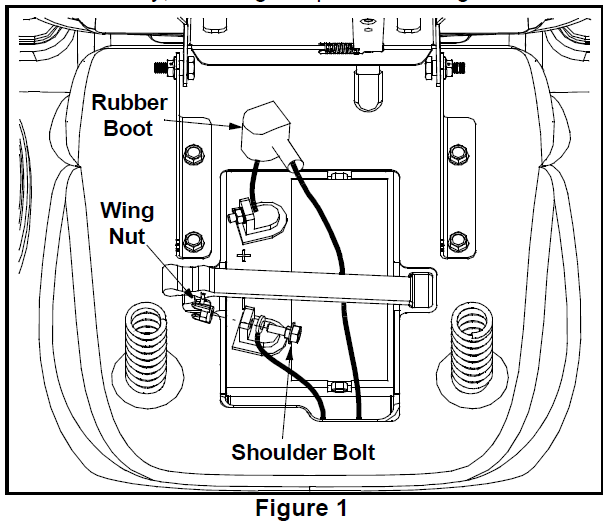
- The positive cable (heavy red wire) is secured to the positive battery terminal (+) with a carriage screw and hex nut at the factory. Make certain that the rubber boot covers the terminal to help protect it from corrosion.
- Remove the shoulder bolt and wing nut from the negative cable.
- Remove the black plastic cover, if present, from the negative battery terminal and attach the negative cable (heavy black wire) to the negative battery terminal (–) with the bolt and the wing nut.
- Make certain the hold-down strap is in position over the battery, securing it in place. See Figure 1.

NOTE: If the battery is put into service after the date shown on top of the battery, charge the battery as instructed on page 20 of this manual prior to operating the tractor.
Shipping Brace Removal
WARNING: Make sure the riding mower’s engine is off, remove the ignition key, and set the parking brake before removing the shipping brace.
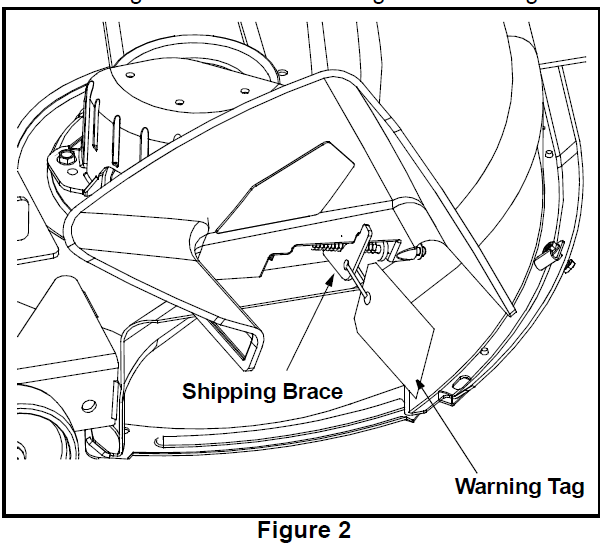
- Locate the shipping brace and warning tag found on the right side of the mower, between the discharge chute and the cutting deck. See Figure 2.

- While holding the discharge chute with your left hand, remove the shipping brace with your right hand by grasping it between your thumb and index finger and rotating it clockwise.
WARNING: The shipping brace, used for packaging purposes only, must be removed and discarded before operating your riding mower.
WARNING: The mowing deck is capable of throwing objects. Failure to operate the riding mower without the discharge cover in the proper operating position could result in serious personal injury and/or property damage.
Gas and Oil Fill-up
The gasoline tank is located under the hood and has a capacity of either two or three gallons. Do not overfill.
WARNING: Use extreme care when handling gasoline. Gasoline is extremely flammable, and the vapors are explosive.
Never fuel a machine indoors or while the engine is hot or running. Extinguish cigarettes, cigars, pipes, and other sources of ignition. Service the engine with gasoline and oil as instructed in the separate Briggs & Stratton Operator/Owner Manual packed with your tractor. Read instructions carefully.
IMPORTANT: Your tractor is shipped with motor oil in the engine. However, you MUST check the oil level before operating. Be careful not to overfill.
Identifying the Mulch Plug
On tractor models LTX-1842, a mulch plug can be found within the cutting deck’s discharge opening.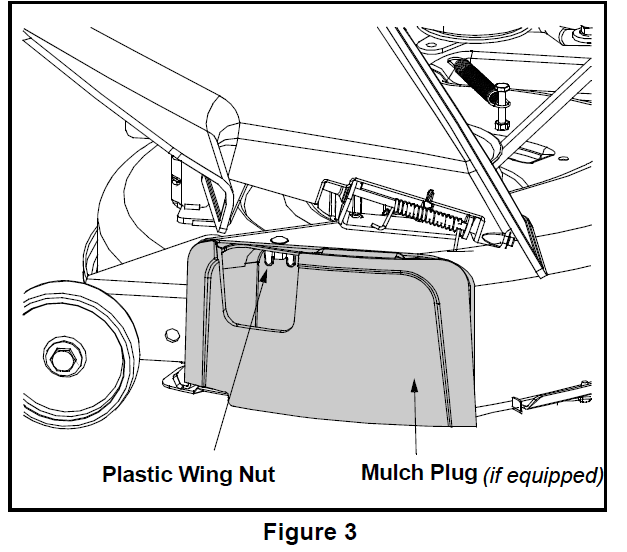
NOTE: Refer to Mulching on page 15 for more detailed information. If you’d prefer to operate the cutting deck without mulching, simply remove the mulch plug by unthreading the plastic wing nut that fastens it to the cutting deck. This will allow the clippings to discharge out of the discharge opening during operation. See Figure 3.
NOTE: On tractor models LTX-2146, the mulch kit is packed separately within the tractor’s crate.
KNOW YOUR LAWN TRACTOR
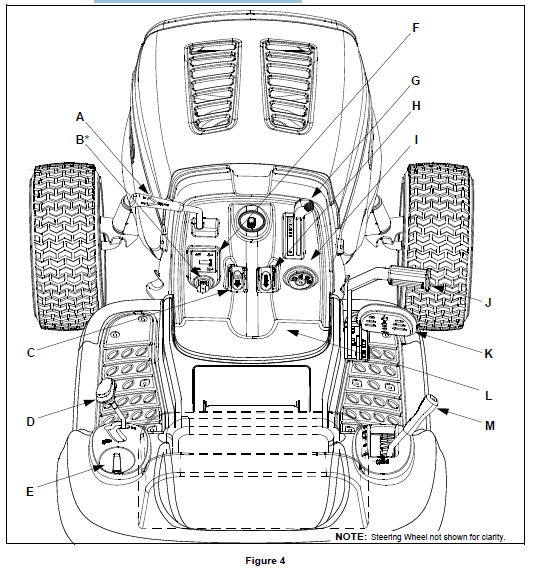
- A PTO (Power Take-off) Lever
- B Choke Control
- C Parking Brake Button
- D Shift Lever
- E Cup Holder
- F Systems Indicator Monitor/ Hour Meter
- G Throttle Control Lever
- H Cruise Control Button
- I Ignition Switch
- J Brake Pedal
- K Drive Pedal
- L Cargo Net (not shown)
- M Deck Lift Lever
Throttle Control Lever
The throttle control lever is located on the right side of the tractor’s dash panel. This lever controls the speed of the engine and, on model LTX-1842, when pushed all the way forward, the choke control also. When set in a given position, the throttle will maintain a uniform engine speed. See Figure 1.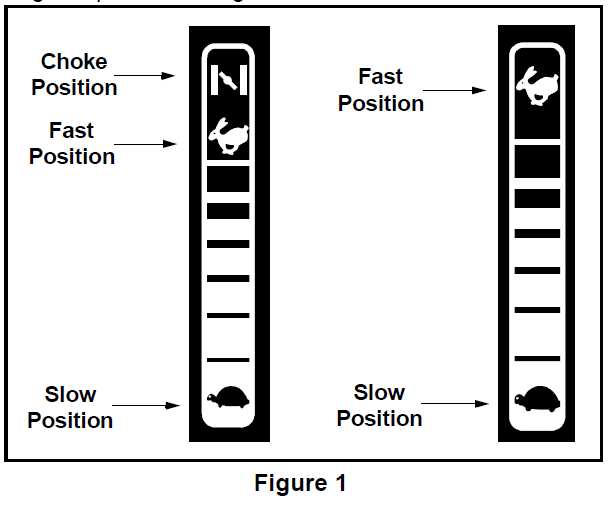
IMPORTANT: When operating the tractor with the cutting deck engaged, be certain that the throttle lever is always in the FAST (rabbit) position.
OPERATING YOUR LAWN TRACTOR
WARNING: Read, understand, and follow all instructions and warnings on the machine and in this manual before operating.
Setting the Cutting Height
Select the height position of the cutting deck by placing the deck lift lever in any of the six different cutting height notches on the right side of the fender. Then adjust the deck wheels so that they are between ¼-inch and ½-inch above the ground when the tractor is on a smooth, flat surface such as a driveway.
WARNING: Keep hands and feet away from the discharge opening of the cutting deck.
NOTE: The deck wheels are an anti-scalp feature of the deck and are not designed to support the weight of the cutting deck.
Refer to Leveling the Deck on page 17 of this manual for more detailed instructions regarding various deck adjustments.
Starting the Engine
WARNING: Do not operate the tractor if the interlock system is malfunctioning. This system was designed for your safety and protection.
NOTE: Refer to the TRACTOR SET-UP on page 8 of this manual for Gasoline and Oil fill-up instructions.
- Insert the tractor key into the ignition switch.
- Place the PTO lever in the disengaged (OFF) position.
- Engage the tractor’s parking brake.
- Activate the choke control.
- Turn the ignition key clockwise to the START position. After the engine starts, release the key. It will return to the ON position.
IMPORTANT: Do NOT hold the key in the START position for longer than ten seconds at a time. Doing so may cause damage to your engine’s electric starter.
- After the engine starts, deactivate the choke control and place the throttle control in the FAST position.
NOTE: Do NOT leave the choke control on while operating the tractor. Doing so will result in a “rich” fuel mixture and cause the engine to run poorly.
Mulching
Your tractor is equipped with a mulch kit, which incorporates special blades already standard on your tractor, in a process of recirculating grass clippings repeatedly beneath the cutting deck. The ultra-fine clippings are then forced back into the lawn where they act as a natural fertilizer. Observe the following points for the best results when mulching.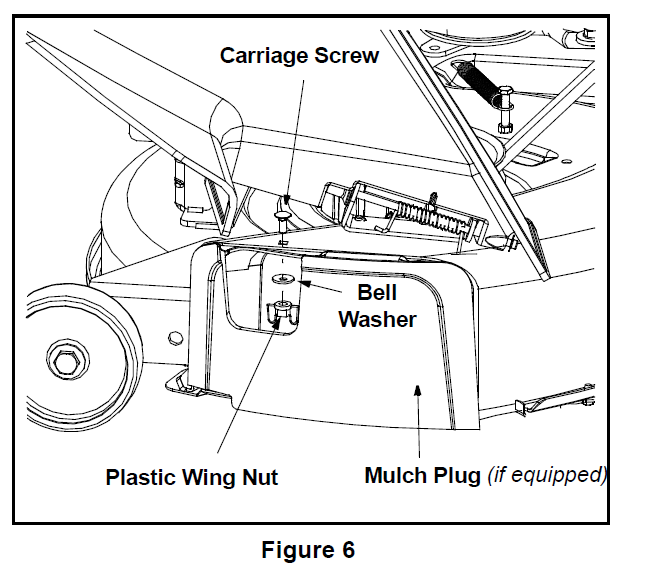
- Never attempt to mulch if the lawn is damp. Wet grass tends to stick to the underside of the cutting deck, preventing proper mulching of the clippings.
- Do NOT attempt to mulch more than 1/3 the total height of the grass or approximately 1-1/2 inches. Doing so will cause the clippings to clump up beneath the deck and not be mulched effectively.
- Maintain a slow ground speed to allow the grass clippings more time to be effectively mulched.
- Always position the throttle control lever in the FAST (rabbit) position and allow it to remain there while mowing. Failing to keep the engine at full throttle places strain on the tractor’s engine and does not allow the blades to properly mulch grass.
NOTE: It is not necessary to remove the discharge chute to operate the mower with the mulch kit installed. Do NOT remove the discharge chute when mulching.
42-inch Decks
To operate the cutting deck without mulching, simply remove the mulch plug by unthreading the plastic wing nut, which fastens it to the cutting deck. This will allow the clippings to discharge out the side. See Figure 6 .
46-inch Decks
The mulch kit is packed separately within the tractor’s crate. Observe the instructions included with the mulch kit for the best results when mulching.
MAKING ADJUSTMENTS
WARNING: Never attempt to make any adjustments while the engine is running.
WARNING: Disconnect the spark plug wire(s) and ground against the engine before performing any adjustments, repairs, or maintenance.
Steering Adjustment
If the tractor turns tighter in one direction than the other, or if the ball joints are being replaced due to damage or wear, the steering drag links may need to be adjusted. Adjust the drag links so that equal lengths are threaded into the ball joint on the left side and the ball joint on the right side: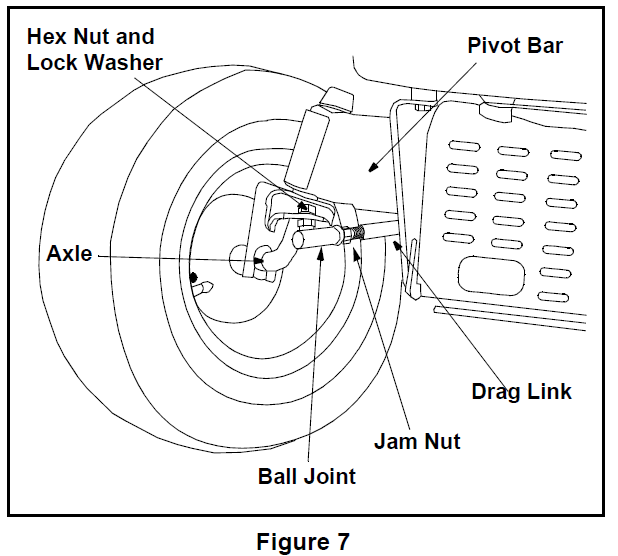
- Loosen the jam nut found on the drag link at the rear of the ball joint. See Figure 7.
- Remove the hex nut and lock washer on the top of the ball joint. See Figure 7.
- Thread the ball joint toward the jam nut to shorten the drag link. Thread the ball joint away from the jam nut to lengthen the drag link.
- Replace the hex nut and lock washer, and retighten the jam nut after proper adjustment is achieved.
NOTE: Threading the ball joints too far onto the drag links will cause the front tires to “toe-in” too far. Proper toe-in is between 1/16″ and 5/16″. Front tire toe-in can be measured as follows: - Place the steering wheel in position for straight-ahead travel.
- In front of the axle, measure the distance horizontally from the inside of the left rim to the inside of the right rim. Note the distance.
- Behind the axle, measure the distance horizontally from the inside of the left rim to the inside of the right rim. Note the distance.
- The measurement taken in front of the axle should be between 1/16″ and 5/16″ less than the measurement taken behind the axle. Adjust if necessary.
MAINTAINING YOUR LAWN TRACTOR
WARNING: Before performing any maintenance or repairs, disengage PTO, move the shift lever into the neutral position, set the parking brake, stop the engine, and remove the key to prevent unintended starting.
Engine
Refer to the Briggs & Stratton Operator/Owner Manual for engine maintenance instructions. Check engine oil level before each use as instructed in the Briggs & Stratton Operator/Owner Manual packed with your unit. Follow the instructions carefully.
Changing Engine Oil
NOTE: Depending on the engine model found on your tractor, it may be necessary to remove the tractor’s side panel in order to replace the oil filter (if so equipped).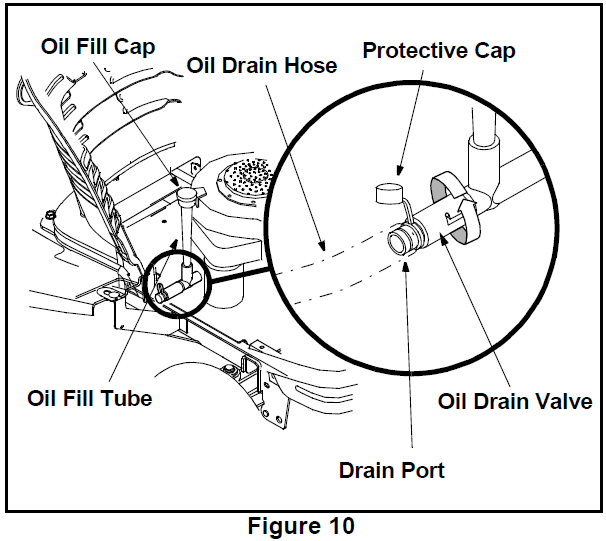
- Unscrew the oil fill cap and remove the dipstick from the oil fill tube. See Figure 10.
- Pop open the protective cap on the end of the oil drain valve to expose the drain port. See Figure 10.
- Push the oil drain hose (packed with this manual) onto the oil drain port. Route the opposite end of the hose into an appropriate oil collection container with a capacity of no less than 64 oz.
- Push the oil drain valve in slightly, then rotate counterclockwise and pull outward to begin draining oil. See Figure 10.
- Service the oil filter (if so equipped) as instructed in the separate Briggs & Stratton Operator/Owner Manual packed with your unit. Perform the above steps in the opposite order after the oil has finished draining.
- Refill the engine with new motor oil.
IMPORTANT: Refer to the Briggs & Stratton Operator/ Owner Manual that is packed with your unit for information regarding the quantity and proper weight of motor oil.
Air Cleaner
Service the pre-cleaner, if so equipped, and cartridge/ air cleaner element as instructed in the Briggs & Stratton Operator/Owner Manual packed with your unit.
Spark Plug(s)
The spark plug(s) should be cleaned and the gap reset once a season. Spark plug replacement is recommended at the start of each mowing season. Refer to the Briggs & Stratton Operator/Owner Manual for the correct plug type and gap specifications.
SERVICE
Battery
The battery is sealed and is maintenance-free. Acid levels cannot be checked.
- Always keep the battery cables and terminals clean and free of corrosive build-up.
- After cleaning the battery and terminals, apply a light coat of petroleum jelly or grease to both terminals.
- Always keep the rubber boot positioned over the positive terminal to prevent shorting.
IMPORTANT: If removing the battery for any reason, disconnect the NEGATIVE (Black) wire from its terminal first, followed by the POSITIVE (Red) wire. When re-installing the battery, always connect the POSITIVE (Red) wire to its terminal first, followed by the NEGATIVE (Black) wire. Be certain that the wires are connected to the correct terminals; reversing them could change the polarity and cause damage to your engine’s alternator system.
Charging
If the unit has not been put into use for an extended period of time, charge the battery with an automotive-type 12-volt charger for a minimum of one hour at six amps.
WARNING: Batteries give off an explosive gas while charging. Charge the battery in a well-ventilated area and keep away from an open flame or pilot light, such as on a water heater, space heater, furnace, clothes dryer, or other gas appliances.
Fuses
Two fuses are installed in your tractor’s wiring harness to protect the tractor’s electrical system from damage caused by excessive amperage. If the electrical system does not function, or your tractor’s engine will not crank, first check to be certain that the fuse has not blown. One can be found under the hood, mounted behind the top of the dash panel on the support bar. The other can be found under the seat, mounted to the inside of the tractor frame next to the battery tray. Pull the fuse out and inspect it to determine if it is good or blown.
WARNING: Always use a fuse with the same amperage capacity for replacement.
Changing the Deck Belt & PTO Belt
WARNING: Be sure to shut the engine off, remove the ignition key, disconnect the spark plug wire(s), and ground against the engine to prevent unintended starting before removing the belt(s).
All belts on your tractor are subject to wear and should be replaced if any signs of wear are present.
IMPORTANT: The V-belts found on your tractor are specially designed to engage and disengage safely. A substitute (non-OEM) V-belt can be dangerous if it does not disengage completely. For a properly working machine, use factory-approved belts. To change or replace the deck belt and PTO belt on your tractor, proceed as follows:
- Lower the deck by moving the deck lift lever into the bottom notch on the right fender.
- Remove the belt guards by removing the self-tapping screws that fasten them to the deck.
- Grasp the rearmost portion of the PTO idler bracket and pivot it toward the discharge chute to relieve tension on the PTO belt.
- Remove the PTO belt from around the engine pulley (and from around the PTO idler pulley(s).
- Grasp the deck idler pulley and pivot it toward the left to relieve tension on the deck belt.
- Remove the deck belt from around all pulleys, including the deck idler pulley.
- Route the new belts (deck belt first) as shown in Figure 14 or Figure 15.
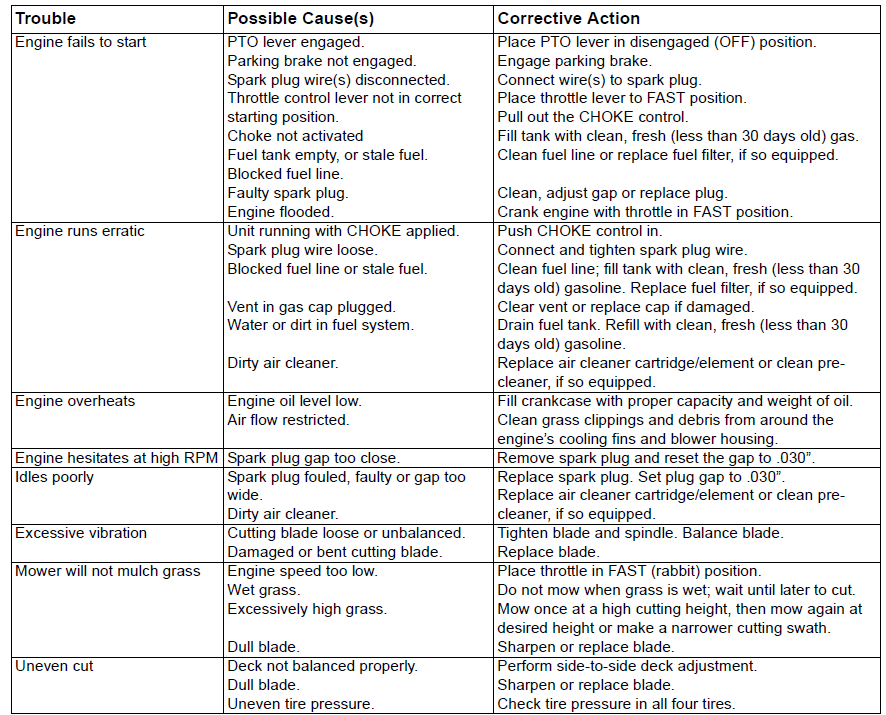
TROUBLESHOOTING
For more manuals by Troy-Bilt, visit ManualsLibraryy
Troy-Bilt LTX-1842 Lawn Tractor-FAQs
Why won’t my Troy-Bilt mower start?
A no-start issue may be caused by old fuel, a dirty carburetor, a clogged fuel filter, bad spark plugs, or a weak battery.
Why does my Troy-Bilt mower start and then stop?
This often happens due to fuel delivery problems, such as a clogged fuel filter, dirty carburetor, or a failing spark plug.
How do I maintain a Troy-Bilt LTX-1842?
Check and tighten blades and mounting bolts regularly, change the oil, replace air and fuel filters, sharpen the blades, and clean the mower deck to prevent buildup.
What type of oil should I use?
SAE 5W-30 engine oil is recommended for Troy-Bilt riding mowers.
How often should I change the oil?
Change the oil every 50 hours of use or once per mowing season, whichever comes first.
How long does a riding mower last?
With proper maintenance, a Troy-Bilt riding mower can last 500–700 hours, and in some cases up to 1,000 hours.
How long does a lawn tractor battery last?
On average, riding mower batteries last between 3–5 years with regular care.
Where is Troy-Bilt equipment made?
Most Troy-Bilt lawn and garden equipment is manufactured and assembled in the United States.
Is Troy-Bilt a good mower brand?
Yes. Troy-Bilt mowers are known for their durability, easy operation, and strong performance for residential lawn care.

