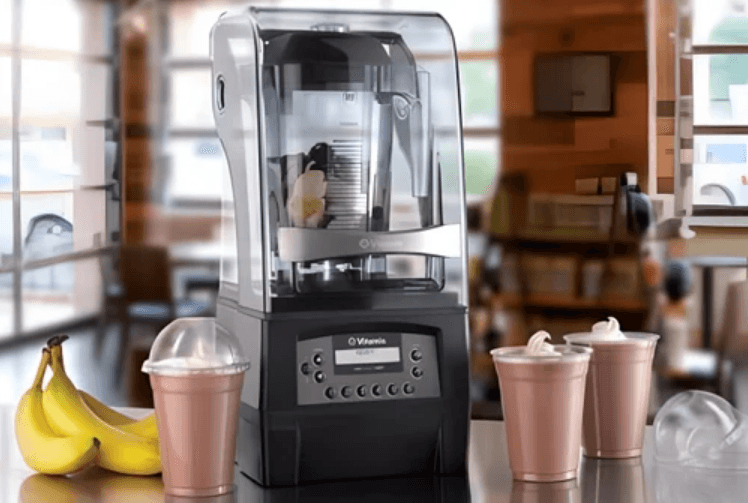
Vitamix 36019 36019-1 Vita-Mix Quiet One Blender
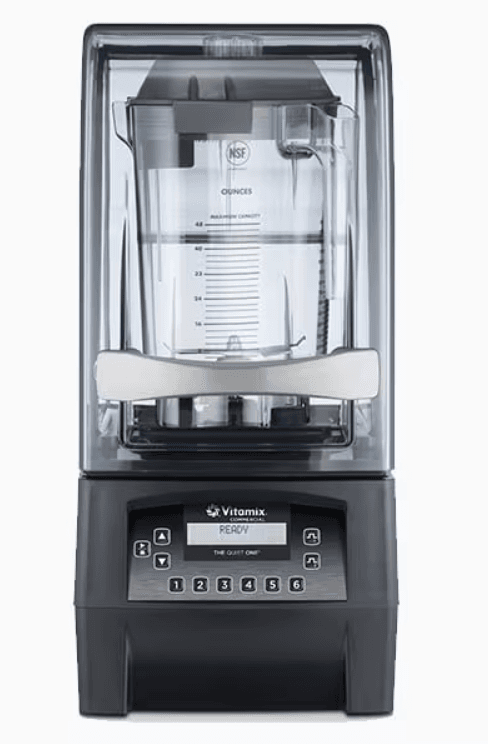
Dimensions:
- 18.0 in. / 45,7 cm high with lid closed
- 24.5 in. / 62,2 cm high with lid open
- Depth: 10.7 in. / 27,2 cm with handle
- Width: 8.5 in. / 21,6 cm

Important Safeguards
READ ALL INSTRUCTIONS, SAFEGUARDS, AND WARNINGS BEFORE OPERATING THE BLENDER.
- Read all instructions.
- DO NOT IMMERSE. To protect against the risk of electrical shock, do not put the motor base in water or other liquids.
- Children should be supervised to ensure that they do not play with the appliance.
- This appliance is not intended for use by persons (including children) with reduced physical, sensory or mental capabilities, or lack of experience or knowledge, unless they have been given supervision or instruction concerning use of the appliance by a person responsible for their safety.
- Appliances can be used by persons with reduced physical, sensory, or mental capabilities or a lack of experience and knowledge if they have been given supervision or instruction concerning the use of the appliance in a safe way and if they understand the hazards involved.
- This appliance shall not be used by children. Keep this appliance and its cord out of reach of children. Children shall not play with this appliance.
- Unplug the power cord from the wall outlet when the Vitamix® machine is not in use, before disassembling, when putting on or taking off parts, and before cleaning, other than washing the container.
- Never come in contact with moving parts, especially the blades.
- If the supply cord is damaged, it must be replaced by the manufacturer, its service agent or similarly qualified persons to avoid a hazard.
- Do not operate any machine that malfunctions, has a damaged cord or plug, has been dropped or is damaged in any manner. If you purchased your equipment in the U.S.A., call Vitamix Technical Support, 800-886-5235 for examination, repair, possible replacement, or electrical or mechanical adjustment. If you purchased outside of the U.S.A., please get in touch with your local authorized Vitamix Distributor, or contact the Vitamix International Division at +1.440.782.2450 or email: [email protected] for a distributor near you.
- Do not use attachments not recommended or sold by Vitamix. Doing so will void the warranty. Alteration or modification of this product in any form is not recommended, as such may result in bodily injury.
- Do not use outdoors.
- Do not let the power cord touch hot surfaces or hang over the edge of the table or counter.
- Be careful if hot liquid is poured into the blender, as it can be ejected out of the appliance due to sudden steam.
- Do not place the machine on or near a hot gas or electrical burner, in a heated oven, or allow the machine to touch hot surfaces. External heat sources can damage the machine.
- Keep hands and utensils out of the container while the motor is running to prevent the possibility of severe personal injury and/or damage to the Vitamix machine. A rubber spatula may be used, but only when the Vitamix machine is not running.
- WARNING: Blades are sharp. Handle carefully.
- Never try to remove the blades while the container is sitting on the motor base.
- Do not operate with loose, nicked, or damaged blades – replace immediately.
- To reduce the risk of personal injury, never place the blade assembly on the motor base without the Vitamix container properly attached.
- Care shall be taken when handling the sharp cutting blades, emptying the bowl, and during cleaning.
- The maximum capacity is equivalent to the ounces (liters) listed on the container, i.e., 48 oz. / 1.4 L, and is substantially less with thick mixtures.
- Always operate the Vitamix machine with the lid in place and securely attached.
- The display window area will scratch when contacted with a scouring pad or sharp object. Use a soft cloth to wipe the control panel area clean.
- The machine cannot be cleaned with a water jet.
- The 20-amp circuit per machine is recommended for a 120V installation. One dedicated circuit per machine is recommended for 220- 240V and 100V-110V installations. Consult your local electrical codes for proper installation.
- CAUTION: Turn the power off or unplug the machine before touching movable parts. Shut off the power switch at night or whenever the machine will be left unattended.
Save These Safety Instructions
- The Vitamix blender’s U.S.A. power cord comes equipped with a three-prong (grounding) plug that mates with a standard three-prong wall outlet (Figure A). This cord will vary for countries outside the USA.
- Do not cut or remove the third (ground) prong from the plug or power cord.
- Consult your electrician if you are not sure if the wall outlet is grounded through the building wiring.
General Instructions
Instructions for Using the Pre-Set Program Buttons
The following are the basic settings of the six preset buttons for The Quiet One®. These programs, numbered 1 through 6, are blending cycles designed for the most commonly made drinks. Depending on the viscosity of the drink you are creating, selecting one of the Pre-Set programs will run the machine for a full cycle. The machine will stop by itself when the cycle is complete. A cycle varies in speed and length. Your machine’s Pre-Set options may differ due to program revisions or due to the difference in recipes; your results may also vary.
- BUTTON 1: General Purpose / Smoothie – blends smoothies and thin drinks consisting of juice and ice to a creamy consistency. (:18)
- BUTTON 2: Double Smoothie – blends similar drinks to those of button 1 but at larger volumes. (:18)
- BUTTON 3: Frozen Coffee and Juices – blends light coffee drinks to a creamy consistency. (:18)
- BUTTON 4: Ice Cream Drinks – blends drinks containing hard ice cream to a thick shake consistency. (:28)
- BUTTON 5: Double and hard-to-blend ice cream drinks. (:20)
- BUTTON 6: Thick Hard-to-blend Smoothie – blends thick frozen fruit & hard ingredients for a thick but consistent smoothie. (:28)
Maintenance Tips
- Never bang the container against a surface to loosen the ingredients. Remove the container from the base and use a rubber spatula to remove thick mixtures from the bottom of your container.
- Never shake or rattle a container while in use.
- Never remove the container before the machine has come to a complete stop.
- Never start the motor before the container is in place.
Control Panel
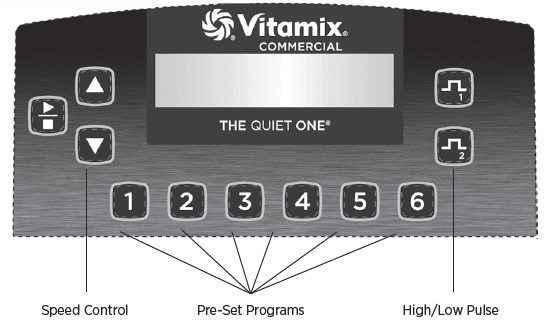
- On/Off Power Switch: Located on the back of the motor base, the On/Off switch controls the power to the machine. While plugged in, switch to on to ready the machine for blending. Shut off the power switch at night or whenever the machine will be left unattended.
- Start/Stop Button: Pressing Start(
 )/Stop(
 ) once starts and runs the machine and turns the blade. Press the Start/Stop button again to stop the machine and the blade.
 - Speed Buttons: Press the button
 to gradually increase the speed of the blade in increments of 1%, up to 100%. Press the
 button to gradually decrease the speed of the blade in increments of 1%, down to 7%. Speed is used to set the blending speed of the Pulse buttons and the Start/Stop button.
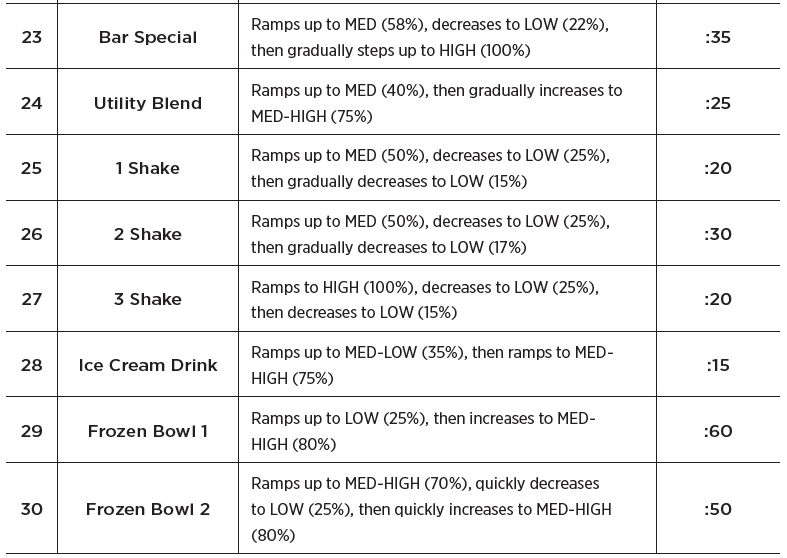
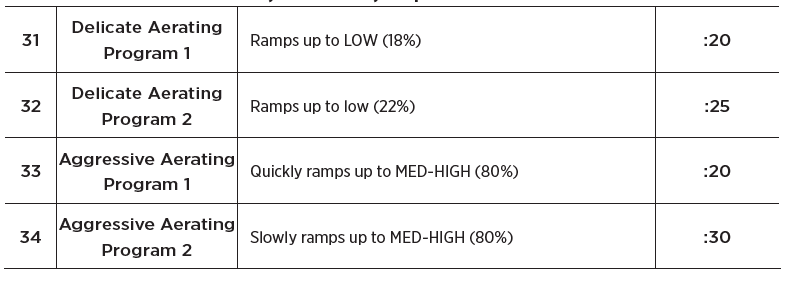
 - Pre-Set Program Buttons: These buttons, numbered 1 through 6, are pre-programmed blending cycles designed for the most commonly made drinks. Depending on the viscosity of the drink you are creating, pressing one of the six Pre-Set program buttons will run the machine for a full cycle. The machine will stop by itself when the cycle is complete. A cycle varies in speed and length. Each button can be reprogrammed to any recipe through custom programming or by reprogramming to any of the 34 available recipes. Due to differences in recipes, your results may vary.
- Display Window: This area, depending on which button is pressed, displays a variety of operation messages. A “Ready” message appears when there is power to the machine.

- Owner Controls: The control panel is accessible by activating the Power Switch located on the back of the motor base while pressing button 2.
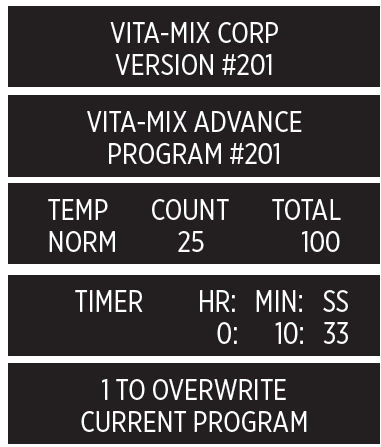
- Once the unit powers up, the display will cycle through three screens. The first indicates the current program version. The second indicates which program is running on the machine. The third will indicate the motor temperature (NORM, WARM, HOT), and the total hours of operation, including production and testing. This time can not be cleared. Once this screen is reached, button 2 can be released.
- Press button 2 within 12 seconds to scroll through the menu settings.
- The first press will reveal the timer. Total operation is recorded in hours, minutes, and seconds, including production and testing. This time cannot be cleared.
- The second press will reveal the name of the program controlling the Pre-Set buttons. If you are using the Advance® settings, this will read “VITA-MIX ADVANCE PROGRAM.”
- The third press will reveal an option to reset the Pre-Set buttons to the original factory settings.
Programming
The Quiet One® is pre-programmed with an Advance® program, which is optimized for the Advance® container. The program can be customized by using the control panel, a programming chip or a programmer software kit available from Vitamix®. Call your distributor or customer service for more information.
Programming Pre-Set Buttons
- Access the 34 stored programs by activating the power switch located on the back of the motor base while pressing the High Pulse button. The display will say “BUTTON SET UP.”
- Press the Speed or buttons to scroll through the “Recipe” numbers until you reach the one you want.
- Press the Pre-Set button that you want to program for the recipe selected.
For Example, if you wanted to program button 1 with recipe #17: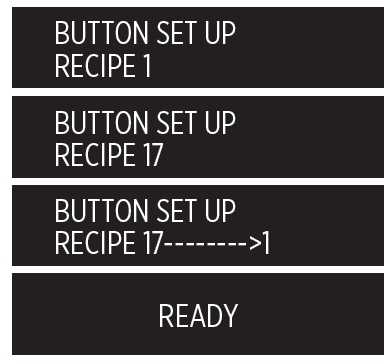
- After accessing the stored programs as described in step 1, the display window will say “BUTTON SETUP.”
- Press the Speed
 or
or button until the screen displays “Recipe 17.”
 - Press the 1 button to apply Recipe 17.
- Either continue programming the other five buttons or press the High Pulse button to exit and continue blending.
Programming your Machine with a Custom Chip
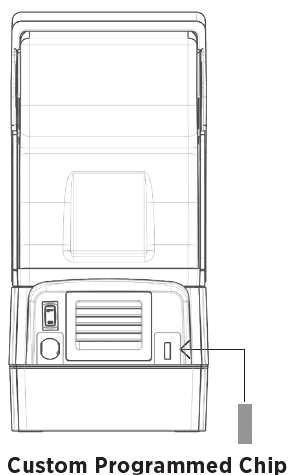
- Turn on the machine.
- Remove the container and rotate the machine to the rear so that you can see the programming port.
- With the rear of the machine facing towards you, insert the custom programmed chip (with the words, “THIS SIDE FACING TO THE FRONT OF THE MACHINE” toward the left) into the port located on the right-hand side of the machine opposite the On/Off switch. Push gently until the chip engages in the port. The display window will read “NEW MODULE.”
- Within 10 seconds, the six Pre-Set buttons will be re-programmed and the display window will read “Saved” then “Ready.”
- Remove the programming chip, return it to the original package, and store it in a safe, easily accessible spot.
- Press one of the six preset buttons to reveal, in the display window, the name of the program/drink.
Resetting the Pre-Set Buttons to the original factory settings
- Access the Owner Controls by activating the power switch located on the back of the motor base while pressing button 2.
- Once the unit powers up, it will cycle through three screens and then stop on the motor status screen. Press button 2 again, within 12 seconds, to scroll through the menu settings.
- Scroll using button 2. The screen will display “1 TO OVERWRITE CURRENT PROGRAM”. Press button 1 to reset to the original factory settings.
IMPORTANT NOTES!
Programming Chip: If the above programming steps are taken and the custom programming does not appear with the first blend cycle, turn the chip 180˚(side-to-side) and try again.
Recipe Options Arranged by recipe number (#) and drink type: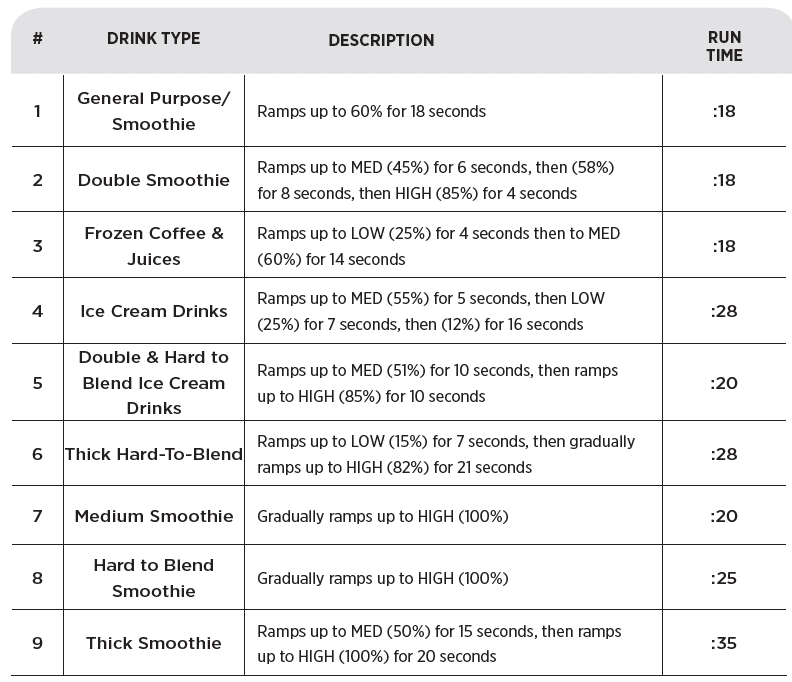
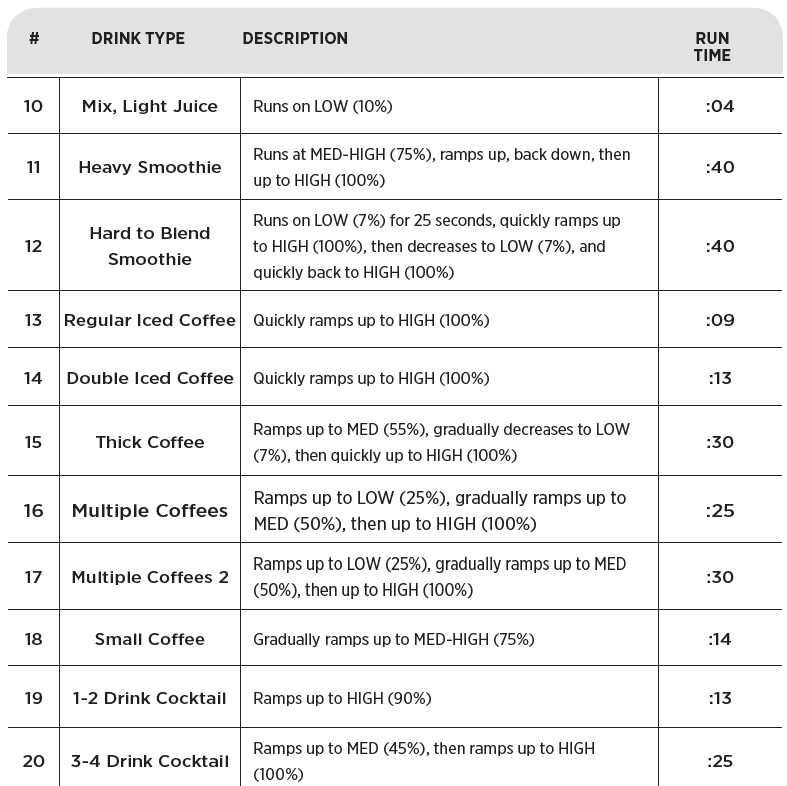
 The following programs are designed to be used with the Vitamix Aerating Container (sold separately). Contact your local Vitamix Dealer/Distributor to purchase the Aerating Container. Contact Vitamix Customer Service directly for availability and product information.
Machine Assembly
Cover Door
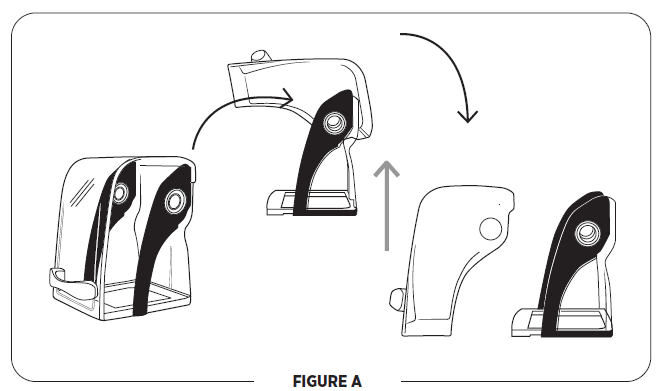
- Lift the handle to open the cover. Gently spread the sides of the door over the round hinges and remove.
- To reinstall the cover door, gently spread the sides of the door and place the door hinge cutouts over the round hinges.

IMPORTANT NOTES!
Containers:
- The Quiet One® machines are optimized for use with the Vitamix® 48 oz. / 1,4 L Advance® container (3 sided container). The 64 oz. / 2,0 L standard container will not fit in the compact cover used on the The Quiet One®. Contact Vitamix customer service at 800-886-5235 or contact your distributor for more information.
- Outside the United States and Canada, your machine may come with a different container configuration.
Twist Lock Compact Cover Removal
Note: The twist lock cover is designed to be removed without the use of tools. DO NOT force the cover to rotate with tools or other objects. To avoid damaging the cover, apply pressure to the cover frame, not the clear plastic material.
To remove the cover, pressure will be applied at two points to disengage the cover from the locking tabs on the motor plate. To remove the twist lock sound enclosure:
- Remove the compact cover door to prevent it from closing unexpectedly. Lift the handle to open the cover. Gently spread the sides of the door over the round hinges and remove.
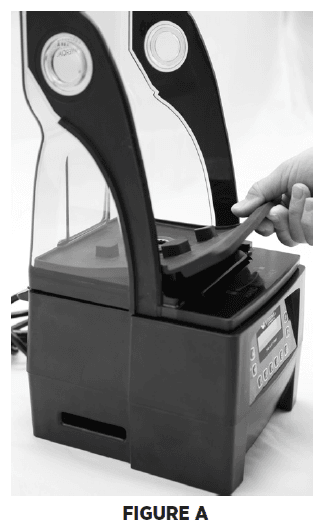
- Lift up on the front of the centering pad and peel away from the motor base. Lift it up and over the drive socket to remove. (See Figure A).

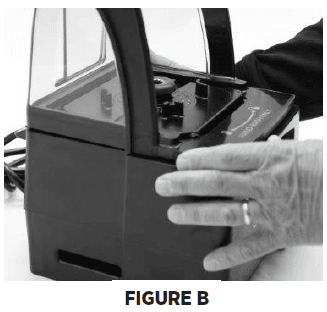
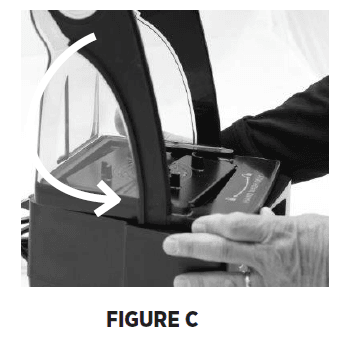
- Grasp the bottom frame of the cover with two hands as shown in (See Figure B). With equal pressure and in one motion, use the index finger of your left hand to apply pressure at the back of the cover frame while at the same time apply pressure with your right thumb to unlock and twist the cover away from the center in a counter-clockwise direction (See Figure C).


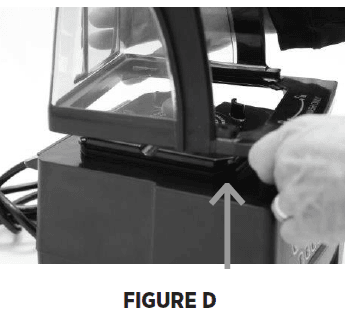
- If necessary, continue applying pressure at these two points until the cover is free and can be separated from the motor base (See Figure D).
- Once disengaged, lift the cover up and away from the blender base (See Figure D).
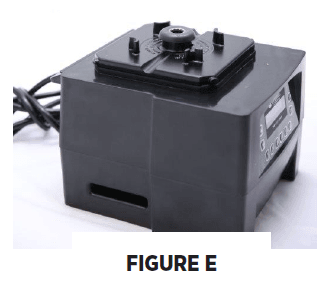
 Note: See Figure E for an example of the motor base with the twist lock compact cover removed.
Twist Lock Compact Cover FAQ’s
Q: My blender has a different type of sound cover. Can I use the new twist lock cover?
A: If your blender has the locking tab motor adapter design, you can use a twist lock cover. The twist lock cover requires the centering pad shown in Figure E. The centering pad can be ordered using Vitamix Item Number 067791.
Q: I have a new blender with a twist lock cover. Can I use my old magnetic-style cover on this machine?
A: No, the older blenders had magnets in the blender base that held the cover in place. The new twist lock motor bases do not include magnets.
Q: My twist lock blender does not have an isolation gasket. Do I need one?
A: No, with the new twist lock cover, the isolation gasket is not needed.
Q: I have a blender with a twist lock motor adapter plate, an isolation gasket, and a magnetic style cover. Can I switch to the new twist lock design?
A: Yes, you can use either type of cover on this design.
Q: I have several older units with magnetic sound covers. I purchased a new blender, and it has a twist-lock cover. I would like to switch all my blenders to the twist lock design.
A: Vitamix is currently not offering an upgrade package to convert your old motor base to a twist lock design.
Q: My blender was repaired, and it was returned it has a twist lock motor plate. Can I still use my magnetic cover and isolation gasket?
A: Yes, you can still use your magnetic style sound cover, or you can upgrade to the new twist lock sound cover and eliminate the isolation gasket.
Caring for Your Machine
IMPORTANT NOTES!
- Cleaning Products: Do not use abrasive cleaning agents or concentrated bleach when cleaning. Do not use any of the following cleaning products: automatic dishwashing detergents, oven cleaners, steel wool, or other abrasive pads.
- Cover: Do not wash the cover, door, handle, or back cover in the dishwasher. It is recommended that the handle not be disassembled during cleaning. However, if you choose to disassemble the handle from the cover, make sure not to over-tighten it when reattaching it to the cover. Doing so will cause damage.
- Container: Do not let mixtures, liquids, or food products dry in the container. Rinse after use. Dry product may lock around the blade and weaken/tear the bearings seal when restarted. Do not place containers in the freezer. Extremely low temperature combined with hot ingredients and/or the immediate rapid action of the blade may crack the container. Microwaving and automatic dishwashing are not recommended.
- Blade Assembly: Do not soak the blade agitator assembly.
* Be sure to unplug the blender and wring excess water out of the cloth or sponge when cleaning around the controls or any electrical part.
** Recommended sanitizing solution: 1.5 tsp. / 7,4 ml institutional or household bleach in 2 qt. / 1,9 L water.
- Motor Base/Control Panel: Unplug the power cord and gently wash the outside surface with a damp, soft cotton cloth moistened with a mild solution of warm water* and nonabrasive detergent or nonabrasive liquid spray cleaner. Be careful not to scratch or scrub the display window on the control panel. Never immerse the motor base in water or other liquids. Dry with a soft cotton cloth.
- Lid: Wash in warm, soapy water. Rinse clean under running water and dry.
- Cover Door: The cover can be removed and cleaned by placing it under running water and washing with a soft cloth. Wipe dry and replace on the base.
- Container Centering Pad: Remove the centering pad. Wash the pad in warm, soapy water. Rinse clean under running water and dry. Reassemble before use. Replace the sound enclosure. The centering pad should be flat on the motor base.
- Container: The Advance® container has been designed to be chemical resistant. However, for maximum container life, hand washing is recommended.
- To Clean: Wash all container parts in warm, soapy water. Rinse and drain. Do not soak the blade assembly.**
- To Sanitize: After all solid residue is removed, fill container 3/4 full with a sanitizing solution mix.*** Return the container to the motor base and firmly position the two-piece lid. Run the machine on a high speed for 30 seconds. Turn the machine off and allow the mixture to stand in the container for an additional 1 1/2 minutes. Pour out the contents. Return the container to the motor base and run the machine empty for an additional 5 seconds. Do not rinse after sanitizing. Allow the container to air dry.
Troubleshooting
For more manuals by Vitamix, visit ManualsLibraryy
Vitamix 36019 36019-1 Vita-Mix Quiet One Blender-FAQs
How do I turn on the Vitamix Quiet One?
Press the Power Switch (right side of the base). The blender won’t run if the switch is off.
What are the speed settings?
The Variable Speed Dial (1–10) lets you control blending:
Low (1–3) for chopping/pulsing
Medium (4–7) for sauces/dips
High (8–10) for smooth purées/soups
How do I use Pulse mode?
Toggle the Pulse Switch for short bursts to chop ingredients without over-blending.
Why does my Vitamix stop mid-blend?
Overheating: The motor has Auto Overload Protection. Wait 45+ minutes to cool.
Container misalignment: Ensure it’s fully seated on the base.
Can it blend hot soup?
Yes! Blend hot ingredients (up to boiling) for 5–6 minutes—friction heats soups to serving temperature.
Can it crush ice?
Yes. Use Speed 10 with liquid to protect blades.
Can it grind coffee/nuts?
Yes, but use the Dry Grains Container (sold separately) for best results.
How do I clean the blender?
Fill halfway with warm water + drop of dish soap.
Blend 30–60 seconds on High.
Rinse/dry thoroughly.
Do blades need sharpening?
No! Vitamix blades are hammermill-style and self-maintain. Replace if dull (see warranty).
How often should I replace the blade assembly?
Inspect weekly. Replace if:
Blades spin too freely (“pinwheeling”).
Blending performance declines.

