
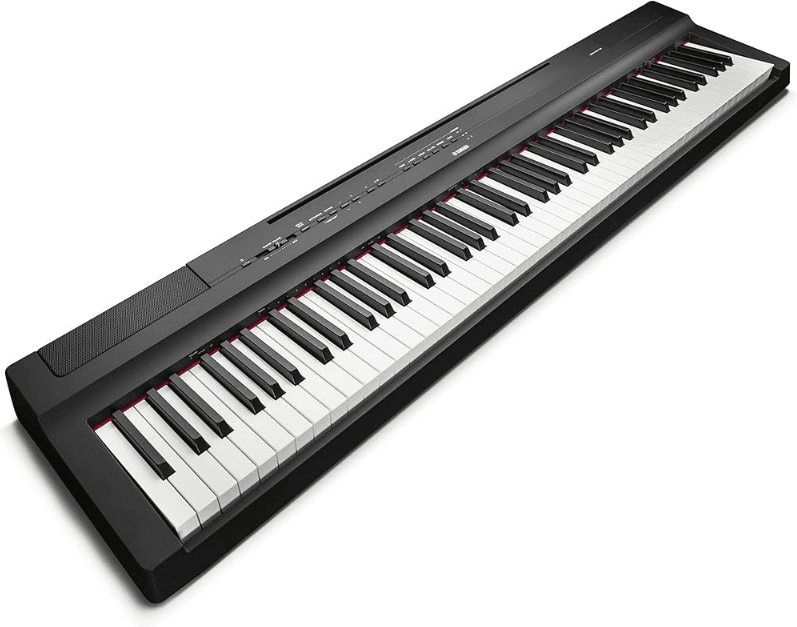
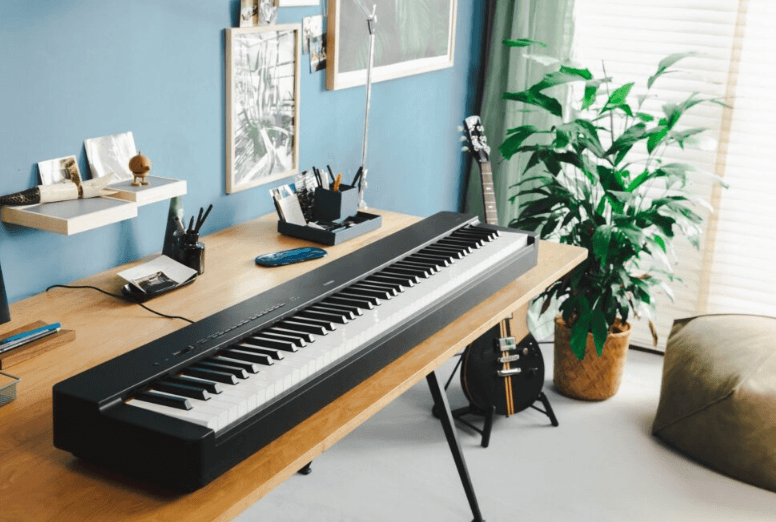
Yamaha P-125 Digital Piano
About the Key Operations
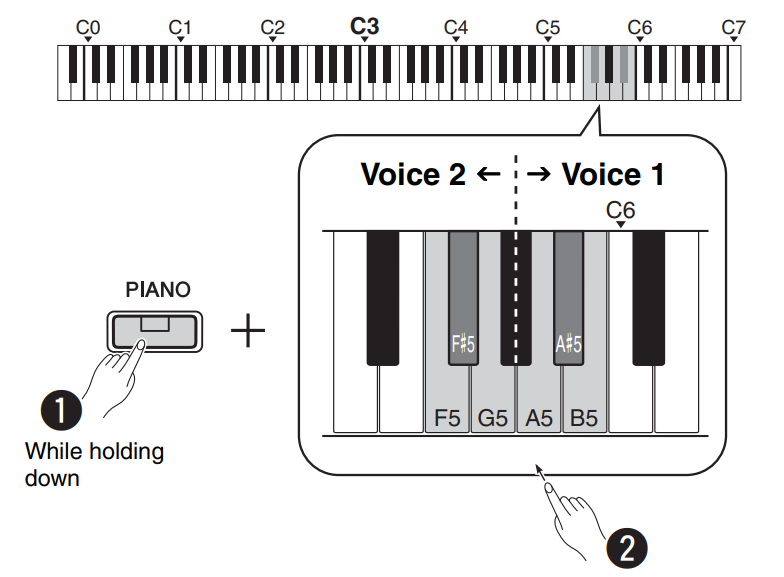
While holding down the button(s), press the appropriate key to make various settings, such as turning the function on or off, playing back the Songs and so on. If you come across the illustrations like those below in this manual, press the same key while holding down the same button(s) as illustrated.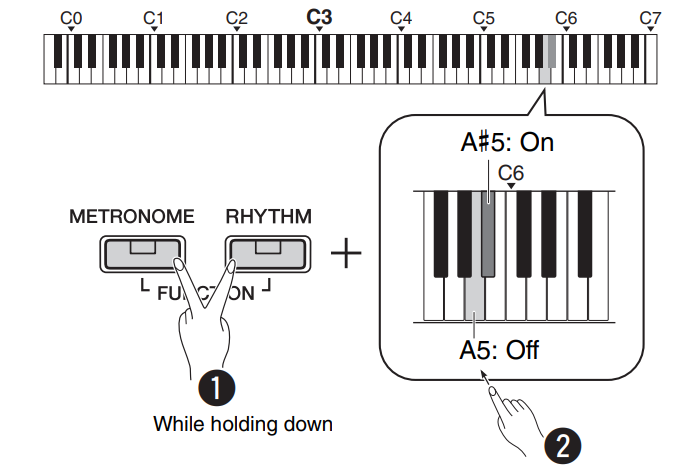
The above illustration indicates
- While simultaneously holding down the [METRONOME] and [RHYTHM] buttons…
- Press one of the shaded keys briefly. Finally, release all the buttons.
Included Accessories
- Owner’s Manual x1
- AC Adaptor* x1
- Warranty* x1
- Online Member Product Registration x1
- Footswitch x1
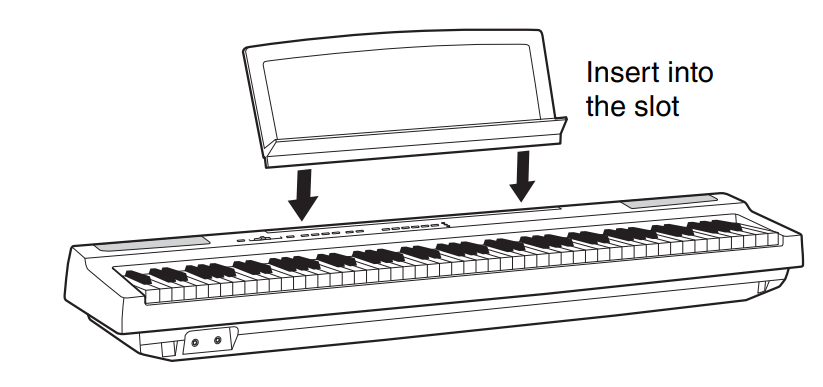
* May not be included depending on your particular area. Please check with your Yamaha dealer. - Music Rest x1
Panel Controls and Terminals
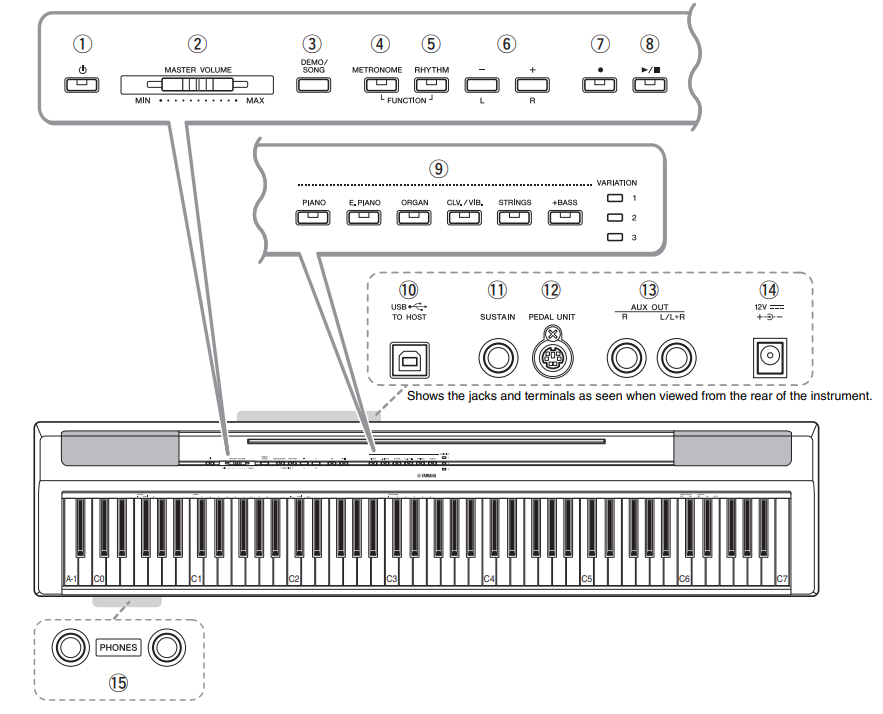

- (Standby/On) switch
For turning the power on or setting it to standby. - [MASTER VOLUME] slider
For adjusting the volume of the entire sound - [DEMO/SONG] button
For playing the Demo Songs and the Preset Songs. - [METRONOME] button
For starting or stopping the metronome. - [RHYTHM] button
For starting or stopping the rhythm - [-][+], [L][R] buttons
For selecting a Song during playback, adjusting the tempo, and selecting the Song part for recording and playback. - (Record) button
For recording your keyboard performance. - (Play/Stop)
For playing back or stopping the recorded performance. - Voice buttons
For selecting a Voice or two Voices played simultaneously, such as Piano and Organ. - [USB TO HOST] terminal
For connecting to a computer or a smart device such as an iPhone or iPad. - [SUSTAIN] Jack
For connecting the included footswitch, an optional footswitch, and a foot pedal. - [PEDAL UNIT] jack
For connecting an optional pedal unit. - AUX OUT [R][L/L+R] jacks
For connecting external audio equipment. - DC IN jack
For connecting the power adaptor. - [PHONES] jacks
For connecting a set of standard stereo headphones.
Setting Up
Power Requirements
Connect the AC adaptor in the order shown in the illustration.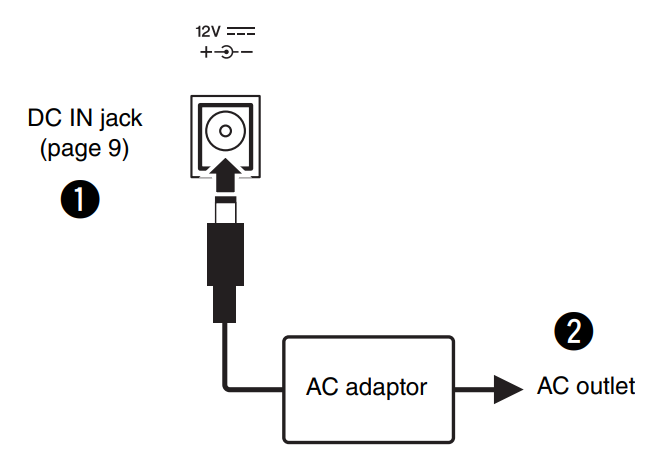
WARNING
- Use the specified AC adaptor (page 25) only. Using the wrong AC adaptor can result in damage to the instrument or overheating.
- When using the AC adaptor with a removable plug, make sure to keep the plug attached to the AC adaptor. Using the plug alone can cause electric shock or fire.
- Never touch the metallic section when attaching the plug. To avoid electric shock, short circuit or damage, also be careful that there is no dust between the AC adaptor and plug.
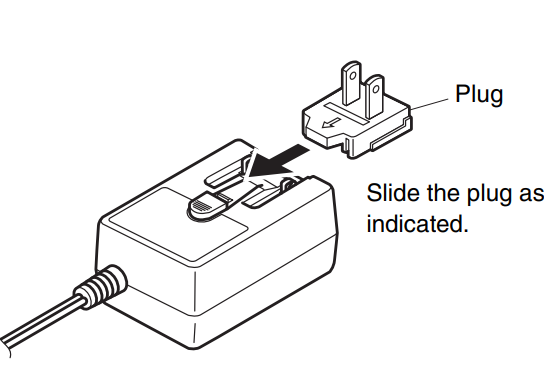 * The shape of the plug differs depending on your area.
CAUTION: When setting up the product, make sure that the AC outlet you are using is easily accessible. If some trouble or malfunction occurs, immediately turn the power off and disconnect the plug from the outlet.
Turning the Power On/Standby
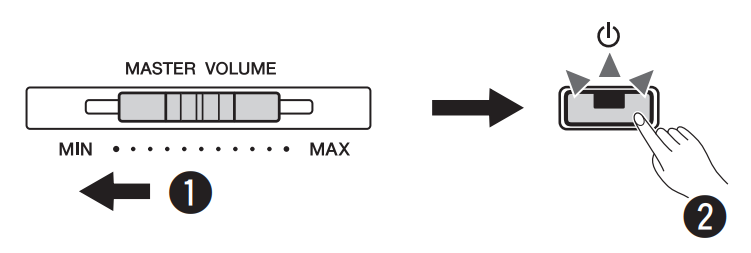
- Turn down the [MASTER VOLUME] to “MIN”.
- Press the (Standby/On) switch to turn the power on.
 The (Standby/On) switch lights up. Adjust the volume as desired while playing the keyboard.
 - Press and hold the (Standby/On) switch for about a second to turn the power to standby mode.
CAUTION: Even when the power switch is turned off, electricity is still flowing to the product at the minimum level. When you are not using the product for a long time, make sure to unplug the power cord from the wall AC outlet.
Auto Power Off Function
To prevent unnecessary power consumption, this function automatically turns the power off if the instrument is not operated for 30 minutes.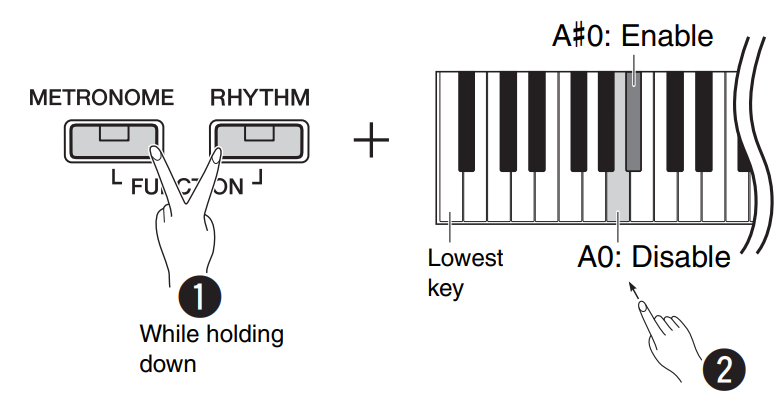 When the power is off, turn the power on while holding down the lowest key to disable Auto Power Off. The [REC] lamp flashes three times, indicating that the Auto Power Off function has been disabled.
NOTICE: If your digital piano is connected to other equipment such as amplifiers, speakers, or a computer but you do not intend to use it for 30 minutes, we recommend that you turn off all devices as described in their owner’s manuals. Doing so eliminates the risk of damage to the other equipment. If you do not want the instrument to turn off automatically when connected to other equipment, disable the Auto Power Off function.
Adjusting the Master Volume
To adjust the volume of the entire keyboard sound, use the [MASTER VOLUME] while playing the keyboard.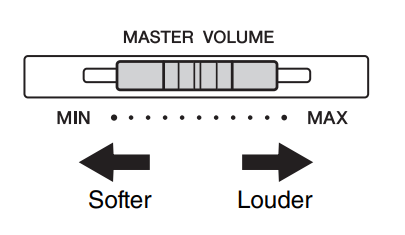
CAUTION: Do not use the instrument for a long period at a high or uncomfortable volume level, since this can cause permanent hearing loss.
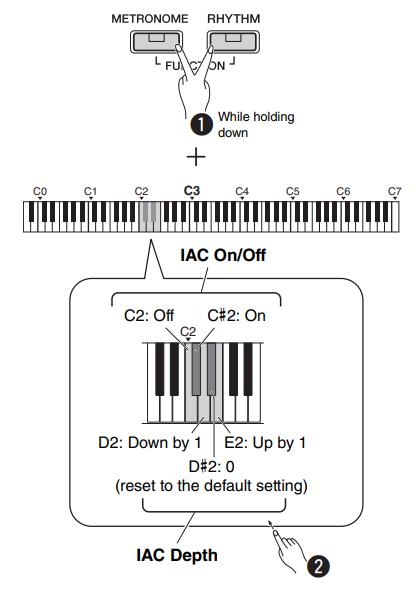
Intelligent Acoustic Control (IAC)
With this function, the sound quality of this instrument is automatically adjusted and controlled according to the overall volume. Even when the volume is low, you can hear both low sounds and high sounds clearly. IAC Control is effective only from the sound output of the instrument speakers.
IAC On/Off
- Default setting: on
IAC Depth
- Setting range: -3 – 0 – +3
- Default setting: 0
Operation Confirmation Sounds
When a setup is changed using a button and key combination, an operation sound (“On,” “Off,” click, tempo value input) is sounded. This confirmation sound can be enabled (On) or disabled (Off) as desired.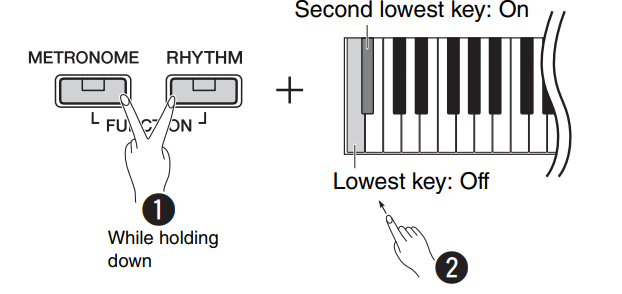
Using Headphones
Connect a pair of headphones to the [PHONES] jack. Since this instrument is equipped with two [PHONES] jacks, you can connect two pairs of headphones. If you are using only one pair, insert the plug into either of these jacks.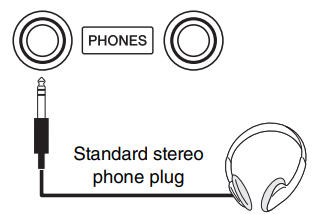
CAUTION: Do not use the headphones for a long period of time at a high or uncomfortable volume level, since this can cause permanent hearing loss.
Reproducing natural sound distance (Stereophonic Optimizer)
Default setting: on
The Stereophonic Optimizer recreates for headphones a natural distance between your ears and the instrument, just as when playing an acoustic piano.
Stereophonic Optimizer On/Off
While holding down [PIANO], press the F3 key to turn the function off or F#3 to turn on.
Using a Pedal (Sustain)
You can produce a natural sustain as you play by pressing the included footswitch plugged into the [SUSTAIN] jack. Also, an optional FC3A foot pedal or FC4A or FC5 footswitch can be connected to this jack. The FC3A lets you use the Half Pedal function.
Damper Resonance
When you select a Piano Voice, pressing the footswitch activates the Damper Resonance/ Sustain sampling effect (when on) to accurately recreate the resonance of an acoustic piano’s strings. To turn the effect on and enable footswitch control, simultaneously hold down [PIANO] and press the C#3 key; to turn it off, simultaneously hold down [PIANO] and press C3.
Default setting: on
Half-pedal function (for FC3A and Pedal Unit)
This function allows you to vary the sustain length depending on how far the pedal is pressed. The farther down you press the pedal, the more the sound sustains. For example, if you press the damper pedal and all notes you are playing sound a bit murky and loud with too much sustain, you can release the pedal halfway or higher to decrease the sustain (murkiness).
NOTE:
- Do not press the footswitch when turning the power on. Doing this changes the recognized polarity of the footswitch, resulting in reversed footswitch operation.
- Make sure that the power is OFF when connecting or disconnecting the footswitch or pedal.
Using the Optional Pedal Unit
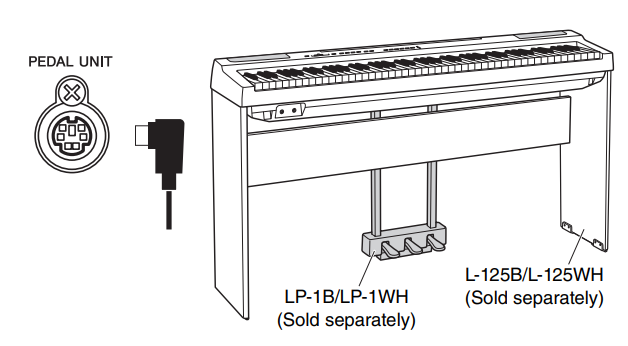
The [PEDAL UNIT] jack is for connecting an optional LP-1B/LP-1WH pedal unit. When connecting the pedal unit, make sure to also assemble the unit on an optional keyboard stand (L-125B/L-125WH).
Damper (Right) Pedal
Pressing this pedal will sustain notes longer. Releasing this pedal immediately stops (damps) any sustained notes. The damper pedal is compatible with the Damper Resonance (see column at left). A “halfpedal” function of this pedal creates partial sustain effects, depending on how far down you press the pedal.
Sostenuto (Center) Pedal
If you play a note or chord on the keyboard and press the sostenuto pedal while the note(s) are held, those notes will sustain as long as you hold the pedal (as if the damper pedal had been pressed), but all subsequently played notes will not be sustained. This makes it possible to sustain a chord, for example, while other notes are played “staccato.”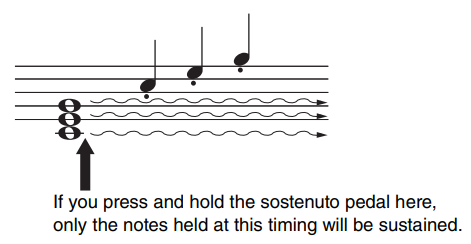
Soft (Left) Pedal
The soft pedal reduces the volume and slightly changes the timbre of notes played while the pedal is pressed. The soft pedal will not affect notes that are already playing when it is pressed.
NOTE: When the “Jazz Organ” is selected, pressing and releasing this pedal switches between “fast” and “slow” of the Rotary Speaker speed. When the Vibraphone is selected, this pedal switches Vibrato on and off.
Selecting & Playing Voices
The instrument has a wide variety of Voices, or instrument sounds, for your enjoyment, including Piano and Organ.
Selecting a Voice
The Voices of the instrument are conveniently divided into specific groups and each of them are assigned to the Voice buttons.
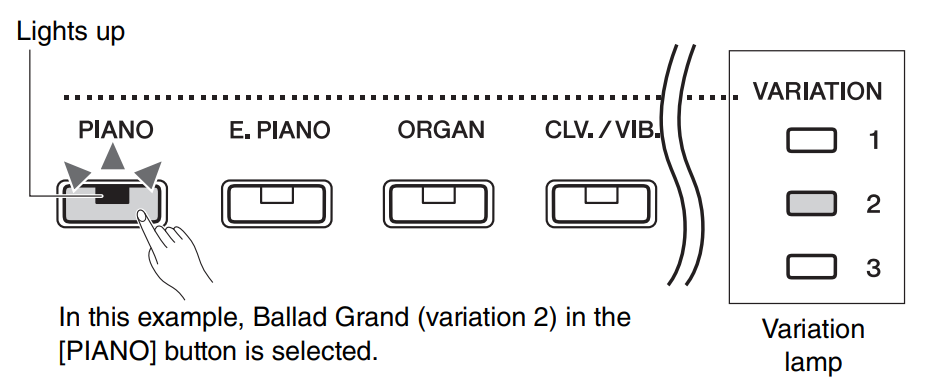
- Press a Voice button (page 9).
A Voice is called up from the selected group. Try playing the keyboard and listening to the sound. Pressing the same Voice button selects the Voices in the group in order. For details, refer to the Voice List below. When the first Voice in the group is selected, the Variation lamp is off. When a Variation Voice 1 – 3 is selected, the corresponding variation lamp lights up.
NOTE:
- The last selected Voice in the selected group will be called up when the Voice button is pressed. This will be reset to the first Voice when you turn off the power.
- Pressing [+BASS] turns on the Split function (page 15).
Voice List
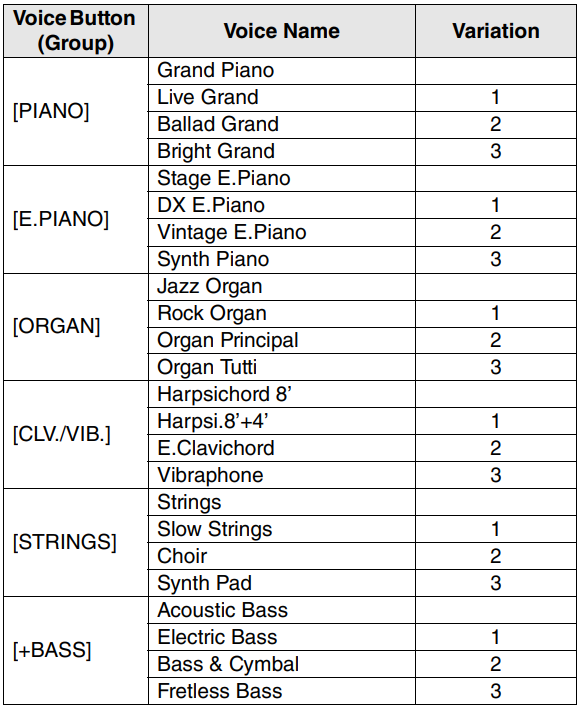 Refer to the “Voice List (Detailed)” on page 26 for more information on the characteristics of each preset Voice.
NOTE: To familiarize yourself with the characteristics of the voices, listen to the Demo Songs for each Voice (page 18).
Using Table EQ
When this is set to on, the speaker sound will be optimized for playing the keyboard placed on the table or desk. This function is effective only from the sound output of the instrument speakers. Turn off when you play the keyboard installed on the stand. Default setting: off
Strengthening the Overall Sound (Sound Boost)
This function is particularly useful when you want not only notes played very loud, but also those played softly, to be clearly audible. Default setting: off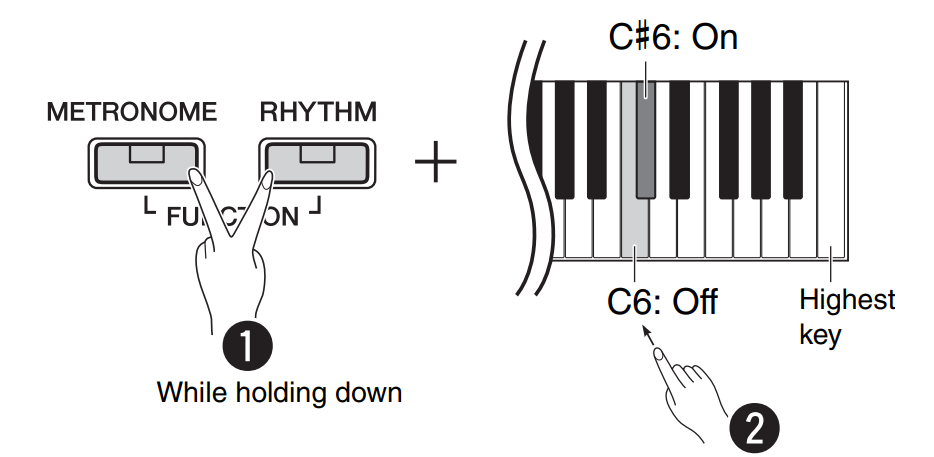
* Refer to the printing above the keyboard (SOUND BOOST OFF/ON).
Layering Two Voices (Dual)
You can layer two Voices and play them simultaneously to create a more richly textured sound.
- Engage Dual.
Choose two desired Voices, then press those Voice buttons simultaneously. Note that the Voice of the left side button is designated as Voice 1, while the Voice of the right side button is designated as Voice 2. The Variation lamps indicate the status of Voice 1.
 - Play the keyboard to enjoy the dual sound.
To shift the Octave for each Voice: To adjust the balance between two Voices:
Setting range: -6 – 0 – +6
Settings below “0” increase the volume of Voice 2, while settings above “0” increase the volume of Voice 1, in relation to the other. - To exit Dual, simply press any Voice button.
Splitting the Keyboard (Split)
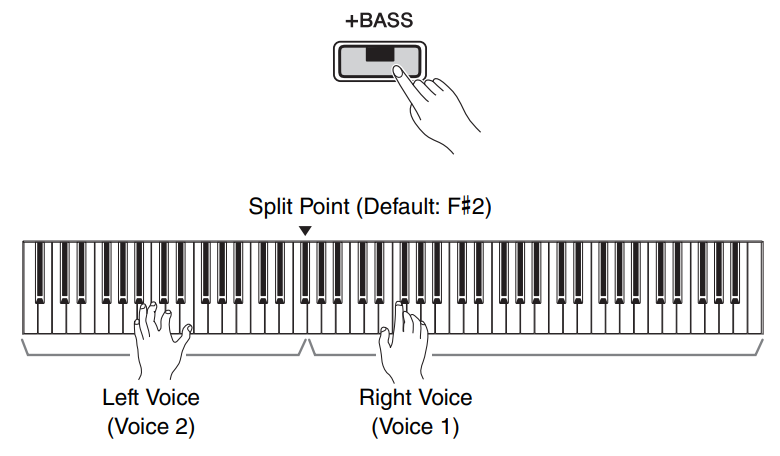
Split mode enables you to play two different Voices on the keyboard — for example, an acoustic bass with your left hand and piano with your right.
- Press [+BASS] to engage Split.
The keyboard is divided into two sections with the F#2 key as the Split Point. Play the keyboard. Note:
Note:- Only Dual, Split or Duo can be called up; both or all cannot be used together.
- Pedal functions cannot be used on the left Voice.
- The Variation lamps indicate the status of Voice 2.
To change the Left Voice to another bass Voice:
Press [+BASS] repeatedly to select the bass Voices in the [+BASS] group in order. Refer to the Voice list on page 13.To change the Left Voice to any Voice other than bass:
While holding down [+BASS], select a desired Voice by pressing the Voice button several times as necessary.
To shift the Octave for each Voice:
Same as in Dual (see previous page).
To adjust the volume balance between two Voices:
Same as in Dual (see previous page).
To change the Split Point:
While holding [+BASS], press the desired key.
- To exit from Split, simply press any Voice button.
Connecting an iPad or iPhone
With an iPad or iPhone connected to your digital
piano, you can use a wide range of apps to expand the
functionality of your instrument in exciting new ways.
For details on how to connect the devices, refer to the
“iPhone/iPad Connection Manual” on page 8.
Smart device application — Smart Pianist
Smart Pianist (free for downloading) lets you select the Voice and make Metronome settings intuitively, and allows you to display the notation, depending on the selected data. For more details on Smart Pianist, other supported apps, and the compatible smart devices, refer to the following Yamaha website. https://www.yamaha.com/kbdapps/
For instructions on connecting the instrument to a smart device, the Connection Wizard in Smart Pianist will guide you according to the operating conditions and environment. To start the Connection Wizard, tap “Menu” located at the upper left of the screen to open the Menu display, and then tap “Instrument” and “Start Connection Wizard.”
NOTICE: If you are using a DAW (digital audio workstation) with this instrument, set Audio Loop Back (page 24) to Off. Otherwise, a loud sound may occur, depending on the settings of the computer or the application software.
Playback/Recording of Audio Data (USB audio interface)
You can play back audio data on a smart device or a computer with this instrument. You can also record your keyboard performance as audio data to a music production app on a smart device or a computer. When using this function on a computer running Windows, you will need to install the Yamaha Steinberg USB Driver to your computer. For details, refer to the “Computer-related Operations” on page 8.
Audio Loop Back On/Off
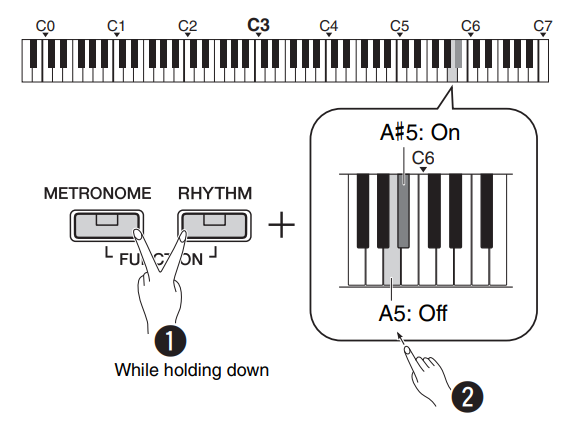
You can set whether audio sound input from the [USB TO HOST] terminal is returned to the computer/smart device or not along with the performance played on the instrument. While holding down [METRONOME] and [RHYTHM] simultaneously, press the G5 key (Off) or G#5 (On).
Default setting: On
NOTICE: If you are using a DAW (digital audio workstation) with this instrument, set Audio Loop Back to Off. Otherwise, a loud sound may occur, depending on the settings of the computer or the application software.
Data Backup and Initialization
The following data will automatically be maintained as backup data even if you turn off the power.
- User Song
- External Song
- Backup data:
Metronome/Rhythm Volume, Metronome Beat, Touch Sensitivity, Tuning, Split Point, Auto Power OFF setting, IAC on/off, IAC Depth, Intro/Ending on/off, Operation Confirmation Sounds on/off, AUX OUT volume settings, Stereophonic Optimizer on/off, Speaker on/off, Table EQ on/off
To save the User Song data to a computer:
The User Song (USERSONG00.mid) can be transferred to a computer and saved as an SMF file. For details, refer to the “Computer-related Operations” on page 8.
To initialize the backup data:
While holding down the highest key, turn the power on to initialize the backup data to the factory’s initial settings. Both
Both ![]() lamps flash, indicating that the initialization is being executed. After the operation is completed, both lamps turn off.
lamps flash, indicating that the initialization is being executed. After the operation is completed, both lamps turn off.
NOTE: If this instrument somehow malfunctions or fails to operate properly, try initializing the data as described above.
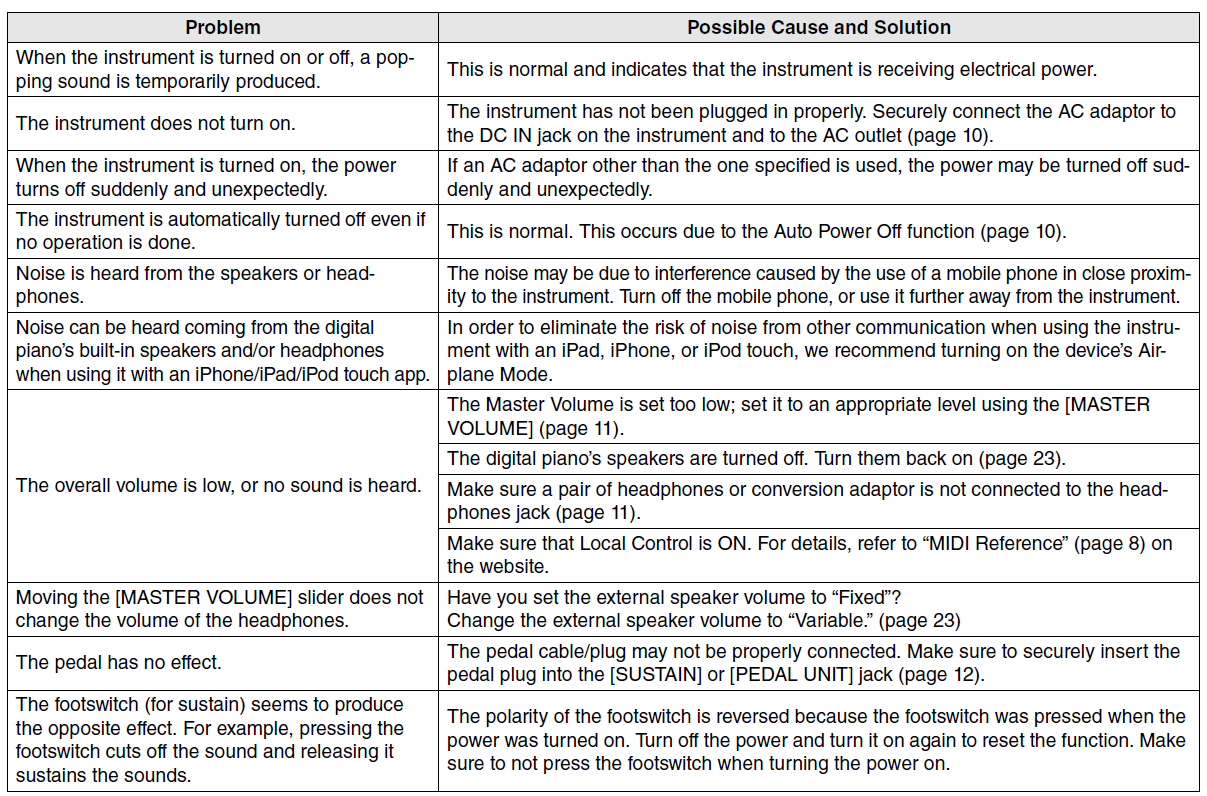
Troubleshooting
Specifications
Dimensions (W x D X H)
- 1326 x 295 x 166 mm (52-3/16” x 11-5/8” x 6-9/16”)
Weight
- 11.8kg (26 lbs. 0 oz.)
Keyboards
- 88 keys (A-1 – C7)
- GHS (Graded Hammer Standard) keyboard with matte black keytops
- Touch Sensitivity (Hard/Medium/Soft/Fixed)
Tone Generation / Voice
- Piano Sound: Pure CF Sound Engine
- Piano Effect: Damper Resonance, Stereo Sustain Samples, Keyoff
Samples, String Resonance
- 24 Preset Voices
- Polyphony: 192
Effects/Functions
- 4 Reverb types, Sound Boost, table EQ, Intelligent Acoustic Control (IAC), Stereophonic Optimizer, Dual, Split, Duo
Accompaniment Rhythm
- Preset: 20
Song Recording/Playback (MIDI data only)
- Preset: 21 Voice Demo Songs, 50 Classic Songs
- 1 User Song with 2 tracks
- Data Capacity: Approx. 100 KB/Song (approx. 11,000 notes)
- Compatible Data Format
- Playback: SMF (format 0, format 1)
- Recording: SMF (format 0)
Storage
- Internal Memory: total maximum size approx. 900 KB (User song: One song approx. 100 KB, Loading song data from a computer: Up to 2 Songs)
Overall Controls
- Transpose: -6 – 0 – +6
- Fine Tuning: 414.8 – 440.0 – 466.8 Hz
- Metronome
- Tempo: 5 – 280
- USB audio interface
Connectivity
- DC IN (12V), PHONES (Standard stereo phone jack) x 2, SUSTAIN, PEDAL UNIT, USB TO HOST, AUX OUT
Amplifiers
- 7W x 2
Speakers
- 12 cm x 2 + 4 cm x 2
Power Supply
- AC Adaptor PA-150 or an equivalent recommended by Yamaha
- Power Consumption: 9 W (When using PA-150 AC adaptor)
- Auto Power Off Function
Included Accessories
- Owner’s Manual, Music Rest, AC Adaptor PA-150 or an equivalent recommended by Yamaha*, Online Member Product Registration, Footswitch, Warranty*
* May not be included depending on your particular area. Please check with your Yamaha dealer.
Separately Sold Accessories
- Keyboard Stand L-125B/L-125WH, Pedal Unit (LP-1B/LP-1WH), Foot Pedal FC3A, Footswitch FC4A/FC5, Headphones (HPH-50/ HPH-100/HPH-150), AC Adaptor: PA-150 or an equivalent recommended by Yamaha, Wireless MIDI adaptor: UD-BT01, Keyboard Bag (SC-KB850)
* The contents of this manual apply to the latest specifications as of the publishing date. To obtain the latest manual, access the Yamaha website then download the manual file. Since specifications, equipment or separately sold accessories may not be the same in every locale, please check with your Yamaha dealer.
For more manuals by Yamaha, visit ManualsLibraryy
Yamaha P-125 Digital Piano- FAQs
Does the Yamaha P-125 have weighted keys?
Yes, the P-125 features fully weighted keys with graded hammer action, providing lighter touch in the higher range and heavier response in the lower register—just like an acoustic piano.
Does the Yamaha P-125 have Bluetooth?
No, the P-125 does not include built-in Bluetooth. However, it does have a USB connection, allowing you to connect to iOS devices and use apps like the Yamaha Smart Pianist.
How can I change the pitch or transpose the Yamaha P-125?
Hold the [Grand Piano/Function] button and press the corresponding F6, F#6, or G6 keys to raise or lower the pitch by semitones.
Do digital pianos like the P-125 need tuning?
No, digital pianos do not require tuning, as the sound is digitally sampled and remains consistent over time.
When was the Yamaha P-125 released?
The Yamaha P-125 was released in 2018, replacing the earlier P-115 model.
Does the P-125 support MIDI?
Yes, the P-125 supports MIDI via USB, and it can transmit MIDI control change messages when pedals or other controls are used.
What’s the best way to transport the Yamaha P-125?
Always transport and store the keyboard horizontally. Avoid standing it upright or on its ends to prevent keybed issues.
How often should I tune my Yamaha piano?
Only acoustic pianos require tuning, typically once or twice a year. The P-125, being digital, never needs tuning.
How do I identify pitch on the piano?
On any piano, low-pitched notes are on the left, while high-pitched notes are on the right. Faster vibration equals higher pitch; slower vibration equals lower pitch.

 The (Standby/On) switch lights up. Adjust the volume as desired while playing the keyboard.
 Pressing the same Voice button selects the Voices in the group in order. For details, refer to the Voice List below. When the first Voice in the group is selected, the Variation lamp is off. When a Variation Voice 1 – 3 is selected, the corresponding variation lamp lights up.
 Note that the Voice of the left side button is designated as Voice 1, while the Voice of the right side button is designated as Voice 2. The Variation lamps indicate the status of Voice 1.
 To adjust the balance between two Voices:
 Note:
Note: