Zojirushi BB-PAC20 Bread Maker
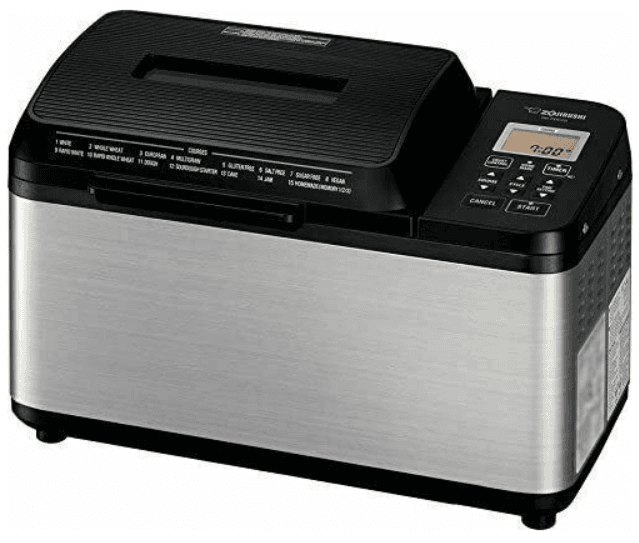
IMPORTANT SAFEGUARDS
WHEN USING ELECTRICAL APPLIANCES, BASIC SAFETY PRECAUTIONS SHOULD ALWAYS BE FOLLOWED, INCLUDING THE FOLLOWING:
- Read all instructions thoroughly.
- Avoid touching hot surfaces and do not close or clog the steam vent opening under any circumstances. The handles and knobs are provided for your safety and protection.
- To prevent hazardous operation or electrical shock, do not immerse power cord, power plug, or baking machine (except baking pan) in water or other liquids.
- Close supervision is recommended when the appliance is used by or near children.
- Unplug from the outlet when the appliance is not in use and before cleaning. Allow the appliance to cool before adding or removing parts, and before cleaning the appliance. Make sure appliance is OFF when not in use, before putting on or taking off parts, and before cleaning.
- Do not use or operate the appliance with a damaged cord or plug. If the appliance malfunctions or has been damaged in any manner, unplug the appliance and return it to the nearest authorized service facility or dealer for examination, repair, or adjustment.
- The use of accessories or attachments not recommended by the appliance manufacturer may be hazardous or may cause malfunction.
- Do not use outdoors.
- Keep the power cord away from hot surfaces and do not let the cord hang over the edge of tables or counters.
- Do not place the appliance on or near a heated surface such as a gas or electric stove, or in a heated oven.
- Always use extreme caution when moving appliances containing hot contents or liquids.
- To disconnect, press CANCEL and remove the plug from the wall outlet. Never pull on the cord.
- Do not use the appliance for anything other than intended or specified purposes.
- Avoid moving parts.
- Use only an electrical outlet rated at 15 amperes or more.
- Use only 120-V electrical current.
- Do not scratch, damage, modify, forcefully bend, pull, twist, or fold the power cord.
- Do not place the appliance on unstable surfaces or on surfaces that are vulnerable to heat.
SAVE THESE INSTRUCTIONS
THIS APPLIANCE IS FOR HOUSEHOLD USE ONLY.
NOTE:
- A short power cord is provided to reduce the risk of becoming entangled in or tripping over it.
- Extension cords may be used if care is exercised in their use.
- When an extension cord is used:
- The marked electrical rating of the extension cord should be at least as great as the electrical rating of the appliance, and
- The longer cord should be arranged so that it will not drape over the countertop or tabletop where it can be pulled on by children or tripped over unintentionally.
This appliance has a polarized plug (one blade is wider than the other). As a safety feature, this plug will fit in a polarized outlet only one way. If the plug does not fit fully in the outlet, reverse the plug. If it still does not fit, contact a qualified electrician. Do not attempt to defeat this safety feature.
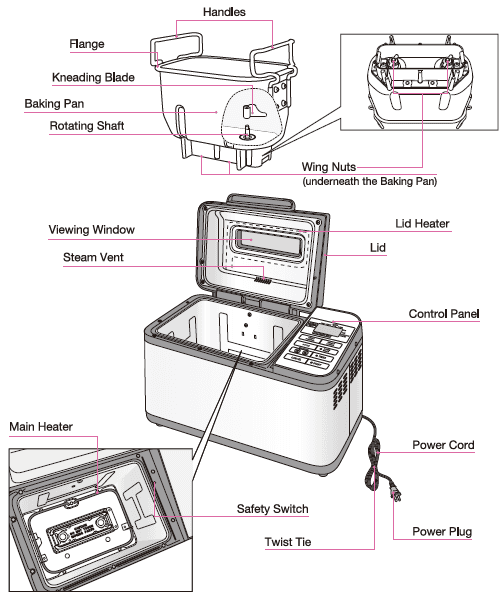
PARTS NAMES 
- Please remove the twist tie holding the Power Cord before use.
- Do not use the Power Cord bundled up. Doing so may cause the Power Cord to become excessively hot, resulting in a malfunction.
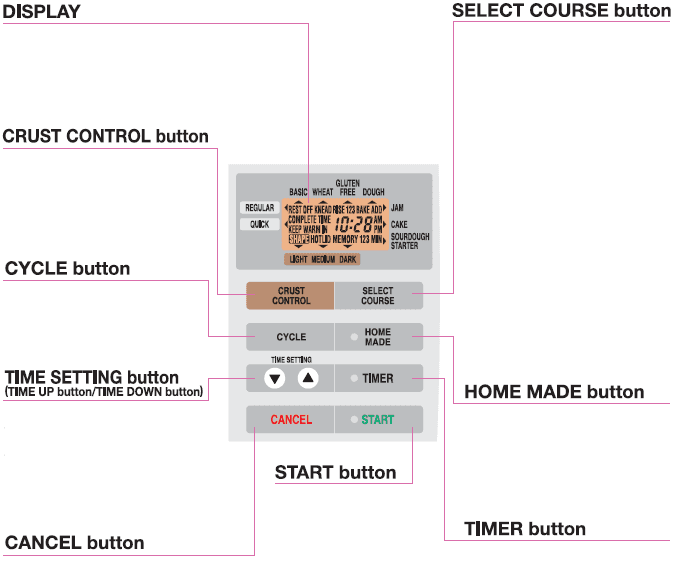
CONTROL PANEL 
DISPLAY
The Display shows the clock, the setting, and the time remaining until completion of the process. The illustration shows all possible displays and is for reference only. This display will not appear during actual use.
CRUST CONTROL button
Use to select the crust color from LIGHT, MEDIUM, or DARK. Crust control can be set for REGULAR BASIC, QUICK BASIC, GLUTEN FREE and CAKE courses only.
CYCLE button
Use to select the cycle and to move on to the next cycle when setting up the HOME MADE course.
TIME SETTING button
(TIME UP button/TIME DOWN button)
Use to set the current time, the time for each cycle of the HOME MADE course, and the Timer. The Timer can be set in 10-minute increments, up to 13 hours. Also use to display the current time during a process.
CANCEL button
Press and hold to cancel the current process, or press to cancel the setting.
START button
Use to start the process or to set the Timer.
START light
The light turns on while the process is ongoing, and it flashes when the time is preset.
SELECT COURSE button
Use to select the dough preparation/ baking course.
REGULAR BASIC: For baking basic bread using active dry yeast.
QUICK BASIC: For baking basic bread more quickly using rapid rise yeast.
REGULAR WHEAT: For baking whole grain bread using active dry yeast.
QUICK WHEAT: For baking whole-grain bread more quickly, use rapid-rise yeast.
GLUTEN FREE: For baking gluten-free bread using active dry yeast.
REGULAR DOUGH: For preparing dough using active dry yeast.
QUICK DOUGH: For preparing dough more quickly, use rapid-rise yeast.
JAM: For making jam.
CAKE: For baking cakes. SOURDOUGH STARTER: For making sourdough starter.
HOME-MADE button
Use to select one of the 3 HOME-MADE memories.
HOME MADE light
Turns on when the HOME MADE course is set and the process is ongoing.
TIMER button
Press this button to set the Timer.
TIMER light
Turns on when the Timer is set.
ACCESSORIES
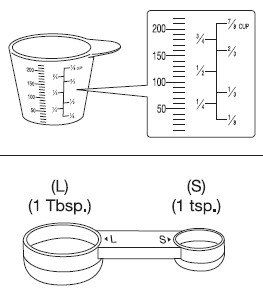
Measuring Cup:
The measuring cup provided is the same as a standard 8 oz. (240ml) measuring cup. Filled to the brim, it measures 1 cup. It may also be used to measure 1 cup of flour; however, for measuring dry ingredients (such as flour) less than 1 cup, please use a nested measuring cup (see below).
Measuring Spoon:
It may be used to measure yeast, sugar, salt, dry milk, and spices. The large side measures 1 tablespoon; the small side measures 1 teaspoon. The halfway mark on each measures one-half tablespoon and one-half teaspoon, respectively.
HOW TO MEASURE THE INGREDIENTS
It is most important that you measure ingredients accurately for the best possible results. Please follow the guidelines below.
Please use a nested measuring cup that is 240ml (8 oz.) per cup.
Dry Ingredients:
- Dry ingredients, especially flour, need to be measured in nested measuring cups (not provided). They usually come in 1/4, 1/3, 1/2, and 1 cup sizes, and fit inside one another.
- Spoon the ingredient into the cup filling it to overflow. Do not press or pack the ingredients, or scoop the ingredients out of the container with the nested measuring cup. Doing so may pack too many ingredients in the cup or create air pockets inside the cup, causing inaccurate measurements.
- Level off by sweeping off the excess with a flat knife. To measure 3/4 cup, fill and level off the 1/2 and 1/4 measuring cups. Do not try to measure 3/4 cup in a 1 cup measuring cup.
- Spices and small amounts of dry ingredients may be measured in the provided measuring spoon. Be sure to level off.
Liquid Ingredients:
- Liquid ingredients may be measured in the provided plastic measuring cup or other measuring cups with lines marking the amount.
- The liquid should be poured into the cup while the cup is placed on a flat surface and measured at eye level.
TIPS FOR SUCCESSFUL BAKING
- Ingredients: Always use fresh ingredients.
- Measurements: Measure ingredients accurately. Bread and yeast are very delicate and will not rise and bake properly if the ingredients are measured inaccurately.
- Liquids First: Always place liquid ingredients in the baking pan first to allow the Home Bakery to knead properly.
- Room Temperature: If the room temperature is over 77°F, we recommend using refrigerated liquids. Flour should be fresh and at room temperature.
- Humidity: Humidity tends to make dough moister. Try adding an extra tablespoon of flour to improve the dough consistency. Repeat if necessary until the dough forms a nice ball.
- High Altitude: For baking in high altitudes, decrease the amount of yeast by approximately 1/2 teaspoon, and decrease the sugar slightly.
HOW TO SET THE CLOCK
- Plug in the Power Cord. The current time will show in the Display. (7:00 AM will blink at the time of purchase and after resetting.)
- Use the TIME SETTING button to set the current time. TIME UP button: Each press advances the time in 1-minute increments. TIME DOWN button: Each press moves the clock in reverse by 1 minute. Press and hold either button to quickly adjust in 10-minute increments.
- The time display will stop blinking after 3 seconds, indicating that the clock has been set.
A blinking 7:00 AM in the Display (except at the time of purchase or after resetting) indicates that the stored lithium battery is out. Please set the clock following the steps above.
HOW TO USE THE TIMER
The Timer sets the Home Bakery to automatically complete the process by a specific time. The Timer can be set in 10-minute increments for up to 13 hours.
- Use the SELECT COURSE button to choose the course.
- Press the TIMER button, and the START light begins to blink. Use the TIME UP (A) button to advance the time in 10-minute increments, or the TIME DOWN ( T) button to set back in 10-minute increments. Press and hold either button to adjust the time more quickly. You can set the Timer up to 13 hours from the current time. Once it reaches 13 hours, it will automatically return to the minimum process time.
- Press the START button and make sure that the TIMER light turns on. The completion time will show in the Display.
NOTE:
- The Timer can be used only with the following courses: REGULAR BASIC, REGULAR WHEAT, and HOME MADE (when SHAPE is turned off).
- Do not use the Timer with recipes that use milk, juice, vegetables, eggs, or other ingredients that may spoil easily.
- The add beeps that indicate when to add additional ingredients will not sound when the Timer is set.
CONVENIENT FUNCTIONS
HOW TO TURN THE REST CYCLE OFF
The REST cycle is designed to stabilize the temperature of the ingredients prior to kneading. Before you turn the REST cycle OFF, please keep in mind that your dough may not rise well if the ingredients or the room temperature are too cold.
- To turn the REST cycle OFF, first select the course, then press and hold the TIME UP button and TIME DOWN button together for at least 3 seconds until REST OFF appears in the Display.
- Once the START button is pressed, REST OFF will disappear from the Display, and the Home Bakery will begin the course.
- JAM, CAKE, and HOME-MADE courses do not include a REST cycle, and therefore cannot be turned off.
- To turn the REST cycle back ON, press and hold the TIME UP button and TIME DOWN button together for at least 3 seconds until REST OFF disappears from the Display.
CHARACTERISTICS OF INGREDIENTS
Dry yeast feeds on sugar and ferments it, thus causing the dough to rise. Dry yeast (simply dried granules of yeast) is made of tiny plants that change food (especially gluten and sugar) into bubbles of carbon dioxide. As these bubbles expand, the bread rises. The recipes developed for the Home Bakery used “Fleischmann’s active dry yeast” or “Fleischmann’s rapid rise yeast”. Dry yeast should be kept in the freezer or refrigerator. Please be sure that fresh yeast is used. Using old yeast is not recommended and may adversely affect the outcome of your bread.
Bread flour is a type of wheat flour made from hard wheat that includes all of the gluten from the grain. Since bread flour has a higher gluten and protein content than all-purpose flour, it is well-suited for use in yeast breads. Gluten gives structure and height to the loaf, thus, bread flour rises better than other flours. It produces a higher loaf and bread that has a coarser texture.
Gluten is an elastic protein found mainly in wheat flour (all flour contains some gluten). Gluten is an important element in all yeast breads, as it gives bread its structure or framework. Flours with a high gluten content make the best bread flours.
Whole wheat flour, ground from the entire wheat kernel, is heavier and richer in nutrients.
All-purpose flour is a blend of refined wheat flour, especially suitable for making cake, croissants, and pizza.
Sugar is important for the color and flavor of breads, as well as to feed the yeast. Recipes that call for sugar require granulated sugar. Do not substitute with powdered sugar, brown sugar or other sweeteners unless indicated.
Salt adds flavor and stabilizes the gluten in the dough. It also controls the growth of yeast.
Butter makes breads soft and glossy. Measure and cut into small pieces. The recipes in this manual were developed using unsalted butter. Salted butter and margarine may be used, but we recommend the use of unsalted butter.
Dairy (milk, dry milk, etc.) adds texture and flavor, and helps keep breads softer. You may substitute milk or buttermilk for dry milk, but the loaf may come out shorter, and the crust may be darker than dry milk breads. The Timer cannot be used if milk or buttermilk is substituted for dry milk.
Eggs add richness and velvety texture to bread dough. Use large eggs in these recipes.
For more Manuals by Zojirushi, visit ManualsLibraryy
Zojirushi BB-PAC20 Bread Maker-FAQs
How long does it take to bake bread in the Zojirushi BB-PAC20?
The quick baking course takes about 2 hours and 20 minutes to complete a loaf. Other courses may take longer depending on the selected settings.
What temperature should the water be when using the bread maker?
For best results, use warm water around 68°F (20°C). Adjust based on room temperature and season for consistent dough quality.
How does the Zojirushi bread maker work?
The machine mixes and kneads the ingredients using a rotating paddle, then allows the dough to rise before baking it at high heat. Different pre-programmed cycles control each stage.
How long is the dough cycle on the BB-PAC20?
The dough cycle runs for about 90 minutes, during which the machine kneads and allows the dough to rise properly.
How can I tell when quick bread is done?
Insert a toothpick into the center—if it comes out clean or with only a few moist crumbs, the bread is fully baked.
What should I do if the dough looks dry?
If the dough appears dry during the first 15 minutes of kneading, add a teaspoon of liquid at a time until the dough becomes smooth and elastic.
When should I add ingredients to the bread maker?
Add liquid ingredients first, then the dry ones. Add the yeast last to keep it separate from the liquids until kneading begins.
Why does the bread maker take longer than a traditional oven?
Bread makers operate at lower temperatures (around 325°F–350°F) and bake larger loaves, which requires a longer baking time compared to conventional ovens.

