Buick 2010 LaCrosse CXS Sedan Car
Keys, Doors, and Windows
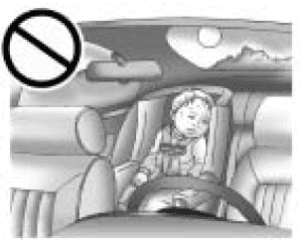
- Leaving children in a vehicle with the ignition key is dangerous for many reasons; children or others could be badly injured or even killed. They could operate the power windows or other controls or even make the vehicle move. The windows will function with the keys in the ignition and children could be seriously injured or killed if caught in the path of a closing window. Do not leave the keys in a vehicle with children.

- The key that is part of the Remote Keyless Entry (RKE) transmitter can be used for the ignition and all locks if the vehicle is a key access vehicle. If the vehicle has the keyless ignition, the key can be used for the locks
Remote Keyless Entry (RKE) System
- See the Radio Frequency Statement on pages 12‑17 for information regarding Part 15 of the Federal Communications Commission (FCC) Rules and RSS-210/211 of Industry Canada.
- Changes or modifications to this system by other than an authorized service facility could void the authorization to use this equipment. If there is a decrease in the RKE operating range:
- Check the distance. The transmitter may be too far from the vehicle.
- Check the location. Other vehicles or objects may be blocking the signal.
- Check the transmitter’s battery. See “Battery Replacement” later in this section.
- If the transmitter is still not working correctly, see your dealer/retailer or a qualified technician for service
Keyless Trunk Opening
- Lift up on the touchpad located above the license plate to open the trunk if the keyless access transmitter is within range.
- Transmitter Buttons
- See the information on how the transmitter buttons function earlier in this section under “Remote Keyless Transmitter Operation (Key Access)
Programming Transmitters to the Vehicle
- Only keyless access transmitters programmed to the vehicle will work. If a transmitter is lost or stolen, a replacement can be purchased and programmed through your dealer/retailer. The vehicle can be reprogrammed so that lost or stolen transmitters no longer work. Any remaining transmitters will need to be reprogrammed. Each vehicle can have up to five transmitters matched to it.
Programming with a Recognized Transmitter
- A new transmitter can be programmed to the vehicle when two recognized transmitters are available. If there are not two recognized transmitters
available, see your dealer/retailer. To program the vehicle, it must be off, and all of the transmitters, both currently recognized and new, must be with you.
- Place the recognized transmitters in the cupholder.
- Insert the vehicle key of the new transmitter into the key lock cylinder located on the outside of the driver door and turn the key to the unlock position five
times within ten seconds. The Driver Information Center (DIC) displays Ready For Remote #2, 3, 4 or 5. - Place the new transmitter into the transmitter pocket. The transmitter pocket is located inside the center console storage area under the cupholder. The cupholder will need to be pulled out to access the transmitter pocket.
- Press the ignition. When the transmitter is learned, the DIC display will show that it is ready to program the next transmitter.
- Remove the transmitter from the transmitter pocket and press the unlock button
Safety Locks
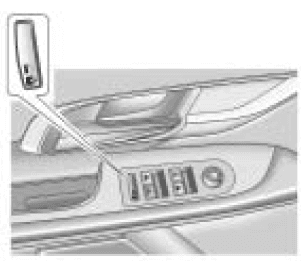
- Press the button on the driver door armrest to activate the safety locks on the passenger rear doors. This switch also disables the rear power windows.
- Once activated, the light, located on the switch, illuminates and goes out when deactivated. If the light flashes the feature may not be working properly
Vehicle Security
- Vehicle theft is big business, especially in some cities. This vehicle has theft-deterrent features; however, they do not make it impossible to steal.
- Anti-Theft Alarm System
- This vehicle has an anti-theft alarm system.
- Arming the System
- To arm the system, press Lock on the RKE transmitter. The alarm automatically arms after about 30 seconds. The security light, located on the instrument panel, flashes.
Immobilizer Operation (Keyless Access)
- This vehicle has a passive theft-deterrent system.
- The system does not have to be manually armed or disarmed.
- The vehicle is automatically immobilized when the transmitter leaves the vehicle.
- The immobilization system is disarmed when the ignition button is pushed in and a valid transmitter is found in the vehicle.

- The security light, located in the instrument panel cluster, comes on if there is a problem with arming or disarming the theft-deterrent system.
- The system has one or more transmitters that are matched to an immobilizer control unit in your vehicle. Only a correctly matched transmitter will start the vehicle.
- If the transmitter is ever damaged, you may not be able to start your vehicle. When trying to start the vehicle, the security light comes on briefly when the ignition is turned on
Windows
WARNING
- Leaving children, helpless adults, or pets in a vehicle with the windows closed is dangerous. They can be overcome by the extreme heat and suffer permanent injuries or even death from heat stroke. Never leave a child, a helpless adult, or a pet alone in a vehicle, especially with the windows closed in warm or hot weather.

Roof
Sunroof
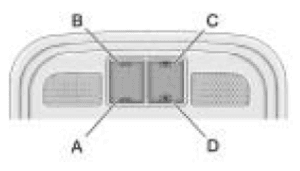
- On vehicles with a sunroof, the switch is located on the overhead console.
- The sunroof only operates when the ignition is in ON/RUN, ACC/ ACCESSORY, or if Retained Accessory Power (RAP) is active. See Retained Accessory Power
(RAP) on pages 8‑20.
Vent
- The sunroof has an express-vent open feature. From the closed position, press the rear of the sunroof switch (A) to vent the sunroof. To stop the sunroof
partway, press the switch a second time. To close the sunroof, press and hold the front of the sunroof switch (B). To stop the sunroof partway, release the switch.
Anti-Pinch Feature
- If an object is in the path of the sunroof while it is closing, the anti-pinch feature will detect the object and stop the sunroof from closing at the point of the
obstruction. The sunroof and sunshade will then return to the open or vent position. To close the sunroof once the obstruction has been removed, refer to the
“Express-Open/Express-Close” functions are described previously. - Do not keep the sunroof open for long periods of time while the vehicle is not in use. Debris can collect in the tracks, damage the sunroof operation and plug the
water draining system.
Seats and Restraints
Front Seat
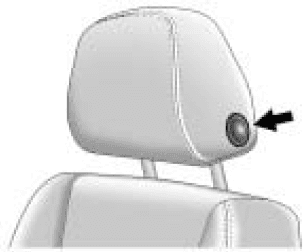
- To raise or lower the head restraint, press the release button located on the side of the head restraint and pull up or push the head restraint down and release the button.
- Pull and push on the head restraint after the button is released to make sure that it is locked in place.
Reclining Seatbacks
WARNING
- You can lose control of the vehicle if you try to adjust the seat while the vehicle is moving. The sudden movement could startle and confuse you, or make you push a pedal when you do not want to. Adjust the driver’s seat only when the vehicle is not moving.

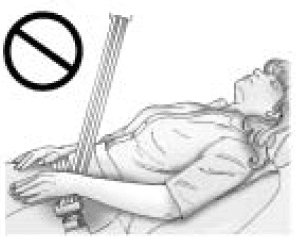
- Sitting in a reclined position when the vehicle is in motion can be dangerous. Even when buckled up, the safety belts cannot do their job when reclined like this.
The shoulder belt cannot do its job because it will not be against your body. Instead, it will be in front of you. In a crash, you could go into it, receiving neck or other injuries. - The lap belt cannot do its job either. In a crash, the belt could go up over your abdomen. The belt forces would be there, not at your pelvic bones. This could
cause serious internal injuries. For proper protection when the vehicle is in motion, have the seat back upright. Then sit well back in the seat and wear the safety belt properly
Heated and Ventilated Front Seats
- On a vehicle with the heated and ventilated cooled seat feature, the buttons are located near the climate controls.
- To use this feature, the ignition must be on. Press a button to turn on the desired feature. A light on that button indicates the feature is on
Safety Belts
- This section of the manual describes how to use safety belts properly. It also describes some things not to safety belts.
- In most states and in all Canadian provinces, the law requires wearing safety belts. Here is why: You never know if you will be in a crash. If you do have a crash,
You do not know if it will be a serious one. - A few crashes are mild, and some crashes can be so serious that even if buckled up, a person would not survive. But most crashes are in between. In many of them, people who buckle up can survive and sometimes walk away. Without safety belts, they could have been badly hurt or killed.
Why Safety Belts Work
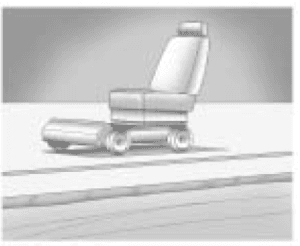
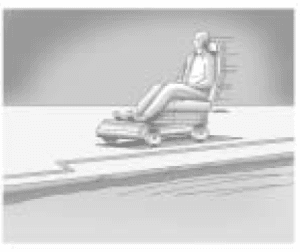
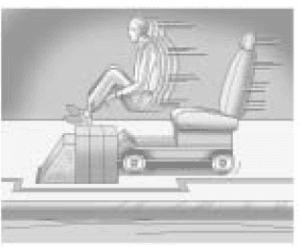
- When you ride in or on anything, you go as fast as it goes

- Take the simplest vehicle. Suppose it is just a seat on wheels.

- Put someone on it.

- Get it up to speed. Then, stop the vehicle. The rider does not stop.
Lighting
- Turn and Lane Change Signals
- Move the lever all the way up or down to signal a turn. An arrow on the instrument panel cluster flashes in the direction of the turn or lane change.
- Raise or lower the lever until the arrow starts to flash to signal a lane change. Hold it there until the lane change is completed. If the lever is briefly pressed and released, the turn signal flashes three times.
- The turn and lane‐change signal can be turned off manually by moving the lever back to its original position.
- If, after signaling a turn or lane change, the arrow flashes rapidly or does not come on, a signal bulb might be burned out.
- Have the bulbs replaced. If the bulb is not burned out, check the fuse. See Fuses and Circuit Breakers on pages 9‑40
Exit Lighting
- The headlamps, taillamps, parking lamps, reverse lamps, and license plate lamps come on at night or in areas with limited lighting when the key is removed from the ignition. The dome lamps also come on
- When the key is removed from the ignition. The exterior lights and dome lamps remain on after the door is closed for a set amount of time, then automatically turn off.
- For a vehicle with Keyless Access, the exterior lights and dome lamps automatically turn on when a door is opened after the ignition is turned off. See Ignition Positions (Keyless Access) on pages 8‑18 or Ignition Positions (Key Access) on pages 8‑19.
Infotainment System
Introduction
- Read the following pages to become familiar with the audio system’s features
- This system provides access to many audio and nonaudio listings. To minimize taking your eyes off the road while driving, do the following while the vehicle is parked:
- Become familiar with the operation and controls of the audio system.
- Set up the tone, speaker adjustments, and preset radio stations
Theft-Deterrent Feature
- The theft-deterrent feature works by learning a portion of the Vehicle Identification Number (VIN) to the infotainment system. The infotainment system does not operate if it is stolen or moved to a different vehicle
Overview (Radio with CD)
- A. VOL/ O
- Turns the system on or off and adjusts the volume.
- B. FAV
- Radio: Opens the favorites list.
- C. Buttons 1 to 6
- Radio: Saves and selects favorite stations.
- D. INFO
- Radio: Shows available information about the current station.
- CD: Shows available information about the current track.
- E. TUNE
- Radio: Manually selects radio stations.
- CD: Selects tracks.
- F. CD/AUX
- Selects the CD player or an external audio source.
- G.

- Radio: Seeks the previous station.
- CD: Select the previous track or rewind within a track.
- H. ZCD Eject
- Removes a disc from the CD slot.
- I.

- Radio: Seeks the next station.
- CD: Select the next track or fast-forward within a track.
- J. RADIO/BAND
- Changes the band while listening to the radio.
- Selects the radio when listening to a different audio source.
- K. Menu Knob
- Opens menus, highlights menu items, or sets numeric values while in a menu.
- L. SELECT
- Selects menu items.
- M. CONFIG
- Opens the settings menu.
- N. BACK
- Menu: Moves one level back.
- Character Input: Deletes the last character.
- O.

- Open the clock menu.
- P. TONE
- Open the tone menu.
- Q.

- Open the phone’s main menu.
- Mutes the audio system.
Vehicle Care
Tire Pressure Monitor System
- The Tire Pressure Monitor System (TPMS) uses radio and sensor technology to check tire pressure levels. The TPMS sensors monitor the air pressure in your vehicle’s tires and transmit tire pressure readings to a receiver located in the vehicle.
- Each tire, including the spare (if provided), should be checked monthly when cold and inflated to the inflation pressure recommended by the vehicle manufacturer on the vehicle placard or tire inflation pressure label.
- (If your vehicle has tires of a different size than the size indicated on the vehicle placard or tire inflation pressure label, you should determine the proper tire
inflation pressure for those tires.)
Service and Maintenance
Scheduled Maintenance
- When the Change Engine Oil Soon Message Displays Change engine oil and filter. See Engine Oil on page 9‑11. An Emission Control Service. When the “Change Engine Oil Soon” message displays, service is required for the vehicle as soon as possible, within the next 1,000 km/600 miles. If driving under the best conditions, the engine oil life system might not indicate the need for vehicle service for more than a year.
- The engine oil and filter must be changed at least once a year and the oil life system must be reset. Your dealer/retailer has trained service technicians who will perform this work and reset the system
For more manuals by Buick visit ManualsLibraryy
Buick 2010 LaCrosse CXS Sedan Car-FAQs
Does the 2010 Buick LaCrosse support Bluetooth audio?
Yes, the 2010 Buick LaCrosse includes Bluetooth for hands-free calling. However, it does not support Bluetooth audio streaming for music.
Does the 2010 Buick LaCrosse come with a backup camera?
Yes, some trims of the 2010 LaCrosse offer a rearview camera along with features like a head-up display, adaptive headlights, and in-dash navigation.
What type of oil filter does the 2010 Buick LaCrosse use?
The 2010 Buick LaCrosse uses an aFe Power Oil Filter, model number 44-LF012-MB.
How often should I change the oil in a 2010 Buick LaCrosse?
For conventional oil, every 3,000–5,000 miles is recommended. If using synthetic oil, change it every 7,500–10,000 miles.
Is the myBuick app free to use?
The myBuick app is free to download, but it requires a compatible vehicle and may need an active OnStar subscription for full functionality.
Does the 2010 Buick LaCrosse have a timing chain or belt?
It has a timing chain, not a belt. This typically requires less frequent maintenance.
How much does a replacement battery cost for the 2010 Buick LaCrosse?
Battery prices range from $26.99 to $359.99 depending on brand and type, with the average cost around $167.
Can I start the 2010 Buick LaCrosse without the key?
No, the car requires a key or key fob to start. Bypass methods are not recommended as they can damage the ignition system or violate vehicle security.
Can I stream music via Bluetooth in the 2010 Buick LaCrosse?
No, the Bluetooth system in this model only supports phone calls, not music streaming.


