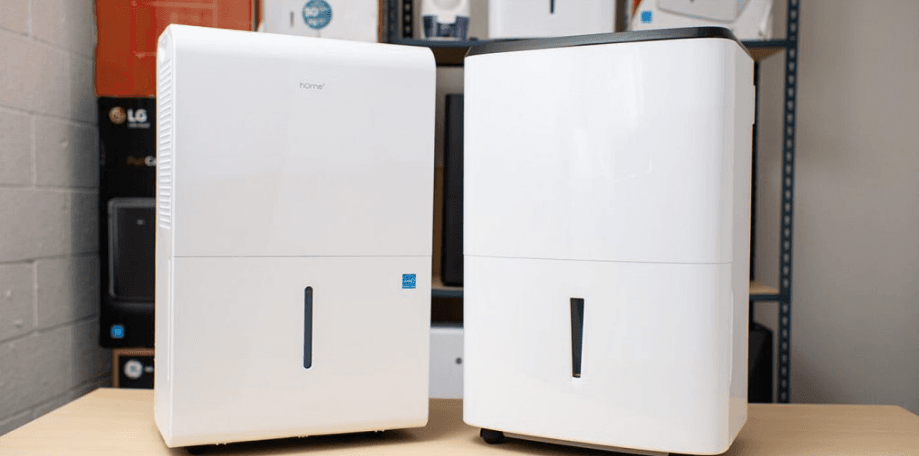
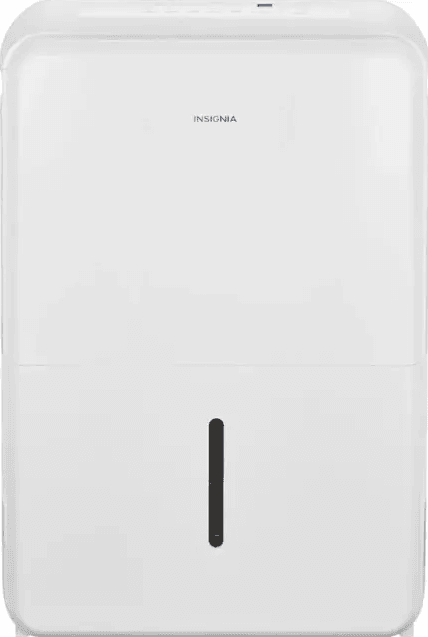
Insignia 50-Pint Dehumidifier
Features
- Maintains a comfortable relative humidity level
- Capable of removing 20, 35, or 50 pints of water out of the air each day (depending on model)
- 20 pt. – 3.2 qt. (3 liter) tank
- 35/50 pt. – 6.3 qt. (6 liter) tank
- Automatically turns off when the tank is full
- Adjustable humidistat for complete control
- Portable design with caster wheels for easy movement and placement
- EnergyStar certified
Package contents
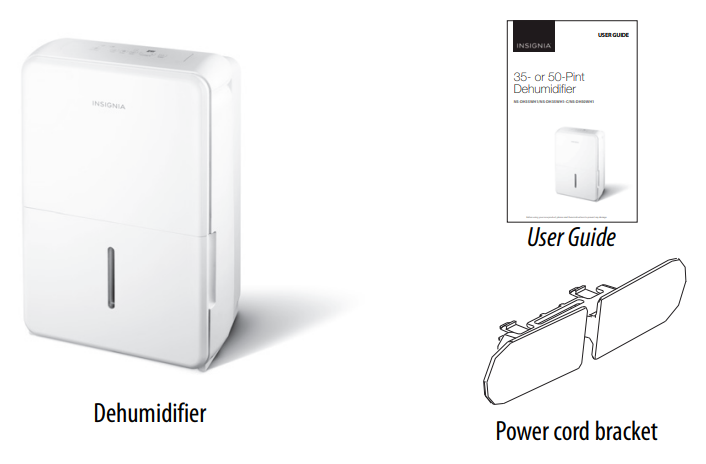
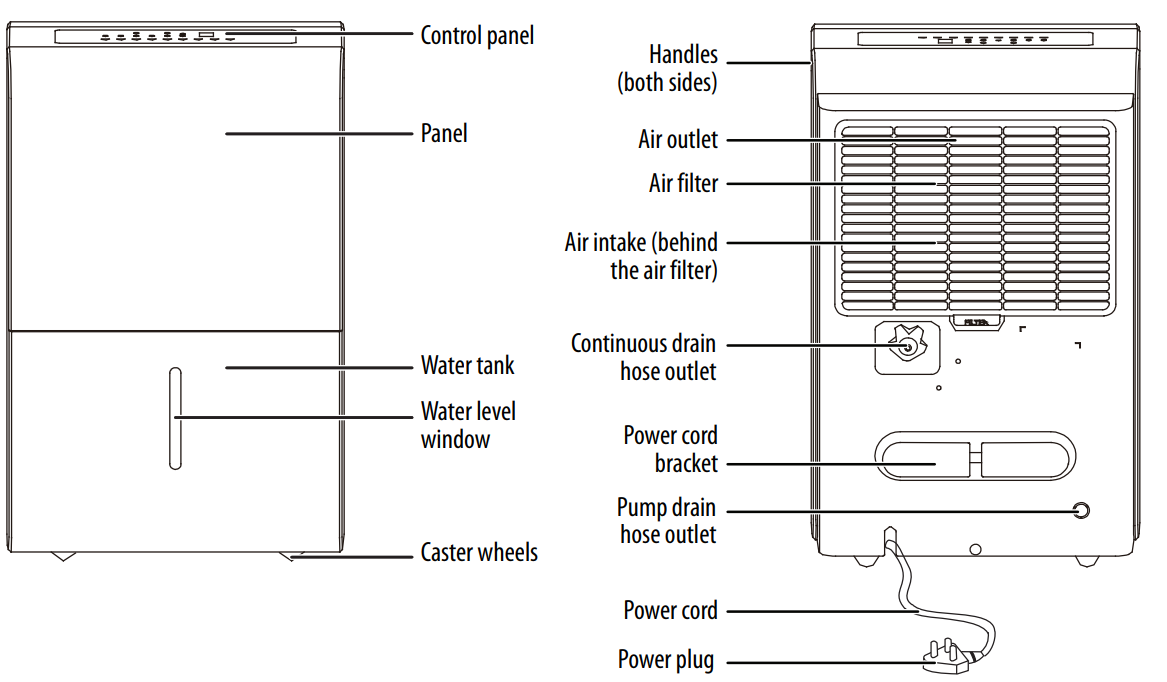
Components
Front and back
Control panel
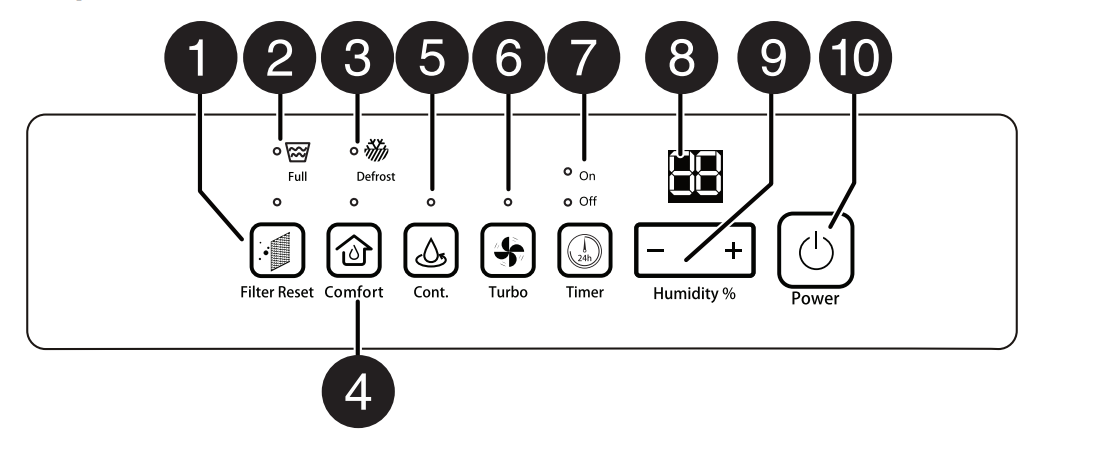
| # | FEATURE | FUNCTION |
| 1 | Filter Reset | The filter light flashes after 250 hours of operation, indicating that the air filter needs to be cleaned. To reset the light after cleaning the filter, press the FILTER button. |
| 2 | Full | Turns on when the water tank is full. Turn off the unit and empty the water tank. |
| 3 | (Auto) Defrost | Turns on when the dehumidifier is in auto defrost mode. The fan continues to run in this mode. |
| 4 | Comfort | Press to set the dehumidifier to the comfort setting (humidity is set to a preset level). The indicator LED turns on. The dehumidifier senses the temperature in the room and automatically adjusts the humidity to 45–55% for the optimal comfort. The length time the dehumidifier is on will vary, depending on ambient humidity and temperature. Press again or adjust the humidity level to turn off the comfort setting. The indicator LED turns off. |
| 5 | Cont. (Continuous dehumidifying) | Press to turn on continuous dehumidifying. The indicator LED turns on. Press again to turn off continuous dehumidifying. The indicator LED turns off. |
| 6 | Turbo | Press to set the fan speed to high. The indicator LED turns on. Press again to set the fan speed to normal. The indicator LED turns off. |
| 7 | Timer | Press to initiate the Auto Start and Auto Stop programs. See Auto Start and Auto Stop timers on page 17. |
| 8 | LED Display | Normally displays the actual room relative humidity level (from 30% to 90%). When setting the desired humidity level, displays the setting level from 35% to 85%. When setting the auto start/stop time, displays the time (0~24 hours). |
| 9 | Humidity % +/- buttons | Use to set the desired humidity level from 35% to 85% (in 5% increments). When auto start/stop mode is initiated, press to set the time until auto start is initiated, then press to set the duration until auto stop turns the unit off. |
| 10 | Power | Press to turn the power on or off. |
Setting up your dehumidifier
Preparing your dehumidifier
- Remove the exterior and interior packing.
- Clean the exterior surface with lukewarm water using a soft cloth.
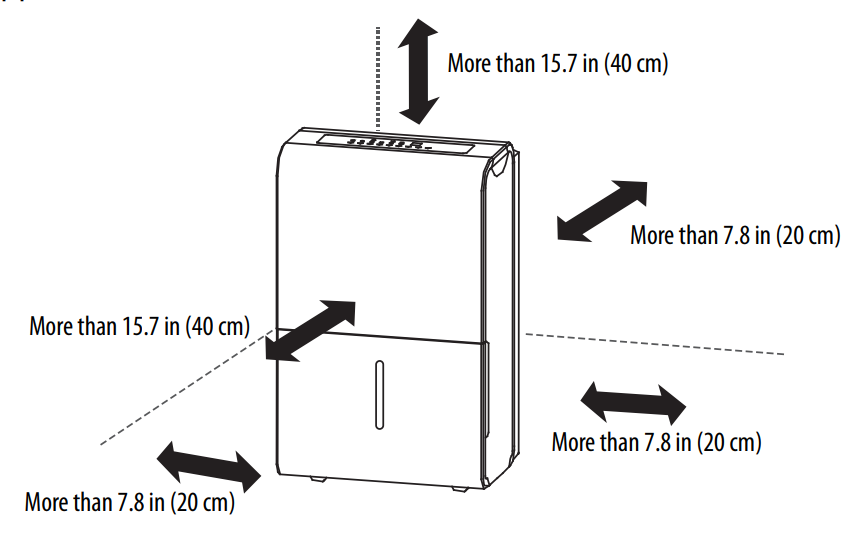
Finding a suitable location
- This dehumidifier is designed to be free standing.
- Place your dehumidifier on a solid floor that is strong enough to support it when the water tank is full.
- The working environment should be between 41° F (5° C) and 90° F (32° C).
- Locate the dehumidifier away from direct sunlight and sources of heat (stove,
heater, radiator, and so on). Direct sunlight may affect the acrylic coating and
heat sources may increase electrical consumption. Ambient temperature below 41° F (5° C) and above 90° F (32° C) will hinder the performance of this appliance.
Connecting to power
- Plug your dehumidifier into a dedicated, properly installed, grounded wall outlet. This appliance should be operated on a separate electrical circuit from other operating appliances. Do not, under any circumstances, cut or remove the third (ground) prong from the power cord. Any questions concerning power and/or grounding should be directed toward a certified electrician or an authorized service center.
- Do not use an extension cord with this dehumidifier. If the power cord is too short, have a qualified electrician install an outlet near the appliance. Use of an extension cord can negatively affect the dehumidifier’s performance.
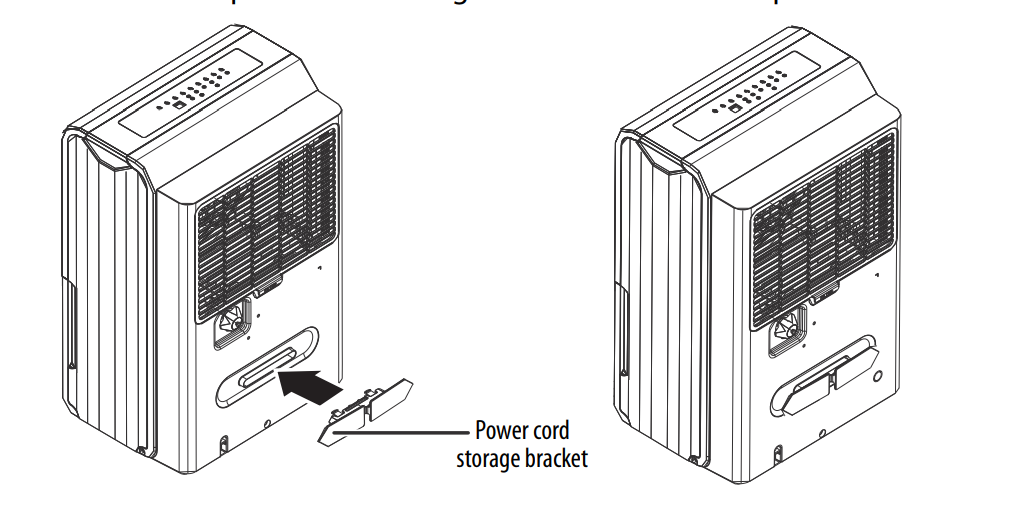
- Remove the power cord storage bracket from your dehumidifier’s water tank (on the front), then insert the power cord storage bracket into the back of your dehumidifier. The power cord storage bracket will click into place.
Using your dehumidifier
- Plug your dehumidifier’s power plug into a power outlet.
- Press the POWER button, then set your dehumidifier to the desired humidity level.
Setting the humidity level
- For drier air, press the button to set a lower humidity level.
- For damper air, press the button to set a higher humidity level.
Auto Start and Auto Stop timers
Your dehumidifier has the option to set a timer to turn it on and/or to turn it off. When you set the Auto Start or Auto Stop timers, the On or Off LED indicators light to remind you which timer has been set. When both the Auto Start and Auto Stop times are set in the same sequence, both the On and Off indicator lights remain lit.
Setting the Auto Start timer
- Press TIMER until the On indicator LED turns on.
- Press and hold the or buttons to select the number of hours before your dehumidifier will automatically turn on, then wait for the LED display to return to its previous state. The setting is saved.
Setting the Auto Stop timer
- Press TIMER until the Off indicator LED turns on.
- Press and hold the or buttons to select the number of hours before your dehumidifier will automatically turn off, then wait for the LED display to return to its previous state. The setting is saved.
Removing collected water
- When the Full indicator lights, remove the tank from your dehumidifier.
- Pour the water out, then reinsert the tank into your dehumidifier.
Removing collected water with continuous draining
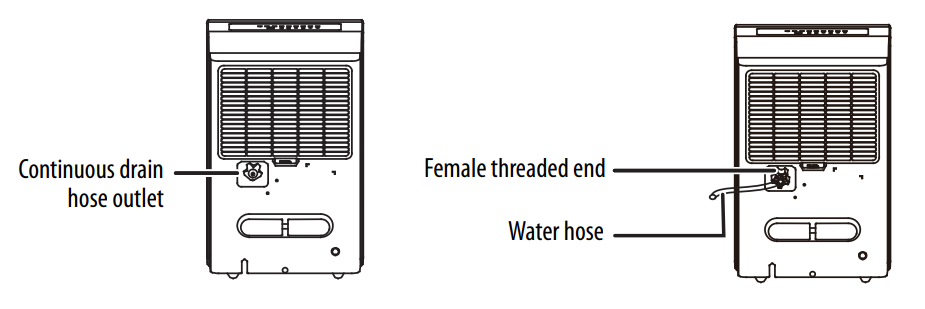
- Remove the plastic cover from the continuous drain hose outlet.
- Screw a 5/16” drain hose (not included) onto the female threaded end of the continuous drain hose outlet.

- Direct the hose towards a floor drain.
Maintaining your dehumidifier
Preparing for maintenance
- Turn your dehumidifier off.
- Disconnect your dehumidifier’s plug from the power supply.
Cleaning the grill and case
- Use water and a mild detergent to clean the grill and case.
- Use a vacuum cleaner or brush to clean the air intake.
Cleaning the tank
- Remove the tank from your dehumidifier, then fill the tank with water and a mild detergent.
- Swish the water and detergent around in the tank, then empty and rinse the tank.
- Let the tank air dry or dry it with a cloth, then place it back into your dehumidifier
Cleaning the air filter
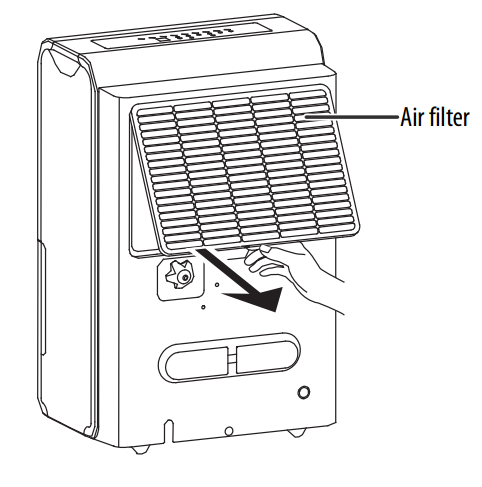
The air filter should be cleaned after 250 hours of use or 30 days, whichever comes first. The FILTER LED indicator lights up after 250 hours of use to indicate when to clean the filter.
- Remove the air filter by pulling it outwards

- Wash the filter with water, then let it air dry.
- Reinstall the filter, then press Filter Reset.
Storing your dehumidifier
- Before storing, let your dehumidifier rest for one full day so that it can air dry, then empty the water tank.
- Clean the grill, case, tank, and air filter.
- Wrap the power cord around the power cord buckle.
- Cover your dehumidifier with a plastic bag.
- Store the unit upright in a dry, well-ventilated area.
Troubleshooting
| PROBLEM | SOLUTION |
| My dehumidifier does not start |
|
| PROBLEM | SOLUTION |
| My dehumidifier does not dry the air as it should |
|
| My dehumidifier makes a loud noise when operating |
|
| My dehumidifier makes a soft, swishing noise when operating |
|
| My dehumidifier makes a gurgling noise when operating |
|
| Frost appears on my dehumidifier’s coils |
|
| There is water on my floor |
|
| The LED display shows ES, AS, P2, or Eb |
|
Understanding the LED display codes
| CODE | MEANING |
| Error | |
| AS | Humidity sensor error. Unplug your dehumidifier and plug it back in. If the error persists, contact Customer Service. |
| ES | Evaporator tube temperature sensor error. Unplug your dehumidifier and plug it back in. If the error persists, contact Customer Service. |
| Eb | The water tank has been removed or is not in the correct position. Replace the tank in the correct position. This code only displays on units with the pump feature. |
| Protection | |
| P2 | The water tank is full or is not in the correct position. Empty the tank or place it in the correct position. On units with pump feature – The water tank is full and needs to be emptied. |
Specifications
| Dimensions (W × D × H) | 20 pt. – 16.1 x 10.7 x 19.7 in. (41 x 27.3 x 50 cm) 35 and 50 pt. – 16.8 x 11.7 x 24.4 in. (42.7 x 29.8 x 62 cm) |
| Weight | 20 pt. – Net = 33 lb. (15 kg) Gross = 36.8 lb. (16.7 kg) 35 pt. – Net = 39.8 lb. (18.06 kg) Gross = 44.6 lb. (20.22 kg) 50 pt. – Net = 41.4 lb. (18.77 kg) Gross = 46.2 lb. (20.94 kg) |
| Power requirements | 115V~60Hz |
| Power consumption | 20 pt. – 270W 35 pt. – 380W 50 pt. – 545W |
| Power cord length | 6.2 ft. (1.9 m) |
| Water tank capacity | 20 pt. – 3.2 qt. (3 liter) tank 35/50 pt. – 6.3 qt. (6 liter) tank |
| Moisture removal rate | 20, 35, or 50 pints/day (9.5, 16.6, or 23.7 liters/day) |
FOR MORE MANUALS BY INSIGNIA, VISIT MANUALSLIBRARYY
Insignia 50-Pint Dehumidifier-FAQ’s
What does “50-pint” mean on a dehumidifier?
It refers to the amount of moisture the unit can remove from the air in a 24-hour period—up to 50 pints.
Does a 50-pint dehumidifier use a lot of electricity?
Not significantly. It typically costs around $15–$18 per month to run, depending on your electricity rate and usage.
How do I clean my dehumidifier?
Empty the water tank, fill it with warm water and mild dish soap, then scrub it with a sponge. Rinse thoroughly before reinserting.
Why isn’t my dehumidifier collecting water?
Check if the air filter is clogged or if frost has formed on the internal coils. Clean or defrost the unit as needed.
What is Smart Mode on the dehumidifier?
Smart Mode monitors humidity levels and automatically turns the unit on or off to maintain optimal air quality.
Can I use my AC as a dehumidifier?
Yes. Many AC units have a “Dry Mode” (often shown with a droplet icon) which removes moisture without significantly lowering temperature.
Is it safe to run the dehumidifier all night?
Yes, it’s safe to run overnight, especially if you’re targeting high humidity. Just consider the noise level if it’s placed in a bedroom.
What humidity level should I set?
For best results, set your dehumidifier between 30% and 50%. This range helps prevent mold while keeping the air comfortably balanced.

