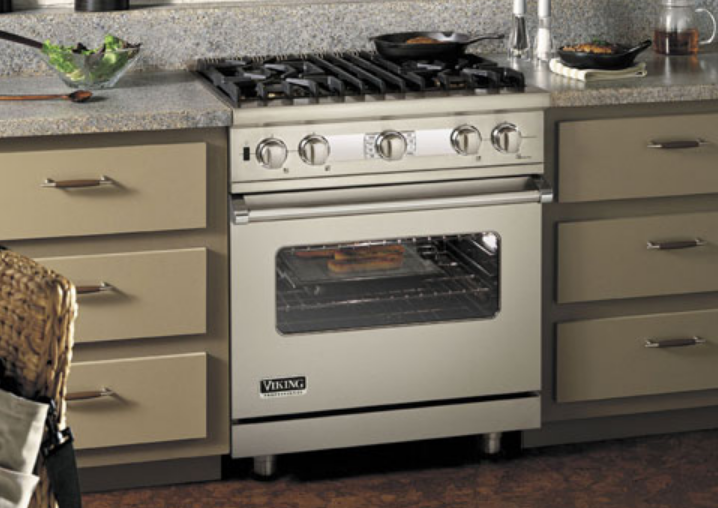
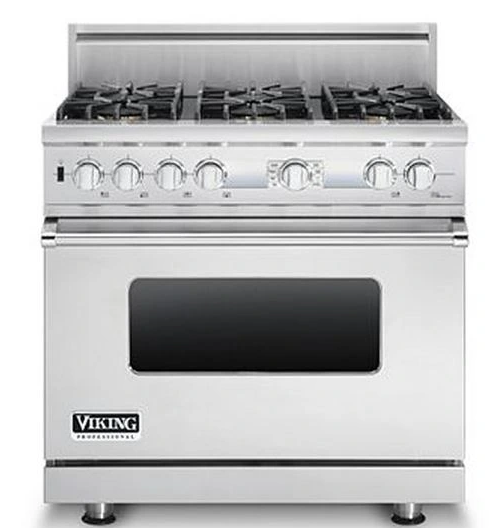
Viking VDSC530 Professional Freestanding Dual Fuel Gas range
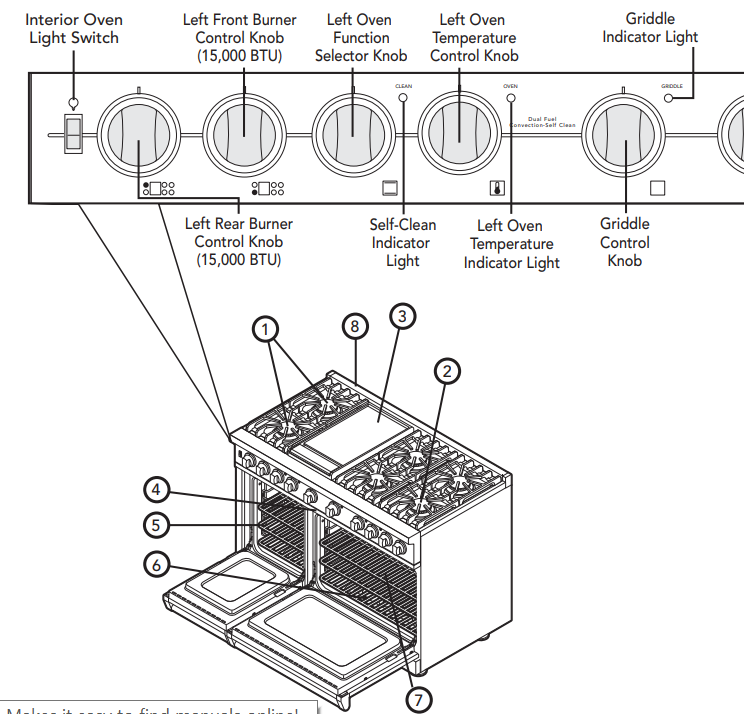
- Five 15,000 BTU sealed burners with porcelain/ Cast iron caps and automatic ignition/Re-ignition
- One 18,500 BTU sealed burner with porcelain/ Cast iron caps and automatic ignition/Re-ignition
- Griddle (Optional)
- Identification plate
- 18” Oven – Two Standard tilt-proof rack/Six rack positions
- 30” Oven – Two TruGlide racks/One Standard tilt-proof rack/Six rack positions
- Broiler pan–located inside the oven
- Island Trim
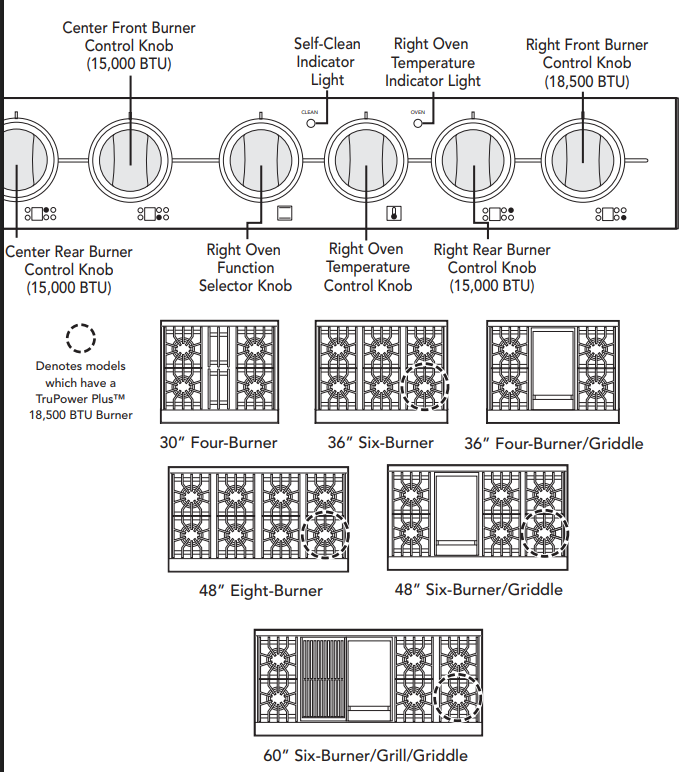
Oven Functions and Settings
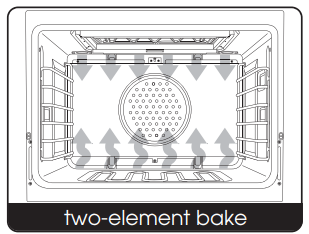
BAKE (Two-Element Bake) Use this setting for baking, roasting, and casseroles.
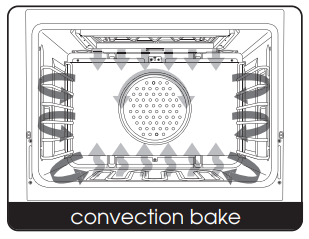
CONV BAKE (Convection Bake) Use this setting to bake and roast foods at the same time with minimal taste transfer.
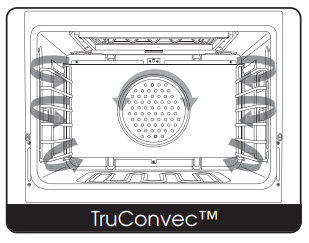
TRU CONV (TruConvec™) Use this bake setting for multi-rack baking for breads, cakes, cookies (up to 6 racks of cookies at once).
CONV ROAST (Convection Roast) Use this setting for roasting whole turkeys, whole chickens, hams, etc.
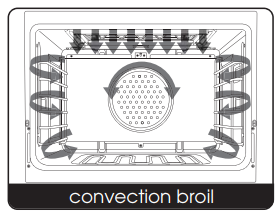
CONV BROIL (Convection Broil) Use this setting to broil thick cuts of meat.
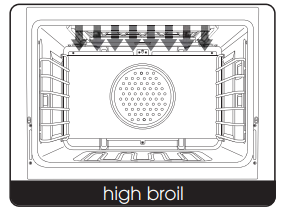
HI BROIL Use this setting for broiling dark meats at 1” thickness or less, where rare or medium doneness is desired.
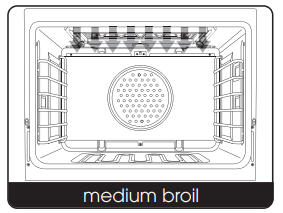
MED BROIL Use this setting for broiling white meats such as chicken or meats greater than 1” thick that would be over-browned in high broil.
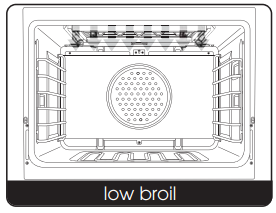
LOW BROIL Use this setting for delicate broiling, such as meringueSELF-CLEANAN Use this function to clean the oven.
Convection Dehydration (TRU CONV) Use this function to dehydrate fruits and vegetables.
Convection Defrost (TRU CONV) Use this function to defrost foods.
Proof (Left oven on 48” W. models) Use this setting to allow yeast dough to rise.
Note: For more information on oven functions, see the “Operation” section.
Surface Operation
Lighting Burners
All burners are ignited by electric ignition. There are no open-flame, “standing” pilots.
Surface Burners-Automatic Reignition
To light the surface burners, push and turn the appropriate control knob counter clockwise to any position. This control is both a gas valve and an electric switch. Burners will ignite at any “ON” position with the automatic re-ignition system. If the flame goes out for any reason, the burners will automatically reignite if the gas is still flowing. When gas is permitted to flow to the burners, the electric igniters start sparking. On all surface igniters, you should hear a “clicking” sound. If you do not, turn off the control and check that the unit is plugged in and that the fuse or circuit breaker is not blown or tripped. Within a few moments, enough gas will have traveled to the burner to light. When the burner lights, turn the burner control to any position to adjust the flame size. Setting the proper flame height for the desired cooking process and selecting the correct cooking vessel will result in superior cooking performance, while also saving time and energy.
Vari-Simmer™
Simmering is a cooking technique in which foods are cooked in hot liquids kept at or just barely below the boiling point of water. Simmering ensures gentler treatment than boiling to prevent food from toughening and/or breaking up. The size of the pan and
the volume of food can have a significant effect on how high or low a flame is needed for simmering. For this reason, Viking range and rangetop burners are engineered with a Vari-Simmer setting. The Vari-Simmer setting is not just one simmer setting, but provides a variable range of simmer settings. This variable range of simmer settings allows you to adjust the flame height to achieve the best simmer, er, depending on the type and quantity of food being simmered. It is this ability that makes the Vari-Simmer setting the most accurate and trustworthy simmer on the market.
TruPower Plus™ Burner (where applicable)
Certain model ranges are equipped with a TruPower Plus 18,500 BTU burner in the front right burner position. This burner is designed to provide extra high heat output, especially when using large pans, and should be used for boiling large quantities or if you need to bring something to a boil quickly. While the TruPower Plus burner has the extra power needed to bring large quantities of liquid to a boil rapidly, it is also able to be turned down low enough to provide a very low and delicate simmer, making this burner the most versatile burner on the market.
Surface Cooking Tips
- Use low or medium flame heights when cooking in vessels that are poor conductors of heat, such as glass, ceramic, and cast-iron. Reduce the flame height until it covers approximately 1/3 of the cooking vessel diameter. This will ensure more
even heating within the cooking vessel, and reducing the likelihood of burning or scorching the food. - Reduce the flame if it is extending beyond the bottom of the cooking vessel. A flame that extends along the sides of the vessel is potentially dangerous, heats the utensil handle and kitchen instead of the food, and wastes energy.
- Reduce the flame height to the minimum level necessary to perform the desired cooking process. Remember that food cooks just as quickly at a gentle boil as it does at a rolling boil. Maintaining a higher boil than is necessary wastes energy,
cooks away moisture, and causes a loss in food flavor and nutrient level. - The minimum pot or pan (vessel) diameter recommended is 6” (15 cm). Use of pots or pans as small as 4” (10 cm) is possible but not recommended.
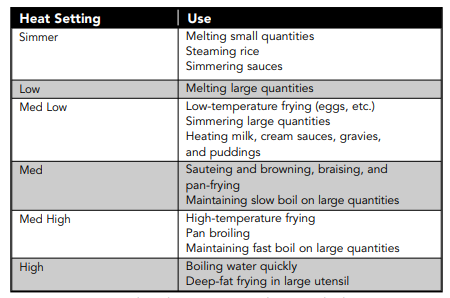
Cooking Vessels
Each cook has his or her preference for the particular cooking vessels that are most appropriate for the type of cooking being done. Any cooking vessels are suitable for use in the range, and it is not necessary to replace your present domestic vessels with commercial cookware. This is a matter of personal choice. As with any cookware, yours should be in good condition and free from excessive dents on the bottom to provide maximum performance and convenience.
Griddle/Simmer Plate (on applicable models)
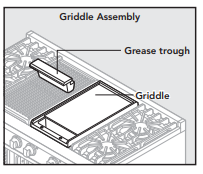
The optional 15,000 BTU griddle is constructed of machined steel with a blanchard finish and is uniquely designed to offer excellent cooking performance as well as easy clean up. The griddle is equipped with an electronic thermostat to maintain an even temperature across the griddle once the desired temperature has been set. The griddle has a power “ON” indicator light that glows when the griddle thermostat has been turned on. This will cycle on and off as needed to indicate the thermostat is maintaining the selected temperature. Before the griddle is used, it is important to season the griddle. This seasoning process will change the appearance of the griddle plate. However, it will also prevent food from sticking and protect the surface from moisture.
Seasoning the Griddle Before the First Use
• Scrub the griddle plate with a mixture of one quart warm water and 1/4 cup white vinegar, using a blue Scotch-Brite™ pad.
Dry thoroughly.
• Wash griddle with warm, soapy water. Rinse off and dry thoroughly.
• Season the griddle by thinly coating the surface with approximately 1/2 to 1 teaspoon of unsalted vegetable oil. Apply to the entire
griddle using a paper towel or clean cloth. Let the oil sit on the griddle for approximately 1 hour and then wipe with a clean cloth or
paper towel to absorb any residual oil. The griddle is now ready for use.
Griddle/Simmer Plate Clean Up & Care
- It is not necessary to wash the griddle after every use. When light cooking is performed and AFTER the griddle has cooled, simply wipe down the surface with a clean cloth or paper towel. The oils in the food which cooked on the griddle surface will naturally season the griddle, providing a “natural” non-stick surface.
- After heavy cooking is completed and the griddle is still warm enough to create steam, pour a small amount of club soda at room temperature directly on the griddle. Using a metal spatula, pull oils and food particles toward the trough in front. Wipe the entire surface with a paper towel. Follow the seasoning process of applying oil.
- Keeping the griddle well seasoned will prevent the griddle from developing surface rust. If the griddle is not used for some time, it must be re-seasoned. The griddle must be re-seasoned each time after it is washed.
- Non-stick cooking spray is not recommended as it contains a high water content that tends to burn quickly.
- Corn oil is not recommended as it has a high sugar level. It will caramelize and burn on the surface, making it very difficult to remove.
- After using the griddle, always remove the grease trough located in the front. Simply pull the trough towards you and lift out. Be sure to allow all surfaces to cool before removing the grease trough. The trough or tray trap needs to be cleaned after each use. A fire hazard may occur if grease accumulates in the trough.
- Note – it is normal for the griddle to darken over time. This is the sign of a well-seasoned griddle.
- Important: Never flood a hot griddle with cold water. This thermal shock promotes griddle warping and can cause the griddle to crack if continued over a period of time.
- For heavy-duty cleaning, Viking Range, LLC offers a Griddle Cleaning Kit (model #GCK). This fast and effective commercial-grade cleaning system will clean your griddle in a matter of minutes. To order, contact your local dealer or order on our website
website at vikingrange.com in the US or brigade.ca in Canada
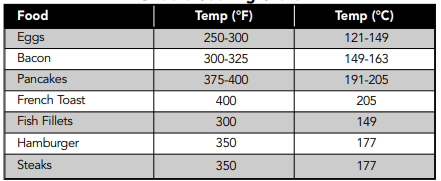
Char-Grill (on applicable models)
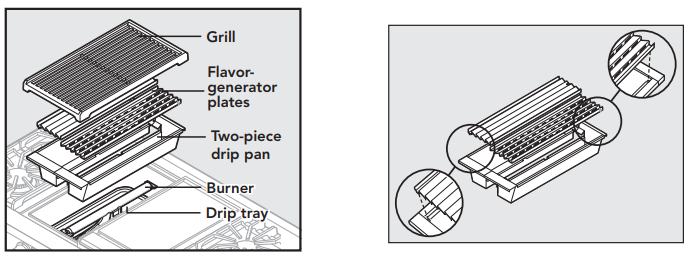
The optional 18,000 BTU char-grill is equipped with a single-piece, heavy-duty porcelainized cast-iron grill grate for easy movement of grilling items. Beneath the grill grate are two slotted porcelainized flavor generator plates, which are designed to catch drippings and circulate a smoke flavor back into the food. Beneath the flavor generator plates is a two-piece drip pan that catches any drippings that might pass beyond the flavor generator plates. This unique grilling system is designed to provide outdoor-quality grilling indoors.
Char-Grill Assembly
Before using the char-grill, you will need to follow these steps to properly assemble the char-grill.
- Remove the two flavor generator plates and grill grate from the cardboard packaging.
- Position the flavor generator plates so that the tab on each plate is inserted in the right, rear hole and left, front hole on the drip pans. (See char-grill assembly section on the following pages.)
- After the flavor generator plates are properly located, place the grill grate on top of the flavor generator plates. After this, the char-grill is assembled and ready to use.
Char-Grill Operation
- Turn the overhead ventilation on before turning the grill on.
- Turn the grill knob counterclockwise to HI.
- Always preheat the grill for 5-10 minutes before placing food on the grill grate.
- Place food items on the grill, cook as desired.
- To turn the grill off, turn the grill knob clockwise to the OFF position.
Char-Grill Cooking Tips
- When grilling chicken, roasts, well-done steaks, or chops and thick pieces of meat, sear on HI. Then, reduce the heat setting to prevent excessive flare-up. This will allow the food to cook through without burning the outside.
- After steaks, chops, or hamburgers have been allowed to sear for approximately one minute, you may slide a spatula under the meat and turn it approximately 90 degrees so that a waffle pattern will be seared onto the food.
- Use a metal spatula instead of tongs or a fork to turn the meat. A spatula will not puncture the meat, allowing juices to escape.
- Turn the meat over only once. Juices are lost when steaks, chops, ps, or hamburgers are turned several times. The best time to turn the meat is after the juices have begun to bubble to the surface.
- To test for doneness, make a small slash in the center of the meat, not the edge. This will prevent loss of juices.
- Occasionally,y there may be flare-ups or flames above the grill due to drops of fat falling on the flavor generator plates. It is normal to have some flare-ups during grilling. Use a long-handled spatula to move food to another area until the flames
subside. - For ease of cleaning, leave the char-grill on for 10 minutes when finished grilling. This will help make cleanup easier once the char-grill has cooled down.
Char-Grill Disassembly for Cleaning
Follow these steps to disassemble the char-grill for cleaning. Make sure the char-grill is completely cool before attempting to disassemble for cleaning.
- Remove the char-grill grate.
- Remove the flavor-generator plates.
- Remove the drip pan. Note that the drip pan is a two-piece drip pan.
- Located beneath the burner is the drip tray. Under normal grilling circumstances, very little, if any, grease will accumulate in the drip tray. If any grease has accumulated in the drip tray, simply wipe it out with a paper towel or a damp cloth.
Char-Grill Assembly
Char-Grill Clean Up & Care
- Char-grill grates:
- May be cleaned immediately after cooking is complete and before turning off the flame. Before cleaning the grill, turn the flame down to a lower setting, such as “MED” or “LOW”. Use a soft-bristle brush to scrub the grill grate. Dip the brush frequently into a bowl of water. Steam is created as the water contacts the hot grate. The steam assists the cleaning process by softening the food particles.
- For a thorough cleaning of the grill grate, use grill cleaner according to the manufacturer’s directions and then soak for 15-20 minutes in hot water and mild detergent solution. After soaking, scrub with a blue Scotch-Brite™ pad. DO NOT use a steel wool pad or abrasive cleaner, for the risk of damaging the porcelain finish. Dry thoroughly.
- Flavor generator plates and drip pan:
- Scrape off all burned-on debris. The flavor generator plates and drip pan are dishwasher safe. If you choose not to wash these components in the dishwasher, then simply soak for 15-20 minutes in hot water and mild detergent solution. After soaking, scrub with a blue Scotch-Brite™ pad.
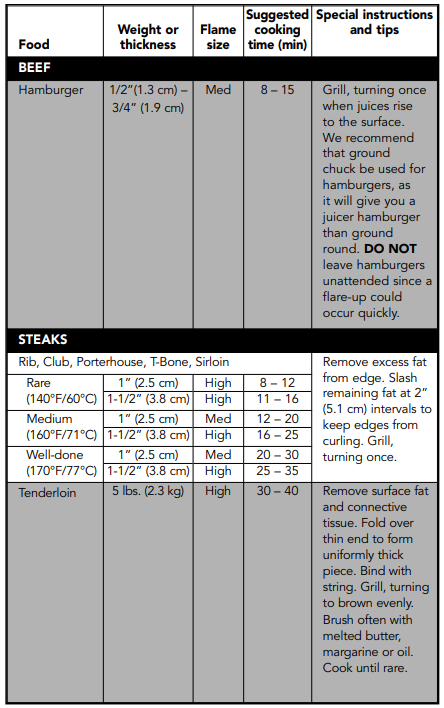
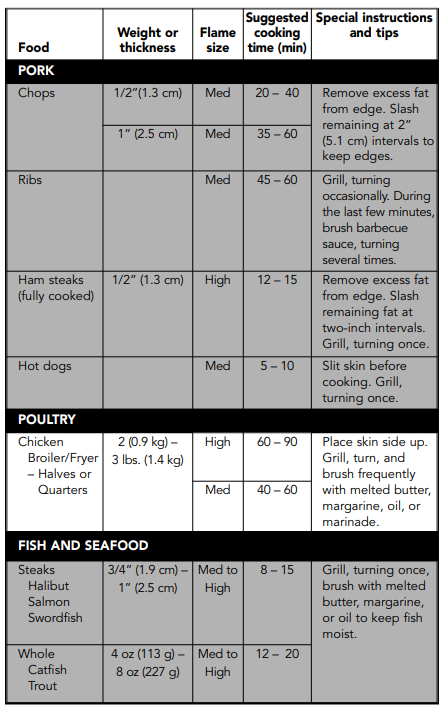
Grill Cooking Chart
Oven Features
Rack Positions
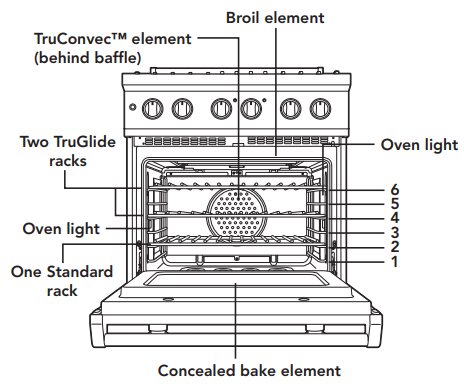
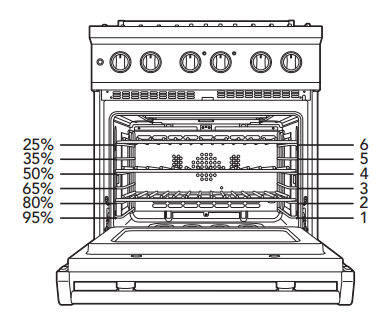
Each 30” and 36” oven is equipped with two full extension glide racks and one standard rack. The 18” oven is equipped with three standard tilt-proof racks. All ovens have six rack positions. Position 6 is the farthest from the oven bottom. Position 1 is the closest to the oven bottom. The racks can be easily removed and arranged at various levels. For best results with conventional baking, DO NOT use more than one rack at a time. It is also recommended, when using two racks, to bake with the racks in positions 2 and 4 or positions 3 and 5.
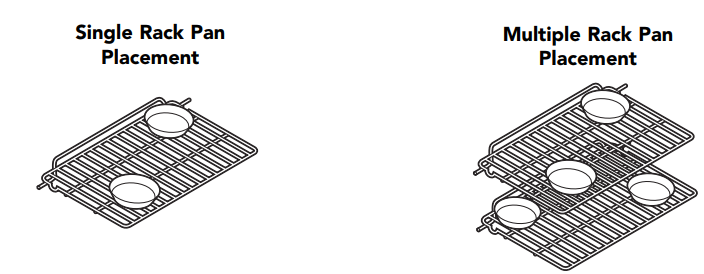
Pan Placement Tips
- When using large (15″ x 13″) flat pans or trays that cover most of the rack, rack positions 2 or 3 produce the best results.
- When baking on more than one rack, it is recommended to use one of the convection modes and the 2nd and 4th position or the 3rd and 5th position for more even baking. When baking on three racks, use any combination of positions
2, 3, 4, and 5 for more consistent results. - Stagger pans in opposite directions when two racks and several pans are used in a conventional bake. If possible, no pan should be directly above another.
- Allow 1 to 2 inches of air space around all sides of each pan for even air circulation.
BAKE (Two-Element Bake)
CONV BAKE (Convection Bake)
TRU CONV (TruConvec™)
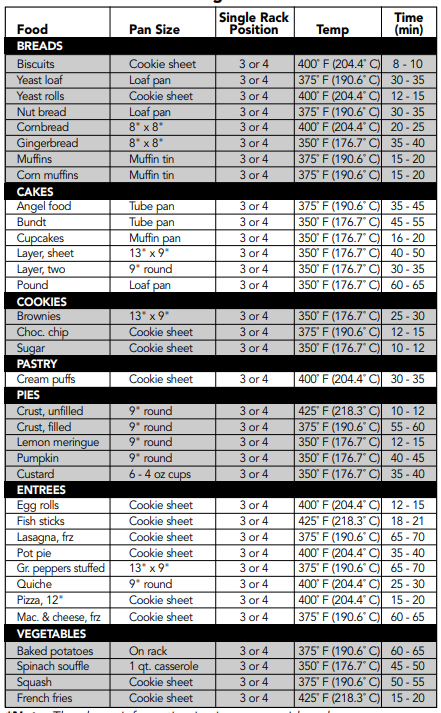
Baking Chart
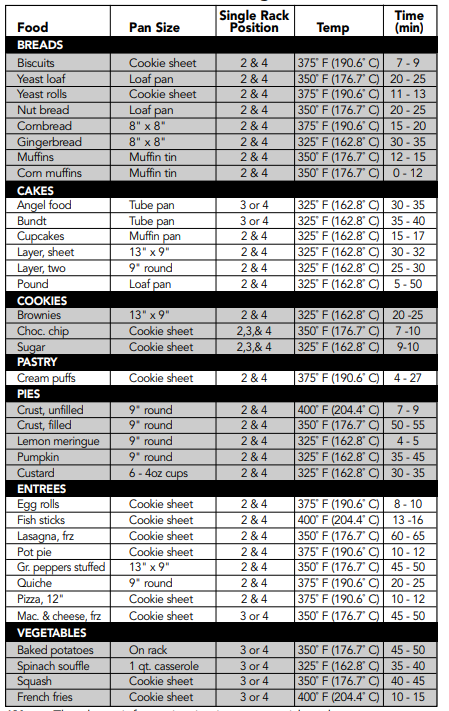
Convection Baking Chart
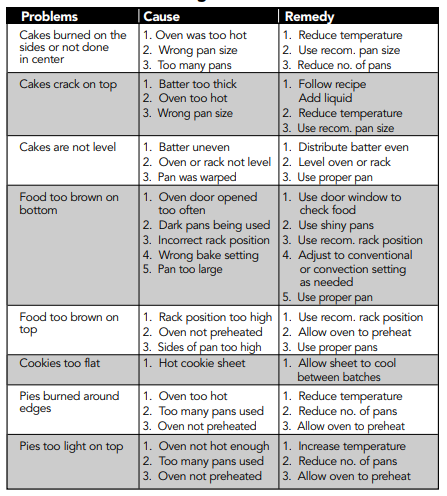
Solving Baking Problems
Roasting
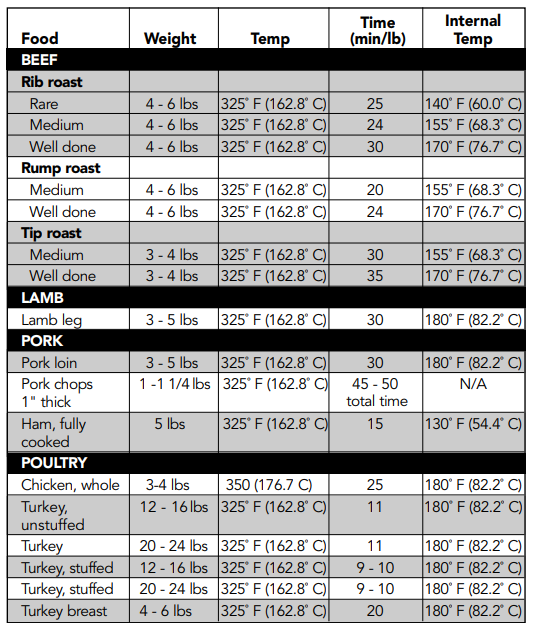
CONV ROAST* (Convection Roast)
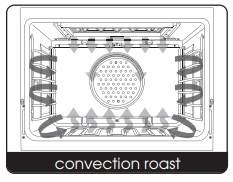
The convection element runs in conjunction with the inner and outer broil elements.
The reversible convection fan runs at a higher speed in each direction. This transfer
of heat (mainly from the convection element) seals moisture inside large roasts. A
time savings is gained over existing, single-fan convection roast modes. Use this
setting for whole turkeys, whole chickens, hams, etc.
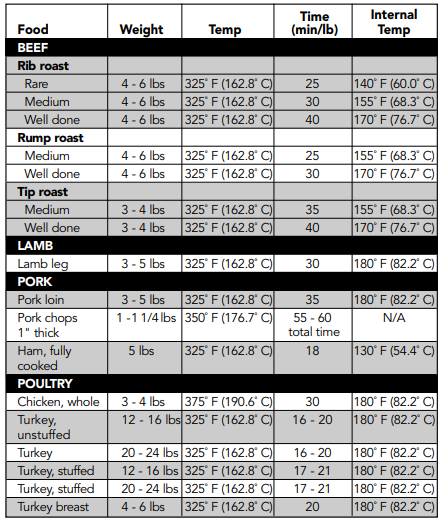
Conventional Roasting Chart
(when using the Bake or Convection Bake setting)
Convection Roasting Chart
Broiling
CONV BROIL (Convection Broil)
HI BROIL
MED BROIL
LOW BROIL
Rack Positions for Broiling
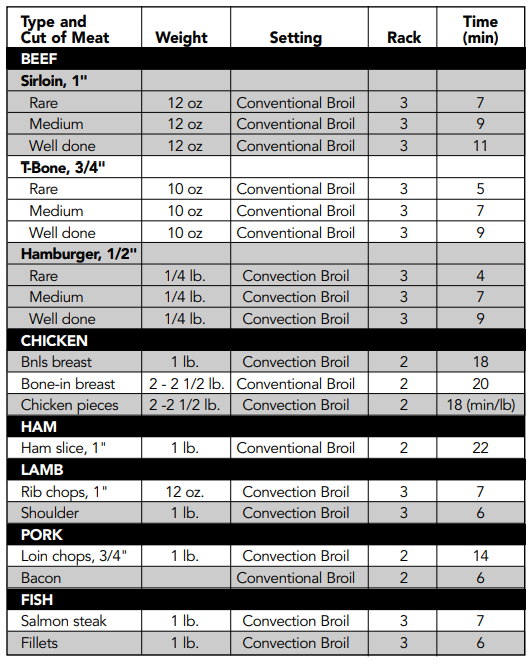
Broiling Chart
Cleaning and Maintenance
Any piece of equipment works better and lasts longer when maintained properly and kept clean. Cooking equipment is no exception. Your range must be kept clean and maintained properly. Before cleaning, make sure all controls are in the “OFF” position. Disconnect the power if you are going to clean thoroughly with water.
Surface Burners
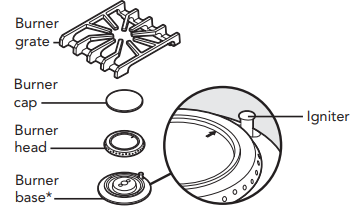
* Note: When replacing the burner head, the arrow must be pointing towards the back of the range.
Wipe up spill-overs as soon as possible after they occur and before
they get a chance to burn in and cook solid. In the event of a spill-over, follow these steps:
- Allow the burner and grate to cool to a safe temperature level.
- Lift off the burner grate. Wash in warm, soapy water.
- Remove the burner cap and burner head and clean them.
Burner Caps
The surface burner caps should be routinely removed and cleaned. ALWAYS clean the burner caps after a spill-over. Keeping the burner caps clean will prevent improper ignition and uneven flames. To clean, pull the burner cap straight up from the burner base. Wipe off surface burner caps with warm, soapy water and a soft cloth after each use. Use a non-abrasive cleanser such as Bon Ami™ and a soft brush or soft Scotch Brite™ pad for cooked-on foods. Dry thoroughly after cleaning. For best cleaning and to avoid possible rusting, DO NOT clean in the dishwasher or self-cleaning oven.
Burner Head
If ports on the burner head are clogged, clean with a straight pin. DO NOT enlarge or distort the ports. DO NOT use a toothpick to clean the ports. When replacing the burner head, carefully align the 2 tabs underneath the burner head with the
outside edge of the burner base. Make sure the tabs are not aligned with the igniter and the burner cap is level. Note: For stubborn stains, use a non-abrasive cleanser such as Bon Ami™ and a soft brush or soft Scotch Brite™ pad. Cleaning Tip: For difficult-to-clean burner caps and heads, place parts in a zip-seal bag with ammonia.
Door Removal
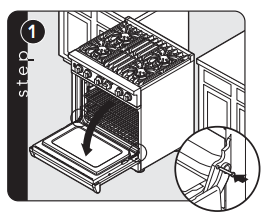
Open the door completely. Place a pin in the pin hole.
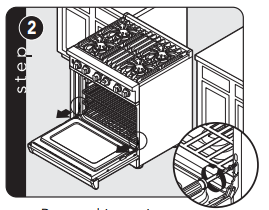
Remove hinge trim screws and hinge trim.
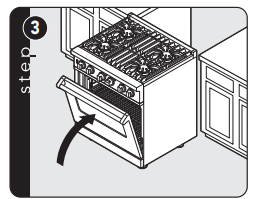
Close until the pins stop the door.
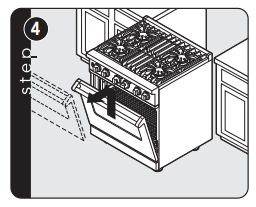
Lift the door up and out.
Door Replacement and Adjustment
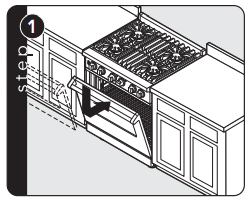
Reinstall the door to the range.e
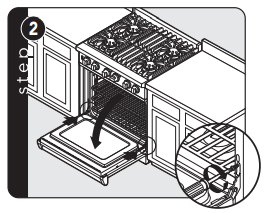
Open the door completely. Reinstall hinge trim.
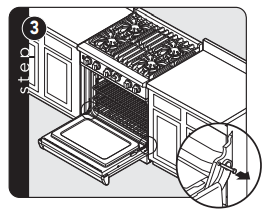
Remove pins from the holes in the hinges.
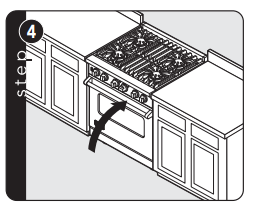
Close the door.
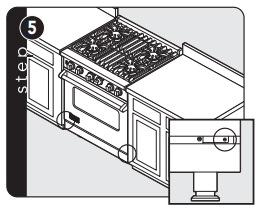
If the door needs to be adjusted, loosen hinge trim screws located in step 2. Adjust the screws located between the door and kickplate using a 5/32” hex head allen wrench. After adjustment, tighten hinge trim screws.
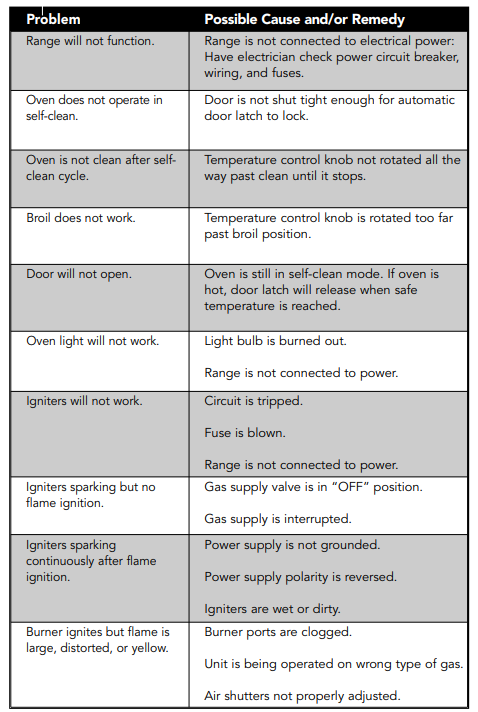
Troubleshooting
FOR MORE MANUALS BY VIKING RANGE, VISIT MANUALSLIBRARYY
Viking VDSC530 Professional Freestanding Dual Fuel Gas range- FAQs
Why isn’t my Viking oven heating up?
If your Viking oven isn’t working, it could be due to a faulty thermostat, a broken heating element, or a problem with the electrical connection. Check these components or consult a professional for help.
What power supply does a Viking range need?
The Viking range requires a 240-208/120V AC, 60 Hz power supply with a 3-wire connection. Make sure it’s fused separately and properly grounded.
How does a dual fuel range operate?
A dual fuel range combines a gas cooktop (for precise flame control) with an electric oven (for consistent, even baking). It requires both a gas line and a 240-volt electric outlet.
How do I clean the Viking gas cooktop?
Use hot, soapy water and a soft cloth to clean the burner bowls and sealed burners after cooking. For stubborn stains, try Soft Scrub (non-bleach) with a blue Scotch-Brite pad. Avoid heavy scrubbing to prevent surface scratches.
Why does my Viking stove keep clicking?
Clicking sounds often happen when moisture reaches the igniter—this can occur after cleaning or a spill. Let the igniter area dry completely before use.
How do I use the self-clean feature on my Viking oven?
Turn the Temperature Control knob past the “Clean” setting until it stops. The indicator light will turn on, and the oven door will automatically lock. The oven will cycle through the cleaning process and unlock once it’s done.
Are Viking ranges considered reliable?
Yes, Viking ranges are well-regarded for their performance, durability, and premium design, as reflected in thousands of positive reviews from satisfied customers.
What voltage does a dual fuel range require?
A dual fuel range needs a 240-volt power supply. Standard 120V outlets are not compatible, so professional installation may be required if your kitchen isn’t already equipped.
What are the drawbacks of a dual fuel range?
Dual fuel ranges need both gas and electric hookups. If your kitchen only has one fuel source, you may need to upgrade utilities, which can add to installation costs.

