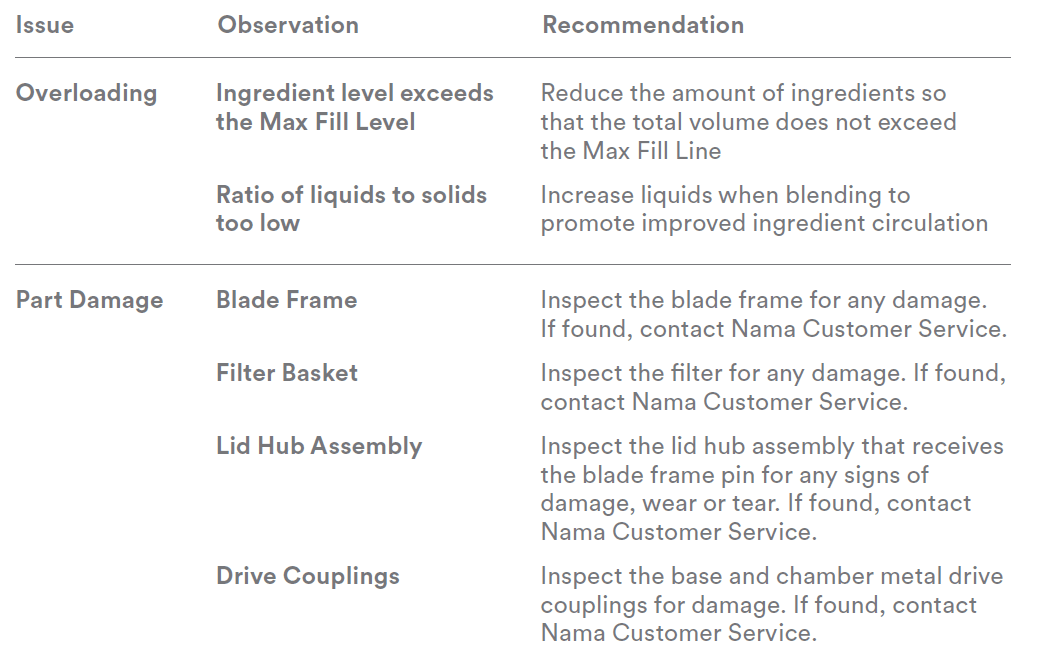
Nama M1 Plant Milk Maker
IMPORTANT SAFEGUARDS
- WHEN USING ELECTRICAL APPLIANCES, BASIC SAFETY PRECAUTIONS SHOULD ALWAYS BE FOLLOWED. READ ALL INSTRUCTIONS.
- TO PROTECT AGAINST RISK OF ELECTRICAL SHOCK, DO NOT PUT THE MAIN BASE (MOTOR) IN WATER OR ANY OTHER LIQUID.
- THIS APPLIANCE IS NOT INTENDED FOR USE BY PERSONS (INCLUDING CHILDREN) WITH REDUCED PHYSICAL, SENSORY, OR MENTAL CAPABILITIES, OR LACK OF EXPERIENCE AND KNOWLEDGE, UNLESS THEY ARE CLOSELY SUPERVISED AND INSTRUCTED CONCERNING USE OF THE APPLIANCE BY A PERSON RESPONSIBLE FOR THEIR SAFETY. CLOSE SUPERVISION IS NECESSARY WHEN ANY APPLIANCE IS USED BY OR NEAR CHILDREN. CHILDREN SHOULD BE SUPERVISED TO ENSURE THAT THEY DO NOT PLAY WITH THE APPLIANCE.
- ALWAYS ENSURE THE APPLIANCE IS PROPERLY ASSEMBLED ACCORDING TO INSTRUCTIONS. OPERATING AN INCORRECTLY ASSEMBLED APPLIANCE MAY CAUSE PRODUCT MALFUNCTION, PRODUCT DAMAGE, OR POSE SAFETY RISK INCLUDING PERSONAL INJURY.
- TURN THE APPLIANCE OFF, THEN UNPLUG FROM THE OUTLET WHEN NOT IN USE, BEFORE ASSEMBLING OR DISASSEMBLING PARTS AND BEFORE CLEANING. TO UNPLUG, GRASP THE PLUG AND PULL FROM THE OUTLET. NEVER PULL FROM THE POWER CORD.
- AVOID CONTACT WITH MOVING PARTS. DO NOT ATTEMPT TO DEFEAT ANY SAFETY INTERLOCK MECHANISMS.
- DO NOT OPERATE ANY APPLIANCE WITH A DAMAGED CORD OR PLUG, OR AFTER THE APPLIANCE MALFUNCTIONS, OR IS DROPPED OR DAMAGED IN ANY MANNER. CONTACT NAMA CUSTOMER SERVICE AT [email protected] (EMAIL) OR NAMAWELL.COM/CONTACT (WEBSITE) FOR REVIEW AND FURTHER INSTRUCTIONS.
- DO NOT LEAVE THE UNIT UNATTENDED WHEN IN USE.
- THE USE OF ATTACHMENTS NOT RECOMMENDED OR SOLD BY THE MANUFACTURER MAY CAUSE FIRE, ELECTRIC SHOCK, OR INJURY.
- DO NOT LET THE CORD HANG OVER THE EDGE OF THE TABLE OR COUNTER.
- NEVER USE THIS APPLIANCE ON AN UNEVEN OR UNSTABLE SURFACE. ENSURE THE APPLIANCE IS POSITIONED AWAY FROM THE EDGE OF A SURFACE.
- DO NOT USE OUTDOORS.
- DO NOT PLACE ON OR NEAR A HOT GAS OR ELECTRIC BURNER OR IN A HEATED OVEN.
- ALWAYS MAKE SURE THE CONTAINER ASSEMBLY IS SECURELY IN PLACE BEFORE THE MOTOR IS TURNED ON. DO NOT REMOVE CONTAINER ASSEMBLY WHILE MILK MAKER IS IN OPERATION.
- MAKE SURE THE MOTOR STOPS COMPLETELY BEFORE DISASSEMBLING.
- DO NOT PUT YOUR FINGERS OR OTHER OBJECTS INTO THE CHAMBER WHILE IT IS IN OPERATION. IF FOOD BECOMES LODGED, STOP THE MILK MAKER, UNPLUG FROM THE POWER OUTLET BEFORE DISASSEMBLY TO REMOVE THE REMAINING FOOD.
- KEEP HANDS AND UTENSILS OUT OF THE CONTAINER WHILE THE MILK MAKER IS IN OPERATION TO REDUCE THE RISK OF SEVERE INJURY TO PERSONS OR DAMAGE TO THE MILK MAKER.
- DO NOT LEAVE FOREIGN OBJECTS, SUCH AS SPOONS, FORKS, OR KNIVES, IN THE CONTAINER, AS THIS WILL DAMAGE THE BLADES AND OTHER COMPONENTS WHEN STARTING THE MILK MAKER AND MAY CAUSE INJURY.
- DO NOT ATTEMPT TO OPERATE WITH DAMAGED BLADES.
- BLADES ARE SHARP. CLEAN AROUND THE BLADE ASSEMBLY WITH EXTREME CARE TO AVOID INJURY.
- CARE SHOULD BE TAKEN WHEN HANDLING THE SHARP CUTTING BLADES, EMPTYING THE CONTAINER, AND DURING CLEANING.
- ILLUMINATED WORDS AND NUMBERS ON THE MOTOR BASE ASSEMBLY INDICATE READY TO OPERATE. AVOID ANY CONTACT WITH BLADES OR MOVING PARTS. AVOID INADVERTENT CONTACT WITH THE DIAL.
- DO NOT USE THE APPLIANCE FOR OTHER THAN INTENDED USE.
- DO NOT ATTEMPT TO OPERATE WITH THE FILTER REMOVED.
- ALWAYS OPERATE MILK MAKER WITH THE LID FIRMLY IN PLACE.
- DO NOT REMOVE THE LID WHILE THE MILK MAKER IS OPERATING. IF THE LID IS REMOVED DURING OPERATION, THE MOTOR BASE WILL STOP AND WILL NOT RUN UNTIL THE LID IS IN PLACE ON THE CONTAINER.
- DO NOT FILL THE CONTAINER ABOVE THE MARKED MAXIMUM CAPACITY LINE TO AVOID RISK OF INJURY DUE TO DAMAGE TO THE LID AND CONTAINER.
- PROCESSING FOR LONGER PERIODS CAN CAUSE OVERHEATING. DO NOT USE YOUR MACHINE CONTINUOUSLY FOR MORE THAN 10 CONSECUTIVE CYCLES.
- DO NOT USE CONTAINERS PROVIDED (INCLUDING LID AND ACCESSORIES) IN THE MICROWAVE.
- ALTERATION OR MODIFICATION OF ANY PART OF THE MILK MAKER, INCLUDING THE USE OF ANY PART OR PARTS THAT ARE NOT GENUINE AUTHORIZED NAMAWELL PARTS, MAY CAUSE FIRE, ELECTRIC SHOCK, OR INJURY AND WILL VOID YOUR WARRANTY.
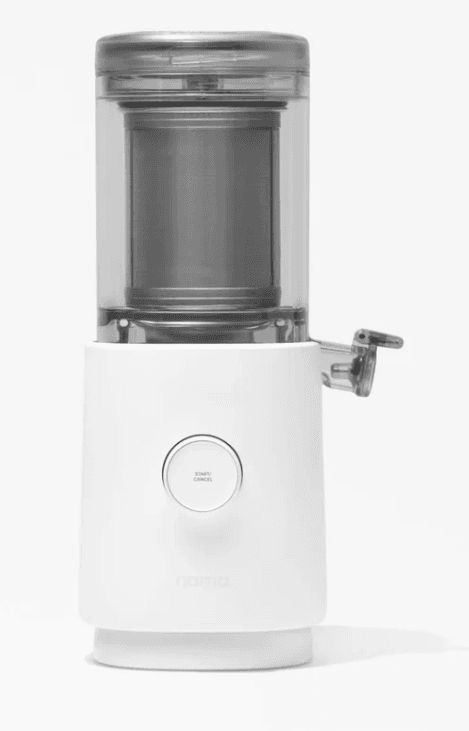
PARTS AND ACCESSORIES
CHAMBER & PARTS BASE PARTS
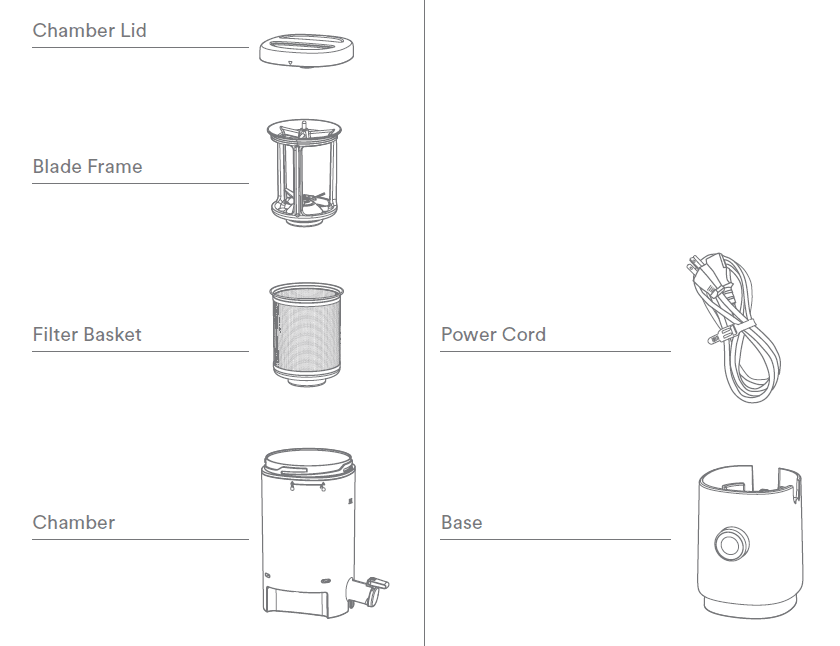
ACCESSORIES
CHAMBER AND BASE DETAILS
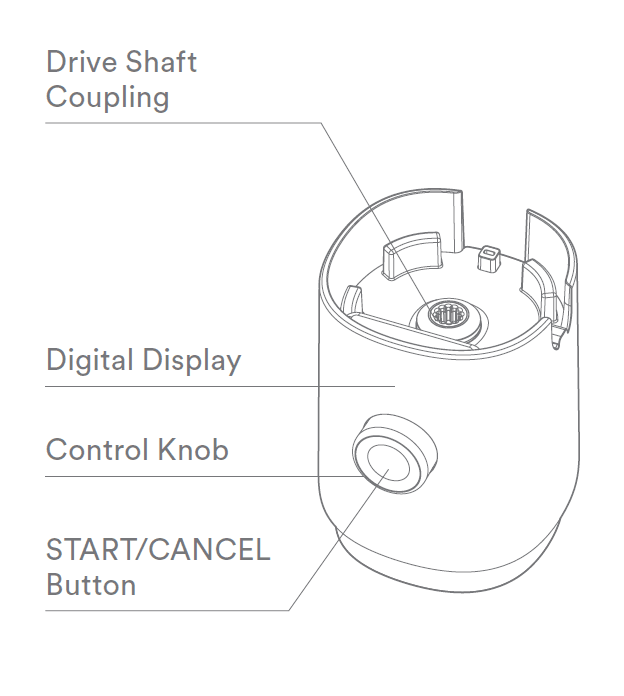
BASE FRONT
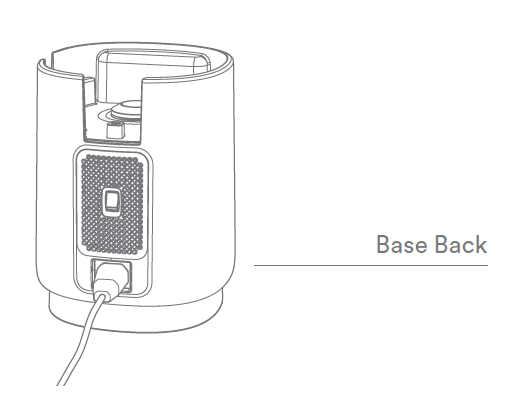
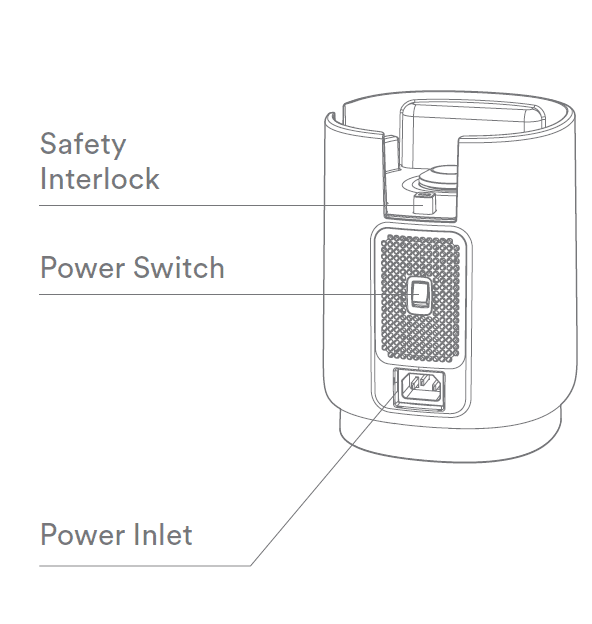
BASE BACK
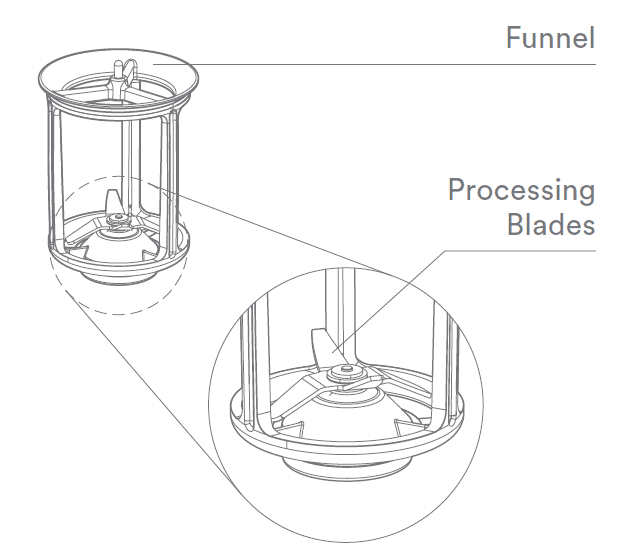
BLADE FRAME
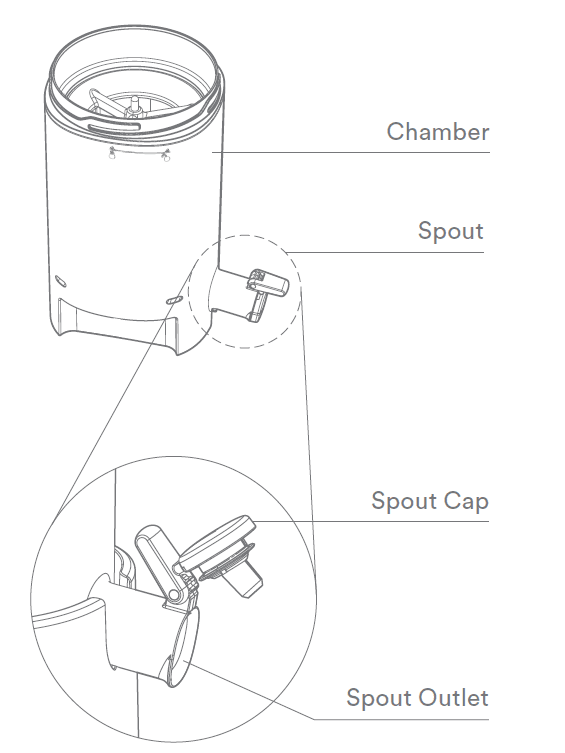
CHAMBER
ASSEMBLY
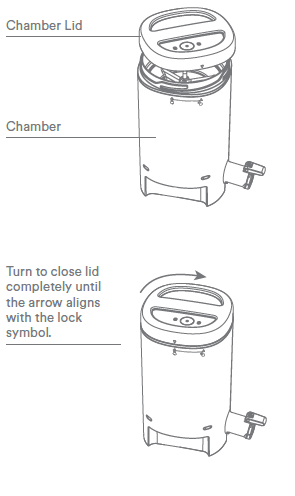
- STEP 1
ASSEMBLE THE CHAMBER SET
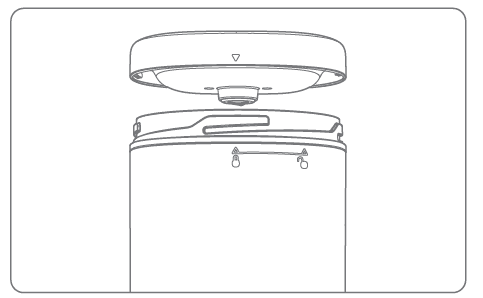
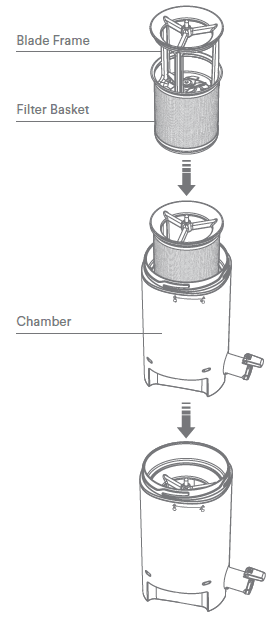
Insert the blade frame into the filter basket, then insert the set into the chamber. Place the chamber lid on top of the chamber with the arrow aligned to the unlock symbol.
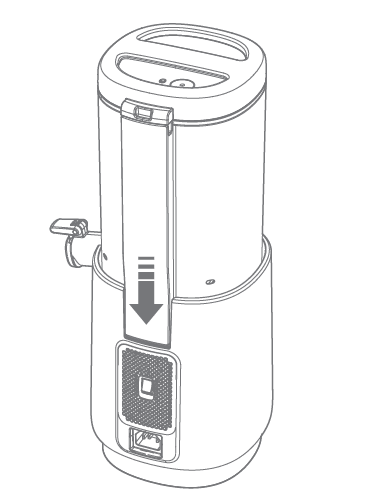
- STEP 2
ALIGN CHAMBER SET TO THE BACK OF BASE
Place the chamber set onto the base, with the spine aligned with the back of the base.
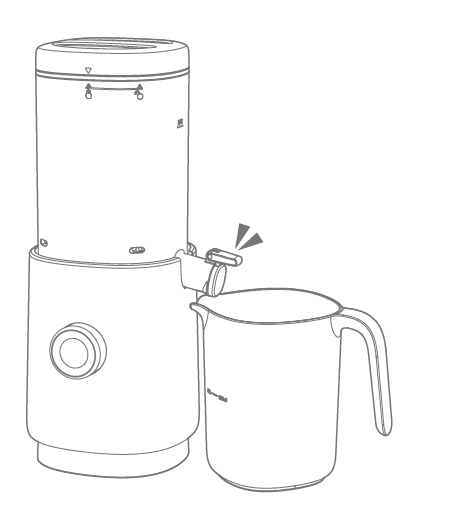
- STEP 3
PLACE THE PITCHER UNDER THE SPOUT
TIP: The Spout cap must be closed before adding ingredients and starting the operation.
- STEP 4
PLUG THE POWER CORD INTO THE BASE, AND CONNECT TO POWER
- STEP 5
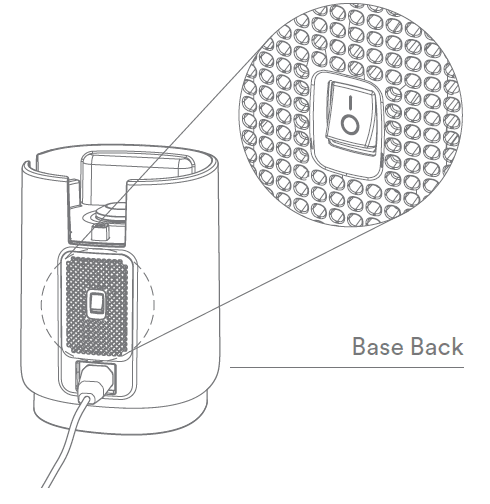
TURN THE POWER SWITCH ON
INTERFACE AND DISPLAY
BLEND TIME
The control knob can be rotated left and right to adjust the blend time.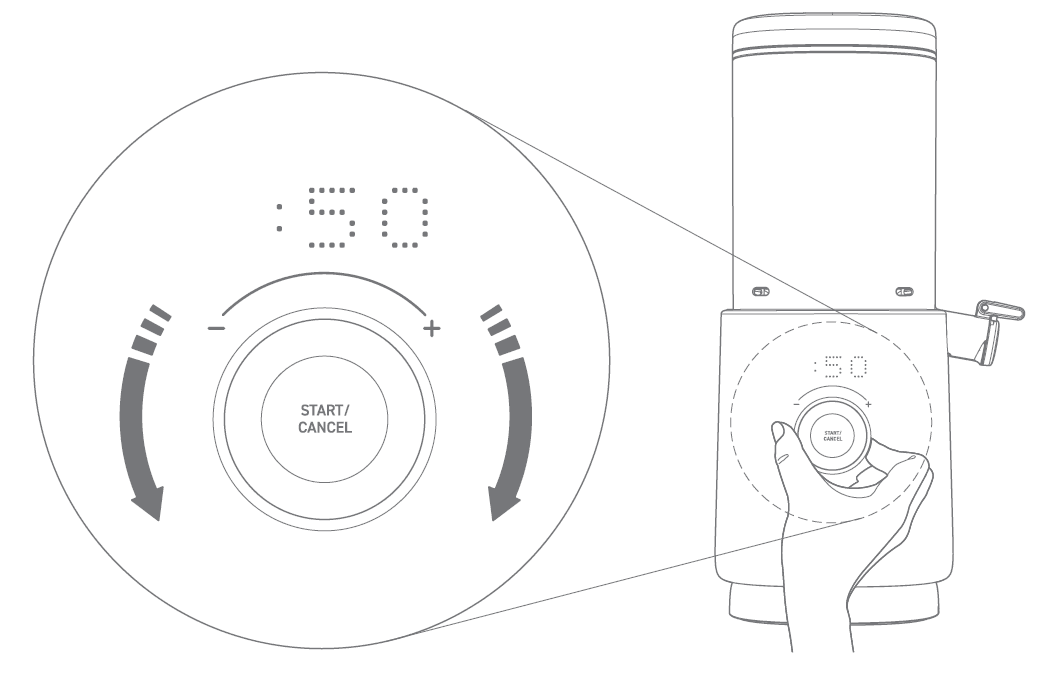
START/CANCEL BUTTON
Press the START/CANCEL button to begin processing. If the START/CANCEL button is pressed during operation, it will stop and revert back to the beginning of the process. Processing can be canceled at any time.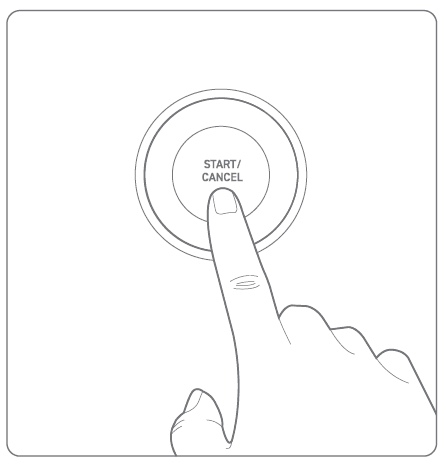
The display can also show messages such as:
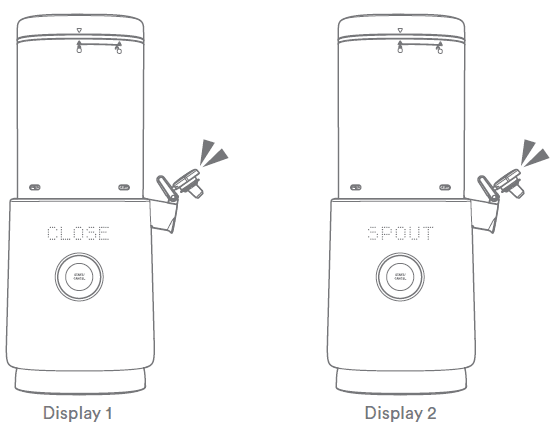
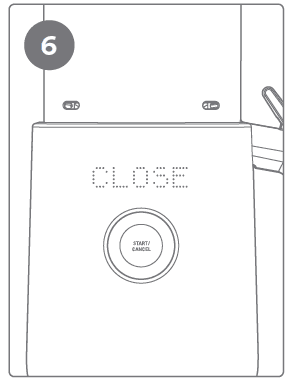
- CLOSE SPOUT
CLOSE SPOUT will display when the spout is open.
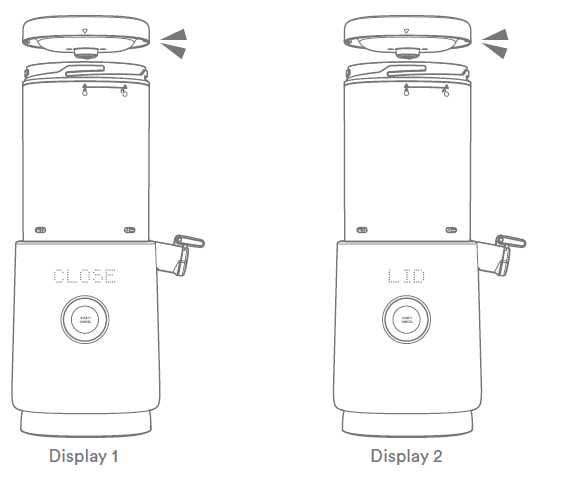
- CLOSE LID
CLOSE LID will display until the lid is properly secured to the chamber set.
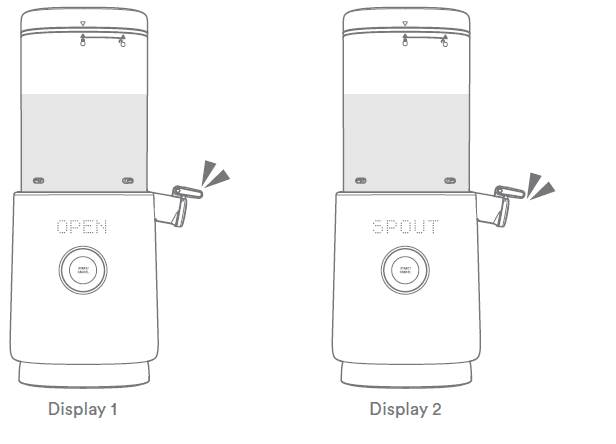
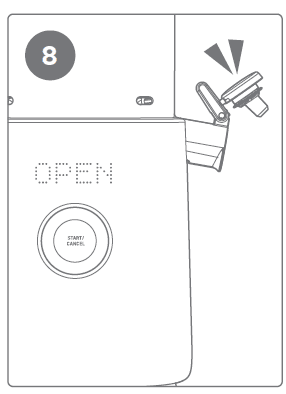
- OPEN SPOUT
OPEN SPOUT will display when the blend cycle is over and the milk is ready to be dispensed.
INGREDIENTS
Preparing ingredients for the best results.
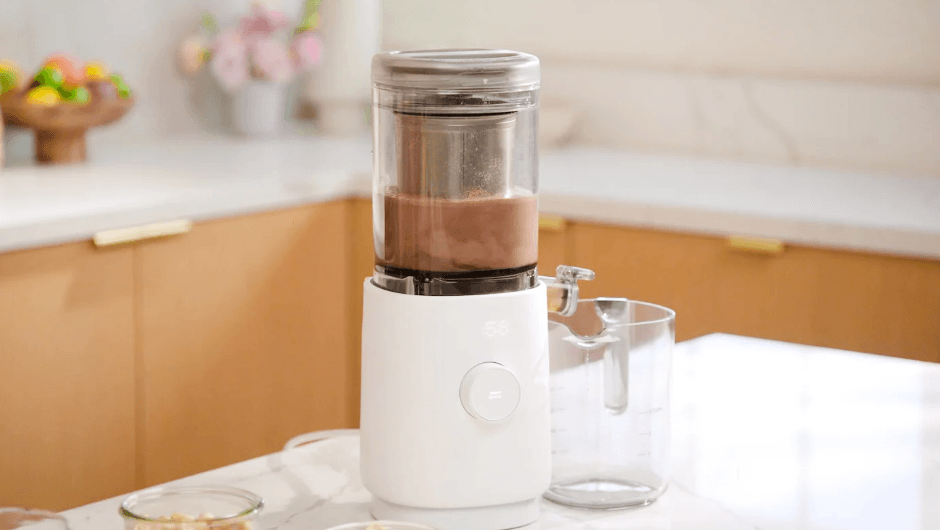
It is not necessary to pre-soak your nuts and seeds to make milk in the Nama M1 Plant-Based Milk Maker. All you need to do is measure your ingredients and add them to the filter basket. After thorough testing, we found a marginal difference in the outcome of the milk based on soaking them or not. However, soaking nuts, seeds, and grains is said to neutralize the enzyme inhibitors, activating the full nutrient potential and making the milk more digestible. If you have the time, soaking can be beneficial. When creating your own milk, we recommend using one cup of nuts, oats, or seeds to 3 to 4 cups of water. Add less water if you like your milk more creamy, add more water if you like a lighter milk. From there, you can enhance the creaminess of the milk by including ingredients such as coconut, cashew, or macadamia. Add more protein by using pistachios, hemp, or pumpkin seeds. And if you’re craving a fruity taste, experiment by adding banana or strawberries, or sweeten with dates, honey, or maple syrup.
NUTS, SEEDS, GRAINS
- Almonds
- Brazil
- Cashews
- Hazelnut
- Hemp
- Macadamia Nut
- Pecan
- Pistachio
- Pumpkin
- Rice
- Rolled Oats
- Sesame
- Sunflower
- Walnut
NATURAL SWEETENERS
- Coconut Sugar
- Dates
- Honey
- Maple Syrup
ADDITIONAL FLAVORS
- Bananas
- Berries
- Black Pepper
- Cacao (or Cocoa) Powder
- Cardamom
- Cinnamon
- Coconut
- Coconut Oil
- Coffee
- Ginger
- Matcha Powder
- Protein Powder
- Sea Salt Flakes
- Teas
- Turmeric
- Vanilla Extract
HOW TO OPERATE
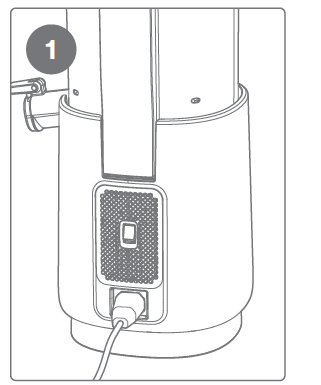
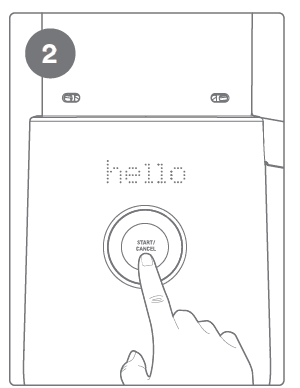
- First, plug the power cord into the back of the base and then into a power outlet. Turn on the power switch on the back of the base.

- The display will turn on, and “hello” will show for 5 seconds. Then, 1:00 minutes will appear on the screen.
Note: If the M1 is idle for 15 seconds, the display will show SET BLEND TIME.
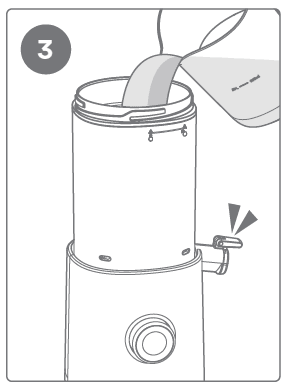
- Add all ingredients, including liquid, into the filter basket.
Note: The order does not matter. Make sure the spout is closed before adding water or liquid. Do not fill the chamber above the MAX FILL line.
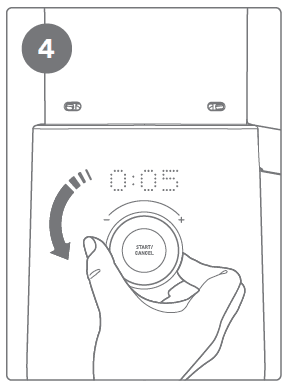
- The default blend time is set for 1:00 minutes. To adjust the blend time lower, turn the control knob counterclockwise to decrease blend time to a minimum of 5 seconds.
Note: Decreasing lower than 0:05 seconds will automatically engage the SPIN ONLY cycle.
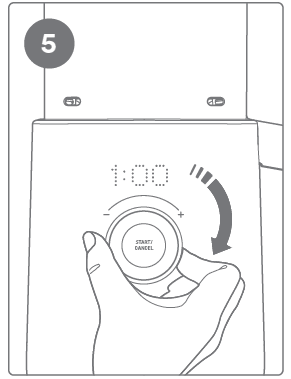
- To adjust the blend time higher, turn the control knob clockwise to increase time to a maximum run time of 1:00 minute.

- Note: Make sure the spout is closed, blending will not start if the spout is open, the display will prompt the user to CLOSE SPOUT.

- Press the START button, and blending will begin, and the timer will count down.
Note: Press the CANCEL button at any time to stop and reset the operation.
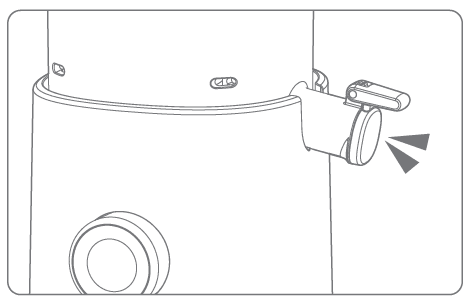
- When blending is complete, the display will prompt the user to OPEN SPOUT.

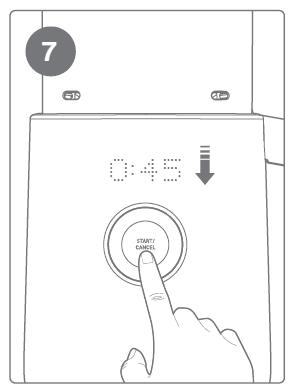
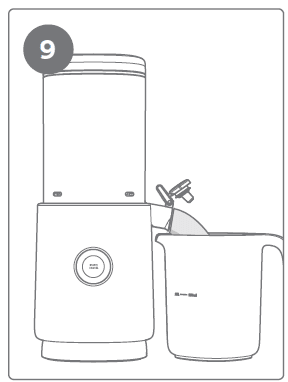
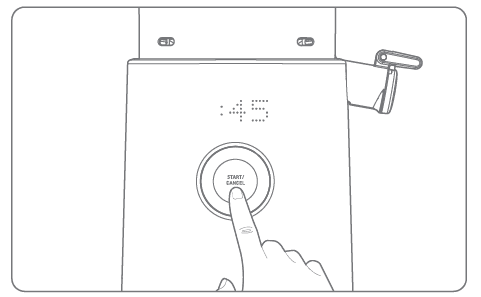
- Open the spout to release milk for a 0:10-second countdown, then the spin cycle will automatically run for 0:45 seconds. The milk will continue to pour out during the spin cycle.

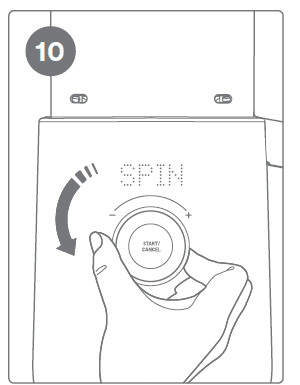
- If you desire a dryer pulp, the spin cycle can be run again. To run the spin cycle, turn the control knob counterclockwise until SPIN ONLY displays and press START to spin for 0:45 seconds.
TIPS
- LID
Close the lid completely to begin processing. If the lid is opened at any time during operation, the unit will stop and reset the program back to defaults.
- SPOUT CAP
Make sure the spout cap is completely closed before adding ingredients.
- SPIN CYCLE
The spin cycle’s purpose is to remove liquid from the pulp and help with cleaning by collecting pulp on the walls of the filter basket.
- PULP STORAGE
Extract the pulp from the filter basket directly onto the pulp pouch. Fold up and secure the seal closed. Store in refrigerator for up to 6 days or freeze.
HOW TO DISASSEMBLE AND CLEAN
DISASSEMBLE
- REMOVE THE FILTER SET FROM THE CHAMBER.
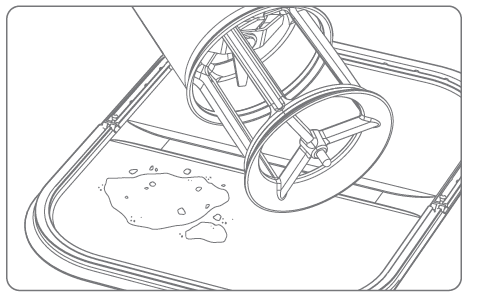
- PLACE THE FILTER SET OVER THE FLAT PULP POUCH.
- REMOVE THE BLADE FRAME FROM THE FILTER BASKET BY GRIPPING THE TOP OF THE BLADE FRAME AND SLOWLY TWISTING IT AS YOU PULL IT OUT.
- THE PULP WILL COME OUT DURING THIS PROCESS, AND ANY PULP THAT DOES NOT FALL OUT NATURALLY CAN BE SCRAPED OFF THE BLADE FRAME.
CLEANING THE M1
- REINSTALL THE FILTER BASKET AND BLADE FRAME.
- ADD A FEW DROPS OF DISH WASHING LIQUID AND 5 CUPS OF WARM WATER TO THE CHAMBER.
- CLOSE THE LID, BLEND FOR 30 SECONDS, AND THEN RUN THE SPIN CYCLE.
- ONCE COMPLETE, DISASSEMBLE THE CHAMBER SET AND RINSE WITH WARM WATER IN THE SINK.
- USE A SPONGE OR CLEANING BRUSH ON ANY REMAINING LEFTOVERS. ENSURE FILTER BASKET IS CLEAN. LEFTOVER PULP CAN DEGRADE THE FILTERING QUALITY OVER TIME.
- AIR DRY OR DRY WITH A CLEAN DISH CLOTH.
- WHEN CLEANING BASE, USE DAMP CLOTH ONLY. DO NOT RUN BASE UNDER WATER.
- MAKE SURE THE M1 IS FULLY DRY BEFORE REASSEMBLY.
Note: We recommend cleaning immediately after use to prevent any buildup or bad smells. All parts are hand-wash only. Do not use the dishwasher for any parts, as it may cause damage to them parts.
TROUBLESHOOTING
We want you to have the best experience with your M1 Milk Maker and are happy to help support you. If you have any questions or issues while using your M1 Milk Maker, you may find solutions on our list of troubleshooting tips below. For additional support, please contact our customer service team at namawell.com/contact. We recommend documenting any issues that you are experiencing with pictures and videos, which will help us to provide you with better service. Please submit your pictures and videos with your inquiry.
MOTOR SMELL
- Smells from using this product for the first few times are normal and will stop after a few uses. This smell comes from the new motor insulation material suddenly heating up when running the motor the first few times. The insulation protects the motor windings from shorting and contamination.
- Overloading the motor by adding highly viscous recipes or too many ingredients above the maximum fill line can cause the motor to emit an odor. If the smell persists, contact Nama Customer Service.
THE PRODUCT DOES NOT POWER ON
- Make sure the chamber set is assembled properly and is correctly aligned on the base. Refer to the assembly on pages 10-11.
- Make sure the power switch on the back of the base is turned on, refer to page 11.
- Check if the power cord is properly plugged into the base and the electrical outlet. Sometimes the power cord is not completely pushed into the back of the base. If the power cord is correctly plugged in, the electrical outlet may not be working, and we recommend plugging into a different electrical outlet to verify.
- Check if the unit is in standby mode. After 5 minutes of inactivity, the display will go dark and the START/CANCEL button will blink slowly. Press the START/CANCEL Button to re-engage.
POWER BUT PRODUCT DOESN’T TURN ON
- Make sure the lid is properly assembled to the chamber. Refer to assembly instructions on pages 10-11. The product will not operate if the lid is not correctly assembled.
- Check that the spout cap is closed. Safety sensors will prevent the product from turning on if the spout cap is open.
- If the control knob is flashing slowly, make sure the lid and spout cap are closed properly. The display will be in standby and control knob will slowly flash until parts are assembled correctly.
THE PRODUCT SUDDENLY STOPS RUNNING
- Check and make sure the chamber is not overloaded with ingredients above the maximum fill line, and that ingredients are less than 1 inch long.
- “THERM ERROR” – If the product is overloaded or runs too many repeated cycles, the motor may stop due to thermal overload protection, and the display will show “THERM ERROR”.
- Allow the product to cool down for at least 30 minutes or until the error is no longer displayed.
- We recommend allowing the product to cool for at least 1 minute between cycles.
- Do not use the product continuously for more than 10 cycles.
DISPLAY SHOWS ‘ERROR BLEND’ OR ‘ERROR SPIN’
- “ERROR BLEND” – During the blending cycle, if the unit is unable to regulate the speed correctly, a safety will trigger and automatically stop the unit, and the “ERROR BLEND” message will appear on the display. Make sure ingredients are not filled above the maximum fill line. If the problem persists, please contact Nama Customer Service.
- “ERROR SPIN” – During the spinning cycle, if the unit is unable to regulate the speed correctly, a safety will trigger and automatically stop the unit, and the “ERROR SPIN” message will appear on the display. Make sure ingredients are not filled above the maximum fill line. If the problem persists, please contact Nama Customer Service.
THE PRODUCT IS VIBRATING DURING OPERATION.
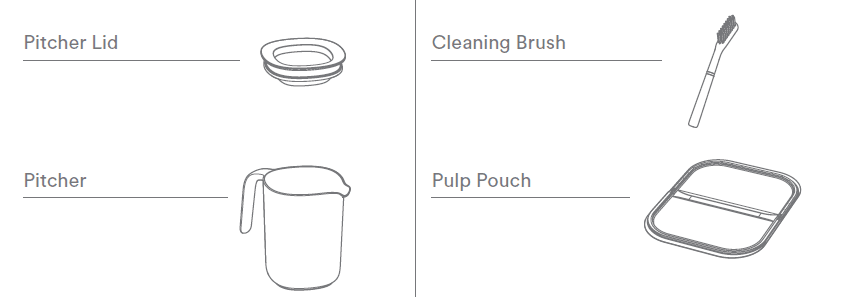
- It is normal for the product to wobble slightly due to the vibrations produced by the base and chamber set. Excessive vibrations can be caused by overloading or damaged parts. Please refer to the table below:

UNUSUAL NOISE WHILE BLENDING OR SPINNING
- It is normal to hear a variation of noises when the product is blending or spinning. If you are concerned, contact Nama Customer Service to help.
PULP IS WET
- It is normal to experience variations in the wetness of pulp with a variety of ingredients. This product has been designed to optimize results across a wide range of ingredients. If you are looking for dryer pulp, we recommend running the SPIN CYCLE additional times. Refer to step 10 on page 17.
- Do not soak ingredients in the chamber set; it can hinder product performance or damage parts. Ingredients can become stuck and clog the filter basket.
- Recipes that include oats can result in wetter pulp. For oat-based recipes, we recommend adding cold water to help process ingredients more efficiently.
WARRANTY
PRODUCT SPECIFICATION

Registration: Your Nama product is automatically registered for its warranty from the date of purchase, so you do not need to take this extra step. If you need assistance with your Nama product, please contact our support team. Be sure to keep the original order number and the email address used to purchase. This certifies that the Nama Plant Based Milk Maker model number MM100/MM122 is covered under warranty by Nama to be free from defects in material, construction, and workmanship. Nama provides a warranty for fifteen (15) years for all parts from the date of purchase by the original owner. Coverage is only valid with proof of purchase from our website or an Authorized Nama Distributor. This warranty does not apply to damages caused by accident, misuse, abuse, commercial use, alteration, failure to follow operating instructions, or damage caused by parts or service unauthorized by Nama. If your product was damaged during shipping, please contact Nama customer support with your order number and pictures of the damage. Nama disclaims all responsibilities for consequential damages from incidental losses caused by use of this appliance. For more details on your Nama product warranty, please refer to our warranty policy on our website at https://namawell.com/pages/nama-M1. For service and assistance with technical difficulties, please contact our customer support at namawell.com/contact or (833) 253-6262.
For more manuals by Nama, visit ManualsLibraryy
Nama M1 Plant Milk Maker-FAQs
How long does the Nama M1 take to make plant milk?
The Nama M1 makes barista-quality plant milk in just 2 minutes—no soaking required!
What types of milk can the Nama M1 make?
It can make almond, oat, cashew, coconut, hemp, rice, and soy milk (soy requires pre-cooking).
Does the Nama M1 heat the milk?
No, it does not have a heating element. For soy milk, cook soybeans separately before blending.
Do I need to soak nuts before using the Nama M1?
No! The M1 grinds and blends raw ingredients without pre-soaking.
What’s the best water-to-ingredient ratio?
Creamy milk: 1 part nuts/seeds to 3-4 parts water.
Lighter milk: Adjust to 1:5.
How do I make oat milk less slimy?
Use rolled oats (not instant).
Blend for only 30-45 seconds.
Avoid over-straining.
Is the Nama M1 easy to clean?
Yes! The stainless steel pitcher and filter are dishwasher-safe. Rinse immediately after use for best results.
What do I do with the leftover pulp?
Store it in the silicone pulp pouch (included) for baking, smoothies, or compost.
How long does homemade plant milk last?
Fresh: Up to 3 days in the fridge (store in airtight glass jars).
Freezing: Up to 1 month (shake well after thawing).
How can I make my plant milk last longer?
Sterilize jars before storing.
Add a pinch of salt or lemon juice as a natural preservative.

 Place the chamber lid on top of the chamber with the arrow aligned to the unlock symbol.