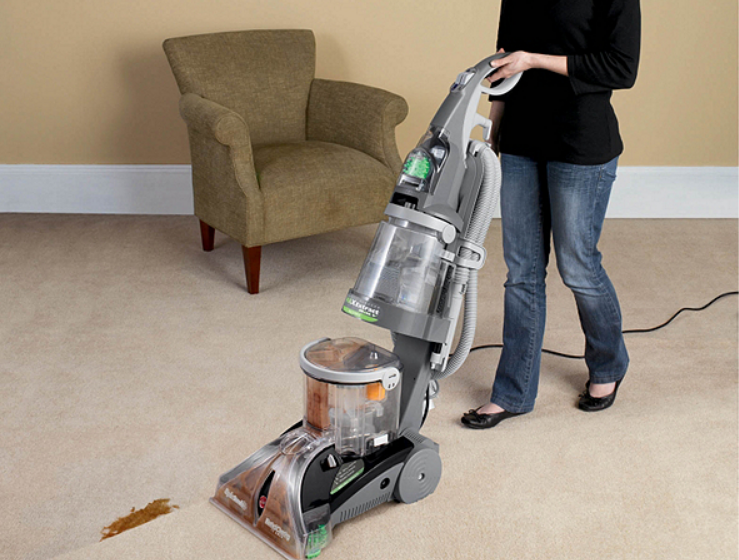
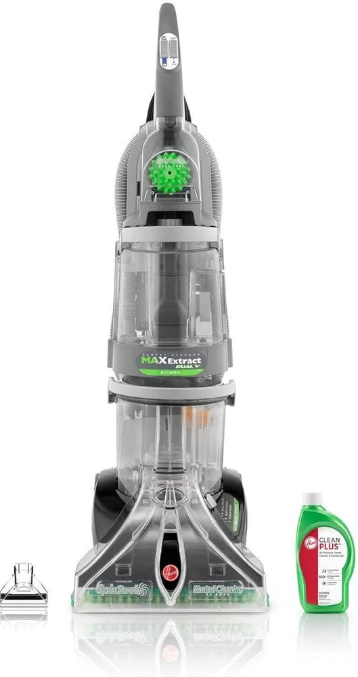
Hoover MAX Extract Dual V Carpet Cleaner
IMPORTANT SAFETY INSTRUCTIONS
SAVE THESE INSTRUCTIONS
When using an electrical appliance, basic precautions should always be followed, including the following:
READ ALL INSTRUCTIONS BEFORE USING THIS APPLIANCE.
WARNING: TO REDUCE THE RISK OF FIRE, ELECTRIC SHOCK, OR INJURY:
- To avoid internal component damage, use only Hoover® cleaning products intended for use with this Appliance. (See Cleaning Products section of this manual.)
- Use only on surfaces moistened by the cleaning process or small spills. Do not immerse the product.
- Connect to a properly grounded outlet only. See “Grounding Instructions”.
- Do not clean over the floor electrical outlets.
- Do not use without tanks in place.
- Use extra care when cleaning stairs. Do not place carpet cleaner on stairs.
- Use the carpet cleaner only for its intended use as described in the instructions.
- Use only attachments recommended by Hoover®; others may cause hazards.
- The use of an extension cord is not recommended. If an extension cord is absolutely necessary, use at least a 16-gauge 3-wire cord that has a 3-prong grounding-type plug and a 3-pole receptacle that accepts the machine plug.
- Unplug the carpet cleaner from the outlet when not in use. Turn off all controls before unplugging.
- Unplug before connecting the SpinScrub® hand tool.
- Always disconnect the cord from the electrical outlet before servicing the carpet cleaner.
- Do not unplug by pulling on the cord. To unplug, grasp the plug, not the cord.
- Never handle a plug or appliance with wet hands.
- Do not pull or carry by the cord, use the cord as a handle, close the door on the cord, or pull the cord around sharp edges or corners. Do not run the appliance on a cord. Keep the cord away from heated surfaces.
- Do not use with a damaged cord or plug. If the appliance is not working as it should, has been dropped, damaged, left outdoors, or dropped into water, take it to an Authorized Hoover® Warranty Service Dealer.
- Close supervision is necessary when any appliance is used by or near children. Do not allow the carpet cleaner to be used as a toy or to run unattended at any time.
- Do not point tools toward people or pets.
- To assist in reducing drying time, be certain the area is well ventilated when using detergents and other cleaners with this machine.
- Keep detergents and other cleaners out of children’s reach.
- Do not use to pick up flammable or combustible liquids such as gasoline or use in areas where they may be present.
- Do not pick up chlorine bleach, drain cleaner, gasoline, or any other toxic material with this appliance.
- Do not pick up anything that is burning or smoking, such as cigarettes, matches, or hot ashes.
- Avoid picking up hard, sharp objects with the carpet cleaner. They may damage the machine.
- Keep hair, loose clothing, fingers, feet, and all parts of the body away from openings and moving parts.
- Use indoors only.
- Do not put any object into openings. Do not use with any opening blocked; keep free of dust, lint, hair, and anything that may reduce air flow.
- To help prevent matting and resoiling, avoid contact with carpets until they are dry.
- Keep children and pets away from carpets until they are completely dry.
- Store in a dry place. Do not expose the machine to freezing temperatures.
- Do not leave the appliance unattended when plugged in.
- DO NOT USE THIS EXTRACTOR ON HARD FLOORS UNLESS YOU HAVE THE PROPER HARD FLOOR ATTACHMENT. USING THIS MACHINE ON HARD FLOORS WITHOUT PROPER ATTACHMENT MAY SCRATCH OR DAMAGE YOUR FLOOR.
Cleaner ASSEMBLY
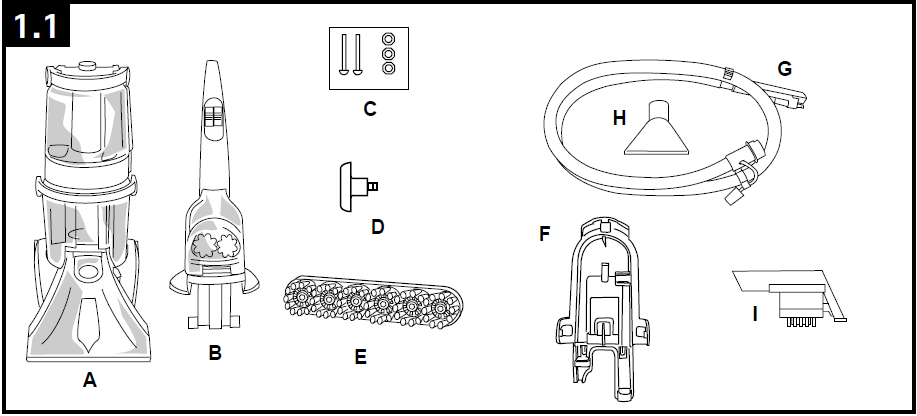
Carton contents
- Cleaner
- Upper Handle
- Handle Bolts and Nuts (Three nuts may be in the bag, but only two or needed for assembly. Bolts and nuts are located in the bag with the hose)
- Hose/Cord Hook
- SpinScrub® Brush Assembly
- Hose/Tool Caddy
- Hose
- Stair/Upholstery Nozzle
- SpinScrub® Hand Tool
Remove all parts from the carton and identify each item shown.
Make sure all parts are located before disposing of the packing materials.
Available on select models only. Accessories not included with your model may be purchased separately by visiting hoover.com.
NOTE: Phillips screwdriver needed for assembly.
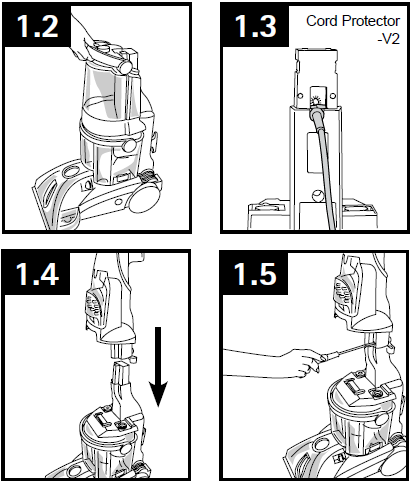
Attach handle
- 1.2 Remove the tank.
- 1.3 Position the cord protector.
- 1.4 Slide the handle down.
- 1.5 Insert bolts and attach nuts. Tighten with a screwdriver.

The actual model may vary from the images shown.
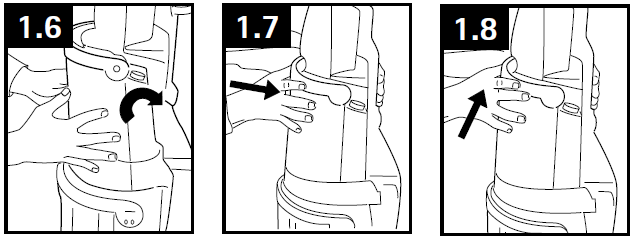
Replace the upper tank
- 1.6 Position the bottom of the tank onto the cleaner.
- 1.7 Push the top of the tank and the tank handle while supporting the back of the cleaner with the other hand.
- 1.8 Push up on the handle to latch it to the cleaner. Check the tank to make sure it is secure.

Attach the hose/cord hook
1.9 Snap the hook onto the cleaner.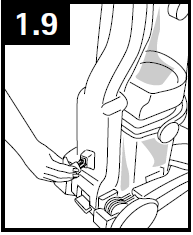
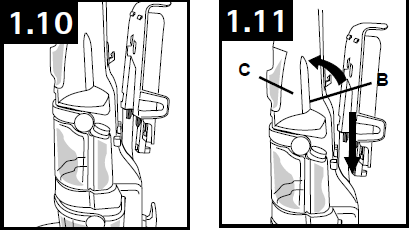
Attach the tool caddy (for storage on the cleaner)
(Available on select models only)
- 1.10 Insert tabs.
- 1.11 Slide the caddy down. Notch (B) rests on hook (C).

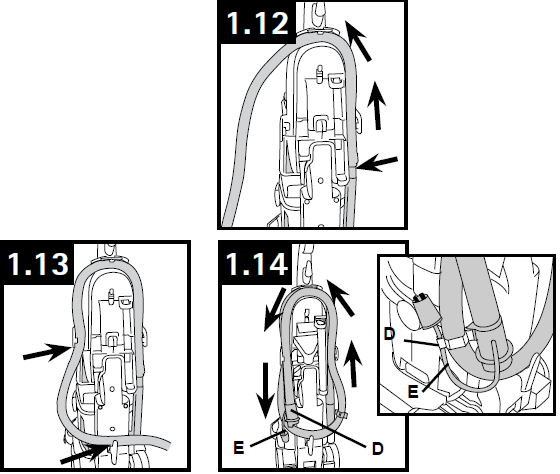
Store hose
- 1.12 Start.
- 1.13 Wrap.
- 1.14 Finish. Use clips (D) to secure the hose and solution tube (E and inset).

Store tools
1.15 Store Tools on the back side of the cleaner as shown.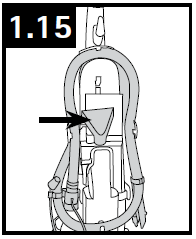
HOW TO USE
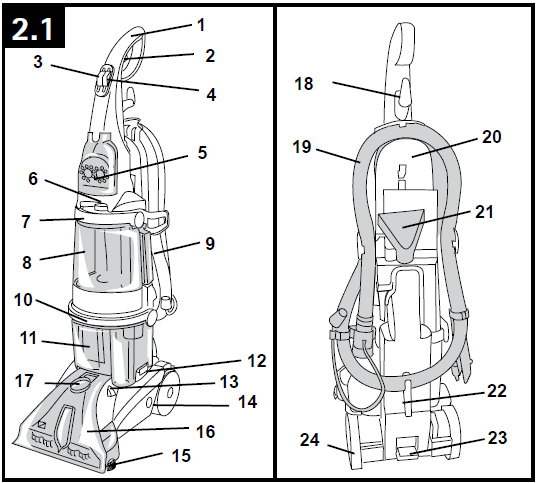
Cleaner Description
- Hand Grip
- SolutionTrigger: Press to release the cleaning solution
- ON/OFF Switch
- Rinse Setting Switch
- SpinScrub® Hand Tool
- Carry Handle
- Clean Water Tank Handle
- Clean Water Tank
- Detergent Container
- Dirty Water Tank Handle
- Dirty Water Tank
- Dirty Water Tank Latches
- SpinScrub® Mode Selector
- Solution Tube Connection Port
- Edge Cleaners: provided on both sides of the nozzle to remove dirt near baseboards
- Nozzle
- Hose Connection Port
- Cord Hook: rotates for quick cord release
- Hose
- Hose/Tool Caddy
- Stair/Upholstery Nozzle
- Cord/Hose Hook
- Handle Release Pedal
- Wheels
Operate the cleaner only at the voltage specified on the data plate on the bottom of the cleaner.
This cleaner is intended for household use.
Accessories not included with your model may be purchased separately by visiting www.hoover.com or your local HOOVER® service center.
CAUTION!
DO NOT USE THIS EXTRACTOR ON HARD FLOORS UNLESS YOU HAVE THE PROPER HARD FLOOR ATTACHMENT. USING THIS MACHINE ON HARD FLOORS WITHOUT PROPER ATTACHMENT MAY SCRATCH OR DAMAGE YOUR FLOOR.
ON-OFF switch
To turn cleaner ON, push the switch down.
To turn the cleaner OFF, push the switch up.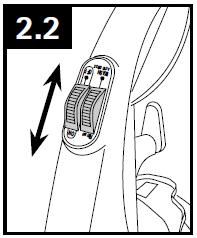
Handle the release pedal.
Step on pedal (A) to lower the handle to the operating position. The handle does not lock into a single position but “floats” to allow convenient operation.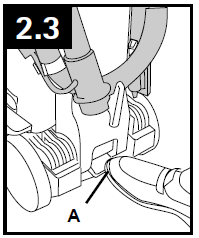
Transporting
To move your cleaner from room to room, put the handle in the upright and locked position, tilt the cleaner back on its wheels, and push forward.
Carry handle
The cleaner may also be lifted by placing a hand above the upper clean water tank handle.
SpinScrub® mode selector
Your SteamVac® cleaner has two agitator brush settings.
SPILL PICK-UP – brushes OFF for picking up spills or cleaning carpets and hard floors when brushing is not desired.
POWER SCRUB – brushes at maximum speed for cleaning carpets. Slide the setting selector to the desired setting before cleaning.
The tanks:
Clean Water Solution Tank (upper tank)
2.7 The clean water tank (C) holds the water that will either be mixed with detergent for cleaning the carpet or floor, or used to rinse the carpet or floor.
The detergent container (D) is permanently attached to the water tank. It holds the detergent that mixes with the water.
How to Fill
Unplug the cleaner from the electrical outlet. To remove the tank, press down on the tank handle and pull forward.
2.8 Fill tank (E) with hot tap water.
CAUTION!
Do not fill with water above 140°F (60°C).
2.9 – 2.10 Fill detergent container (F) with Hoover® Carpet/Upholstery Detergent. Replace the container cap and tighten.
Position the bottom of the tank onto the cleaner using one hand on each side of the tank to center it on the unit.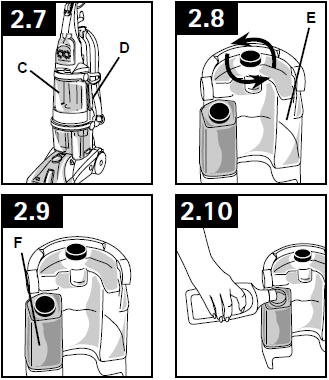
IMPORTANT
The tank pivots towards the back of the unit. Push the top of the tank and the tank handle while supporting the back of the unit with your other hand.
IMPORTANT
Use only HOOVER® SteamVac® detergents. They are specially formulated for use with your SteamVac® cleaner. Non-Hoover® cleaning solutions may harm the machine and void the warranty.
Push up on the handle once the tank is back to latch it to the unit.
Check the tank to make sure it is securely latched.
There may be a small amount of water (indicated by arrows) on the base when the tank is removed from the unit. This is a normal condition.
CAUTION!
Detergents contain Anionic and Nonionic Surfactants. Avoid contact with the eyes and skin. In case of contact with the eyes, flush with cold water for 15 minutes. In case of contact with skin, wash with water. If irritation persists, call a physician.
Dirty Water Tank (lower tank)
The Dirty Water Tank holds the dirty solution that is picked up from the surface being cleaned. When the Dirty Water Tank is full, the automatic shut-off will engage, suction will stop, and the tank must be emptied (see Automatic Shut-Off section).
How to Empty
Turn the cleaner off and unplug it from the electrical outlet.
To prevent possible leaking, remove the clean water tank by pressing down on the tank handle and pulling forward; set the tank aside (do not set the tank on furniture).
Turn the Dirty Water Tank latches (G) outward (one on each side of the tank). Raise the handle straight up and lift the tank off the cleaner. Carry the tank to sink or drain.
Lower the handle toward the back of the tank to unlock the lid. Lift the lid off the tank.
Empty the tank and reposition the lid.
For full suction, it is important that the Dirty Water Tank lid is properly secured before cleaning. Raise the tank handle to the carrying position and place it onto the cleaner. Lower handle to the front of the tank. Turn latches (one on each side of the tank) inward to lock the tank in place.
IMPORTANT
Make sure the tank handle is moved forward to lock the tank lid before putting the cleaner in an upright position. Failure to secure properly may result in damage to the tank handle and may cause poor suction.
Automatic shut off
When the Dirty Water Tank (lower tank) is full, the automatic shut-off mechanism will shut off the cleaner suction (suction will be noticeably reduced).
At that time, the yellow float disk will rise to the top of the Dirty Water Tank lid. The cleaner will no longer pick up dirty solution, and the motor sound will become noticeably higher in pitch.
When this happens, turn the cleaner off and empty the Dirty Water Tank before continuing to use it.
Check the clean water tank also; it may need to be refilled.
Do not use without a float and float retainer in place. If broken or dislodged, take it to an Authorized Dealer for repair.
How to CLEAN
Before you begin cleaning
- Vacuum thoroughly – For carpet, use a HOOVER® vacuum cleaner with an agitator for best results. Vacuum upholstery with a vacuum cleaner with cleaning tool attachments. Use a crevice tool to reach into tufts and folds. Do not use the carpet cleaner as a dry vacuum cleaner.
- For upholstery, check cleaning code – Use your HOOVER® carpet cleaner only if the upholstery fabric is marked with a “W” (for “wet” clean) or “S/W” (for “solvent/dry” or “wet” clean). Do not clean fabric marked “S” (“solvent/dry” clean only). If your upholstery does not have a code, seek professional assistance.
- Test for colorfastness – Wet a white absorbent cloth with the detergent. In a small, hidden area, gently rub the surface with the dampened cloth. Wait ten minutes and check for color removal or bleed with a white paper towel or cloth. If the surface has more than one color, check all colors.
- When cleaning the entire floor, move furniture out of the area to be cleaned (may not be necessary if only high-traffic areas are to be cleaned). For furniture too heavy to move, place aluminum foil or wax paper under the legs. This will prevent wood finishes from staining carpet. Pin up furniture skirts and draperies.
- Pretreat spots and heavy traffic areas with HOOVER® Spot & Stain Spray Cleaner*- Follow Directions on bottle.
- To prevent staining, use plastic or aluminum foil to protect wood or metal surfaces from possible water spray.
- To avoid wetting and possible damage to wood floors underneath area rugs/carpet, either move area rugs/ carpet to a non-wood hard floor surface or place waterproof material (e.g., plastic) underneath them before cleaning.
Available at additional cost if not included with your model.
After cleaning
Allow carpet or upholstery to dry. To help prevent matting and resoiling the carpet, keep children and pets away from the surface until it is completely dry. If it is necessary to walk on a damp carpet, place towels or white cloths on the traffic areas.
If furniture must be replaced before the carpet is dry, place plastic or aluminum foil under the legs of furniture so metal slides or wood finishes will not stain the carpet.
Empty tanks, rinse with clean water, and let air dry. Rinse the Dirty Water Tank lid and let it air dry.
Remove lint from the filter screen located inside the Dirty Water Tank.
Remove lint from the filter screen located at the bottom of the cleaner.
IMPORTANT
When brushes seem to be rotating slowly, disconnect the cleaner from the electrical outlet and check and clean this screen.
MAINTENANCE
Familiarize yourself with these home maintenance tasks, as proper use and care of your cleaner will ensure continued cleaning effectiveness.
Any other servicing should be done by an authorized service representative.
Nozzle: How to Clean
If lint or other debris becomes lodged in the nozzle, it can be removed for cleaning.
CAUTION!
To reduce the risk of injury from moving parts, unplug the cleaner before servicing.
Remove both tanks. With the handle in an upright position, tilt the cleaner back so that the handle rests on the floor.
Lift up the rear edge of the nozzle. Slide the nozzle up and remove from the cleaner.
To replace the nozzle, line up tabs (A) on the nozzle with holes (B) in the cleaner. Slide tabs into holes.
Brushes: How to Change and Clean
Your cleaner is equipped with removable brushes. Follow these directions for changing brush assemblies or for easy cleaning.
CAUTION!
To reduce the risk of injury from moving parts, unplug the cleaner before servicing.
How to Remove
To prevent possible leaking, remove the Clean Water Tank and Dirty Water Tank. Set the tanks aside.
With the handle in an upright position, tilt the cleaner back until the handle rests on the floor.
Grab the brush assembly and pull firmly. The brushes can be cleaned under running water.
How to Replace
Align posts on both ends of the brush assembly with slots in the cleaner housing.
Make sure that the square post also aligns with the square hole. Turn the brushes slightly until the post fits easily into the hole.
Press the brush assembly firmly to snap into place.
TROUBLESHOOTING
If a minor problem occurs, it usually can be solved quite easily when the cause is found by using the checklist below.
Any other servicing should be done by an authorized service representative.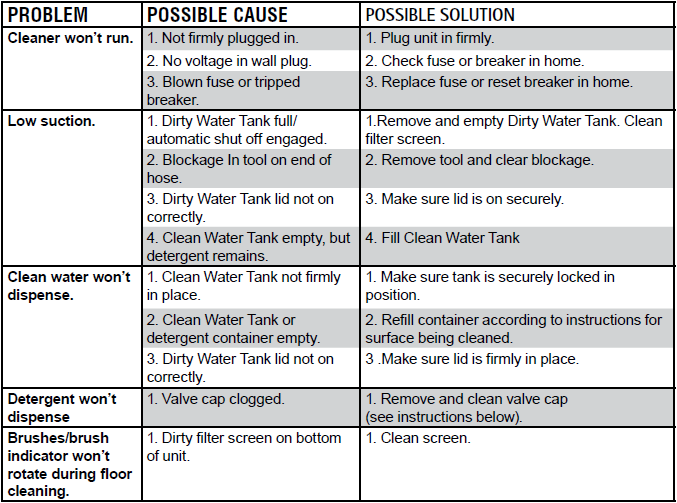
Helpful Reminders
- Use HOOVER® brand detergents; others may foam too much or cause leaking.
- Use extra dry strokes to aid in the faster drying of the carpet.
- Fill tank with hot (under 140˚F /60˚C) tap water ONLY. Do not put any detergent in the water tank. Fill the detergent container with HOOVER® detergent.
- Secure the Dirty Water Tank lid before cleaning.
- Empty Dirty Water Tank when full or when the automatic shut-off engages.
For more Manuals by Hoover, visit ManualsLibraryy
Hoover MAX Extract Dual V Carpet Cleaner-FAQs
How do I set up my Hoover MAX Extract Dual V Carpet Cleaner?
Unbox and assemble according to the manual.
Fill the clean water tank with hot tap water and the recommended cleaning solution.
Plug in the machine and ensure all hoses and attachments are securely connected.
What type of cleaning solution should I use?
Only use Hoover-branded cleaning solutions or those specifically recommended in the manual. Avoid using vinegar, bleach, or soap, as they can damage the machine.
How do I fill and empty the tanks?
Clean Water Tank: Fill with hot water up to the marked line, then add solution.
Dirty Water Tank: Empty after each use and rinse before storage.
How do I start cleaning with the Hoover MAX Extract?
Turn on the machine.
Press the spray trigger to release cleaning solution.
Slowly push the cleaner forward, then pull back to extract dirt and water.
Repeat passes until the carpet looks clean.
Why is my cleaner leaving behind too much water?
You may be pressing the spray trigger too much—use it sparingly.
Move the machine slower on the pull-back stroke for better suction.
Check for clogs in the suction hose or dirty water tank.
How do I clean the brushes and nozzles?
Remove hair and debris from the brush roll after each use.
Wipe the suction nozzle with a damp cloth to prevent buildup.
Check for blockages in the hose if suction weakens.
Why is my carpet still dirty after cleaning?
Try pre-treating tough stains before cleaning.
Make multiple passes over heavily soiled areas.
Ensure the dirty water tank isn’t full during use.
How often should I clean the filters?
Rinse the foam filter after every use.
Replace the HEPA filter every 3–6 months, depending on usage.
Can I use this cleaner on upholstery?
Yes! Use the upholstery tool included with the machine for furniture, stairs, and car interiors.
Why is my machine not turning on?
Check the power cord and outlet.
Ensure the water tanks are properly seated.
Verify that the machine is plugged in securely.

