
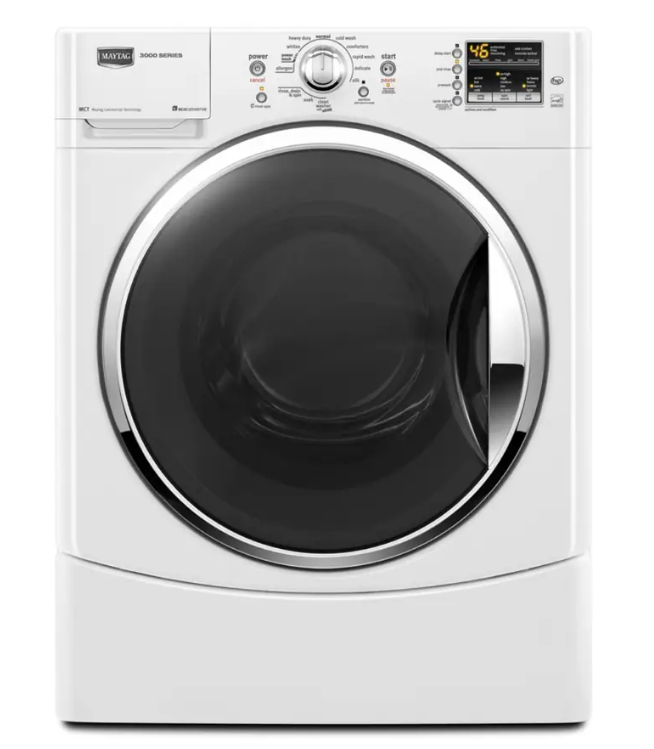
Maytag 2000 Series Front Loading Automatic Washer
IMPORTANT SAFETY INSTRUCTIONS
WARNING: To reduce the risk of fire, electric shock, or injury to persons when using the washer, follow basic precautions, including the following:
- Read all instructions before using the washer.
- Do not wash articles that have been previously cleaned in, washed in, soaked in, or spotted with gasoline, dry-cleaning solvents, other flammable, or explosive substances, as they give off vapors that could ignite or explode.
- Do not add gasoline, dry-cleaning solvents, or other flammable or explosive substances to the wash water. These substances give off vapors that could ignite or explode.
- Under certain conditions, hydrogen gas may be produced in a hot water system that has not been used for 2 weeks or more. HYDROGEN GAS IS EXPLOSIVE. If the hot water system has not been used for such a period, before using the washing machine, turn on all hot water faucets and let the water flow from each for several minutes. This will release
any accumulated hydrogen gas. As the gas is flammable, do not smoke or use an open flame during - Do not allow children to play on or in the washer. Close supervision of children is necessary when the washer is used near children.
- Before the washer is removed from service or discarded, remove the door or lid.
- Do not reach into the washer if the drum, tub, or agitator is moving.
- Do not install or store the washer where it will be exposed to the weather.
- Do not tamper with controls.
- Do not repair or replace any part of the washer or attempt any servicing unless specifically recommended in this manual or in published user-repair instructions that you understand and have the skills to carry out.
- See “Electrical Requirements” for grounding instructions. This time.
SAVE THESE INSTRUCTIONS
INSTALLATION REQUIREMENTS
Tools and Parts
Gather the required tools and parts before starting the installation. The parts supplied are in the washer drum.
Tools needed for connecting the water inlet hoses
- Pliers (that open to 19/16″ [39.5 mm])
- Flashlight (optional)
Tools needed for connecting the drain hose
- Locking pliers (that open to 19/16″ [39.5 mm])
Tools needed for installation
- Open-end wrenches 14 mm and 13 mm
- Level
- Wood block
- Ruler or measuring tape
Parts supplied
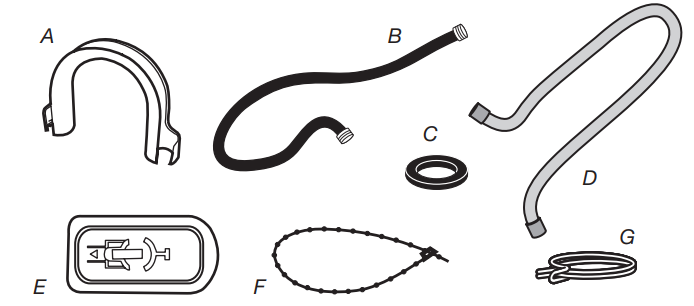
- A.Drain hose form
- B. Inlet hose (2)
- C. Inlet hose washer (4)
- D. Drain hose
- E. Transport bolt hole plug (4)
- F. Beaded strap
- G.Hose clamp
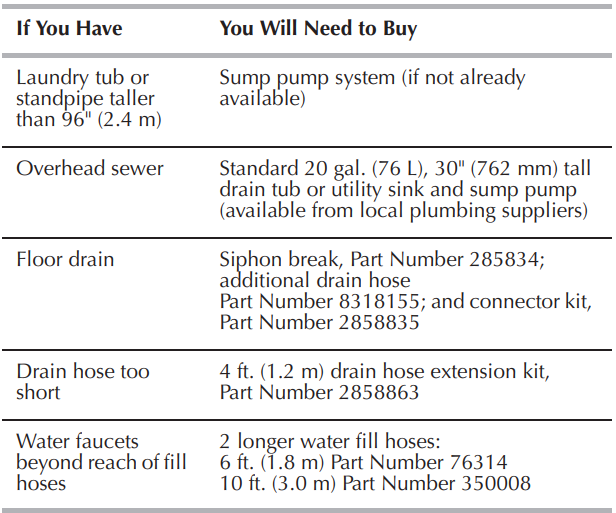
Alternate Parts
Your installation may require additional parts. If you are interested in purchasing one of the items listed here, call the toll-free number on the cover or in the “Assistance or Service” section.
Options
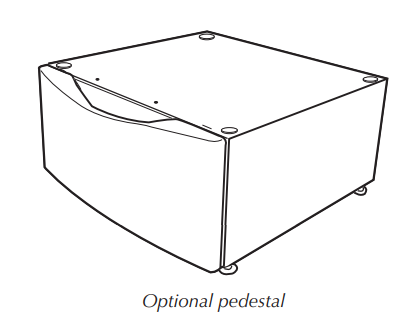
Pedestal
You have the option of purchasing pedestals of different heights separately for this washer. You may select a 10″ (254 mm) or a 15.5″ (394 mm) pedestal. The pedestal will add to the total height of the washer.

Stack Kit
Are you planning to stack your washer and dryer? To do so, you will need to purchase a Stack Kit.
To order, call the dealer from whom you purchased your washer or refer to the “Assistance or Service” section. Ask for Part Number 8572546.
Location Requirements
Selecting the proper location for your washer improves performance and minimizes noise and possible washer “walk.” Your washer can be installed under a custom counter, or in a basement, laundry room, closet, or recessed area. See “Drain System.”
Companion appliance location requirements should also be considered. Proper installation is your responsibility.
You will need:
- A water heater set to deliver 120°F (49°C) water to the washer.
- A grounded electrical outlet located within 6 ft. (1.8 m) of where the power cord is attached to the back of the washer. See “Electrical Requirements.”
- Hot and cold water faucets located within 4 ft. (1.2 m) of the hot and cold water fill valves, and water pressure of 20-100 psi (137.9-689.6 kPa).
- A level floor with a maximum slope of 1″ (25 mm) underthe the entire washer. Installing the washer on soft floor surfaces, such as carpets or surfaces with foam backing, is not recommended.
- A sturdy and solid floor to support the washer with a total weight (water and load) of 400 lbs (180 kg).
Do not operate your washer in temperatures below 32°F (0°C). Some water can remain in the washer and can cause damage in low temperatures.
Installation clearances
- The location must be large enough to allow the washer door. To be fully opened.
- Additional spacing should be considered for ease of installation and servicing. The door opens more than 90°, and it is not reversible.
- Additional clearances might be required for wall, door, and floor moldings.
- Additional spacing of 1″ (25 mm) on all sides of the washer is ecommended to reduce noise transfer.
- Companion appliance spacing should also be considered.
Washer Dimensions
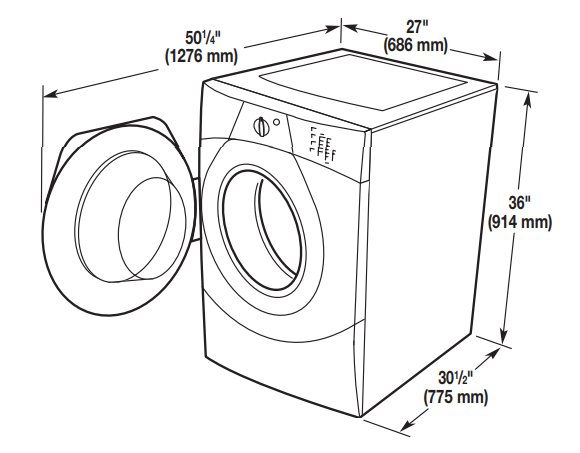
Recommended installation spacing for custom under-counter installation
The dimensions shown are for the recommended spacing.
Custom undercounter installation – Washer only

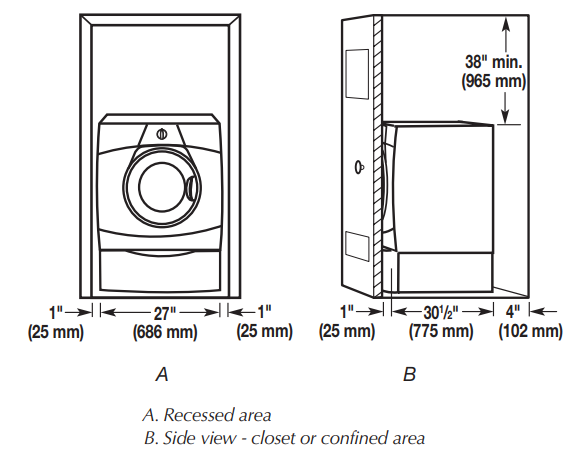
Recommended installation spacing for recessed or closet installation, with or without a pedestal
The dimensions shown are for the recommended spacing.
Recessed area or closet installation
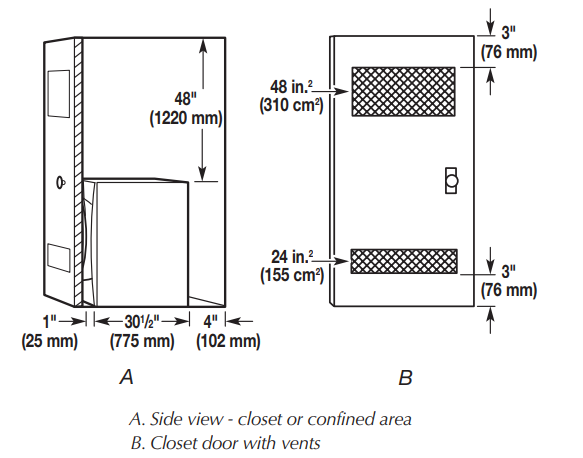
Recessed or closet installation – Washer on pedestal
Recommended installation spacing for recessed or closet installation, with a stacked washer and dryer
The dimensions shown are for the recommended spacing.
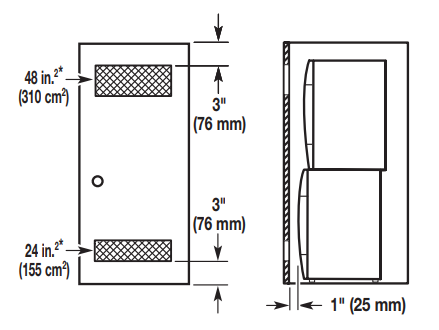
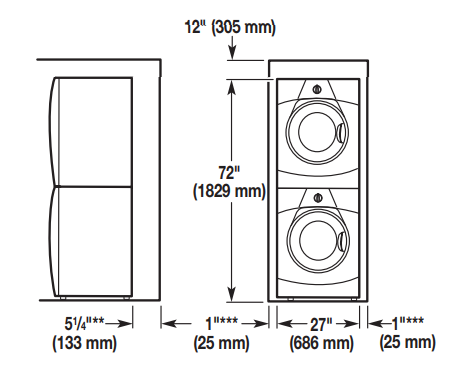
*Min. Top and bottom air openings for the closet door.
**The external exhaust elbow requires additional space.
***Wall, door, and floor molding may require additional spacing.
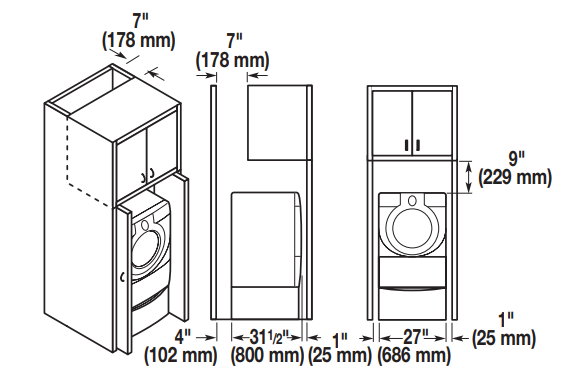
Recommended installation spacing for the cabinet installation
The dimensions shown are for the recommended spacing. For cabinet installation, with a door, the minimum ventilation openings in the top are required.
Drain System
The washer can be installed using the standpipe drain system (floor or wall), the laundry tub drain system, or the floor drain system. Select the drain hose installation method you need. See “Tools and Parts.”
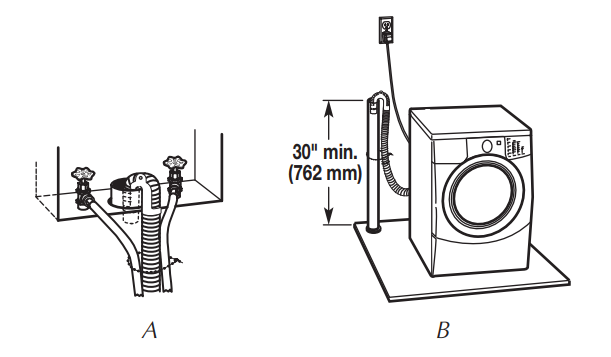
Standpipe drain system – wall or floor (views A & B)
The standpipe drain requires a minimum diameter standpipe of ! 2″ (50 mm). The minimum carry-away capacity can be no less than 17 gal. (64 L) per minute. The top of the standpipe must be at least 30″ (762 mm) high and no higher than 96″ (2.4 m) from the bottom of the washer.
Laundry tub drain system (view C)
The laundry tub needs a minimum of 20 gallons. (76 L) capacity. The top of the laundry tub must be at least 30″ (762 mm) above the floor.
Floor drain system (view D)
The floor drain system requires a siphon break that may be purchased separately. See “Tools and Parts.” The siphon break must be a minimum of 28″ (710 mm) from the bottom of the washer. Additional hoses might be needed.

Electrical Requirements
![]() WARNING
WARNING
Electrical Shock Hazard
- Plug into a grounded 3-prong outlet.
- Do not remove the ground prong.
- Do not use an adapter.
- Do not use an extension cord.
- Failure to follow these instructions can result in death, #re, or electrical shock.
- A 120-volt, 60 Hz., AC-only, 15- or 20-amp, fused electrical supply is required. A time-delay fuse or circuit breaker is recommended. It is recommended that a separate circuit serving only this appliance be provided.
- This washer is equipped with a power supply cord having a 3-prong grounding plug.
- To minimize possible shock hazard, the cord must be plugged into a mating, 3 prong, grounding-type outlet, grounded by local codes and ordinances. If a mating outlet is not available, it is the personal responsibility and obligation of the customer to have a properly grounded outlet installed by a qualified electrician.
- If codes permit and a separate ground wire is used, it is recommended that a qualified electrician determine that the ground path is adequate.
- Do not ground to a gas pipe.
- Check with a qualified electrician if you are not sure the washer is properly grounded.
- Do not have a fuse in the neutral or ground circuit.
GROUNDING INSTRUCTIONS
For a grounded, cord-connected washer
This washer must be grounded. In the event of a malfunction or breakdown, grounding will reduce the risk of electrical shock by providing a path of least resistance for electric current. This washer is equipped with a cord having an equipment-grounding conductor and a grounding plug. The plug must be plugged into an appropriate outlet that is properly installed and grounded in accordance with all local codes and ordinances.
WARNING: Improper connection of the equipment grounding conductor can result in a risk of electric shock.
Check with a qualified electrician or serviceman if you are in doubt as to whether the appliance is properly grounded. Do not modify the plug provided with the appliance – if it will ot fit the outlet, have a proper outlet installed by a qualified electrician.
For a permanently connected washer
This washer must be connected to a grounded metal, permanent wiring system, or an equipment grounding conductor must be run with the circuit conductors and connected to the equipment-grounding terminal or lead on the appliance.
INSTALLATION INSTRUCTIONS
Remove Transport System
WARNING
- Excessive Weight Hazard
- Use two or more people to move and install the washer.
- Failure to do so can result in back or other injury.
IMPORTANT: Position the washer so that the rear of the washer is within approximately 3 ft. (900 mm) of its final location.
There are 4 transport bolts in the rear panel of the washer that support the suspension system during transportation. These bolts also retain the power cord inside the washer until the bolts are removed.

- On the back of the washer, loosen the 4 transport bolts using a 13 mm wrench.
- Once the bolt is loose, move it to the center of the hole and completely pull out the bolt, including the plastic spacer covering the bolt.

- Once all 4 bolts are removed, discard the bolts and spacers. Then pull the power cord through the opening of the rear panel and close the hole with the attached cap.
- Cover the bolt holes with the 4 transport bolt hole plugs.
NOTE: If the washer is to be transported at a later date, call your local service center. To avoid suspension and structural damage, your machine must be properly set up for relocation by a certified technician.
Connect the Inlet Hoses
Insert new flat washers (supplied) into each end of the inlet hoses. Firmly seat the washers in the couplings.

Connect the inlet hoses to the water faucets..
Make sure the washer drum is empty and flat washers have been placed into the hose couplings. Both hoses must be used for the washer to work properly.
- Attach a hose to the hot water faucet. Screw on the coupling by hand until it is seated on the washer.
- Attach a hose to the cold water faucet. Screw on the coupling by hand until it is seated on the washer.
- Using pliers, tighten the couplings with an additional two-thirds turn.

NOTE: Do not overtighten. Damage to the coupling or water faucet can result. Both faucets must be turned on for the washer to work properly.
Clear the water lines..
- Run water through both faucets and inlet hoses, into a laundry tub, drainpipe,, pe,, or bucket, to get rid of particles in the water lines that might clog the inlet valve screens.
- Check the temperature of the water to make sure that the hot water hose is connected to the hot water faucet and that the cold water hose is connected to the cold water faucet.

Connect the inlet hoses to the washer.
IMPORTANT: Make sure that the flat washers have been placed into the hose couplings.

- Attach the hot water hose to the washer’s hot (H) water inlet valve. Screw on the coupling by hand until it is seated on the washer.
- Attach the cold water hose to the washer’s cold (C) water faucet. Screw on the coupling by hand until it is seated on the washer.
- Using pliers, tighten the couplings with an additional! Two-thirds turn.
NOTE: Do not overtighten or use tape or sealants on the valve. Damage to the valves can result. - Turn on the water faucets completely and check for leaks.
NOTE: Replace inlet hoses after 5 years of use to reduce the risk of hose failure. Record hose installation or replacement dates on the hoses for future reference.
Periodically inspect and replace hoses if bulges, kinks, cuts, wear, or leaks are found.
Connect the Drain Hose
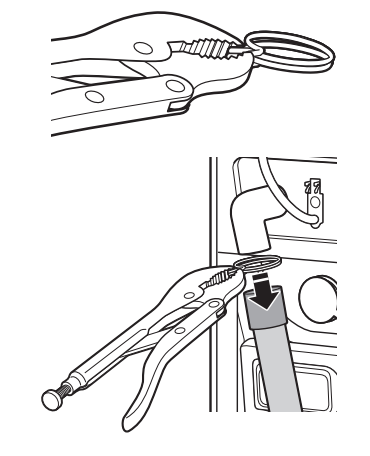
Remove the drain hose from the washer drum
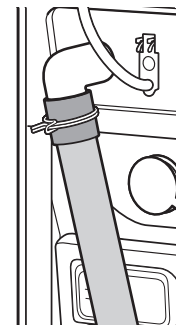
- Use locking pliers, squeeze the hose clamp tabs together, and insert them over the end of the drain hose.

- Slide the drain hose onto the washer connection.

- Once the drain hose is in place, release the pliers.

- Washer drain system can be installed using a floor drain, wall standpipe, floor standpipe, or laundry tub.
Laundry tub drain or standpipe drain
Connect the drain hose form to the corrugated drain hose.

- A. Snap either end of the drain hose form to the drain hose at the point where the corrugation begins.
- B. Bend the drain hose over the drain hose form and snap into place.
To keep the drain water from going back into the washer
- Use the drain hose form, and do not force excess drain hose into the standpipe. Hose should be secure, but loose enough to provide a gap for air.
- Do not lay excess hose on the bottom of the laundry tub.
Floor drain
You may need additional parts. See the Floor drain under “Tools and Parts.”
Secure the Drain Hose
The drain hose must be secured to stop the hose from moving when water is pumped out. If the drain hose moves, water may end up on the floor.
- Drape the power cord over the washer top.
- Move the washer to its final location.
- Place the drain hose in the laundry tub or standpipe as shown.
See illustrations A and B. NOTES:
- Do not force the excess drain hose back into the rear of the washer.
- To avoid siphoning, do not seal or put more than 4½”! (114 mm) of the drain hose into the drainpipe or standpipe.
- If the washer faucets and the drain standpipe are recessed, put the hooked end of the drain hose in the standpipe as shown. See illustration C.
Level the Washer
Proper foot-to-floor contact and leveling your washeravoid excessivee noise and vibration.
NOTE: Installing the washer on soft floor surfaces, such as carpets or surfaces with foam backing, is not recommended.
- Slide the washer to its final location.
- Check that all four feet are in firm contact with the floor.
- Check the levelness of the washer by placing a level on the top edge of the washer, first side to side, then front to back.
 If the washer is against a wall, move the washer out slightly before tipping back. If the washer is not level, first prop the front with a wooden block and adjust the front feet high, t moving the hexagonal plastic part as necessary. Repeat to adjust the back feet.
 - Make sure all four feet are in firm contact with the floor. Then check that the washer is perfectly level (use a level). Repeat steps 1-3 until the washer is level.
- After the washer is level and all four feet are in firm contact with the floor, use a 9/16″ (14 mm) open-end wrench to turn the locknuts on the feet, tightly against the washer cabinet.
IMPORTANT: All four locknuts on the feet must be tightened. If the locknuts are not tight against the washer cabinet, the washer may vibrate. - The washer should not move front to back, side to side, or diagonally when pushed on its top edges.
- Confirm the levelness of the washer.
Complete Installation
- Check the electrical requirements. Be sure that you have the correct electrical supply and the recommended grounding method. See “Electrical Requirements.”
- Check that all parts are now installed. If there is an extra part, ! back through the steps to see which step was skipped.
- Check that you have all of your tools.
- Dispose of/recycle all packaging materials.
- Check that both water faucets are on.
- Check for leaks around faucets and inlet hoses.
- Plug into a grounded 3-prong outlet.
- Read “Washer Use.”
- To test and to clean your washer, measure 1/2 of the detergent manufacturer’s recommended amount of High Efficiency (HE) detergent for a medium-size load. Pour the detergent into the detergent dispenser. Select NORMAL and then press START/ PAUSE. Allow the washer to complete one whole cycle.

FEATURES AND BENEFITS
Your new front-loadinghigh-efficiencyy washer was designed to conserve resources and lower your water and energy bills. The washer is designed to determine and then provide the amount of water needed for the best performance. The time of operation may be greater for this new system than for a conventional washer.
Electronic Controls
Flexible electronic controls are easy to usewhether you are a beginner or an expert.
Auto Water Level
Adjusting to the size of the load, this feature allows the washer to use the minimal amount of water needed to clean and rinse the clothes. With a low water level, you can obtain the same results. Because only the required amount of water is used, the washer saves energy, too. You can obtain the same washing results for! Small and large load sizes.
Larger Load Size
Since there is no agitator, you can wash larger, bulkier items such as an average-size sleeping bag. You are also able to wash more clothes at one time, which means fewer loads. You can wash a pillow or a large stuffed teddy bear.
Suspension System
To reduce washer “walk” and “off-balance” conditions, your new washer combines:
- 2 Springs to isolate vibration
- 3 Shock absorbers at the washer base to minimize movement
Stainless Steel Drum
The stainless steel drum eliminates corrosion and enables higher spin speeds for more water extraction, reducing drying time.
Adaptive Variable Speed Motor
The motor adapts to the load size and to the cycle selected to give the optimum cleaning, rinsing, and spinning conditions. The motor can handle slow speeds needed for delicate items and is powerful enough to drive an average clothes load up to high-speed spin.
Spin Speeds
This washer automatically selects the spin speed based on the cycle selected. For some cycles, the default spin speed can be changed if desired. This washer offers up to three different spin speed choices.
Add Clothes
This option is available in all wash cycles except Rinse, Drain & Spin, and Clean Washer with AFFRESH™ cycle. When this option is available at the beginning of the cycle, the Add Clothes status light will illuminate for the first 7 minutes. This washer allows a 7-minute period in which other garments may be added to a load.
Dynamic Balance
A precision balancing system allows the washer to reach high-speed spins. The washer spins faster so that clothes coming out of the washer will have less moisture than with traditional top-load machines. In addition, if the Dynamic Balance system detects off-balance loads during spinning, it redistributes the clothes so that they are evenly balanced.
Smart Dispensers
The three compartments in the dispenser allow loading of all laundry products before the washer is started. The products! Will be dispensed into the wash at the optimal time for high-performance cleaning. The bleach release system is included in the detergent advantage system. The detergent is added at the beginning of the cycle, and the bleach is added after the enzymes have had a chance to do their cleaning. The fabric softener is dispensed in the rinse cycle or the 2nd Rinse, if selected. The Detergent Advantage System Dispenser tray is easily removed for cleaning.

TROUBLESHOOTING
First, try the solutions suggested here or visit our website and reference FAQs (Frequently Asked Questions) to possibly avoid the cost of a service call…
In U.S.A. www.maytag.com/help In Canada www.maytag.ca
Noisy, vibrating, off-balance
Is the washer level?
The washer must be level. The four feet should be properly installed, and the nuts should be tightened against the washer cabinet.
All four feet of the washer must be in firm contact with the floor. If the washer is on a pedestal, the washer must be secured to the pedestal, and all four pedestal feet must be in firm contact with the floor.
Did you empty your pockets?
You may be hearing items that are caught under the door seal or basket. Check under the door seal and remove items.
Washer making a different noise?
As with any new product, you will hear sounds that you are not accustomed to. You may hear various sounds when the door is locked or unlocked, and during the washing, rinsing, or spinning process. Between changes in wash actions, there will be momentary pauses. You will hear water spraying and splashing during the wash and rinse cycles. These new sounds and pauses are part of normal washer operation.
Is the washer installed on a sturdy and solid floor?
Refer to the “Installation Instructions” for flooring requirements. Noise and vibration may be reduced by placing a piece of 3/4″ (19.1 mm) plywood underneath your washer. The plywood may extend underneath both the washer and the dryer to keep them at equal heights.
Is the washer gurgling or humming?
As water is drained from the washer, you may hear air being pulled through the pump. This happens at the end of draining. It is normal.
Leaking
Was the door opened during “Add Clothes”?
Water can drip off the inside of the door when the door is opened after the start of a cycle.
Is HE detergent being used?
The non-High Efficiency detergents can cause oversudsin ,which can leak from the rear of the washer.
Are the fill hoses tight? OR Are the fill hose gaskets properly seated?
Check both ends of each hose. See “Connect the Inlet Hoses.”
Is the drain hose properly installed?
The drain hose should be secured to the drainpipe or laundry tub. See “Secure the Drain Hose.”
Is the sink or drain clogged?The sinkk and drainpipe must be able to carry away 17 gallons. (64 L) of water per minute. If the sink or drain is clogged or slow, water can back up out of the drainpipe or sink. Check household plumbing (laundry tubs, faucets, drdrainpipeswater pipes) for leaks.
Dispenser operation
Is the fabric softener dispenser clogged?
Clean the fabric softener dispenser. See “Washer Care” for details.
Are the laundry products in the correct dispenser compartment?
Add the correct amounts of detergent, fabric softener,r or liquid chlorine bleach to the correct compartments. Add powdered or liquid color-safe bleach to the Main Wash compartment.
Is there water in the dispenser at the end of the cycle?
A small amount of water will remain in the dispenser compartment. This is normal.
MAYTAG® LAUNDRY WARRANTY
LIMITED WARRANTY
For one year from the date of purchase, when this major appliance is operated and maintained according to instructions attached to or furnished with the product, Maytag brand of Whirlpool Corporation or Whirlpool Canada LP (hereafter “Maytag”) will pay for factory specified parts and repair labor to correct defects in materials or workmanship that existed when this major appliance was purchased. Service must be provided by a Maytag-designateded service company. YOUR SOLE AND EXCLUSIVE REMEDY UNDER THIS LIMITED WARRANTY SHALL BE PRODUCT REPAIR AS PROVIDED HEREIN. This limited warranty is valid only in the United States or Canada and applies only when the major appliance is used in the country in which it was purchased. Proof of original purchase date is required to obtain service under this limited warranty.
ITEMS EXCLUDED FROM WARRANTY
This limited warranty does not cover
- Replacement parts or repair labor if this major appliance is used for other than normal, single-family household use o,r when it is used in a manner that is inconsistent with published user or operator instructions and/or installation instructions.
- Service calls to correct the installation of your major appliance, to instruct you on how to use your major appliance, to replace or repair house fuses, or to correct house wiring or plumbing.
- Service calls to repair or replace appliance light bulbs, air filters, or water filters. Consumable parts are excluded from warranty coverage.
- Damage resulting from accident, alteration, misuse, abuse, fire, flood, acts of God, improper installation, installationnot byh electrical or plumbing codes, or use of products not approved by Maytag.
- Cosmetic damage, including scratches, dents, cips,, or other damage to the finish of your major appliance, unless such damage results from defects in materials or workmanship and is reported to Maytag within 30 days from the date of purchase.
- Pick up and delivery. This major appliance is intended to be repaired in your home.
- Repairs to parts or systems resulting from unauthorized modifications made to the appliance.
- Expenses for travel and transportation for product service if your major appliance is located in a remote area where service by an authorized Maytag servicer is not available.
- The removal and reinstallation of your major appliance if it is installed in an inaccessible location or is not iinstalled byMaytag’s published installation instructions.
- Replacement parts or repair labor on major appliances with original model/serial numbers that have been removed, altered, or cannot be easily determined.
DISCLAIMER OF IMPLIED WARRANTIES
IMPLIED WARRANTIES, INCLUDING ANY IMPLIED WARRANTY OF MERCHANTABILITY OR IMPLIED WARRANTY OF FITNESS FOR A PARTICULAR PURPOSE, ARE LIMITED TO ONE YEAR OR THE SHORTEST PERIOD ALLOWED BY LAW. Some states and provinces do not allow limitations on the duration of implied warranties of merchantability or fitness, so this limitation may not apply to you. This warranty gives you specific legal rights, and you also may have other rights that vary from state to state or province to province.
LIMITATION OF REMEDIES; EXCLUSION OF INCIDENTAL AND CONSEQUENTIAL DAMAGES
YOUR SOLE AND EXCLUSIVE REMEDY UNDER THIS LIMITED WARRANTY SHALL BE PRODUCT REPAIR AS PROVIDED HEREIN. MAYTAG SHALL NOT BE LIABLE FOR INCIDENTAL OR CONSEQUENTIAL DAMAGES. Some states and provinces do not allow the exclusion or limitation of incidental or consequential damages, so these limitations and exclusions may not apply to you. This warranty gives you specific legal rights, and you also may have other rights that vary from state to state or province to province.
If outside the 50 United States and Canada, contact your authorized Maytag dealer to determine if another warranty applies. If you think you need repair service, first see the “Troubleshooting” section of the Use & Care Guide. If you are unable to resolve the problem after checking “Troubleshooting,” additional help can be found by checking the “Assistance or Service” section or by calling Maytag. In the U.S.A., call 1$800$688$9900. In Canada, call 1$800$807$6777.
Keep this book and your sales slip together for future reference. You must provide proof of purchase or installation date for in-warranty service.
Write down the following information about your major appliance to better help you obtain assistance or service if you ever need it. You will need to know your complete model number and serial number. You can find this information on the model and serial number label located on the product.
Dealer name ____________________________________________________
Address _________________________________________________________
Phone number ___________________________________________________
Model number ___________________________________________________
Serial number ___________________________________________________
Purchase date ___________________________________________________
For more manuals by Maytag, visit ManualsLibraryy
Maytag 2000 Series Front Loading Automatic Washer- FAQs
How long does a Maytag washer last?
With proper care, a Maytag washer lasts 10–12 years on average.
Is it worth repairing a Maytag washer?
If under 5 years old: Usually worth repairing.
If repair costs exceed 50% of a new washer’s price: Consider replacement.
Where is Maytag manufactured?
Maytag washers are made in Newton, Iowa; Herrin, Illinois; Searcy, Arkansas; and Mexico.
How do I unlock the door if my washer stops mid-cycle?
Power off the washer for 5 minutes to reset.
If stuck, check for error codes (like F5 E2) and clear obstructions.
What’s the fastest wash cycle?
The Quick Wash cycle cleans small, lightly soiled loads in less time.
Do all front-load washers have a filter?
Most Maytag models have a drain pump filter (located at the front bottom).
Some HE washers use a self-cleaning pump instead.
What’s the best detergent for a Maytag front-load washer?
Use HE (High-Efficiency) detergent like Swash® to prevent excess suds.
How do I reset my Maytag washer?
Unplug for 5 minutes or press “Cancel” twice + “Start”.
For error codes (F9 E1, F5 E3, etc.), check the manual for troubleshooting.
Can I use vinegar to clean my washer?
Yes, white vinegar helps remove odors (run an empty hot cycle with 1–2 cups).



 NOTES:
 If the washer is against a wall, move the washer out slightly before tipping back. If the washer is not level, first prop the front with a wooden block and adjust the front feet high, t moving the hexagonal plastic part as necessary. Repeat to adjust the back feet.