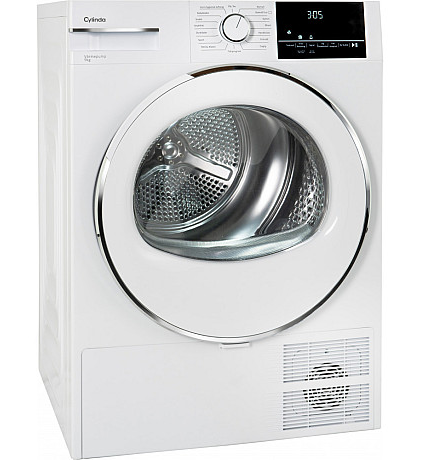
Cylinda FTA6396A Washing Machine
Safety Instructions
This section includes the safety instructions necessary to prevent the risk of personal injury or material damage. Our company shall not be held responsible for damages that
may occur if these instructions are not observed.
- Installation and repair operations shall always be performed by Authorised Service.
- Use original spare parts and accessories only.
- Do not repair or replace any component of the product unless it is clearly specified in the user manual.
- Do not modify the product
Intended Use
- The product’s shelf life is 10 years. During this period, original spare parts will be available to operate the appliance properly.
- This product has been designed for domestic use. It is not for commercial purposes, nor should it be used outside of its intended use.
- The product must only be used for washing and rinsing laundry that is marked accordingly.
- Electrical products are dangerous for children and pets. Children or pets should not play with, climb on top or inside the product. Check inside the product before use.
- Use the child lock to prevent children from intervening with the product.
- Do not forget to close the loading door when leaving the room where the product is located. Children and pets may get locked inside and drown.
- Children should not perform cleaning and user maintenance work without an adult’s supervision.
- Keep the packaging materials away from children. Risk of injury and suffocation.
- Keep all detergents and additives used for the product away from children’s reach.
- Cut the power cable and brake and deactivate the locking mechanism of the loading door before disposing of the product for children’s safety.
Technical Specifications
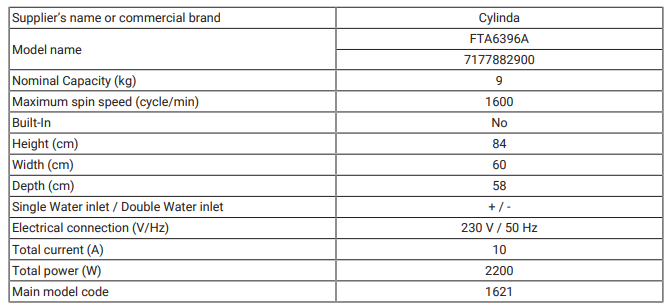
Installation
- Please contact the nearest Authorised Service for the installation of the appliance.
- Make sure that the installation and electrical connections of the product are performed by an authorised service agent. The manufacturer shall not be held responsible for damages caused by operations performed by unauthorised persons.
- Preparation of the location and electrical, tap water, and wastewater installations
The place of installation is under the customer’s responsibility. - Make sure that the water inlet and discharge hoses, as well as the power cable, are not folded, pinched, or crushed while pushing the product into its place after
installation or cleaning procedures. Before installation, visually check if the
product has any defects. Do not have the product installed if it is damaged. Damaged products cause risks to your safety.
Appropriate Installation Location
- Place the product on a hard and level floor. Do not place it on a carpet with a high pile or other similar surfaces. An inappropriate floor may cause problems with noise and vibration
- Total weight of the washing machine and the dryer -with a full load- when they are
placed on top of each other, reaches approx. 180 kilograms. Place the product
on a solid and flat floor that has sufficient load-carrying capacity. - Do not place the product on the power cable.
- Do not install the product in places where the temperature may fall below 0 ºC. Freezing might damage your product.
- Leave a minimum space of 1 cm between the product and the furniture.
- If you will install the product on a surface with steps, never place it close to the
edge. - Do not place the product on any platform.
- Do not place heat sources such as cookers, irons, ovens, heaters, etc. on the appliance, and do not use them on the product.
Assembly of Bottom Panel Covers
- To increase the sound comfort of the product, attach cover A after removing the package foam.
Cover A
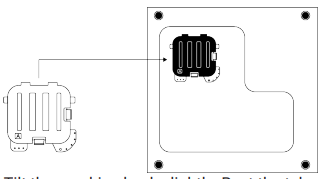
Tilt the machine back slightly. Rest the tabs of Cover A against the lower panel. Complete the assembly by rotating the cover.
- Cover B and the Cap are optional. If available, attach cover B and the Cap.
Cover B
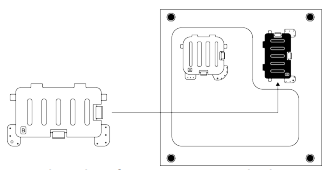
Rest the tabs of Cover B against the lower panel. Complete the assembly by rotating the cover.
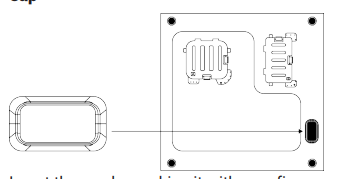
Insert the cap by pushing it with your finger.
Removing Transportation Safety Bolts
- Loosen all transportation safety bolts with an appropriate wrench until they turn freely.
- Bend the inner part by pressing it at the grip areas and pulling the part out.
- Attach the plastic covers supplied in the User Manual Bag to the holes on the rear panel.

Connecting to Water Supply
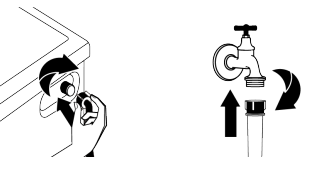
- Tighten all hose nuts by hand. Never use a tool when tightening the nuts.
- Open the taps completely after making the hose connection to check for water
leaks at the connection points. If any leak occurs, turn off the tap and remove
the nut. Check the gasket and tighten the nut carefully again. To prevent water leaks and resultant damage, keep the taps closed when you do not use the product.
Connecting the Drain Hose to the Drain
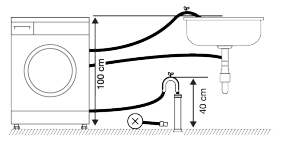
- Attach the end of the drain hose directly to the wastewater drain, washbasin, or bathtub.
- Connect the drain hose to a minimum height of 40 cm and a maximum height
of 100 cm. - Installing the water draining hose at ground level or close to the floor (40 cm below) and then raising it makes water discharge difficult, and the laundry may
come out extremely wet. Thus, follow the heights provided in the figure.
- To prevent the wastewater from going back into the product again and to ensure
easy drainage, do not immerse the end of the hose in the wastewater or do not insert it into the drain for more than 15 cm. If it is too long, cut it short. - The end of the hose should not be bent, it should not be stepped on, and the hose must not be pinched between the drain and the product. Otherwise, water discharge issues may emerge.
- If the length of the hose is too short, use it by adding an original extension hose. The overall length of the hose shall not be longer than 3.2 m. To prevent water leaks, always secure the connection between the extension hose and the draining hose of the product with a suitable clamp so that it does not come off and cause leaks.
Adjusting the Stands
- Loosen the lock nuts on the feet by hand.
- Adjust the feet until the product stands level and balanced.
- Tighten all lock nuts again by hand.

Electrical Connection
Connect the product to a grounded outlet protected by a 16 A fuse. Our company shall not be responsible for the damages that shall be incurred due to using the product without grounding according to local regulations.
- Connection must comply with national regulations.
- The electrical connection cable infrastructure of the product must be adequate and suitable for the product requirements. It is recommended to use a residual current device.
- The power cable plug must be within easy reach after installation.
- If the current supply to the fuse or breaker in the house is less than 16 Amps, have a qualified electrician install a 16-amp supply.
- The voltage specified in the “Technical specifications” section must be equal to your mains voltage.
- Do not make connections via extension cables or multi-plugs. Overheating and
burning may occur due to the connecting cable.
Start Up
Before starting to use the product, make sure that the preparations described in sections “Environmental instructions” and “In.
Sorting the Laundry
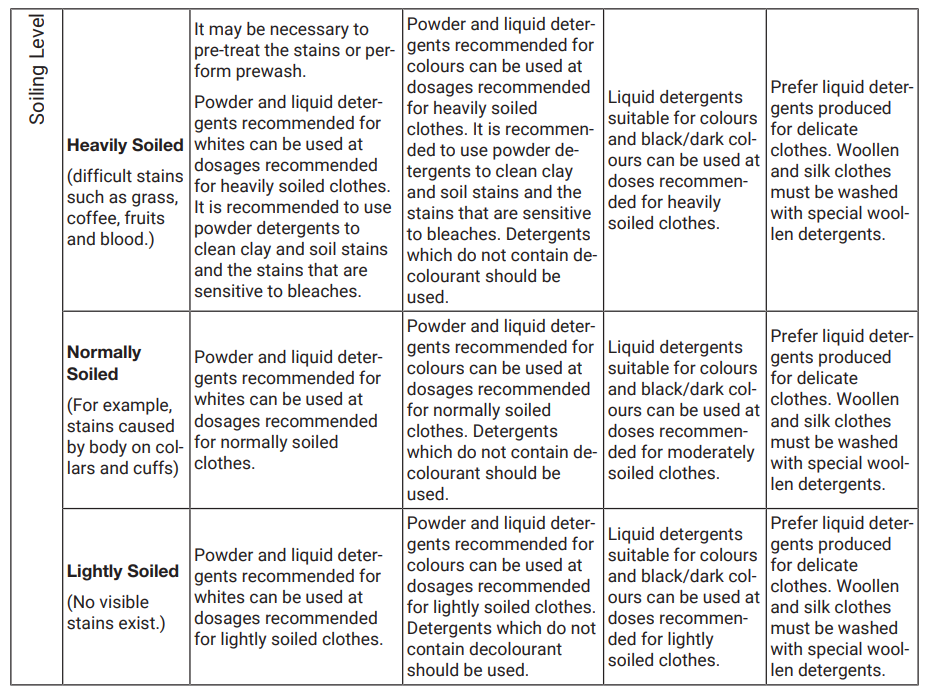
- Sort laundry according to type of fabric, colour, degree of soiling, and allowable water temperature.
- Always observe the instructions given on the garment care labels.
Preparing Laundry for Washing
- Laundry items with metal attachments, such as underwiring, belt buckles, or metal buttons, will damage the product. Remove the metal pieces or wash such clothes by putting them in a laundry bag or a pillow case.
- Take out all substances in the pockets, such as coins, pens, and paper clips, and
turn the pockets inside out and brush. Such objects may damage the product or
cause a noise problem. - Put small-sized clothes, such as an infant’s socks and nylon stockings, in a laundry bag or a pillow case.
- Place the curtains without compressing them. Remove curtain attachment items.
Curtain attachment items may cause pulling and tearing on the curtain. - Fasten zippers, sew loose buttons, and mend rips and tears.
- Wash “Machine washable” or “Hand washable” labelled products only with an
appropriate programme. - Do not wash colours and whites together. New, dark coloured cottons release a lot
of dye. Wash them separately. - Tough stains must be treated properly before washing.
- Wash trousers and delicate laundry turned inside out.
- Laundry that is subjected to materials such as flour, lime dust, milk powder, etc., intensely must be shaken off before placing it into the product. Such dust and powders on the laundry may build up on the inner parts of the product over time and can cause damage.
Tips for Energy and Water Saving
The following information will help you use the product in an ecological and energy/water-efficient manner.
- Operate the product in the highest load capacity allowed for the programme you
have selected, but do not overload. See “Programme and consumption table” - Observe the temperature instructions on the detergent packaging.
- Wash slightly soiled laundry at low temperatures.
- Use faster programmes for small quantities of lightly soiled laundry.
- Do not use prewash and high temperatures for laundry that is not heavily soiled or stained.
- If you plan to dry your laundry in a dryer, select the highest spin speed recommended during the washing process.
- Do not use more detergent than the recommended amount on the detergent packaging.
Loading the Laundry
- Open the loading door.
- Put the laundry items into the product in a loose manner.
- Push the loading door to close until you hear a locking sound. Ensure that no
items are caught in the door. The loading door is locked while a programme is
running. The door lock will open once the programme is completed. Then you
can open the loading door. If the door does not open, apply the solutions provided for the “Loading door cannot be opened” error in the Troubleshooting section.
Tips for Efficient Washing

Displayed Programme Duration
You can view the programme duration on the display of your machine while selecting
a programme. Depending on the amount of laundry you have loaded into your machine,
foaming, unbalanced load conditions, fluctuations in power supply, water pressure,
and programme settings, the programme duration is automatically adjusted while the programme is running.
Control Panel
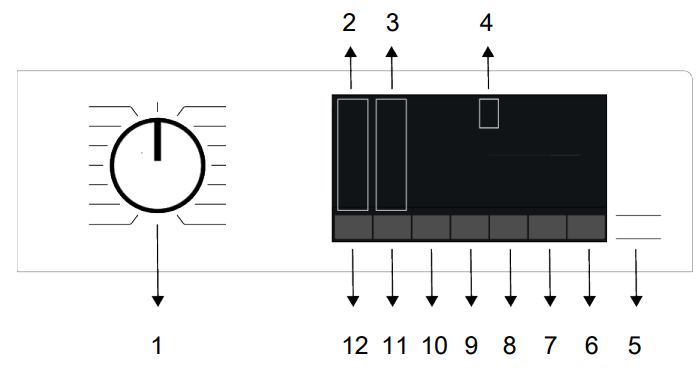
- Programme Selection Button
- Temperature Level Lights
- Spin Level Indicator Lights
- Display
- Start/Pause Button
- Remote Control Button
- End Time Setting Button
- Auxiliary Function Button 3
- Auxiliary Function Button 2
- Auxiliary Function Button 1
- Spin Speed Adjustment Button
- Temperature Setting Button
Symbols on the Display
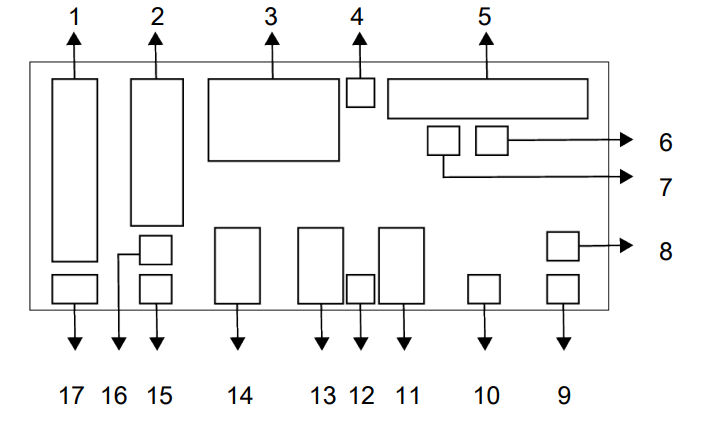
- Temperature Indicator
- Spin Speed Indicator
- Duration information
- Door lock is engaged symbol
- Programme follow-up indicator
- No Water indicated
- Add Garment Indicator
- Bluetooth Connection Indicator
- Remote Control Indicator
- Delayed Start Enabled Indicator
- Auxiliary Function Indicators 3
- Child Lock Enabled symbol
- Auxiliary Function Indicators 2
- Auxiliary Function Indicators 1
- No spin indicator
- Rinse Hold Indicator
- Cold Water indicator
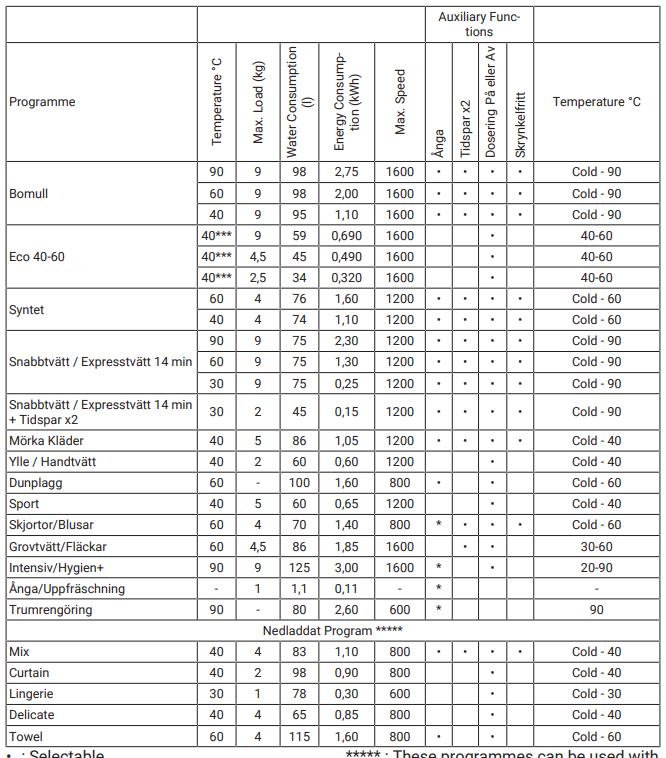
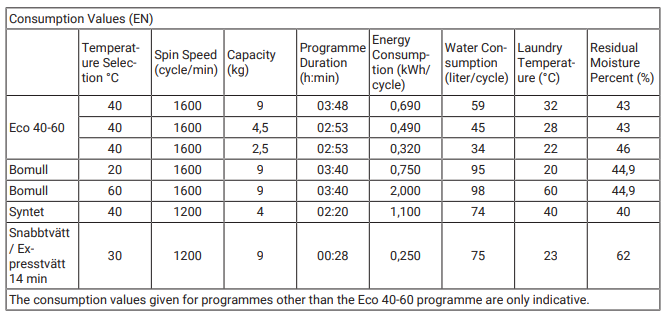
Programme and Consumption Table
Maintenance and Cleaning
Cleaning the Detergent Drawer: When to clean
- When you open the dosing tank cover and see a thickened non-fluid detergent or softener,
- If you are not satisfied with the washing results, it may be that the detergent or softener has become stiff and therefore cannot be taken into the washing area.
- If the liquid in the tank does not decrease, although dosing is selected, and you do not load detergents or softeners for a long time,
- If you want to change the washing ingredients you have filled in the chamber (for example, if you are not satisfied with the detergent and do not want to use it) or if you have done incorrect loading (for example, if you have placed detergent or
softener in the detergent tank), - If a different brand of detergent or softener will be added,
- If a washing agent with different specifications (e.g., if detergent is added for coloured ones when there is detergent in the tank for whites) is added,
- If a different-concentration washing agent is added (to avoid wasting the previously filled detergent, you can put them in the powder detergent compartment in the next washing and consume it by selecting the «powder detergent active» position on the screen).
- If the new softener has the same specifications but only a different scent, (it should be noted that the scent of the mixture will be different if it is added without cleaning the remaining softener,
- If it is not going to be used for a long time (e.g., at the time of moving to the
summer house and at the time of return, for 3 months or more, the liquid washing agent may become denser and may become stiffer at the end, and may not make dosing, although the system indicates full.
Cleaning:
Before starting cleaning, unplug your appliance by pressing the On/Off button.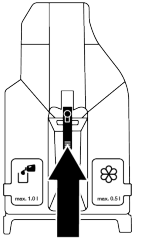
- Press the blue part in the middle of the detergent drawer to pull it towards you and remove it.

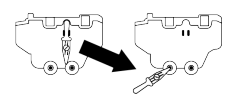
- Remove the drain stick located at the back of the drawer from its slot.
- Place the slot behind the detergent drawer to be emptied towards the inside of the compartment to be emptied.
- Gently push the drain stick into the slot behind the detergent compartment.
- The detergent will start to pour into the container.
- The same is carried out for the softener compartment.

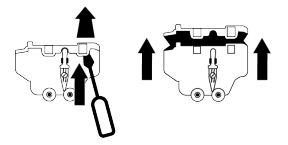
- The guides holding the top cover of the detergent drawer are removed with a
flathead screwdriver (there are a total of 6 guides, two each on the right, left, and
back of the drawer), and the inside of the drawer is washed. - After the completion of the washing process, the cover is inserted into the drawer.
Make sure that all guides are in place. If the guides do not fit, liquid may spill from the drawer, or the detergent box may get trapped in the drawer rail or move with difficulty. Therefore, make sure that the guides are firmly seated. - Insert the drain stick back into its slot in the back of the drawer.
- Refit the drawer by paying attention to its slot and slides, and push the drawer to close. Once detergents and softeners are added, they will be ready for use in dosed programs.
Troubleshooting
Programs do not start after the loading door is closed.
- Start / Pause /Cancel button might not be pressed. >>> * Press the Start /
Pause /Cancel button. - It may be difficult to close the loading door in case of excessive loading. >>>
Reduce the amount of laundry and make sure that the loading door is closed properly.
The program cannot be started or selected.
- The product has switched to self-protection mode due to a supply problem (line
voltage, water pressure, etc.). >>> Depending on the product model, select another program by turning the Program Selection button or pressing and holding
the On/Off button for 3 seconds to cancel the program. The previous programme
will be cancelled. See Cancelling the Programme [} 33].
Water inside the product.
- Some water has remained in the product due to the quality control processes in
the production. >>> This is not a failure; water is not harmful to the product.
The product does not take water in.
- The tap is turned off. >>> Turn on the taps.
- The water inlet hose is bent. >>> Flatten the hose.
- The water inlet filter is clogged. >>> Clean the filter.
- The loading door is not closed. >>> Close the door.
The product does not drain water
- The water drain hose is clogged or twisted. >>> Clean or flatten the hose.
- The pump filter is clogged. >>> Clean the pump filter.
The product vibrates or makes noise.
- The product is standing unbalanced. >>> Adjust the stands to balance the product.
- A hard substance has entered the pump filter. >>> Clean the pump filter.
- Transportation safety bolts are not removed. >>> Remove the transportation safety bolts.
- Laundry quantity in the product is too little. >>> Add more laundry to the product.
- Excessive laundry is loaded in the product. >>> Take out some of the laundry from the product or distribute the load by hand to balance it homogeneously in the product.
- The product is leaning on a rigid item. >>> Make sure that the product is not leaning
on anything.
FOR MORE MANUALS BY CYLINDA, VISIT MANUALSLIBRARYY
Cylinda FTA6396A Washing Machine-FAQs
How do I find the model number of my washing machine?
The model number is usually on a label inside the washing machine door or on the back of the machine. This label helps identify the exact model for service or parts.
How do I prepare laundry before washing?
Sort clothes by color and fabric type, close zippers and fasten buttons, and check care labels to protect your clothes and get the best wash results.
How do I start a washing program?
Load the drum loosely, add the correct amount of detergent, select the desired program using the dial or buttons, then press start.
What should I do if the door won’t open after a cycle?
Wait a few minutes as the door lock releases after the cycle ends. If it still won’t open, check for water in the drum and error messages, then follow troubleshooting guidance.
How do I clean and maintain the washing machine?
Regularly clean the detergent drawer, drum, and door seal. Run a cleaning cycle monthly and check hoses for leaks or blockages.
What should I know about installation and water connection?
Ensure the water supply is cold with proper pressure, tighten hoses by hand (not tools), and check for leaks after connecting.
How do I handle error codes on the machine?
Refer to the manual for specific error codes. Common errors include water level, temperature, or motor issues, which may require cleaning filters or contacting service.
Can I move the washing machine safely?
Before moving, remove transport bolts or reinstall protective bolts if transporting again later to prevent damage. Keep the machine upright during transport.


