
Simplicity 1692967 Regent Lawn Tractor-Mower
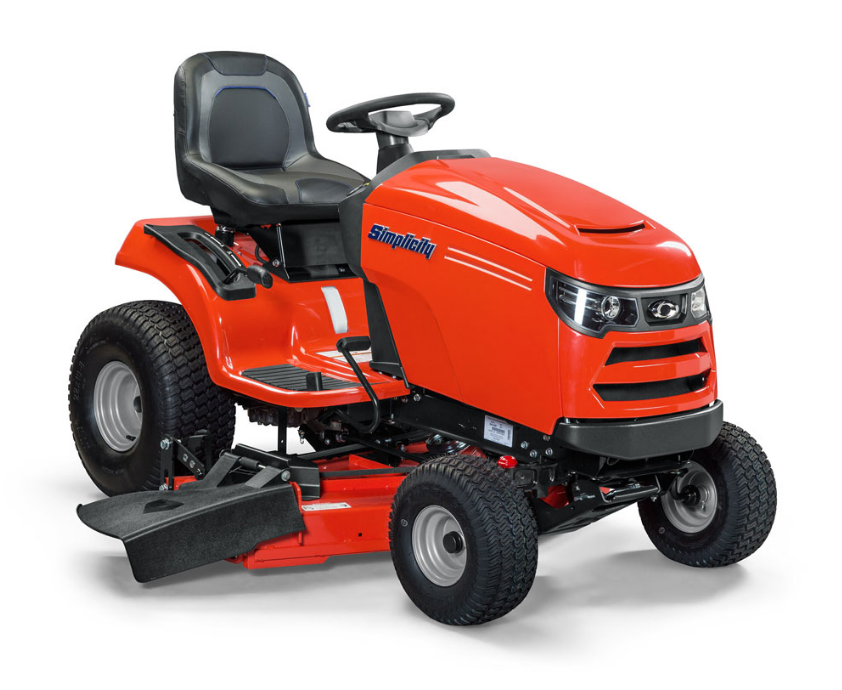
Features & Controls
CONTROLS – HYDRO MODEL
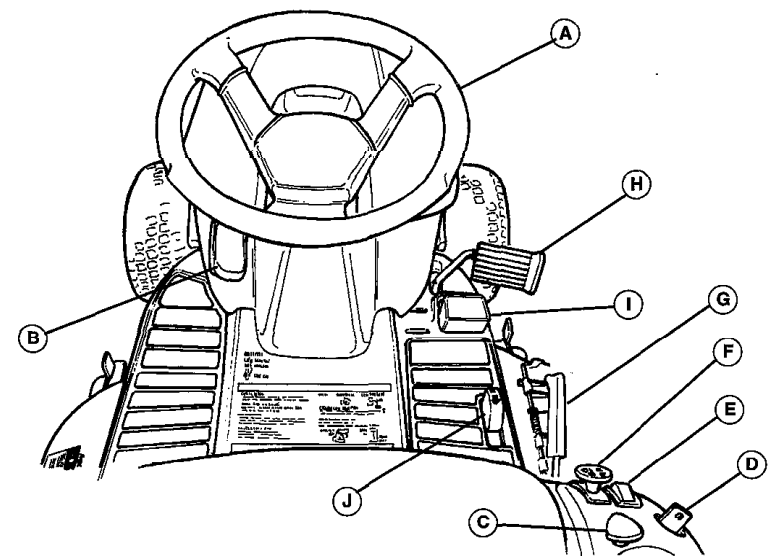
- A. Steering Wheel
- B. Engine Throttle Control
- C. Parking Brake Knob
- D. Ignition Key/Switch
- E. Headlight Switch
- F. PTO (Electric Clutch) Switch
- G. Mower Height Adjustment Lever
- H. Brake Pedal
- I. Forward Direction Pedal
- J. Rear Direction Pedal
CONTROLS – GEAR MODEL
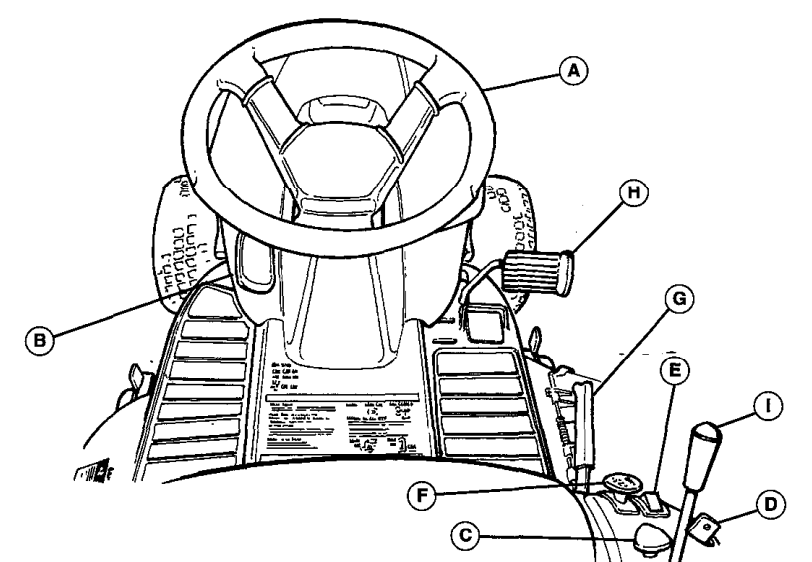
- A. Steering Wheel
- B. Engine Throttle Control
- C. Parking Brake Knob
- D. Ignition Key/Switch
- E. Headlight Switch
- F. PTO (Electric Clutch) Switch
- G. Mower Height Adjustment Lever
- H. Clutch/Brake Pedal
- I. Gear Selector
Operation
GENERAL
Before the first time operation, drive in an open area without mowing, to become accustomed to the unit. Be sure to read all information in the Safety and Operation sections before attempting to operate this tractor and mower.
Test 1 – Engine should NOT crank if any of the following conditions exist:
- The transmission is out of neutral
- The PTO switch is engaged.
- The clutch/brake pedal is not fully depressed.
Test 2 – The Engine should crank if ALL of the following conditions are met:
- The transmission is in neutral.
- The PTO switch is disengaged.
- The clutch/brake pedal is fully depressed.
Test 3 – The Engine should shut off if any of the following conditions exist:
- The operator rises off the seat with the transmission in gear and the clutch/brake pedal not fully depressed, and/or the oarkina brake is not set.
- The operator rises off the seat with the clutch/brake pedal not depressed;
- The operator rises off the seat with PTO engaged.
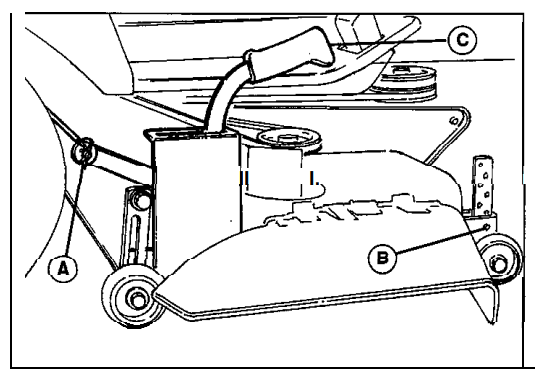
- A. Clip
- B. Pin 84 Clip
- C. Height Adjustment Lever
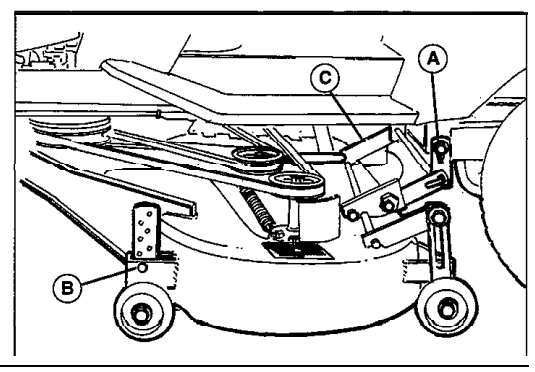
- A. Rod
- B. Pin & Clip
- C. Lever
MOWER INSTALLATION & REMOVAL
- Turn the front wheels of the tractor full left.
- Place the mower in the lowest cutting position.
- Remove the clip (A, figure 4) from the right side of the rod. Pull the rod (A, figure 5) out from the left side.
- Move lever (C, figure 5) towards the right side of the tractor to release belt tension, then slide the belt off of PTO pulley.
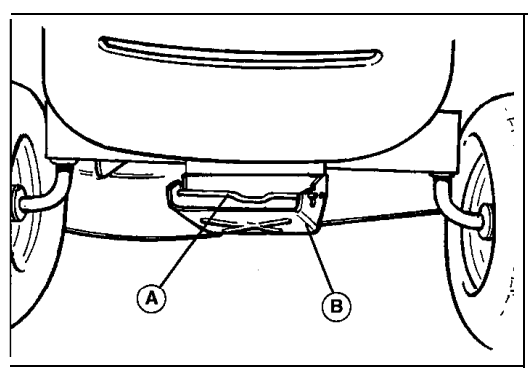
- Disconnect the front hitch by pulling out on the release rod (A, figure 6) and lifting the mower hitch off the tractor hitch. Slide the mower deck out from under the right side of the tractor.
- Install the mower in the reverse order.
ADJUSTING MOWER CULTIVATING HEIGHT
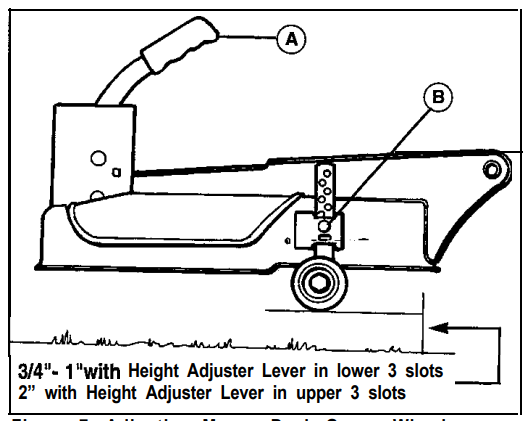
- Set the mower height adjustment lever (A, figure &) to the desired cutting height.
- Remove the pin &clip (B, figure 7) from each mower deck front gauge wheel.
- Adjust the gauge wheels to achieve the appropriate mower deck-to-ground clearance, as shown in Figure 7. Reinstall the pin & clip to each wheel.
CHECKS BEFORE STARTING
- Make sure you have proper wheel or counterweights installed if required. See Slope Operation in the Safety Rules section. Make sure any slopes are within the required limits.
- Check that the crankcase is filled to the full mark on the dipstick. See the engine Operator’s Manual for instructions and oil recommendations.
- Make sure all nuts, bolts, screws, and pins are in place and tight.
- Make sure you can reach all controls from the operator’s positions. If not, see SEAT ADJUSTMENT.
- Fill the gasoline tank with fresh gasoline. Fill to the bottom of the filler neck to avoid spillage and overflow. DO Do not mix oil with gasoline. Refer to the engine manual for gasoline recommendations.
CLUTCH/BRAKE PEDAL OPERATION
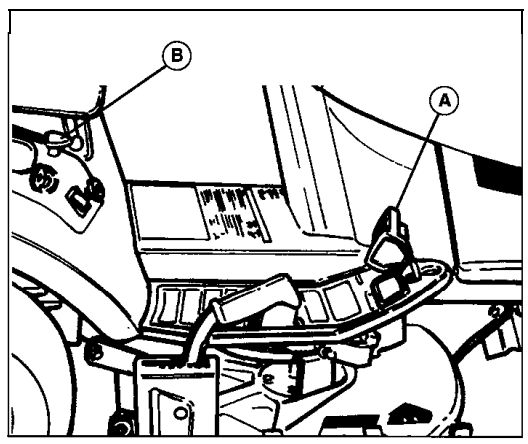
On the gear model, depressing the pedal (A, figure 8) halfway disengages the transmission drive. Depressing the pedal further applies the tractor brake. In the hydro model, depressing the pedal applies the tractor brake.
PARKING BRAKE
The parking brake can be applied by fully depressing the brake pedal (A, figure 8), then pulling up on the parking brake knob (B, figure 8).
STARTING THE ENGINE
- While sitting in the operator seat, set the parking brake.
- Set engine throttle control (6, figures 2 & 3) all the way up to CHOKE. A warm engine may not require choking.
- Disengage the PTO by pushing the sh;itc,h all the way down (F, figures 2 & 3)
- On hydro models, with your foot off the pedals (I & J, figure 2), the tractor is in the neutral position. On gear models, put the gear selector (I, figure 3) in neutral.
- Insert the key into the ignition switch (D, figures 2 & 3) and turn it to START.
DRIVING THE TRACTOR
In the hydro model, ground speed is infinitely variable according to how far the pedals (I & J, figure 2) are moved in the forward or reverse position. On the gear model, ground speed is selected by fully depressing the clutch/brake pedal, then moving the gear selector (I, figure 3) to the appropriate position. Most mowing is done in 3rd or 4th gear with engine speed between 3/4 and full speed. If the terrain is rough, hilly, or sloping, use first or second gear. If the grass is wet or over three inches (76mm) high, use full engine speed (with low gear) so the mower will have enough power to cut the grass. Shift gears only with the Tractor stopped and the clutch/brake pedal fully depressed.
- If you are ready to mow, set the mower to the desired cutting height. See Adjusting Mower Cutting Height, page 8.
- Set engine throttle control (B, figures 2 & 3) for the desired speed. Between 3/4 and full speed is recommended for mowing.
- Engage the mower PTO by pulling up on the switch (F, figures 2 & 3).
- On the hydro model, release the parking brake by depressing the brake pedal (A, figure Et), then press down on either pedal (I or J, figure 2) for the desired
direction and speed of travel. On the gear model, fully depress the clutch/brake pedal (A, figure 8) to release the parking brake and disengage the clutch. Use the gear selector (I, figure 3) to select the gear best suited for conditions, then slowly
release the clutch/brake pedal to engage the clutch and start the tractor in motion.
STOPPING THE TRACTOR
- On hydro model, gradually take your foot off the pedals (I & J, figure 2) to make a smooth stop. To make a more rapid stop, depress the brake pedal (H, figure 2).
On the gear model, press the clutch/brake pedal (A, figure 8) down only far enough to disengage the clutch to make a gradual stop. For a more rapid stop, press the
pedal down fully to apply the brake. - Engage the parking brake by pulling up on the knob (B, figure 8) with the brake pedal fully depressed.
- Disengage the PTO by pushing down on the switch (F, figures 2 & 3).
- Set engine throttle control to SLOW. Stopping a hot engine too fast may cause engine damage. Let the engine idle for about a minute.
- Turn the key to OFF and remove it.
Mowing Patterns & lips
Mowing Conditions
The best mulching results from mowing when the lawn is dry and the grass blades are not overgrown. Follow these guidelines for best results:
- Do not use the mower as a mulching mower during the first two or three mowings in the spring. The long grass blades, quick growth, and often wetter conditions are more suitable for side-discharge (broadcasting) or grass bagging operations.
- Avoid mulching after rain or heavy dew. It may be better to mow later in the day or early evening when the lawn is drier
- Change the mowing pattern each time.
- If mulching baffles are removed, the original deflector must be in operating position for safe side-discharge mowing.
Normal Care
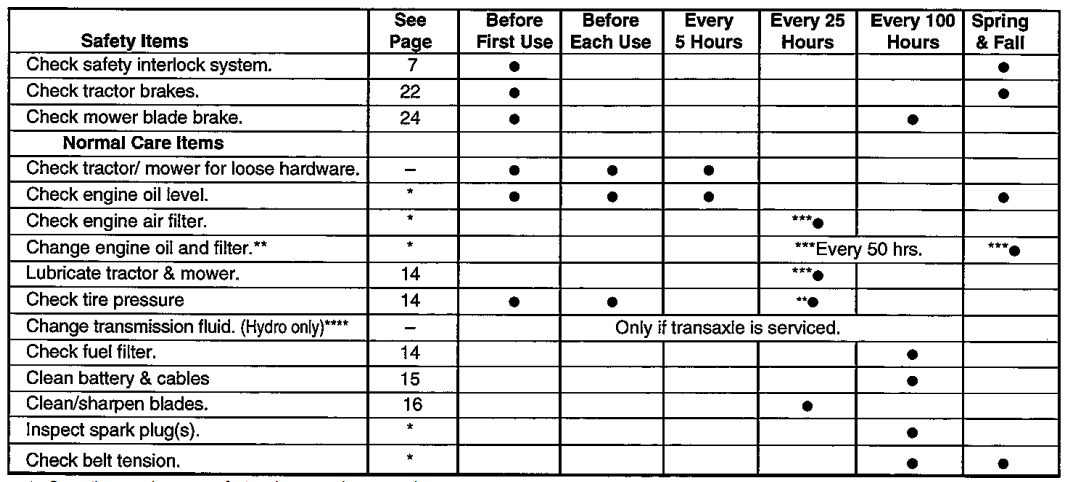
SCHEDULE
The following schedule should be followed for normal care of your tractor and mower. You will need to keep a record of your operating time. Determining operating time is easily accomplished by multiplying the time it takes to do one job by the number of times you’ve done the job, or you can install the optional hour meter.
RAISING THE HOOD & SEAT
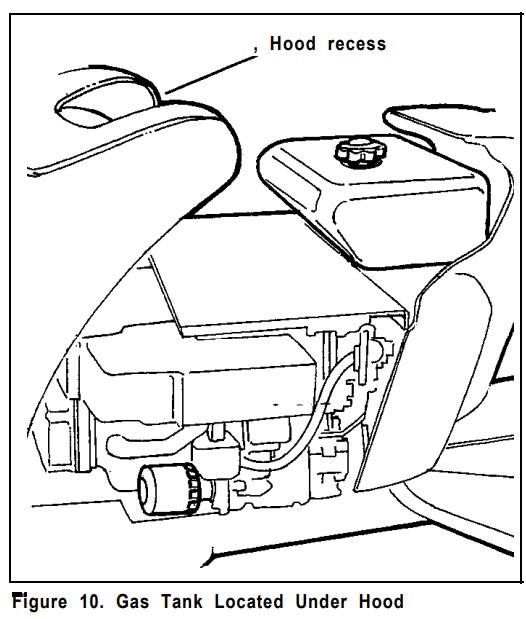
- To raise the hood, grasp the hood recess (figure 10) on top, then pivot the hood up and forward.
- To raise the seat for battery access, tilt the seat forward.
CHECKING/ADDING GASOLINE
Raise the hood and check the fuel tank to be sure there is enough gasoline to complete the job. To add gasoline, remove the gas cap. Do not overfill. Leave room in the tank for fuel expansion. Refer to your engine manual for _. gasoline recommendations. Install and hand-tighten the gas cap.
CHECKING TIRE PRESSURE
- Front tire pressure should be 12 – 15 psi (82 – 103 kPa).
- Rear tire pressure should be 10 – 12 psi (56 – 82 kPa).
CHECKING FUEL FILTER
The fuel filter is located in the fuel line between the fuel tank and the carburetor. If the filter is dirty or clogged, replace it as follows. Place a container below the filter to catch spilled gasoline.
- Using a pliers, open and slide the hose clamps from the fuel filter.
- Remove hoses from the filter.
- Install a new filter in the proper flow direction in the fuel line. Secure with hose clamps. See the warning at the beginning of the procedure.
BATTERY MAINTENANCE
Checking the Battery Fluid
- Raise the seat by tilting it forward to gain access to the battery.
- Remove battery filler cap (C, figure 13). Fluid must be even with the split ring full mark. If not, add distilled water.
- Reinstall filler cap.
Cleaning the Battery and Cables
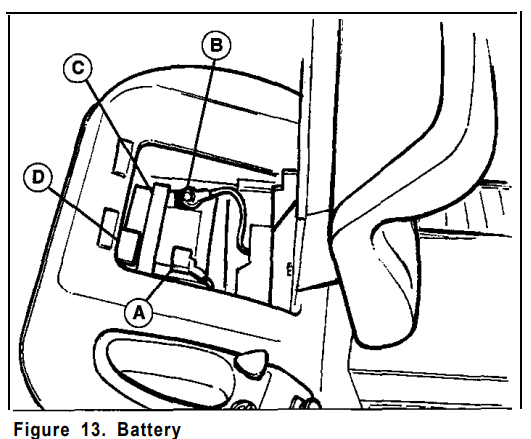
- Disconnect the cables from the battery, negative cable first (B, figure 13)
- Remove the battery clamp (D, figure 13), then remove the battery.
- Scrub the battery, cable, and battery compartment with baking soda and water.
- Clean the battery terminals and cable clamps with a wire brush and battery post terminal cleaner.
- Reinstall the battery and clamp.
- Connect cables, positive cable first. Position the positive cable over the seat switch harness to prevent the orevent harness from becoming pinched in the seat pivot.
- Coat cable clamps and terminals with grease or petroleum jelly.
SERVICING THE MOWER BLADES
- Remove the mower from the tractor. Sea Mower Installation & Removal.
- Blades should be sharp and free of nicks and dents. If not, sharpen blades as described in the following steps.
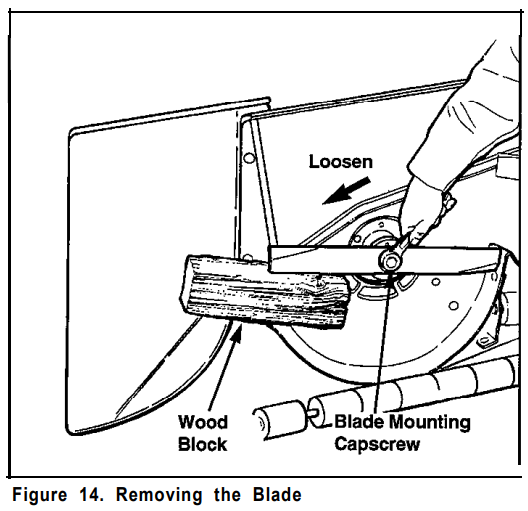
- To remove the blade for sharpening, use a wooden block to hold the blade while removing the blade mounting capscrew (figure 14).
- Use a file to sharpen the blade to a fine edge. Remove all nicks and dents in the blade edge. If the blade is severely damaged, it should be replaced.
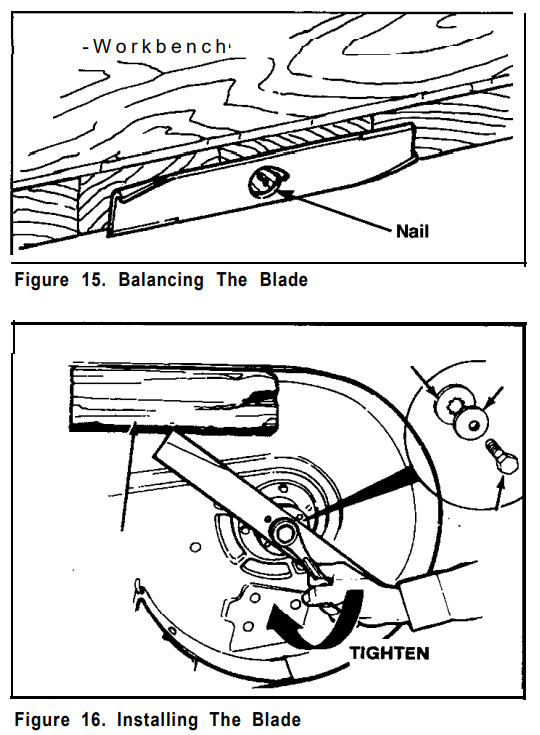
- Balance the blade as shown in Figure 15. Center the blades’ hole on a nail lubricated with a drop of oil. A balanced blade will remain level.
- Reinstall each blade with the tabs pointing up toward the deck as shown in Figure
- Secure with a capscrew, spring washer, and hex washer. Use a wooden block
to prevent blade rotation and torque capscrews to 50- 70 ftlbs. (67-95 N.m.).
TEMPORARY STORAGE (30 DAYS OR LESS)
Remember, the fuel tank will still contain some gasoline, so never store the tractor indoors or in any other area where fuel vapor could travel to any ignition source. Fuel vapor is also toxic if inhaled, so never store the tractor in any structure used for human or animal habitation. Here is a checklist of things to do when storing your tractor temporarily or in between uses:
- Keep the tractor in an area away from where children may come into contact with it. If there’s any chance of unauthorized use, remove the spark plug (s) and put them in a safe place. Be sure the Spark plug opening is protected from foreign objects with a suitable cover.
- If the tractor can’t be stored on a reasonably level surface, chock the wheels.
- Clean all the grass and dirt from the mower.
LONG-TERM STORAGE (LONGER THAN 30 DAYS)
Before you store your tractor for the off-season, read the Maintenance and Storage instructions in the Safety Rules section, then perform the following steps:
- Drain crankcase oil while the engine is hot and refill with a grade of oil that will be required when the tractor is used again.
- Prepare the mower deck for storage as follows:
- a. Remove mower deck from the tractor.
- b. Clean underside of mower deck.
- c. Coat all bare metal surfaces with paint or a light coat of oil to prevent rusting.
- Clean external surfaces and the engine.
- Prepare the engine for storage. See the engine owner’s manual.
- Clean any dirt or grass from the cylinder head cooling fins, engine housing, and air cleaner element.
- Cover the air cleaner and exhaust outlet tightly with plastic or other waterproof material to keep out moisture, dirt, and insects.
- Completely grease and oil the tractor as outlined in the Normal Care section.
- Clean up the tractor and apply paint or rust preventative to any areas where paint is chipped or damaged.
- Be sure the battery is filled to the proper level with water and is fully charged. Battery life will be increased if it is removed, put in a cool, dry place, and fully charged about once a month. If the battery is left in the tractor, disconnect the negative cable.
- Drain the fuel system completely or add a gasoline stabilizer to the fuel system. If you have chosen to use a fuel stabilizer and have not drained the fuel system, follow all safety instructions and storage precautions in this manual to prevent the possibility of fire from the ignition of gasoline fumes. Remember, gasoline fumes can travel to distant sources of ignition and ignite, causing risk of explosion and fire.
Troubleshooting & Repair
GENERAL
This section of the manual provides troubleshooting and repair instructions for the more common and easily corrected problems. For other problems, it is recommended that you contact your dealer. Locate the problem that best describes the trouble that you have encountered. Check the possible causes one at a time, in the order that they are listed.
TROUBLESHOOTING THE TRACTOR
The engine will not turn over or start.
- Transmission not in neutral-start position. Place the transmission in neutral.
- PTO switch in the up position (engaged). Place the switch in the down position to disengage PTO.
- Out of fuel. Allow the engine to cool, then refill the fuel tank.
- Engine flooded. Move throttle control out of the CHOKE position
- Circuit breaker tripped. Wait one minute for the automatic reset. Replace if defective (see your dealer).
- Battery terminals require cleaning. See Normal Care section.
- Batlety discharged or dead. Recharge or replace.
- Wiring is loose or broken. Visually check wiring & replace broken or frayed wires. Tighten loose connections.
- The solenoid or starter motor is faulty. Repair or replace.
- The safety interlock switch or module is faulty. Replace if needed (see your dealer).
il. Spark plug faulty, fouled, or incorrectly gapped. Clean and gap or replace. See the engine manual. - Water in fuel. Drain fuel & refill with fresh &I.
- Old stale gas. Drain fuel & replace with fresh fuel.
- Brake pedal not fully depressed (Gear model).
The engine starts hard or runs poorly.
- Fuel mixture too rich. Move control out of the choke position. If the problem still exists, clean the air filter.
- Carburetor adjusted incorrectly. See the engine manual.
- Spark plug faulty, fouled, or incorrectly gapped. Clean and gap or replace. See the engine manual.
FOR MORE MANUALS BY Simplicity Mower, VISIT MANUALSLIBRARYY
Simplicity 1692967 Regent Lawn Tractor-Mower-FAQs
How does a Simplicity Regent lawn tractor work?
The Regent lawn tractor uses an engine-powered drive system to turn the mower blades and move the tractor forward, making lawn care faster and easier.
How do I start a Simplicity riding mower?
Sit on the seat, press the brake pedal, set the choke (if needed), turn the ignition key, and release the brake once the engine starts.
What type of engine does the Regent lawn tractor have?
It is equipped with a Briggs & Stratton engine designed for reliable performance, smooth operation, and easy starting.
Why won’t my Simplicity mower start?
Common causes include stale fuel, a dirty air filter, faulty spark plugs, or a weak battery. Check these parts during troubleshooting.
Where is the fuse located on a Simplicity Regent mower?
The fuse is typically near the battery or under the dashboard panel. If the mower won’t start, check and replace a blown fuse.
What type of oil should I use in my Regent mower?
SAE 30 oil is recommended for warmer climates, while SAE 10W-30 or synthetic 5W-30 is better for a wider temperature range.
How fast can the Regent lawn tractor go?
The Regent usually runs at speeds up to 5–7 mph, allowing for efficient mowing across medium to large lawns.
How do I maintain my Simplicity Regent mower?
Check and change the oil regularly, clean or replace the air filter, sharpen blades, and inspect belts, cables, and tires for wear.

