VTech CS6829 DECT 6 Cordless Telephone
Important safety instructions
When using your telephone equipment, basic safety precautions should always be followed to reduce the risk of fire, electric shock, and injury, including the following:
- Read and understand all instructions.
- Follow all warnings and instructions marked on the product.
- Unplug this product from the wall outlet before cleaning. Do not use liquid or aerosol cleaners. Use a damp cloth for cleaning.
- Do not use this product near water such as near a bath tub, wash bowl, kitchen sink, laundry tub or a swimming pool, or in a wet basement or shower.
- Do not place this product on an unstable table, shelf, stand or other unstable surfaces.
- Avoid placing the telephone system in places with extreme temperature, direct sunlight, or other electrical devices. Protect your phone from moisture, dust, corrosive liquids and fumes.
- Slots and openings in the back or bottom of the telephone base and handset are provided for ventilation. To protect them from overheating, these openings must not be blocked by placing the product on a soft surface such as a bed, sofa or rug. This product should never be placed near or over a radiator or heat register. This product should not be placed in any area where proper ventilation is not provided.
- This product should be operated only from the type of power source indicated on the marking label.
What’s in the box
Your telephone package contains the following items. Save your sales receipt and original packaging in the event warranty service is necessary.
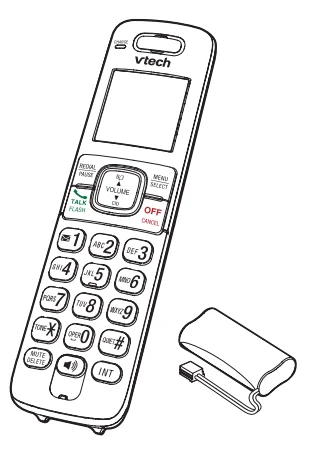
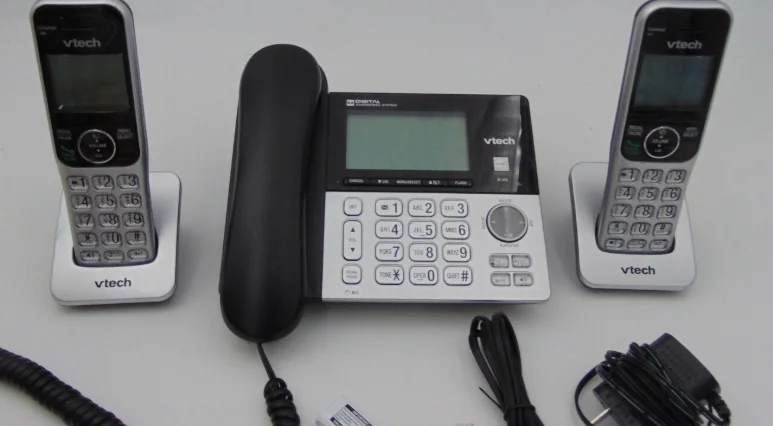
- 1 set for CS6829;
- 2 sets for CS6829-2/CS6829-26;
- 3 sets for CS6829-3
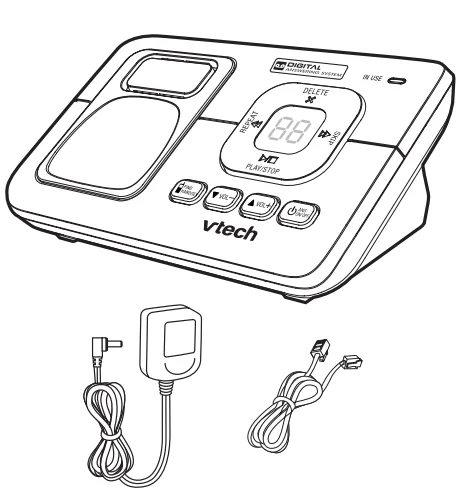
1 set for CS6829/CS6829-2/CS6829-26/CS6829-3
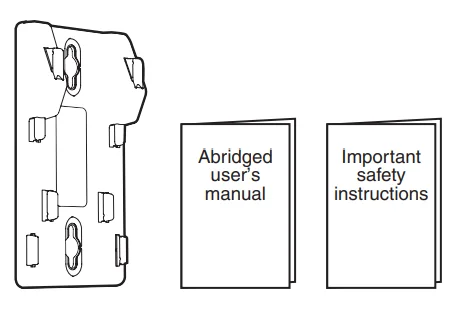
1 set for CS6829/CS6829-2/CS6829-26/CS6829-3
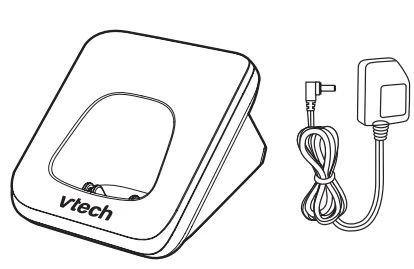
- 1 set for CS6829-2/CS6829-26;
- 2 sets for CS6829-3
Overview
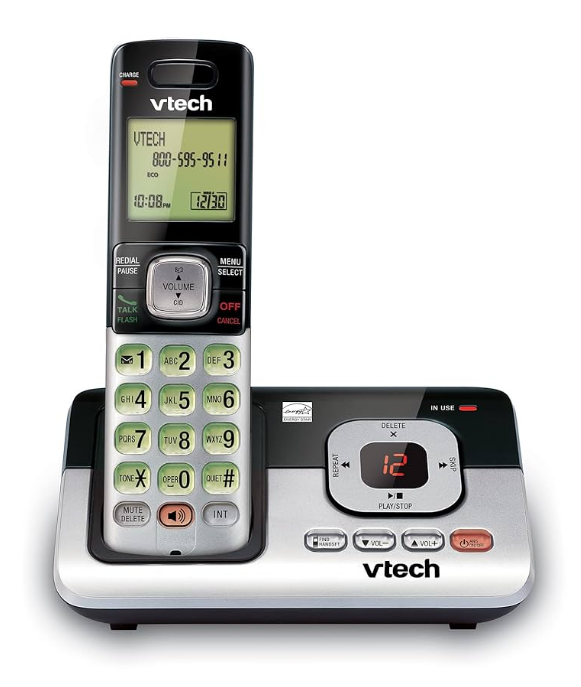
Telephone-based overview
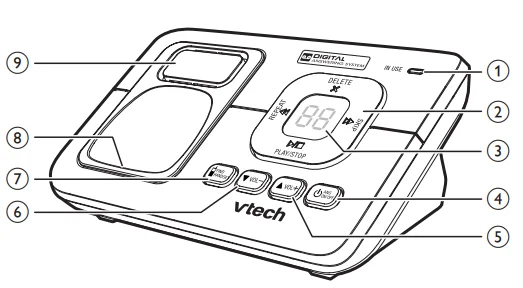
- – IN USE light
- Flashes when there is an incoming call, or another telephone sharing the same line is in use.
- Flashes when handsets are being deregistered.
- When the telephone is in use, or the answering system is answering a call.
- When a handset is being registered.
- Control key panel
- Delete the playing message.
- Press twice to delete all old messages.
- Repeat a message.
- Press twice to play the previous message.
- Skip to the next message.
- Play messages.
- Stop playing messages.
- Message window
- Shows the number of messages and other information of the answering system or telephone base.
- ON/OFF
- Turn on or off the answering system.
- volume +,_
- Increase the listening volume.
- Increase the telephone base ringer volume.
- Decrease _
- Decrease the listening volume.
- Decrease the telephone base ringer volume.
- hand set
- Page all system handsets.
- Charging pole
- Speakerphone
Handset overview
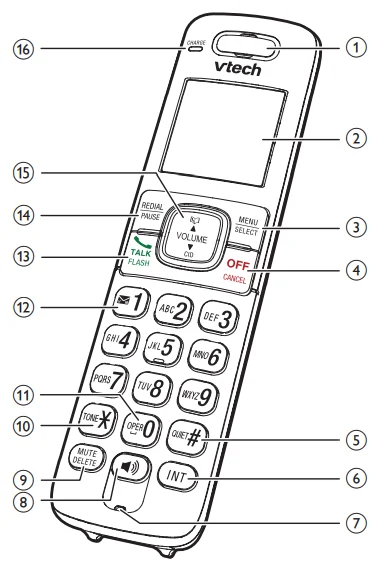
- Handset earpiece
- LCD
- Menu
- Show the menu.
- While in a menu, press to select an item, or save an entry or setting.
- Off
- Hang up a call.
- Return to the previous menu or idle mode without making changes.
- Delete digits while dialing.
- Silence the handset ringer temporarily while the phone is ringing.
- Erase the missed call indicator while the handset is not in use.
- Quit
- Turn on or off the quiet mode.
- Show other dialing options when reviewing a caller ID log entry.
- I N T
- Start an intercom conversation or transfer a call (for multi-handset models only).
- Microphone
- Make or answer a call using the handset speakerphone. Switch between the handset speakerphone and the handset earpiece during a call.
Charger overview
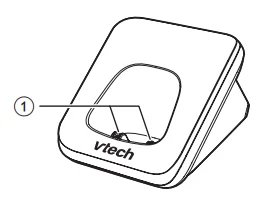
- Charging pole
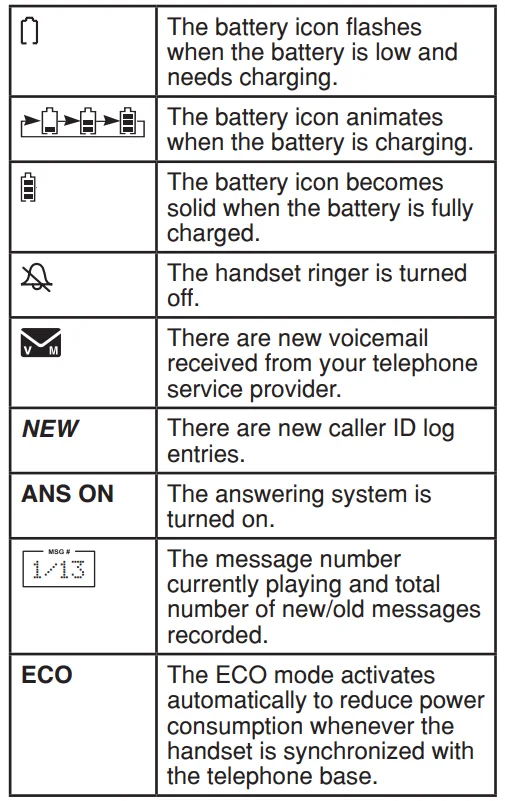
Display icons overview
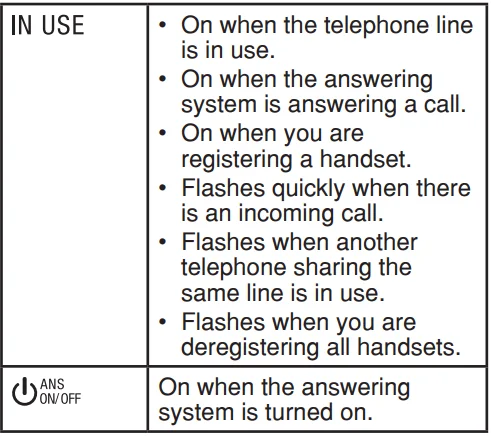
Telephone base lights overview
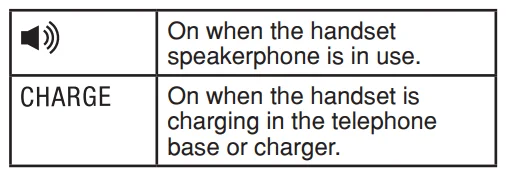
Handset lights overview
Connect
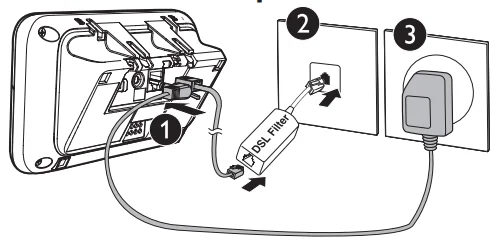
You can choose to connect the telephone base for desktop usage or wall mounting.
Connect the telephone base
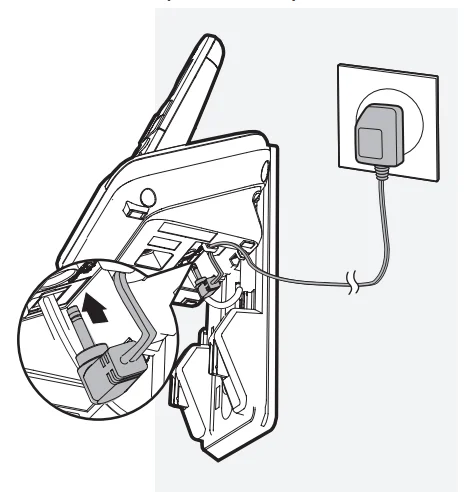
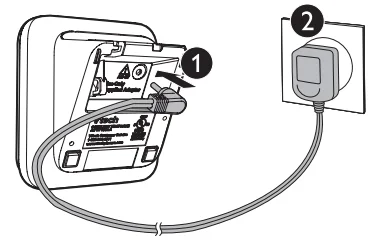
Connect the charger
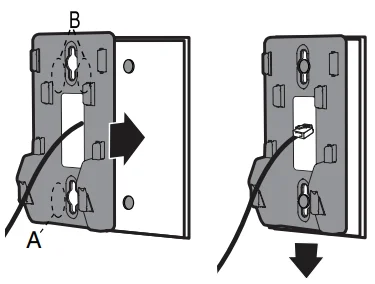
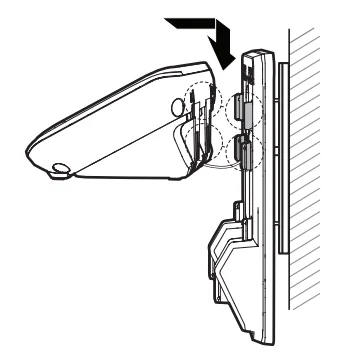
Mount the telephone base
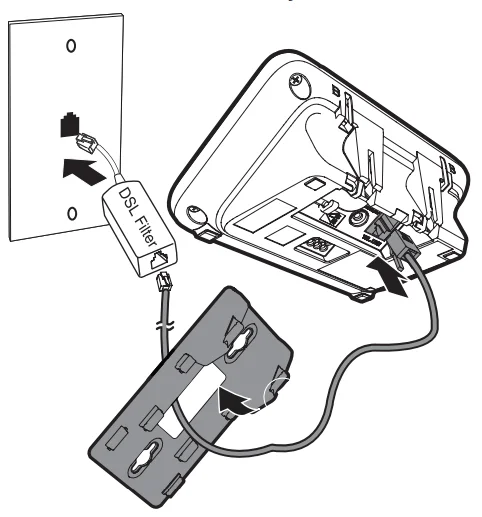
- Connect the telephone line cord to the telephone base. Route it through the wall mount bracket, and then connect it to the wall jack.

- Align and place the wall mount bracket on the standard wall plate.

- Align and place the telephone base on the wall mount bracket.

- Connect the power adapter.
Install and charge the battery
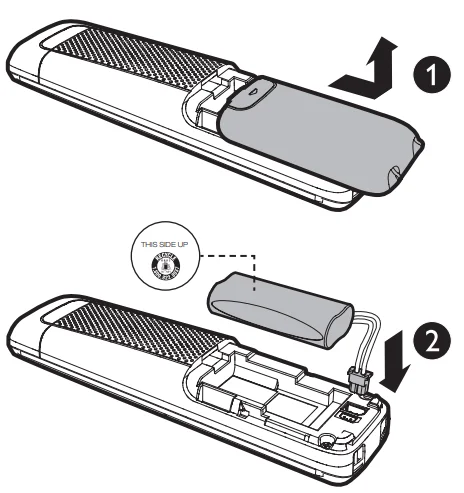
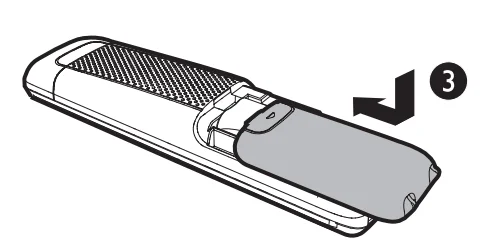
Install the battery
- Use only the supplied battery.
- Charge the battery provided with this product only in accordance with the instructions and limitations specified in this
manual. - If the handset will not be used for a long time, disconnect and remove the battery to prevent possible leakage.
Charge the battery
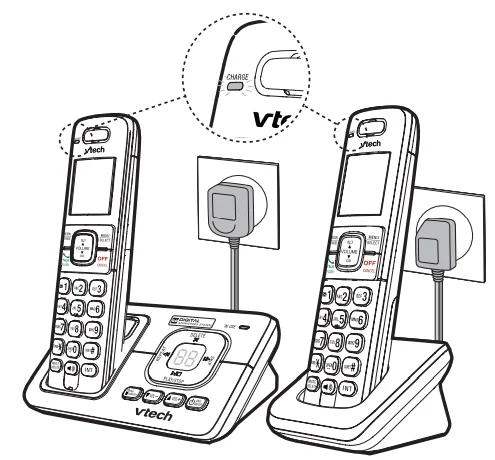
Place the handset in the telephone base or the charger to charge.
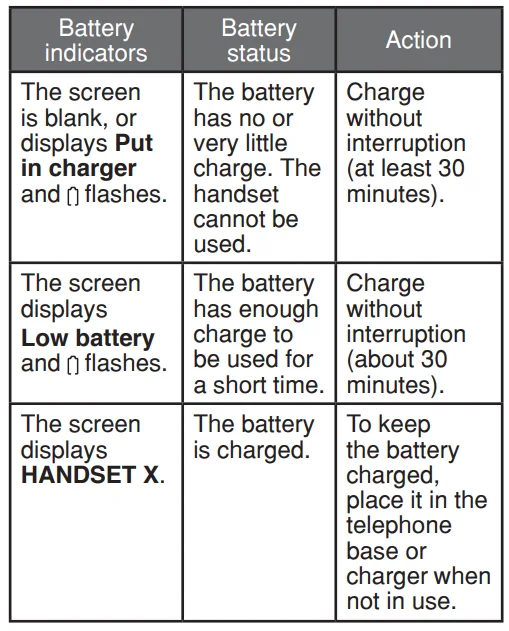
Once you have installed the battery, the handset LCD display indicates the battery status (see the following table).
When the battery is fully charged, you can expect the following performance: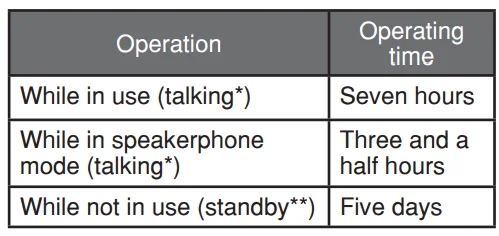
- Operating times vary depending on your actual use and the age of the battery.
- The handset is not charging nor in use.
Before use
After you install your telephone or power returns following a power outage, the handset will prompt you to set the date and time.
Set date and time
- Make sure you set the date and time including the year correctly; otherwise the answering system does not announce the correct day of the week for your recorded messages time stamp
- Use the dialing keys (0-9) to enter the month (MM), date (DD) and year (YY). Then press SELECT.
- Use the dialing keys (0-9) to enter the hour (HH) and minute (MM). Then press T or S to choose AM or PM.
- Press SELECT to save
Check for dial tone
Press. If you hear a dial tone, the installation is successful.
If you do not hear a dial tone:
- Make sure the installation procedures described above are properly done.
- It may be a wiring problem. If you have changed your telephone service to digital service from a cable company or a VoIP service provider, the telephone line may need to be rewired to allow all existing telephone jacks to work. Contact your cable/VoIP service provider for more information.
Operating range
This cordless telephone operates with the maximum power allowed by the Federal Communications Commission (FCC). Even so, this handset and telephone base can communicate over only a certain distance – which can vary with the locations of the telephone base and handset, the weather, and the layout of your home or office. When the handset is out of range, the handset displays Out of range or no pwr at base. If there is a call while the handset is out of range, it may not ring, or if it does ring, the call may not connect well when you press . Move closer to the telephone base, then press to answer the call. If the handset moves out of range during a telephone conversation, there may be interference. To improve reception, move closer to the telephone base.
Configure your telephone
Use the handset menu
- Press MENU when the phone is not in use.
- Press T or S until the screen displays the desired feature menu.
- Press SELECT.
- To return to the previous menu, press CANCEL.
- To return to idle mode, press and hold CANCEL.
Set language
The LCD language is preset to English. You can select English, French or Spanish to be used in all screen displays.
- Press MENU when the handset is not in use.
- Press T or S to choose Settings and then press SELECT twice.
- Press T or S to choose English, Français or Español.
- Press SELECT twice to save your setting. You hear a confirmation tone.
Home area code
If you dial local calls using only seven digits (area code not required), you can program your home area code so that when you receive a call within your local area, the telephone number is automatically stored in the caller ID log without the area code.
- Press MENU when the handset is not in use.
- Press T or S to choose Settings and then press SELECT.
- Press T or S to choose Home area code, and then press SELECT. The screen displays the currently stored home area code.
- Use the dialing keys (0-9) to enter the desired home area code.
- Press DELETE to delete a digit.
- Press and hold DELETE to delete all digits.
- Press SELECT to confirm. You hear a confirmation tone.
Dial mode
The dial mode is preset to touch-tone dialing. If you have pulse (rotary) service, you need to change the dial mode to pulse dialing before using the telephone.
- Press MENU when the handset is not in use.
- Press T or S to choose Settings, and then press SELECT.
- Press T or S to choose Dial mode, then press SELECT.
- Press T or S to choose Touch-tone or Pulse, then press SELECT to confirm your selection. You hear a confirmation tone.
Temporary tone dialing
If you have pulse (rotary) service only, you can switch from pulse to touch-tone dialing temporarily during a call. This is
useful if you need to send touch-tone signals to access your telephone banking or long-distance services.
- During a call, press TONE.
- Use the dialing keys to enter the number. The telephone sends touchtone signals. It automatically returns to pulse dialing mode after you end the call.
Telephone operations
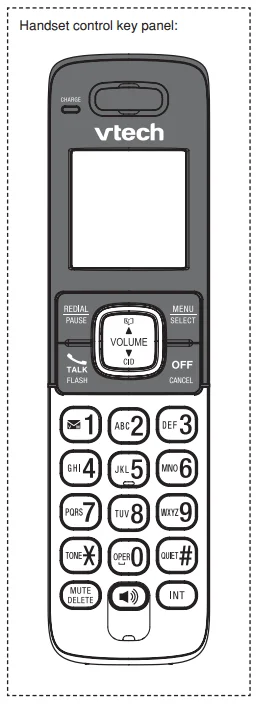
Speakerphone: During a call, press to switch between speakerphone and normal handset use. When the speakerphone is active, the handset displays Speaker.
Mute: The mute function allows you to hear the other party but the other party cannot hear you.
- During a call, press MUTE. The handset displays Muted.
- Press MUTE again to resume the conversation. The handset displays Microphone on briefly.
Call waiting: When you subscribe to call waiting service from your telephone service provider, you hear an alert tone if there is an incoming call while you are already on a call.
- Press FLASH to put the current call on hold and take the new call.
- Press FLASH at any time to switch back and forth between calls. If you also subscribe to caller ID service, it will let you see the name and telephone number of the caller during call waiting.
It may be necessary to change your telephone service to use this feature. Contact your telephone service provide if:
- You have both caller ID and callwaiting, but as separate service (you may need to combine these service);
- You have only caller ID service, or only call waiting service; or
- You do not subscribe to caller ID or call waiting services. There are fees for caller ID services. In addition, services may not be available in all areas
Chain dialing: Use this feature to initiate a dialing sequence from numbers stored in the directory, caller ID log or redial while you are on a call. Chain dialing can be useful if you wish to access other numbers (such as bank account numbers or access codes) from the directory, caller ID log or redial list.
To access a number in the directory while on a call:
- Press MENU/SELECT twice to enter the directory.
- Press T or S to scroll to the desired entry.
- Press SELECT to dial the displayed number.
Redial list
Each handset stores the last 10 telephone numbers dialed. Entries are shown in reverse chronological order.When there are already 10 entries, the oldest entry is deleted to make room for the new entry.
Add a directory entry
- Enter the number when the phone is not in use. Press SELECT, then go to Step 3. -ORPress MENU when the phone is not in use, then press T or S to scroll to Directory. Press SELECT twice to choose Add contact.
- When Enter number displays, use the dialing keys to enter the number. -ORCopy a number from the redial list by pressing REDIAL and then press T, S or REDIAL repeatedly to select a number. Press SELECT to copy the number.
- Press SELECT to move on to enter the name. The handset displays Enter name.
- Use the dialing keys to enter the name. Additional key presses show other characters of that particular key. The first character of every word is capitalized.
- Press SELECT to save. The handset displays Saved and then you hear a confirmation tone.
Alphabetical search
- Follow the steps in Review a directory entry above to enter the directory.
- Use the dialing keys to enter the letter associated with the name. For example, if you have entries for Jenny, Jessie, Kristen and Laura in your directory, press 5 (JKL) once to see Jenny (when Jenny displays, press T to see Jessie), twice to see Kristen, or three times to see Laura. If there is no name entry matching your search, the next closest match in alphabetical order appears. If necessary, press T or S to browse.
Delete a directory entry
- Search for the desired entry in the directory (see Review a directory entry or Alphabetical search).
- When the desired entry appears, press DELETE. The handset displays Delete contact? and the number.
- Press SELECT to confirm. The handset displays Deleting … and then Contact deleted. You hear a confirmation tone.
Edit a directory entry
- Search for the desired entry in the directory (see Review a directory entry or Alphabetical search).
- When the desired entry appears, press SELECT. The handset displays Edit number and the stored number.
- Use the dialing keys to edit the number, then press SELECT. The handset displays Edit name and then the stored name.
- Use the dialing keys to edit the name. Additional key presses show other characters of that particular key. The first character of every word is capitalized.
- Press SELECT to save. The handset displays Saved and then you hear a confirmation tone.
Speed dial: You can copy up to 9 directory entries into the speed dial locations (0 and 2-9) so that you can dial these numbers using fewer keys than usual. The speed dial memory locations are stored in the telephone base and are shared by all handsets. Changes made to the speed dial entries on one handset apply to all.
Assign a speed dial entry
- Press MENU when the phone is not in use.
- Press T or S to scroll to Directory then press SELECT.
- Press T or S to scroll to Speed dial and then press SELECT.
- Press T or S or the dialing keys (0 or 2-9) to choose the desired speed dial location.
- Press SELECT. The handset displays Copy from DIR… and then the first entry in the directory.
- Search for the desired entry in the directory (see Review a directory entry or Alphabetical search).
- Press SELECT to save. You hear a confirmation tone. The name (up to 12 characters) appears in the selected speed dial location.
Reassign a speed dial entry
- Press MENU when the phone is not in use.
- Press T or S to scroll to Directory then press SELECT.
- Press T or S to scroll to Speed dial and then press SELECT.
- Press T or S or the dialing keys (0 or 2-9) to choose the desired speed dial location to reassign.
- Press SELECT twice. The handset displays Reassign SD.
- Press SELECT. The handset displays Copy from DIR… and then the first entry in the directory.
- Search for the desired entry in the directory (see Review a directory entry or Alphabetical search).
- Press SELECT to save. You hear a confirmation tone. The name (up to 12 characters) appears in the selected speed dial location.
FOR MORE MANUALS BY VTECH, VISIT MANUALSLIBRARYY
VTech CS6829 DECT 6 Cordless Telephone-FAQs
How do I set up my VTech CS6829 cordless phone?
Connect the telephone base to a power outlet and a phone jack. Insert the handset battery, place it in the charger, and let it charge for about 10–12 hours before first use. Once charged, follow the on-screen setup prompts.
How do I check voicemail on my VTech DECT 6.0 phone?
To listen to voicemail, press and hold the 1 key or dial *98 from your handset. Follow the voice prompts to access, listen, and manage your messages.
Does the VTech CS6829 have an answering machine?
Yes, this model includes a built-in digital answering system that can record, play, and delete voice messages directly from the handset or base unit.
How do I reset my VTech DECT 6.0 cordless phone?
Disconnect the battery and power cord from the base for a few minutes. Reconnect them and place the handset on the base to re-establish the connection. This resets most issues without erasing settings.
How can I factory reset my VTech phone?
To perform a full factory reset, open the Menu, navigate to Settings > Servicing > Provisioning, and select Reset. Confirm by pressing OK. This will restore default factory settings.
How do I use the intercom on my VTech cordless phone?
Press the INT button on one handset to call another. The receiving handset will ring; answer by pressing /FLASH, INT, or any number key. To end the intercom call, press OFF/CANCEL or return the handset to the base.
How do I adjust the volume on my VTech phone?
When not on a call, press MENU/SELECT > Ringers > Volume, then choose Off, Low, or High. While on a call, use the VOL▲/VOL▼ buttons to adjust the earpiece volume.
What does DECT 6.0 mean on a cordless phone?
DECT 6.0 stands for Digital Enhanced Cordless Telecommunications, offering better range, clear sound quality, and less interference compared to older analog phone systems.
Can I block unwanted calls on my VTech CS6829 phone?
Yes. Use the Call Block feature in the phone’s menu to add unwanted numbers to the block list. Blocked numbers will not ring through to your handset.

