LG LDS5540ST Dishwasher With Tub
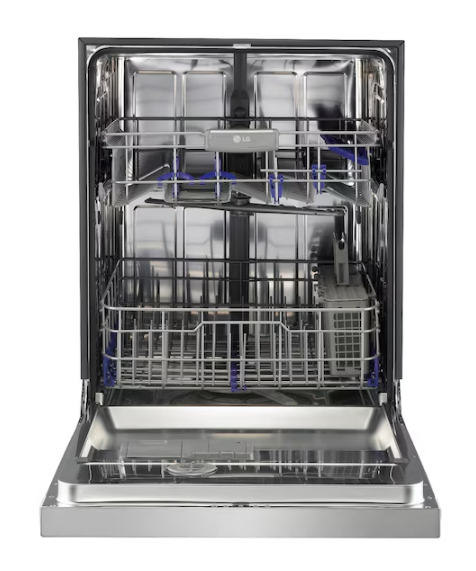
IMPORTANT SAFETY INFORMATION
- Use the dishwasher only for its intended function.
- Only use detergents or rinse agents recommended for use in a dishwasher. Keep all dishwasher detergents and additives out of the reach of children.
- This appliance is not intended for use by young children.
- When loading items to be washed:
- Load sharp items so that they are not likely to damage the door seal.
- Load sharp knives with the handles up to reduce the risk of injury when reaching into the dishwasher.
- Do not wash plastic items in the dishwasher unless they are labeled “dishwasher safe” or the equivalent. For plastic items that are not so labeled, check the manufacturer’s recommendations.
- Do not operate the dishwasher unless all enclosure panels are properly in place.
- Do not tamper with the controls.
- Do not abuse, sit on, or stand on the door or dish racks of the dishwasher.
- To reduce the risk of injury, do not allow children to play in or around the dishwasher.
PARTS AND FEATURES
FEATURES
LARGE CAPACITY
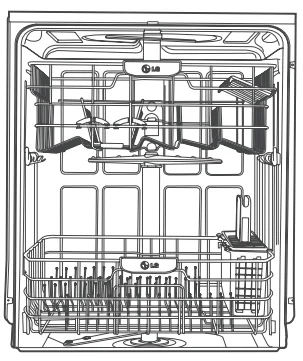
LG dishwashers allow you to load very large items in both the upper and lower racks. The tall tub provides extra overall capacity and the clearance to accommodate large dishes. Extra-large items (max. 14 in.) may be loaded in the lower rack by raising the upper rack.
VARIO SPRAY SYSTEM
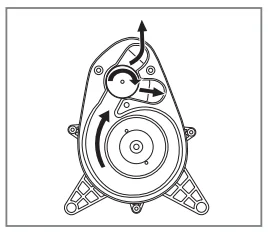
The water spray alternates between the upper and lower racks, so all of the power from the motor is directed to one rack at a time. This concentrates all of the cleaning power of the motor on each rack in turn.
SLIM DIRECT MOTOR™
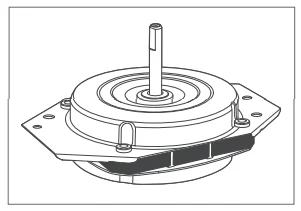
The new Slim Direct Motor™ is inverter-controlled. Wash power is controlled based on cycle selection.
SOFT FOOD GRINDER AND SELF-CLEANING FILTER
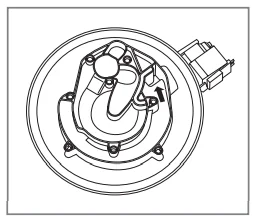
For best wash results, your LG dishwasher has a built-in soft food grinder and a self-cleaning soft food and residue into small particles that can be flushed down the drain. The self-cleans the wash water as it circulates to separate any residue from the wash water. All dirt and residue easily washes down the drain.
HYBRID DRYING SYSTEM
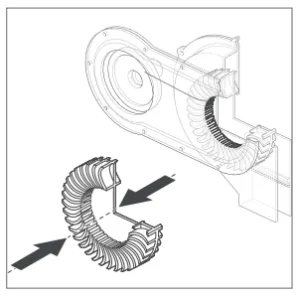
This system effectively dries dishes without the use of a heating element that would increase energy consumption.
PARTS
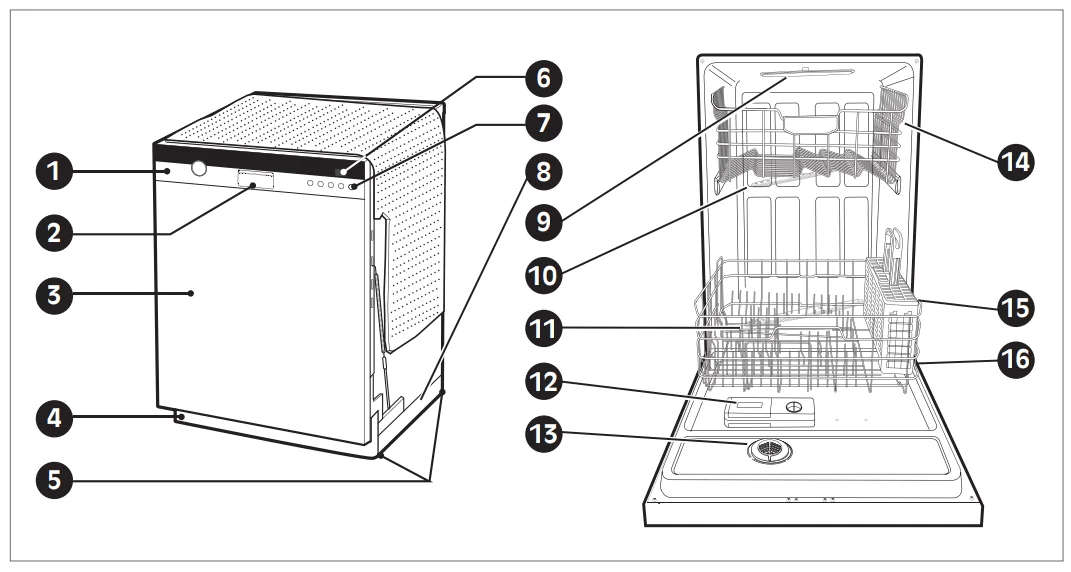
- CONTROL PANEL
- DOOR HANDLE
- FRONT COVER
- LOWER COVER
- LEVELING FEET
- DISPLAY WINDOW
- POWER BUTTON
- BASE
- TOP SPRAY ARM
- UPPER SPRAY ARM
- LOWER SPRAY ARM
- DETERGENT AND RINSE AID DISPENSER
- DRYING VENT COVER
- UPPER RACK
- SILVERWARE BASKET
- LOWER RACK
SPECIFICATIONS

CONTROL PANEL
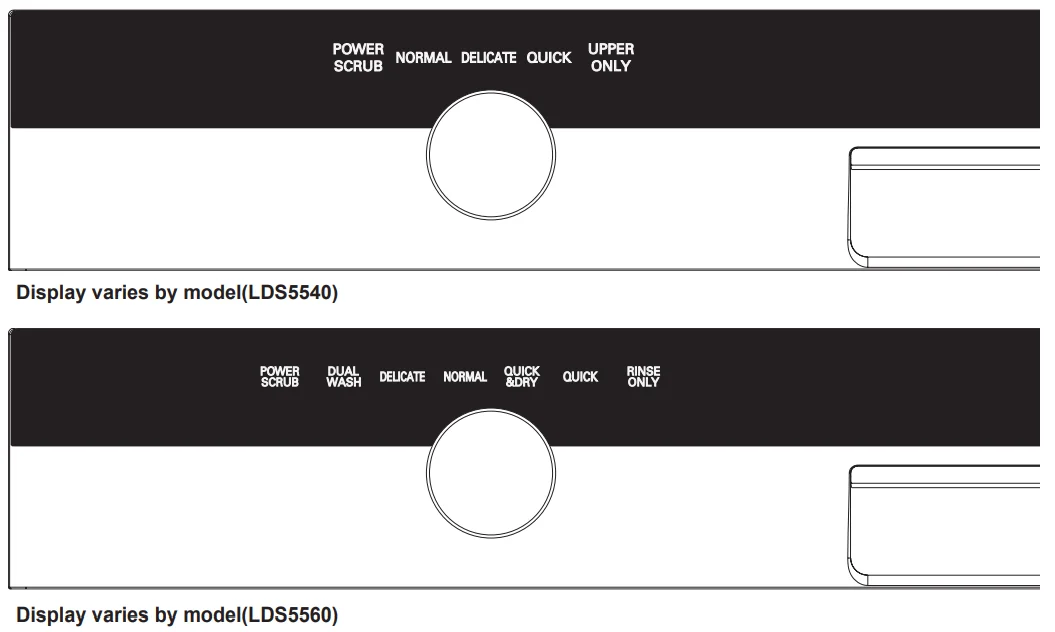
Cycles: Select your desired cycle
POWER SCRUB: This cycle is for heavily and hard-soiled dishes. Power Scrub can also help reduce hard water spotting on dishes.
NORMAL: This cycle is for normally soiled, everyday loads.
DELICATE: The cycle is intended for effectively cleaning delicate items such as fine china and stemware.
QUICK(LDS5540), QUICK & DRY(LDS5560): This is a shortened cycle that is intended for washing and drying recently used dishes or lightly soiled loads.
QUICK (LDS5560): This is a shortened cycle that is intended to wash recently used or lightly soiled loads, without drying.
RINSE ONLY: This cycle is a quick rinse for dishes that will not be washed immediately. This cycle will rinse dishes that have excess soil to soften dried-on residue. Rinsing the dishes will help prevent odors in the dishwasher. No detergent should be used.
DUAL WASH: This cycle washes the upper and lower racks at different spray intensities. The default setting for this cycle washes the lower rack with strong spray intensity and the upper rack with soft spray intensity. This provides optimum cleaning performance for mixed loads, including fine china and stemware. If other combinations are desired, use the steps listed below to change the intensities or to use the HALF LOAD feature.
How To Use Dual Wash:
- Select Dual Wash.
- Press the Spray button to toggle between Soft, Medium, and Strong for the upper spray arm.
- After making your selection for the upper spray arm, press the Half Load button.
- Press the Spray button to toggle between Soft, Medium, and Strong for the lower spray arm.
- Close the door to start the cycle.
UPPER ONLY: This cycle is only for washing items placed on the upper rack.
Cycle Options
Press the desired cycle and then select the options for that cycle.

SANITARY: This high-temperature rinse sanitizes dishes and glassware in accordance with NSF/ANSI Standard 184 for residential dishfood establishments.
EXTRA DRY: Select the EXTRA DRY option for better drying performance. This option adds 60 minutes of extra drying time to the cycle.
EXTRA RINSE: The Extra Rinse symbol indicates that an extra rinse has been added to the cycle.
DELAY START: The Delay Start feature allows you to delay the start of a selected cycle. Each time the Delay Start button is pressed, the delay time will increase by an hour. The delayed start time can be set from 1 to 19 hours, in one-hour increments.
CHILD LOCK: The Child Lock feature helps prevent your settings from being changed during a cycle. Selecting this feature locks all of the buttons, except for the Power button, on the control panel. This feature does not lock the door.
To activate the Child Lock:
- Press the Power button.
- Select the cycle (and desired options).
- Press and hold the Extra Rinse and Delay Start buttons for three seconds. The Child Lock indicator will illuminate in the display once the Child Lock is activated.
DIGITAL DISPLAY: The Digital Display on the control panel shows the ESTIMATED cycle time. When the dishwasher is powered up, the display will be blank. When the cycle and options are selected, the display will show the total estimated time to complete those selections. During operation, the display shows the remaining estimated operating time.
Cycle Options
Press the desired cycle and then select the options for that cycle.

RINSE: Repeated pressing of the Rinse button will select the desired Rinse option. The Sanitary, Extra Rinse, or Sanitary and Extra Rinse lights will show in the bottom left portion of the display.
SANITARY: This high-temperature rinse sanitizes dishes and glassware in accordance with NSF/ANSI Standard 184 for residential dishwashers. Certified dishwashers are not intended for licensed food establishments.
EXTRA RINSE: The Extra Rinse symbol indicates that an extra rinse has been added to the cycle. An extra rinse can help reduce hard water spotting on dishes. To add an extra rinse, press the Rinse button repeatedly until the Extra Rinse symbol appears in the display.
SPRAY (INTENSITY): First, select the desired cycle. Press the Spray button repeatedly until the desired spray intensity is selected. Soft, Medium, Strong
HALF LOAD: For small loads, you may use just the upper or lower rack to save energy. Each press of the Half Load button cycles between the upper rack only and the lower rack only.
DELAY START: The Delay Start feature allows you to delay the start of a selected cycle. Each time the Delay Start button is pressed, the delay time will increase by an hour. The delayed start time can be set from 1 to 19 hours, in one-hour increments.
POWER: Press the Power button to turn on the control panel. If no cycle is selected within four minutes, the dishwasher will power off. After the cycle is complete, the power automatically turns off for safety and to reduce energy consumption. If there is a power surge, power outage, or disruption of any kind, the PF indicator will display, and power will be automatically turned off for safety. The cycle will need to be restarted.
EXTRA DRY: Select the Extra Dry option for better drying performance. This option adds 60 minutes of extra drying time to the cycle. The Extra Dry button will illuminate when the option has been selected. Press and hold the Rinse and Spray buttons for three seconds.
TO CANCEL A CYCLE: To cancel a cycle, open the door and then press and hold the Spray and Half Load buttons simultaneously for approximately three seconds. The drain pump will activate, and the cycle will cancel. The display will show “dr,” and the dishwasher will drain the water. After the dishwasher is drained, the power will turn off.
If power is turned on and no cycle has been selected, the dishwasher will power off within four minutes.
CHILD LOCK: The Child Lock feature helps prevent your settings from being changed during a cycle. Selecting this feature locks all of the buttons, except for the Power button, on the control panel. This feature does not lock the door.
To activate the Child Lock:
- Press the Power button.
- Select the cycle (and desired options).
- Press and hold the Half Load and Delay Start buttons for three seconds. The Child Lock indicator will illuminate in the display once the Child Lock is activated.
- Close the door to begin the cycle.
CHIME ON/OFF: To enable or disable the chime, first, turn on the dishwasher. Press and hold the Spray and Delay Start buttons simultaneously for approximately three seconds.
DIGITAL DISPLAY: The Digital Display on the control panel shows the ESTIMATED cycle time. When the dishwasher is powered up, the display will be blank. When the cycle and options are selected, the display will show the total estimated time to complete those selections. During operation, the display shows the remaining estimated operating time.
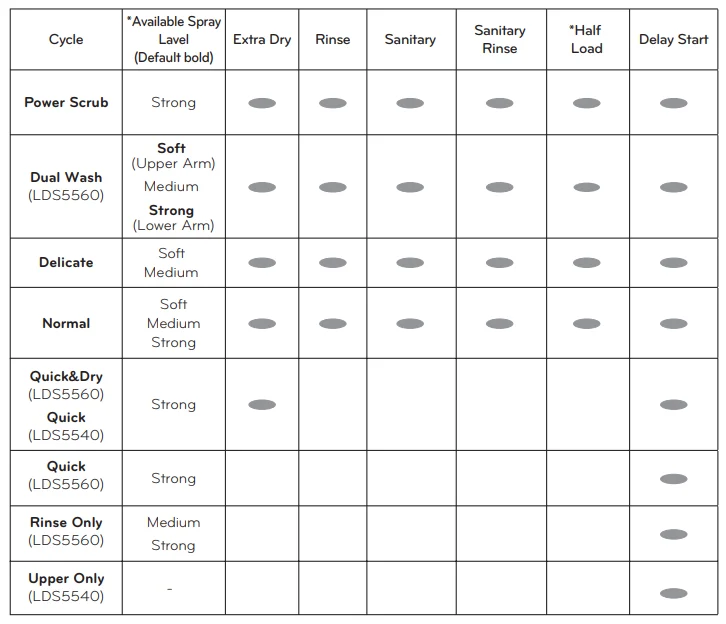
CYCLE OPTION CHART
The cycle guide below shows the available options for each cycle.
ICONS

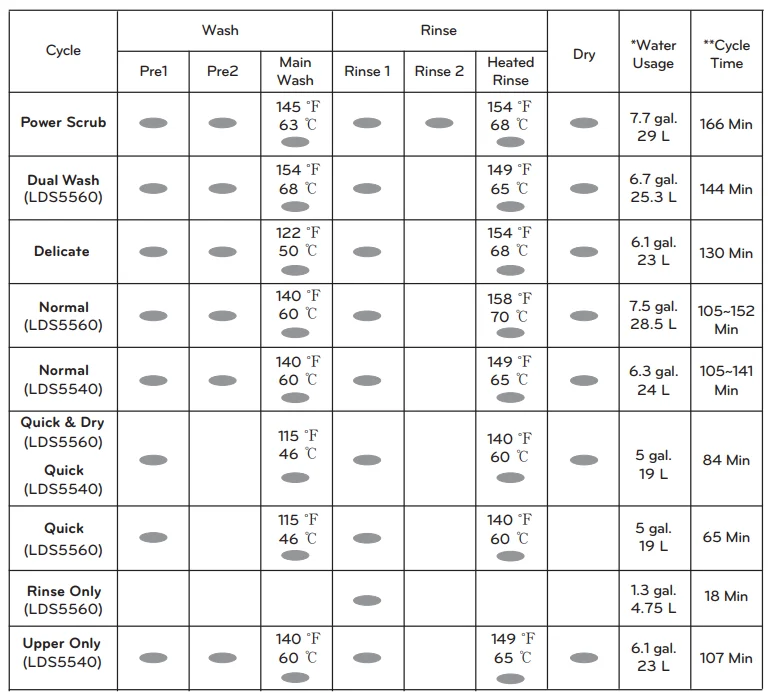
CYCLE SELECTION CHART
The cycle guide below shows the default settings and available options for each cycle.
OPERATING INSTRUCTIONS
QUICK START
- LOAD THE DISHES: Scrape the dishes free of excess food, bones, and any other hard, non-soluble residue. Pull each rack out and load the dishes as described in this manual.
- MEASURE THE DETERGENT: With the recommended amount of detergent and close the lid. If a prewash is desired, the recess on top of the lid should
- TURN ON THE DISHWASHER: To turn on the display panel, press the Power button.
- CHECK THE RINSE AID: The Rinse Aid indicator light will illuminate if the level of rinse aid in the dishwasher is low. Add rinse aid if the level is low to
- SELECT THE CYCLE AND OPTIONS: to the Cycle Selection Chart. The display will show the estimated time for the cycle and the options selected.
- CLOSE THE DOOR: The dishwasher will start automatically, after a slight delay, when the door is closed and latched. During the cycle, the display will indicate the estimated time remaining for the cycle anthe d options selected. If the door is opened during the cycle, the dishwasher will stop. When the door is closed, the cycle will resume from the point where it was stopped.
- END OF CYCLE: When the cycle is complete, a chime will sound.
LOADING THE LOWER RACK
NON-DISHWASHER SAFE ITEMS
The combination of high water temperature and dishwasher detergents may damage certain items. LG does not recommend
washing the following items in the dishwasher:
- Hand-painted silver or gold leaf dishes
- Wood or bone-handled utensils
- Iron or other rust-prone utensils
- Plastic items that are not dishwasher safe
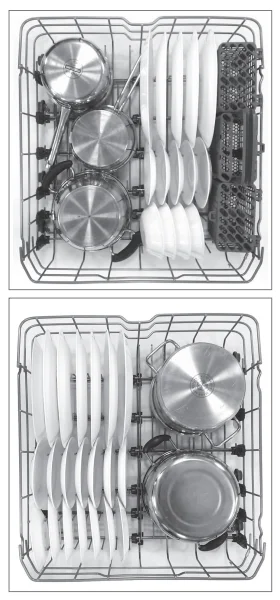
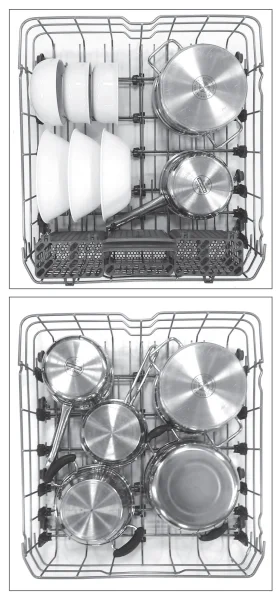
When in doubt, check the manufacturer’s recommendations. The extra-tall tub allows loading of dishes, pans, or other utensils up to 14 inches high. The lower rack is recommended for dinner plates, soup bowls, dishes, pots, pans, lids, and grill trays. Plates should be positioned vertically and facing the center of the rack. Pots, pans, and large bowls must be turned so that the inside faces downward. The silverware basket may be used in either the lower or upper rack.
RACK LOADING TIPS
LOADING 10 PLACE SETTINGS
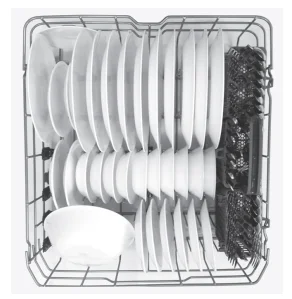
- Load plates, soup bowls, etc., between the tines.
- Load cookie sheets, cakpansan, and other large items on the sides or back of the rack. Loading these items in the front of
The dishwasher can prevent the water spray from reaching the detergent dispenser. - Make sure that pot handles and other large items do not stop the rotation of the spray arms.
LOADING 12 PLACE SETTINGS
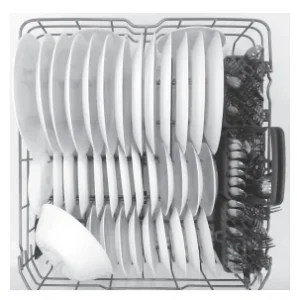
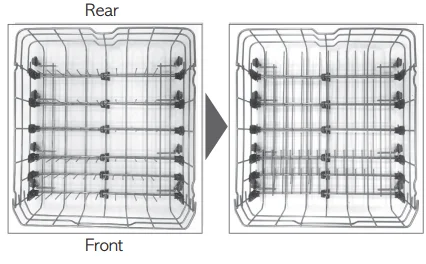
FOLDING DOWN THE LOWER TINES
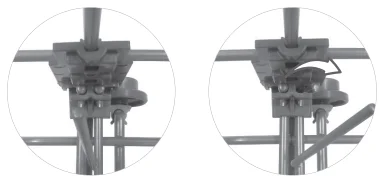
The tines are adjustable to fit dishes of various sizes.
LOADING DISHES & POTS
LOADING POTS & BOWLS
LOADING THE SILVERWARE BASKET
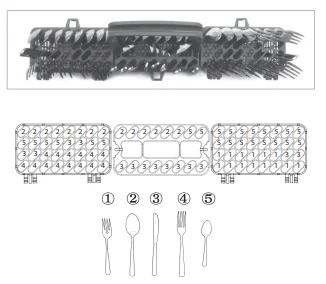
The silverware basket has separators to avoid scratching and tarnishing of delicate silverware. The basket can be separated into three separate baskets that can be used individually in both the upper and lower racks. Unlock the tabs above the left and right sides separately.
SILVERWARE LOADING TIPS:
- For best cleaning results, use the top separators in the basket when loading silverware. The separators will prevent nesting of silverware.
- Load sharp items, such as knives, pointing down.
- When unloading the dishwasher, it is best to start with the silverware basket. Doing so will prevent water droplets from falling on your silverware from the upper rack.
HEIGHT ADJUSTABLE UPPER RACK
The upper rack adjusts up and down. Adjust the upper rack to allow tall and oversized items up to 14 inches high in the lower rack. Adjust the upper rack down to allow placement of large dishes up to 12 inches high in the upper rack. The upper rack comes in the upper position.
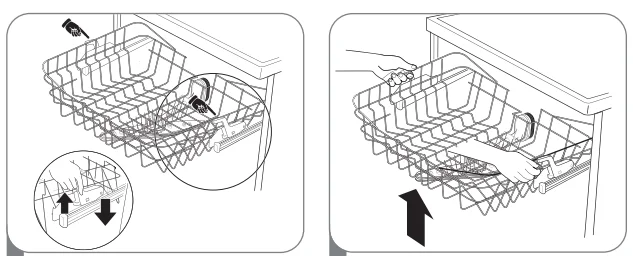
- To lower the rack: Hold the rack at the center of each side to support its weight. Then, lift the lever on each side to release the rack and lower it to the lower position.
- To raise the rack: Simply lift the rack at the center of each side (see illustration) until the rack locks into place in the upper position. It is not necessary to lift the lock levers to raise the rack.
LOADING THE UPPER RACK
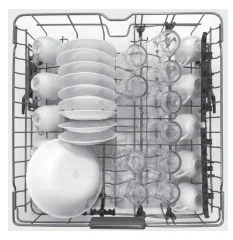
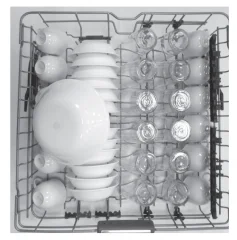
Use the upper rack for small or delicate items such as small plates, cups, saucers, glasses, and dishwasher-safe plastic items. Cups, glasses, and bowls must be positioned upside down. Extra cups or cooking utensils can be laid on the fold-down cup racks, which may also provide support for long-stemmed glasses. Make sure items do not interfere with the rotation of the spray arms above and below the upper rack.
LOADING 10 PLACE SETTINGS
LOADING 12 PLACE SETTINGS
UPPER RACK LOADING TIPS:
- Place cups and glasses in the rows between the rack tines. Placing them over the rack tines can lead to breakage and water spots.
- To avoid chipping, do not let stemware touch other items.
- Place items so that the open end faces down for cleaning and drying.
- Do not stack items on top of each other.
LOADING THE CUTLERY RACK (on some models)
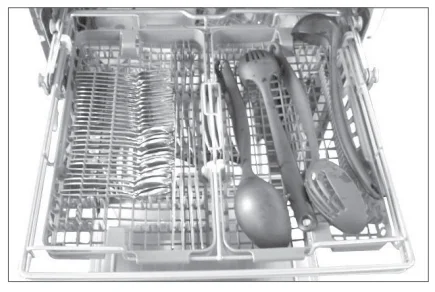
The cutlery rack is best suited for flatware and most cooking or serving utensils. Heavily soiled utensils or items with baked-on foods should be placed in the middle rack or spoon basket for best performance. The separators on the cutlery racks help keep flatware separated to avoid damage and improve cleaning.
CARE & CLEANING
KEEPING THE DISHWASHER: If you will not be using the dishwasher for a long period of time, run a cleaning cycle according to the CARE & CLEANING instructions to remove the food debris at the bottom of the dishwasher and close the door.
CLEANING THE METALLIC PARTS: Some exterior and interior parts can be cleaned with a damp cloth, steel tub, especially with hard water.
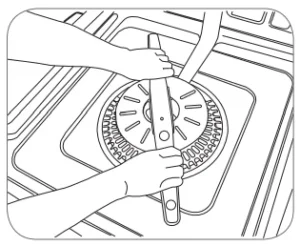
- Make sure that food particles do not block the water jet holes.
- When cleaning is necessary, remove the lower spray arm by pulling it up.
- After cleaning the lower spray arm, replace it by pushing down until it clips into place. Be sure that the spray arm can turn freely
CLEANING THE UPPER SPRAY ARM
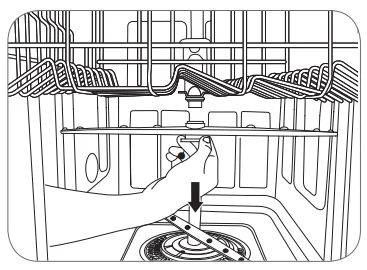
- Pull the upper rack forward. Make sure that food particles do not block the water jet holes.
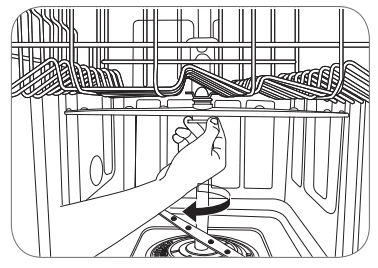
- When cleaning is necessary, remove the upper spray arm by turning the nut on the bottom of the spray arm 1/8 turn counterclockwise and pulling down.

- After cleaning the upper spray arm, press it up into place. Turn the nut 1/8 turn clockwise to make sure that the nut locks back into place
CLEANING THE TOP SPRAY ARM
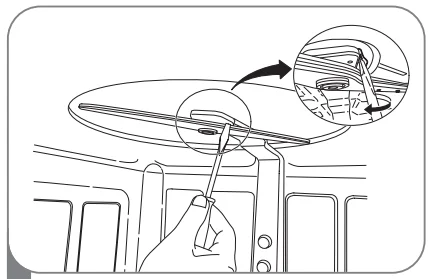
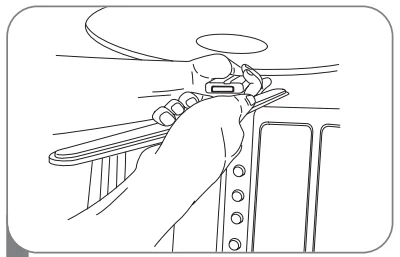
- Make sure that food particles do not block the water jet holes. When cleaning is necessary, use a screwdriver to release the retainer clip from the bracket that holds the top spray arm assembly to the tub.

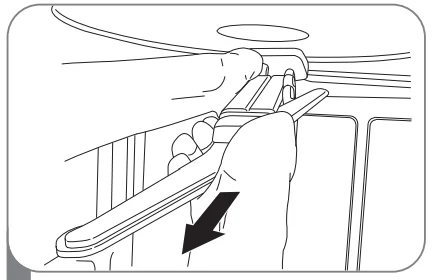
- Pull the spray arm out.

- After cleaning the top spray arm, replace it. Slide it back into place and make sure the retainer clip engages.

SEASONAL MAINTENANCE AND STORAGE
- If you will be absent for an extended period of time during warmer months, it is recommended that you close the water valve.
- If you will be absent for an extended period of time during colder months, and there is a possibility of freezing temperatures, it is recommended that you winterize the water supply lines and the dishwasher itself. Winterization must be performed by experienced service personnel.
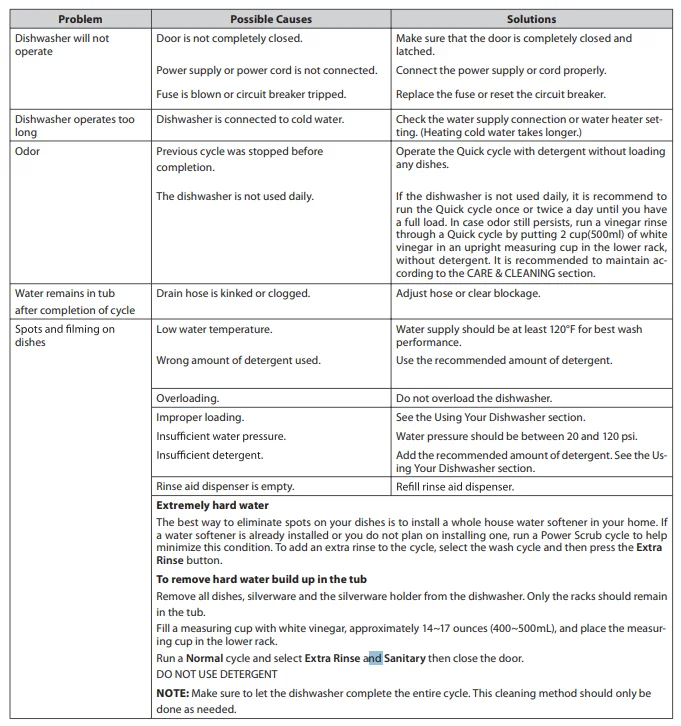
BEFORE CALLING FOR SERVICE
Smart Diagnosis Using Your Smartphone
- Download the LG Smart Laundry & DW application on your smartphone.
- Open the LG Smart Laundry & DW application on your smsmartphone.
- Press the Smart Diagnosis button on your smartphone.
- Press the Diagnosis button on your ssmartphone
- Press the Dishwasher button on your smartphone.
- Press the RECORD button on the ssmartphoneand then hold the momouthpiecef the smasmartphonear the speaker located on the panel. Hold the phone no more than one inch (but not touching) the machine.
- Press and hold the Sanitary button on the dishwasher display for three seconds.
FOR MORE MANUALS BY LG, VISIT MANUALSLIBRARYY
LG LDS5540ST Dishwasher With Tub-FAQs
How do I perform a factory reset on my dishwasher?
Some models allow a factory reset by holding the Start/Reset button for several seconds. For others, turn off the power completely and restore it. This resets all settings to default.
Why is my LG dishwasher noisy?
Noise can result from misaligned spray arms, worn motors, or debris in the drain. Ensure the dishwasher is level and clean internal parts regularly.
How can I reduce dishwasher noise?
Load dishes correctly, avoid overloading, and ensure spray arms rotate freely. Use the Tub Clean cycle periodically to remove buildup.
How do I use the Tub Clean cycle?
Select the Tub Clean cycle, add the recommended dishwasher cleaner, and run the cycle empty. This removes grease, grime, and odors from the tub.
How long does a normal wash cycle take?
Cycles vary: standard wash takes about 2–3 hours, while Eco or Heavy Duty modes may take longer.
Can I use vinegar or baking soda in my LG dishwasher?
Yes, vinegar helps remove odors and buildup. Baking soda can freshen and aid cleaning, but avoid using them together at the same time.
How often should I clean the dishwasher filter?
Clean the filter at least once a month to maintain drainage and ensure optimal cleaning performance.
Why does my dishwasher take 3 hours to wash?
Eco-friendly modes lower water temperature to save energy, which extends cycle time. Use normal or quick wash for faster cycles.
How do I make my dishes shine in the dishwasher?
Use the correct detergent, avoid overloading, rinse heavily soiled items, and run the Rinse Aid function if available.


