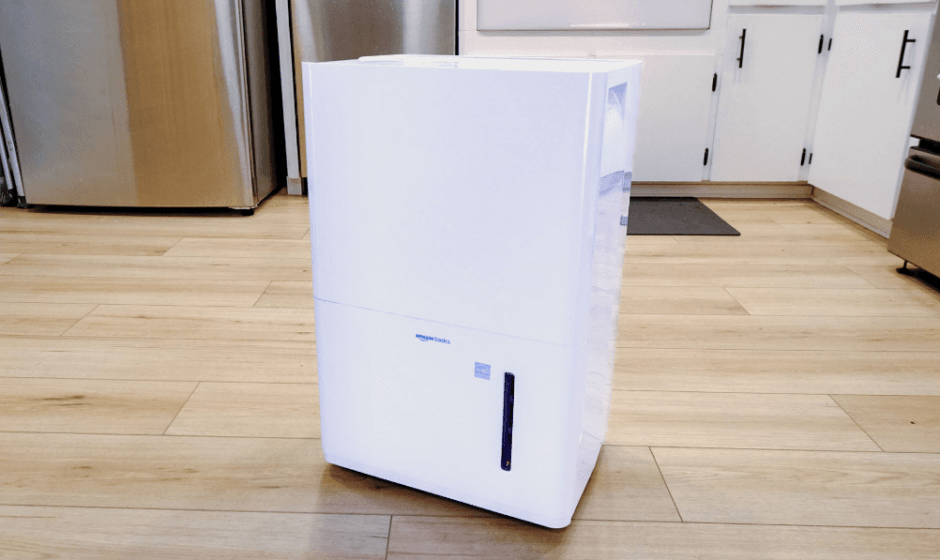
Amazon Basics 50-Pint Dehumidifier with Drain Pump
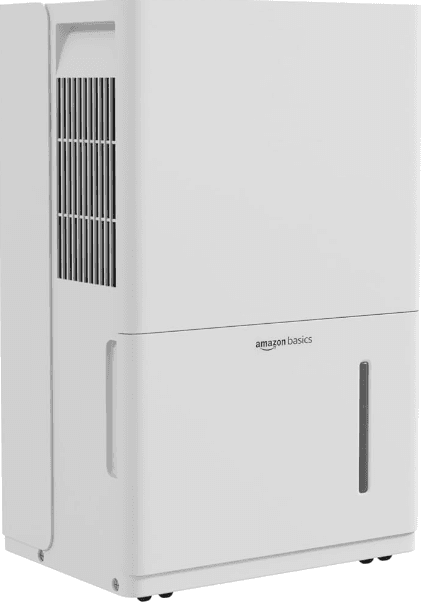
Product Description
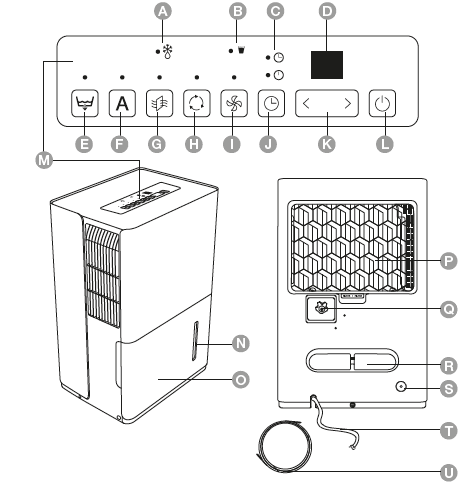
- A Defrost indicator
- B Full indicator
- C On/off timer indicators
- D Display
- E Pump button
- F Auto button
- G Filter button
- H Continuity mode button
- I Turbo button
- J Timer button
- K decrease/increase buttons
- L On/off button
- M Control panel
- N Water level
- O Water tank
- P Air filter with grille
- Q Drain hose outlet
- R Cord winding
- S Pump drain hose outlet
- T Power cord with plug
- U 1/4″ (6.4 mm) drain hose
Operation (Positioning)
Do not place the product in corners, directly at walls, or under cabinets. For a proper operation allow at least the distances given below.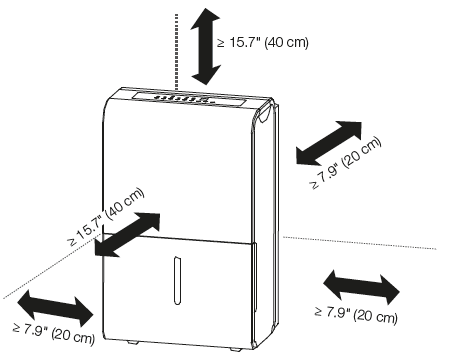
Operation (Control Panel)
NOTICE During normal operation, the display (D) shows the actual room humidity (% RH).
Button
Function
- Press to activate the drain pump operation. The button indicator lights up.
- If installed, remove the drain hose from the drain hose outlet (Q) and close it.
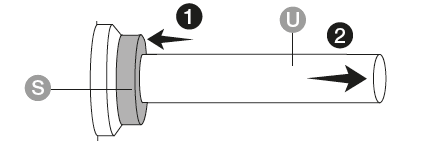
- Connect the drain hose (U) to the pump drain hose outlet (S).
- When the water tank is 1/3 filled, the pump starts to work.
- Press again to deactivate the drain pump operation. The button indicator goes off.
 Auto (F)
- Press to activate the automatic mode. The button indicator lights up.
- The product automatically operates dependently on the temperature and humidity to provide the optimum comfort for the user.
- Press again to deactivate the automatic mode. The button indicator goes off.
 Filter (G)
- After approx. 250 hours of operation, the indicator over the filter button lights up to remind the user to clean the filter.
- After cleaning the filter, press and hold the filter button for 3 seconds to switch the filter indicator off and to zero the filter counter.
 Continuous operation (H)
- Press to toggle between continuous operation and operation on demand.
- Button indicator on – Continuous operation: The product operates continuously and absorbs as much humidity as possible.
- Button indicator off – Operation on demand: Set manually the desired room humidity with the < > buttons (K). The setting is shown on the display (D). The adjustable value is 35 % RH to 85 % RH.
- After no button is pressed for 5 seconds, the setting is saved and the display (D) switches to the actual room humidity.
- The product switches off when the desired room humidity is undercut by 1 %.
- The product switches on when the desired room humidity is exceeded by 5 %.
 Turbo (I)
- Press to increase the fan speed for faster room air circulation. The button indicator lights up.
- Press again to set the fan speed to normal speed. The button indicator goes off.
 Timer (J)
- Set a timer when the product will switch on or off.
- Press the button to toggle between the on and the off timer. Which timer is selected is shown by the timer indicators (C).
 on timer
 off timer
- Set the timer with the < > buttons (K). The setting is shown on the display (D). The adjustable value is 0.5 hours to 24 hours.
 Using the < > (K) buttons
- The relative humidity value is inputted in increments of 5.
- The timer can be set.
 On/off (L)
- Press to switch the product on/off.
Indicator
 Defrosting (A)
 Full (B)
Description
- Defrosting indicator: The product is defrosting its cooling system.
- Full indicator: The water tank (O) is full.
Operation (Functions)
NOTICE The product does not operate when the water tank (O) is full or is not placed properly into the housing. In that case, the ![]() full indicator (B) lights up, and the display (D) shows an error code.
full indicator (B) lights up, and the display (D) shows an error code.
Switching on/off
- Connect the product to the suitable socket outlet. The display (D) and the
 full indicator (B) shortly light up.
 - Press the on/off button (L) to switch the product on/off.
- Refer to the “Operation (Control Panel)” chapter to make the settings.
Emptying the water tank
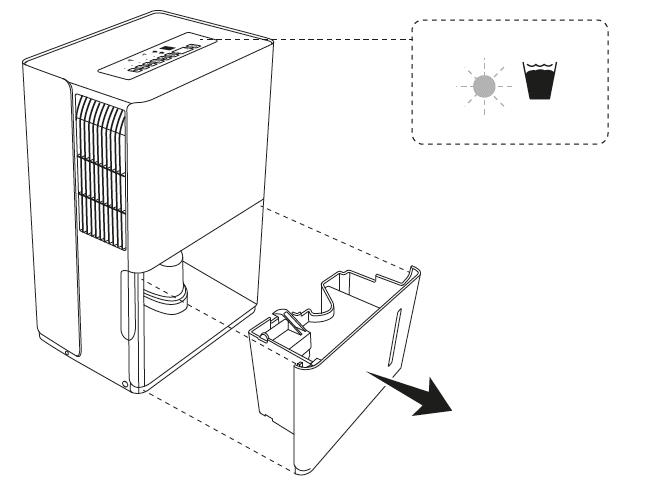
- When the water tank (O) is full the product stops its operation. The
 full indicator (B) lights up, and the display (D) shows an error code.
 - Hold the water tank (O) on its sides and carefully pull it out.
- Drain the water into a sink.
- Place the water tank (O) properly into the housing.
- The product restarts automatically.
Using a drain hose (continuous drainage)
When using a drain hose, the collected water is drained out of the drain hose outlet (Q). No water is collected in the water tank (O).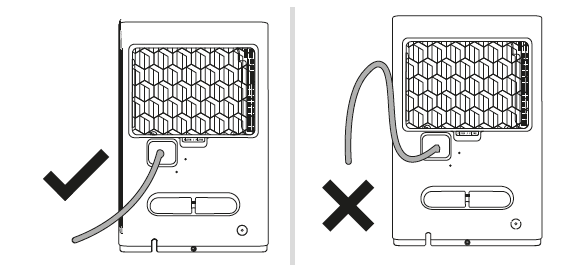
- Open the drain hose outlet (Q) by turning it in a counter-clockwise direction.
- Connect a hose by using a 1″ (2.54 cm) female connector (both separately purchased).
- Place the end of the drain hose at a suitable drain.
Using the drain pump outlet (continuous drainage)
Risk of damage! Insert the drain hose (U) at least (0.59″) 15 mm into the pump drain hose outlet (S).
Risk of damage! Do not use this function when the outdoor temperature is ≤ 32 ºF (0 °C). The water in the hose may freeze and block it. The drain pump starts its work when the water tank is filled at 1/3 of its volume. Do not exceed the drain hose height of ≤ 16′ (5 m).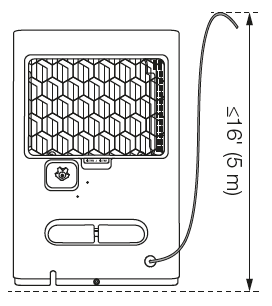
- If installed, remove the drain hose from the drain hose outlet (Q) and close it.
- Firmly press the 1/4″ (6.4 mm) drain hose (U) to the pump drain hose outlet (S).
- Place the end of the drain hose (U) at a suitable drain.
- Press the
 pump button (E) to activate the drain pump. The indicator above the
 pump lights up.
 - When the water tank is 1/3 filled, the drain pump starts to work.

- To remove the drain hose (U), first push the ring of the pump drain hose outlet (S) in the direction of the housing. Then pull out the drain hose (U).
Defrost function
The product automatically performs defrosting in regular intervals according to the ambient room temperature. The![]() defrost indicator (A) lights up when this feature is activated.
defrost indicator (A) lights up when this feature is activated.
Cleaning
- To clean the product, wipe with a soft, slightly moist cloth.
- Dry the product after cleaning.
- Never use corrosive detergents, wire brushes, abrasive scourers, or metal or sharp utensils to clean the product.
Air filter
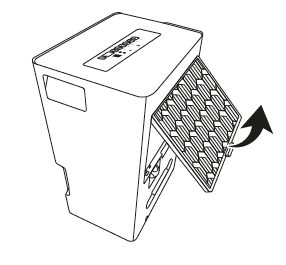
- Clean the air filter grille (P) on a bi-weekly basis.
- Pull out the air filter with grille (P) carefully on its handle.
- Clean the filter with the grille (P) with a vacuum cleaner or a soft brush. If necessary, clean the filter under running water.
- Let the filter with grille (P) dry.
- Reassemble the filter (P) into the housing.

Drain pump filter
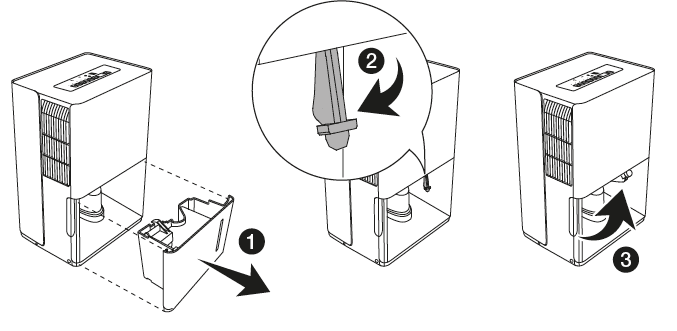
- Remove the water tank (O). On the right side of the interior of the housing, there is the drain pump filter.
- Carefully clamp the filter down.
- Clean the filter with a suitable tool (e.g. a brush or a waterproof vacuum cleaner) which will not push the dirt inside the filter.
- Pull the filter up again and place the water tank into the housing.
Storage
- Drain all water out of the product and let it dry.
- Store the product in its original packaging in a dry area. Keep away from children and pets.
- Avoid any vibrations and shocks.
Maintenance
- Any person who is involved with working on or breaking into the refrigerant circuit should hold a current valid certificate from an industry-accredited assessment authority, which authorizes their competence to handle refrigerants safely following an industry-recognized assessment specification.
- Servicing shall only be performed as recommended by the equipment manufacturer. Maintenance and repair requiring the assistance of other skilled personnel shall be carried out under the supervision of the person competent in the use of flammable refrigerants.
Problem
The product does not switch on.
Cause / Solution
- Check if the power plug is connected to the socket outlet. Check if the socket outlet works.
- Check the water level in the water tank (O).
- Check that the water tank’s (O) is properly fitted into the housing.
Problem
The product does not dry the air as it should.
Cause / Solution
- Wait to get enough time to remove the humidity.
- Make sure there are no curtains, blinds, or furniture blocking the front or back of the product.
- The desired humidity level may not be set low enough.
- Check that all doors, windows, and other openings are securely closed.
- The room temperature is too low, below 41 °F (+5 °C).
- A kerosene heater or another equipment is giving off water vapor in the room.
Problem
The product makes a loud noise during operation.
Cause / Solution
- The air filter is clogged.
- The product is tilted instead of staying upright as it should be.
- The floor surface is not leveled.
Problem
Water on floor
Cause / Solution
- The drain hose connection may be loose.
- The drain hose outlet (S) might be opened.
- The drain hose pump is activated, but no drain hose is connected.
Specifications
- Rated voltage:115 V~, 60 Hz, single phase
- Rated current: max. 7.8 A
- Power input: max. 810 W
- Standby power: 1 W
- Moisture removal: 50 pints/day (23.66 L/day)
- R.H. range: 35 – 85 % R.H.
- Rated IEF: 0.48 gal/kWh (1.8 L/kWh)
- Water tank capacity: 1.59 gal (6 L)
- Refrigerant: R410A, 7.4 oz (210 g)
- Fan IP rating: IP04
- Power cord and plug: 3- wire; grounded
- Airflow: 11301/13066 ft/h (320/370 m3/h)
- Sound emission: ≤54 dB(A)
- Operating temperature: 41 °F to 90 °F (+5 °C to +32 °C)
- Net weight: approx. 42 lb (18.9 kg)
- Dimensions (W x H x D): approx. 15.4 x 24.3 x 11.1″ (392 x 616 x 282 mm)
For more manuals by Amazon Basics visit, ManualsLibraryy
Amazon Basics 50-Pint Dehumidifier with Drain Pump-FAQs
Why does my dehumidifier fill up with water so quickly?
If your dehumidifier’s water basin fills quickly, it may be due to excess moisture in the air caused by issues like cracked pipes, leaks, or open crawl spaces. Adjusting the humidity control to a drier setting may also help.
What humidity level should I set my dehumidifier to?
Set your dehumidifier to maintain a humidity level between 30% and 50%. Too much moisture can cause dampness and mold, while too little can make the air overly dry and attract bacteria.
What is the ideal height for a dehumidifier?
For effective continuous drainage, the dehumidifier should be placed 1–2 feet above the floor, allowing gravity to assist with water drainage through the hose.
Does my dehumidifier need a pump?
Dehumidifiers without a pump rely on gravity for drainage or require manual emptying. Models with a pump can drain water upwards or against gravity, offering more flexibility.
How much moisture can a dehumidifier remove daily?
Most dehumidifiers can remove between 30 to 70 pints of water per day, depending on the model and humidity levels.
Should I use my dehumidifier on high or low fan speed?
For larger rooms or higher humidity levels, use a high fan speed for better airflow and faster dehumidification. Lower fan speeds are suitable for smaller areas or quieter operation.
At what temperature does a dehumidifier stop working?
Dehumidifiers generally stop working effectively below 41°F, as the evaporator coils may freeze at such temperatures.
How often should I empty a 50-pint dehumidifier?
Depending on humidity levels, a 50-pint dehumidifier may require emptying every 1–2 days when in use.
Is it safe to run a dehumidifier overnight?
Yes, dehumidifiers are designed for continuous operation and can be safely run overnight, offering benefits like improved air quality while you sleep.

