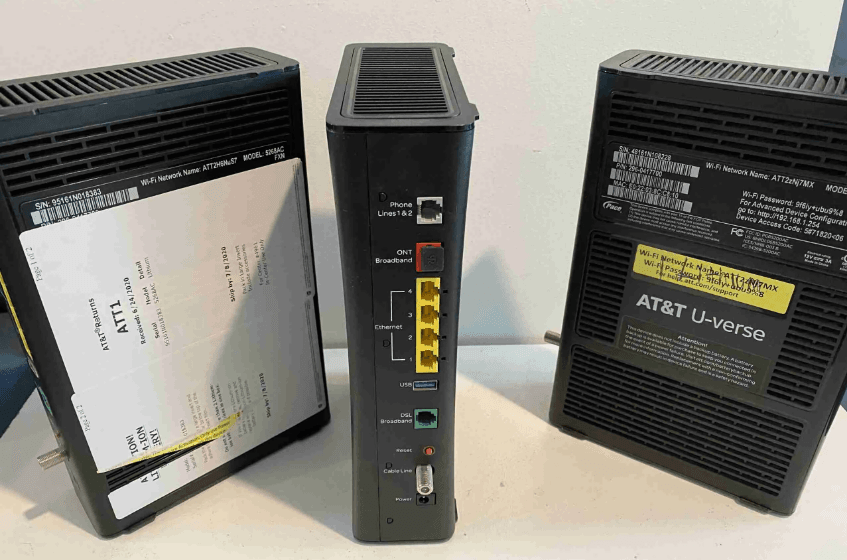
AT&T Pace 5268ac Gateway Internet Wireless Modem Router
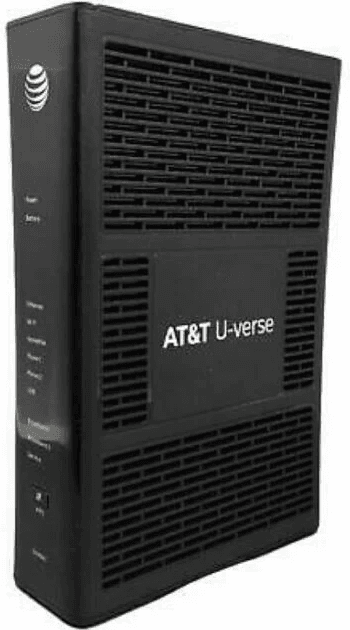
Introduction
Status lights
Use the status lights on the front of the gateway to determine its current state.
| Status light | Description |
| Power | • Solid green. The gateway is on. • Red. The gateway may have a fault with its power supply. |
| Battery | • Solid green. The backup battery is installed, but the gateway is not currently using battery power. • Flashing green. The battery is charging. • Solid red. The battery is faulty. • Flashing red. The battery should be replaced. • Solid amber. The gateway is using battery power. • Flashing amber. The battery is low. • Off. No battery is installed, or the battery has no charge. • Alternating colors. The battery is conducting a self-test. |
| Ethernet | • Solid green. A computer or other device is connected to an Ethernet port. • Flickering green. There is activity from devices connected to an Ethernet port. The flickering of the light is synchronized to data traffic. |
| Wireless | • Solid green. A wireless computer or other device is connected to the gateway. • Flickering green. There is inbound or outbound activity. The flickering of the light is synchronized to data traffic. |
| Home PNA | • Solid green. A set-top box or other device is connected to the coaxial port. • Flickering green. There is activity from devices connected to the coaxial port. The flickering of the light is synchronized to data traffic. |
| Voice 1 Voice 2 | • Solid green. A phone is connected. • Flashing green. The associated phone is active. |
| USB | • Solid green. A device is connected to the USB port. • Flashing green. The USB device is active. |
| Broadband 1 Broadband 2 | • Solid green. The gateway is connected to the provider network. • Flashing green. The gateway is trying to connect to the service provider network. The light might flash for a few moments while the gateway connects. • Flashing green and red. The gateway has been trying to connect to the service provider network for more than three minutes. See “Connection issues” on page 24. • Flashing red. The gateway cannot connect to the service provider network, or no DSL signal is detected. See “Connection issues”. • Off. The gateway is turned off, or the associated line is not connected or not in use. |
| Service | • Solid green. The gateway is connected to the service provider network and has obtained a WAN IP address. • Fast flashing green. The gateway is trying to obtain an IP address. • Red. The service provider network is not responding, the gateway has been configured incorrectly, or there was an authentication failure. |
| WPS | • Solid green. WPS (Wi-Fi Protected Setup) is used to configure the gateway. |
Setting up the Gateway
Before you install the gateway, find an appropriate location for it. Set up the gateway near the main computer or any other device that will connect to it through the wired Ethernet ports.
The gateway also serves as a wireless access point, so you should consider the wireless network when choosing the location for the gateway. Consider the following when determining the location of the gateway:
- Place the gateway at least 5 ft (1.5 m) from cordless phones, microwave ovens, or other electronic devices to avoid potential interference, and at least 6 in (15 cm) from your television to avoid audio hissing or static.
- Place the gateway in an open area to minimize interference from its surroundings. Wireless signal strength is much stronger in an open area than in an area with obstructions. In a single-story building, place the gateway as high and as close to each wireless device as possible.
- Keep the gateway away from large metal objects. Metal objects can reflect or obstruct signals, which can negatively impact wireless signal quality.
- Place the gateway in an open area to allow for proper ventilation.
- Keep the gateway away from water sources like water coolers or aquariums.
Note: We recommend that you use the included stand to install the gateway vertically. This prevents things from being stacked on top of it, which can block vents and cause the gateway to overheat.
Connection overview
Connect the gateway to the DSL line, and connect devices to the gateway using a wired or wireless connection. The following illustration shows an overview of the connections.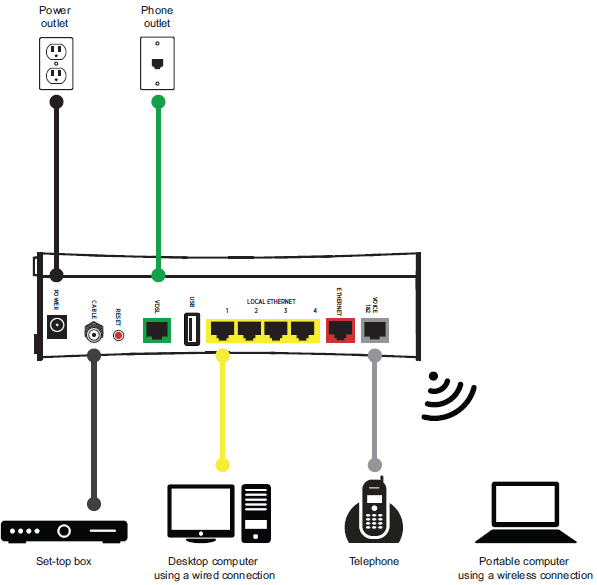
Inserting the battery
The gateway includes an integrated battery. The battery provides backup power in case of power failure. You should insert the battery before you use the gateway.
- Open the battery door.
- Insert the battery into the battery compartment.
- Close the battery door.
Connecting the power adapter
Use the power adapter that was packaged with the gateway because it matches the power requirements of the gateway and it complies with local requirements.
- Connect one end of the power adapter to the POWER port on the gateway.
- Connect the other end to a power outlet.
After the gateway is powered on, the power light blinks green for a moment and then turns steady green.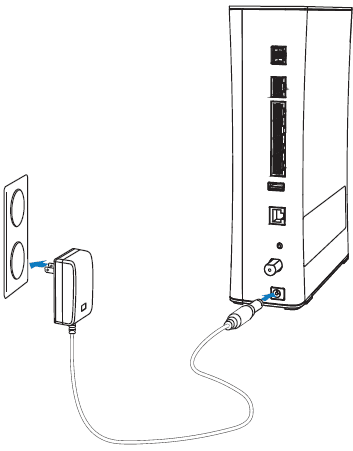
Connecting the gateway to the Internet
You can connect the gateway to the Internet using the DSL port or the Ethernet port.
Using the VDSL port
Connect the gateway to the Internet through the VDSL port.
- Connect one end of a phone cord to the green VDSL port on the gateway.
- Connect the other end of the phone cord to the phone outlet.
After the gateway recognizes the connection, the Broadband light blinks green for a moment and then turns steady green.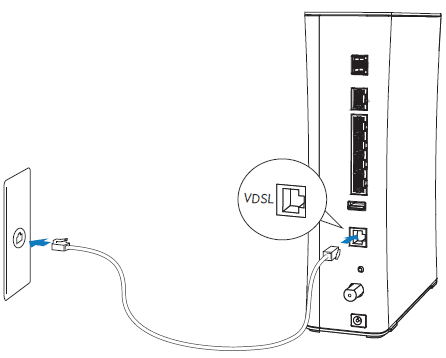
Using the Ethernet port
If directed by your service provider, you can connect the gateway to the Internet through the Ethernet port.
- Connect one end of an Ethernet cable to the Ethernet port on the gateway.
- Connect the other end of the Ethernet cable to the broadband device.
After the gateway recognizes the connection, the Broadband light blinks green for a moment and then turns steady green.
Installing DSL filters
The DSL signal is carried over the same lines as the regular phone signal. Converting your regular phone line to DSL can cause high-pitched tones and static when you use the phone. To eliminate the noise, install DSL filters on every phone or phone device that shares the same phone number as the DSL service.
You need one DSL filter for each phone device (such as a desktop phone, analog modem, Fax, or answering machine). If you have several phone devices connected to each other and are using a single phone jack, install only one DSL filter between the phone jack and the first device in the series.
Important: Do not install a DSL filter on the line that is connected to the DSL gateway.
Installing a DSL inline filter
For most phones, you should install the DSL filter between the device and the phone jack.
- Connect the cable from the phone to the DSL filter.
- Connect the cable from the DSL filter to the phone jack.
Installing a DSL wall filter
For a wall-mounted DSL filter, install the DSL filter between the original wall plate and the wall-mounted phone.
- Lift the phone from the wall pegs and disconnect the phone cord from the phone jack.
- Connect the phone cord from the back of the DSL filter to the phone jack, and mount the filter on the wall plate pegs using the keyhole slots.
- Connect the phone cable to the phone jack located on the front of the mounted DSL filter. Note: If you have a DSL gateway, you can connect it to the DSL port at the bottom of the filter.
- Attach the phone to the mounting pegs on the DSL filter.
Configuring the Gateway
The gateway is configured automatically by your service provider, but you can change certain settings, such as the wireless network name, password, and firewall options.
Opening the gateway home page
Use the gateway home page to change settings on your gateway.
- Start your web browser.
- In the address bar, enter http://192.168.1.254.
You can also use http://gateway.pace.com to open the gateway home page
Configuring LAN settings
Typically, your Internet service provider automatically assigns and configures an IP address when the gateway connects to the Internet. Advanced users can use a static IP address that allows them to run services like file servers or mail servers. Service providers typically offer static IP addresses as an extra service.
Change these settings only if you are familiar with networking concepts.
Configuring DHCP
DHCP (Dynamic Host Configuration Protocol) allows network addresses to be allocated dynamically as needed. The gateway can be both a DHCP client and a DHCP server. The gateway is a DHCP client because it obtains an IP address from the service provider over the Internet. The gateway is a DHCP server because it assigns IP addresses to the devices in your home network.
If you change the local network IP address range, you must renew the DHCP lease on devices connected to the home network and manually reconfigure all devices configured with static IP addresses.
- Open the gateway home page at http://192.168.1.254.
- Click the Settings tab, then the LAN tab.
- Click DHCP.
- For DHCP Network Range, select an IP address range or select Configure manually to set up a custom range for the DHCP IP address pool.
- If you selected Configure manually, enter the following information:
- Router Address. The LAN IP address of the gateway.
- Subnet Mask. The subnet mask of the gateway (default: 255.255.255.0).
- First DHCP Address. The first IP address in the DHCP IP address pool is to be assigned on the local network.
- Last DHCP Address. The last IP address in the DHCP IP address pool to be assigned on the local network.
- For DHCP Lease Time, enter the number of hours a device can use an assigned IP address before it expires.
- For New Device DHCP Pool, select Private Network or Public Network. Use Public IP addresses only with DMZplus or a secondary subnet that allows you to have public IP addresses routed through the device.
- Click Save.
Allocating IP addresses
You can allocate specific IP addresses to devices that are configured with DHCP, and map devices to particular static IP addresses. For Internet public hosting of applications or servers associated with static addresses, you can map a device to a specific public static IP address or to the next unassigned address from the public pool. The default public IP device mapping is to the router’s WAN IP address.
Alternatively, you can configure static public or private IP addresses on the devices themselves. Static IP addresses on devices override settings on this page.
- Open the gateway home page at http://192.168.1.254.
- Click the Settings tab, then click the LAN tab.
- Click IP Address Allocation. The page shows the devices in your network.
- Go to the appropriate device and select the following options to override the default DHCP settings:
- Firewall. Determines whether the gateway firewall is enabled for the device.
- Address Assignment. A specific address or address type.
- WAN IP Mapping. The address or address pool from which you want to select an IP address.
- Click Save.
Configuring firewall settings
The gateway’s default firewall settings block unwanted access from the Internet. Most users will not need to change the default firewall settings. If necessary, you can modify the firewall settings to allow certain Internet traffic or users through the firewall to devices on your home network.
Hosting an application
To allow access from the Internet to applications running on computers inside your home network, you need to open firewall pinholes and associate the intended application with a computer connected to your gateway. If you cannot find a listing for your application, you can define an application with the protocol and port information.
- Open the gateway home page at http://192.168.1.254.
- Click the Settings tab, then click the Firewall tab.
- Click Applications, Pinholes, and DMZ.
- Select the computer that will host the application. If the computer you want to select is unlisted because it is powered off and the Hide inactive devices option is enabled, you can select it if it is on the same network and you know its IP address. Enter the IP address and click Choose.
- Select Allow individual application(s).
- From the Application List panel, select the application you want to host. You can filter the application list by selecting a category. To select multiple applications, hold down the [Shift] or [Ctrl] keys while making your selections. Using the [Shift] key lets you make your selections in a contiguous order, while the [Ctrl] key selects the groups in any order.
- Click Add.
- Click Save.
Defining an application profile
An application profile allows application-specific data to pass through the firewall. You can define an application profile that is not included in the application list. This feature is typically used if the application for which you would like to pass data to a given computer is new or has been recently updated to a new version.
- Open the gateway home page at http://192.168.1.254.
- Click the Settings tab, then click the Firewall tab.
- Click Applications, Pinholes, and DMZ.
- Scroll down to the Edit Firewall settings for this computer pane.
- Scroll down and click Add a new user-defined application.
- Enter the following information:
- Application Profile Name. A descriptive name for the application profile.
- Protocol. Select TCP or UDP. If the application you are adding requires both, you can create a separate definition for each.
- Port (or Range). The port number or range of port numbers that the application uses. For example, some applications require only one port to be opened (such as TCP port 500); others require that all TCP ports from 600 to 1000 be opened. If only one port is required, enter the port number in the From field.
- Protocol Timeout. The amount of time in seconds that can pass before the application times out. If the field is blank, the gateway uses the default values (86400 seconds for the TCP protocol and 600 seconds for the UDP protocol).
- Map to Host Port. A value that maps the port range you established in the Port field to the local computer. For example, if you set the value to 4000 and the port range being opened is 100 to 108, the forwarded data to the first value in the range will be sent to 4000. Subsequent ports will be mapped accordingly; 101 will be sent to 4001, 102 will be sent to 4002, and so on.
- Application Type. Select the application type. If you do not know the application type, leave the field blank.
- Click Add to List.
Troubleshooting
This section provides information about common gateway installation issues. If an issue has more than one potential cause, the most common cause is listed first.
Connection issues
Use the information in this section to identify and resolve issues related to connectivity.
The Power light is not on.
- The power cable may be loose or disconnected. Check the power cable to ensure that the cable is securely connected. If the power cable is plugged into a power strip or switched outlet, ensure that it is on. Ensure that you are using the power supply that came with the gateway.
- The power supply may be faulty. Verify that the light on the power supply is green.
- The AC outlet may be faulty. Try plugging the gateway into a known good outlet. The Power light blinks immediately after the device starts, and then turns steady green.
- The Power light blinks during POST (Power on self-test). This is normal behavior. The Power light is red.
- The POST (Power on self-test) may have failed. Press the Reset button and hold it for 10 seconds to reset the gateway. The Broadband light blinks.
- The Ethernet or DSL cable may be loose or disconnected. Check the connections to ensure that the cable is securely connected.
- The DSL connection may not be established. Press the Reset button and hold it for 10 seconds to reset the gateway. If resetting the gateway does not fix the problem, contact your service provider.
For more Manuals by AT&T, visit ManualsLibraryy
AT&T Pace 5268ac Gateway Internet Wireless Modem Router-FAQ.s
Is the AT&T Gateway a modem or a router?
The AT&T Gateway works as both a modem and a router. It connects your home to the internet and also distributes the connection wirelessly to your devices.
What is the AT&T Wi-Fi Gateway?
It’s a device that combines a modem and a router into one unit, allowing you to connect to the internet and share that connection with multiple devices over Wi-Fi.
How can I access the settings of my AT&T modem/router?
Connect to your AT&T network and open a browser. Go to http://att.wirelessinternet. Use the admin login (default: attadmin) found on the label at the bottom of the device.
What is the web address to access the AT&T modem interface?
Type http://192.168.1.254 into your browser. This gives you access to settings and features for your gateway and network.
Can I use my own router with the AT&T modem?
Yes, you can use a third-party router. To do this, you need to set up IP Passthrough mode on your AT&T gateway so the secondary router can manage the network.
Does the AT&T router have a WPS button?
Yes. You can press the WPS button on the AT&T router to quickly connect compatible devices. You have 2 minutes to complete the connection after pressing the button.
What is a gateway connection?
A gateway connects different networks, while a router handles traffic within a single network. The AT&T Gateway combines both functions in one device.
Why is my AT&T Gateway blinking red?
A slow blinking red light means there’s no internet connection. Check all cables and try restarting the device by holding the reset button for 10 seconds.

