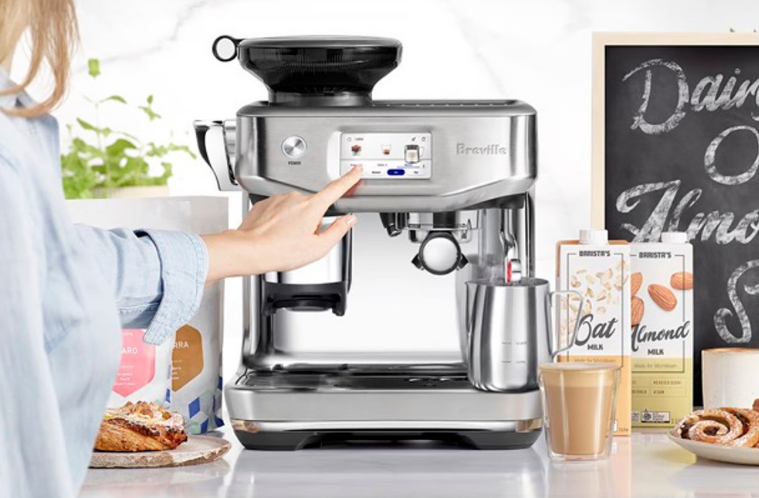
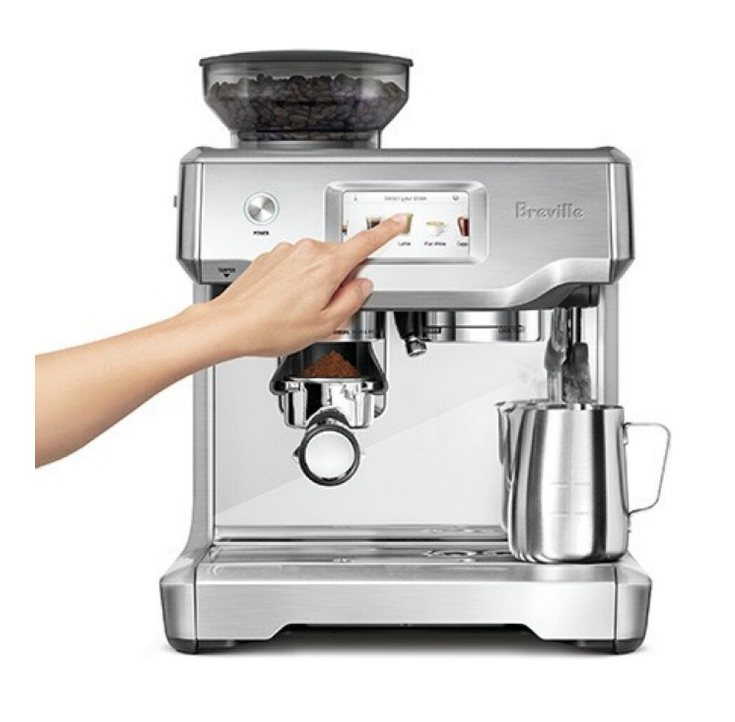
Breville BES880BSS Barista Touch Espresso Machine
IMPORTANT SAFEGUARDS
- Carefully read all instructions before operating and saving for
future reference. - Do not touch hot surfaces. Use handles or knobs as advised in this instruction book.
- To protect against fire, electric shock, and injury to persons, do not immerse the power cord, plug, or appliance itself in
water or other liquids. - Close supervision is necessary when any appliance is used by or
near children. - Do not place the appliance near the edge of a table or countertop. Ensure the surface is level, clean, and free of water
and other substances. - Do not place the appliance on or near a hot gas or electric burner. Do not place it in, or allow it to come in contact with
a heated oven. - This appliance is recommended for household use only. Do not use this appliance for anything other than its intended use. Do not use outdoors. Do not use it in moving vehicles or boats.
Components
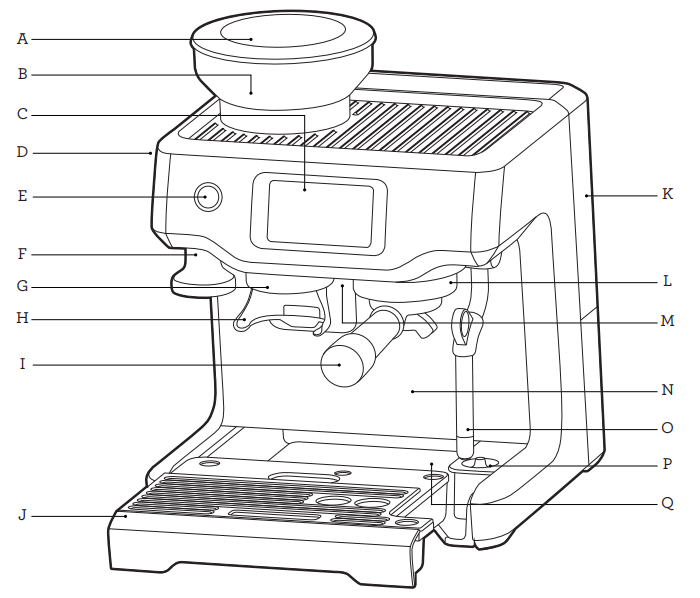
- A. ½lb bean hopper with a locking system for easy removal,
storage, and transfer of coffee beans. - B. Integrated conical burr grinder
- C. Touch screen control panel displays current settings and provides a touch interface.
- D. GRIND SIZE selector Espresso grind settings from fine to coarse.
- E. POWER button
- F. Integrated removable 54mm tamper
- G. Grind outlet
- H. Hands-free grinding cradle
- I. 54mm stainless steel portafilter with commercial-style spouts.
- J. Removable wet & dry coffee separator drip tray With Empty Me! Tray full indicator.
- K. 68 fl. oz (2L) removable water tank with replaceable water filter to reduce impurities and scale.
- L. Group Head
- M. Dedicated hot water outlet
- N. Extra-tall cup clearance for tall mugs
- O. Easy clean steam wand For automatic milk texturing.
- P. Milk temperature sensor
- Q. Storage tray (located behind drip tray) Houses accessories when not in use.
ACCESSORIES
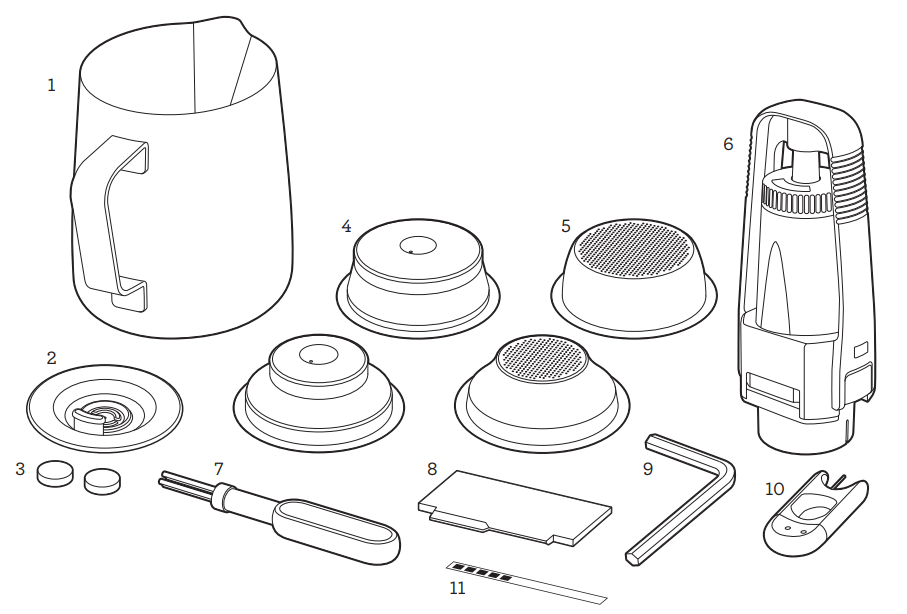
- Stainless steel milk jug
- Cleaning disc
- Cleaning tablets
- Dual Wall filter baskets (1 cup & 2 cup). Use with pre-ground coffee.
- Single Wall filter baskets (1 cup & 2 cup). Use when grinding fresh whole coffee beans.
- Water filter and holder
- Cleaning brush
- The Razor™ precision-dosing tool
- Allen key to disassemble the shower screen (see page 25).
- Steam wand cleaning tool
- Water hardness test strip
Barista Touch Features
COLOR TOUCH SCREEN CONTROL PANEL
Swipe & select from the drinks menu. Adjust your shot volume, milk texture, or milk temperature, then save it as your personal favorite.
AUTOMATIC HANDS-FREE MILK TEXTURING
Automatically textures milk to the selected temperature and style from silky smooth latté to creamy cappuccino. Automatic purge
removes residual milk from the steam wand when returned to the downward position.
RAPID HEAT UP
The innovative heating system achieves an ideal extraction temperature in 3 seconds.
INTEGRATED CONICAL BURR GRINDER
Stainless steel conical burrs maximize ground coffee surface area for a full espresso flavor. Upper and lower burrs are removable for cleaning.
ADJUSTABLE GRIND SIZE
Espresso grind settings range from fine to coarse for optimal extraction.
ADJUSTABLE GRIND AMOUNT
Adjust the amount of fresh ground coffee dosed into the filter basket to suit the fineness or coarseness of the grind.
AUTOMATIC DOSING
Use the FILTER SIZE button to tell the machine if you are using a 1 CUP or 2 CUP filter basket. The grinder will dispense the
required amount of ground coffee for a single or double cup dose.
HANDS-FREE GRINDING
Auto stop for hands-free grinding directly into the portafilter.
THE RAZOR™ DOSE TRIMMING TOOL
The patented twist blade trims down the puck to the right level for precision dosing and consistent extraction.
ADJUSTABLE TEMPERATURE CONTROL
For optimum coffee flavor.
PID TEMPERATURE CONTROL
Electronic PID temperature control for increased temperature stability.
INSTANT HOT WATER
Dedicated hot water outlet for making Americanos and pre-heating cups.
LOW PRESSURE PRE-INFUSION
Applies low water pressure at the start of the extraction to gently expand grinds for an even extraction.
VOLUMETRIC CONTROL
Preset 1 & 2 cup volumes, manual override, or programmable shot volumes.
DRY PUCK FEATURE
Removes excess water from the ground coffee in the filter basket after extraction for easy disposal of the coffee puck
Assembly
Machine Preparation
Remove and discard all labels and packaging materials attached to your espresso machine. Ensure you have removed all parts and
accessories before discarding the packaging. Remove the packaging and the plastic bags containing the water filter and water filter
holder. Clean parts and accessories (water tank, portafilter, filter basket, jug) using warm water and a gentle dishwashing liquid. Rinse well then dry thoroughly.
INSTALLING THE WATER FILTER
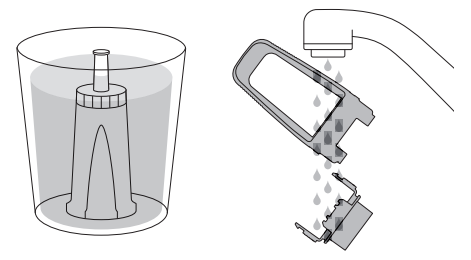
- Remove the water filter and water filter holder from the plastic bag.
- Soak the filter in cold water for 5 minutes.
- Wash the filter holder with cold water.

- Set the reminder for the next replacement. We recommend replacing the filter after 3 months.

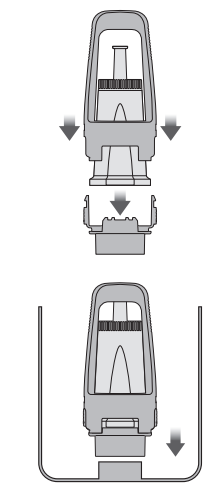
- Insert the filter into the two parts of the filter holder.
- To install the assembled filter holder into the water tank, align the base of the filter holder with the adapter inside the water tank. Push down to lock into place. Fill the water tank with cold water before sliding it back into position at the back of the machine and locking it into place.
Functions
FIRST USE
- Press the POWER button to turn the machine on.
- Follow the instructions on the screen to guide you through the first-use setup.
- After completing the setup, the machine will tell you that it is ready to use.
- Touch “Guide” and the machine will guide you step by step to make your first coffee. Touch the and go to the Drinks Menu or
< to repeat the Setup. To repeat the Guide at any time, go to the Settings Menu.
GRINDING OPERATION
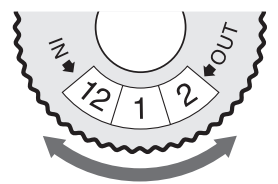
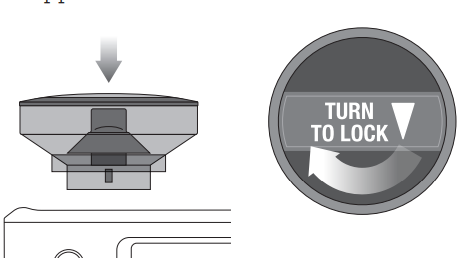
Insert the bean hopper into position on top of the machine. Turn the dial to lock into place. Fill the hopper with fresh beans.
DRINK SELECTION
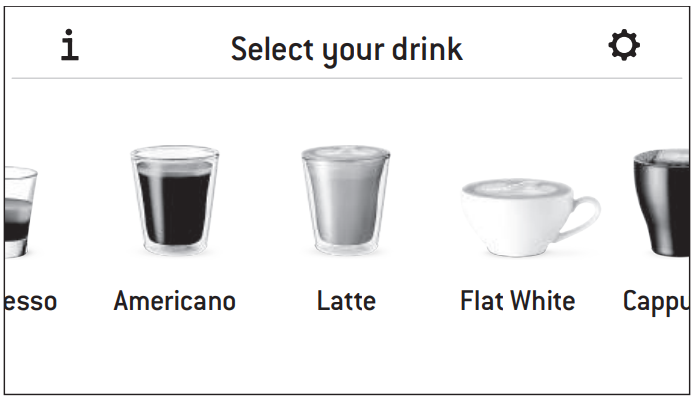
To enter the Drinks Menu screen, touch the Home icon. Swipe & select your drink. Touch the ‘Help & Tip’ icon to see the Barista Touch™ Guide.
DRINK SCREEN
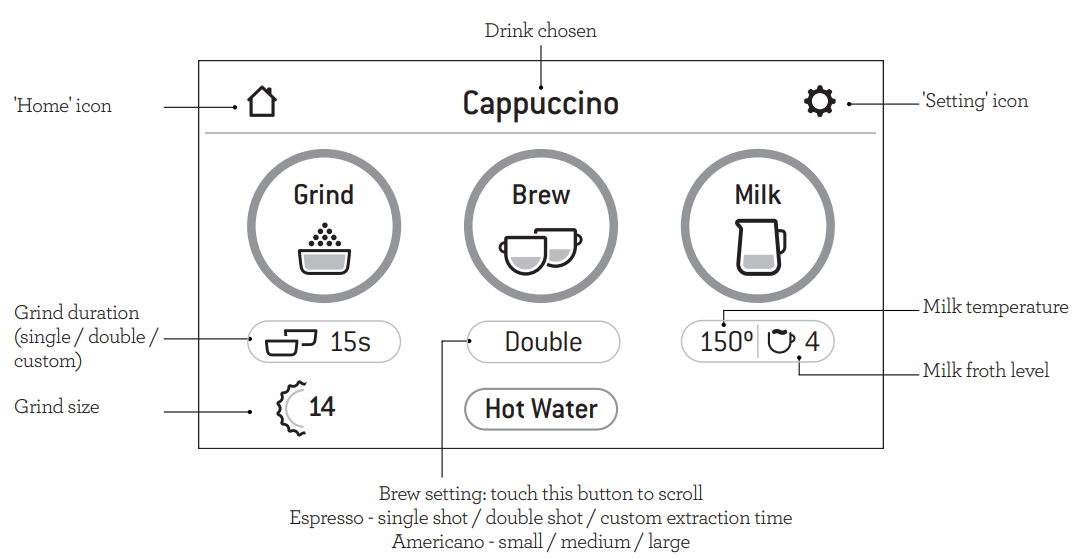
On this screen, you can customize your drink by touching the oval-shaped buttons. You cannot adjust the Grind Size by touching the button, use the dial on the side of the machine.
SETTING GRIND SIZE
Selecting Your Filter Basket
Choose and insert the Filter Basket into the Portafilter for the number of coffees or strength you are making. Use the Single Cup Filter Basket for making a single cup or a weaker-tasting espresso. Use the Double Cup Filter Basket for making 2 cups or a stronger-tasting espresso, usually for mugs or larger cups. See ‘TIPS’ for a more detailed guide. In the touchscreen, select the chosen filter basket by touching the toggle option under the ‘Grind’ button. The grind size will affect the rate of water flow through the coffee in the filter basket and the flavor of the espresso. When setting the grind size, it should be fine but not too fine and powdery. When trying a new coffee, it may take 2 or 3 tries to identify the correct grind size for your coffee.
There are numbered settings on the touchscreen. The smaller the number, the finer the grind size. The larger the number, the coarser the grind size
Automatic Dosing
- Ensure the hopper is locked into position and is filled with fresh coffee beans.
- Ensure the filter basket is completely dry before placing the portafilter into the grinding cradle.
- Touch the ‘Grind’ button once, or push and release the portafilter to engage the grinding activation switch. Then allow fresh ground coffee to fill the portafilter.
- Grinding will automatically stop; however, if you wish to stop grinding before the cycle has finished, push and release the portafilter.
Manual Dosing
- If you prefer to manually dose, with the portafilter inserted in the grinding cradle, push and hold the portafilter to engage the
grinding activation switch. Continue holding until the desired amount of ground coffee has been dosed. - To stop grinding, release the portafilter. This will release the grinding activation switch and stop the grinding function.n
Tamping the Ground Coffee
- Once grinding is complete, carefully withdraw the portafilter from the grinding cradle.
- Tap the portafilter several times to collapse and distribute the coffee evenly in the filter basket.
- Tamp down firmly using approx. 30–40lbs (15–20kgs) of pressure. The amount of pressure is not as important as consistent pressure every time.
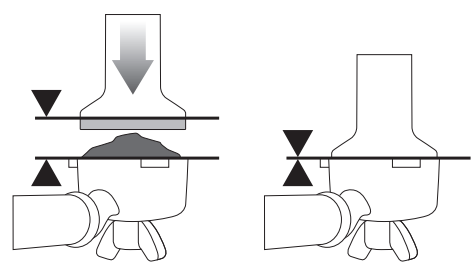
- As a guide to dose, the top edge of the metal cap on the tamper should be level with the top of the filter basket AFTER the coffee has been tamped.
EXTRACTION GUIDE
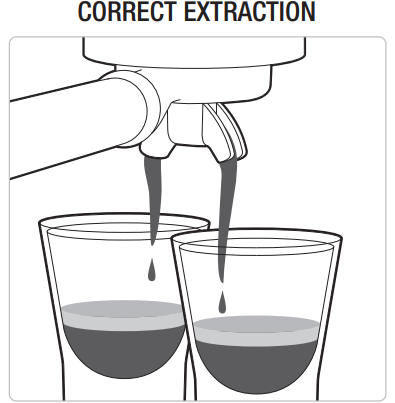
- The flow starts after 8–12 seconds.
- Flow slowly like warm honey.
- Crema is golden brown with a fine mousse texture
- Espresso is dark brown
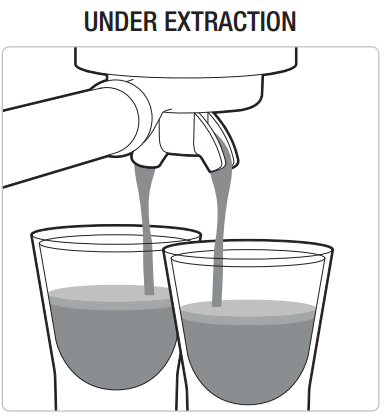
- The flow starts after 1–7 seconds.
- Flow fast like water.r
- Crema is thin and pale
- Espresso is pale brown
- Tastes bitter/sharp, weak, and watery
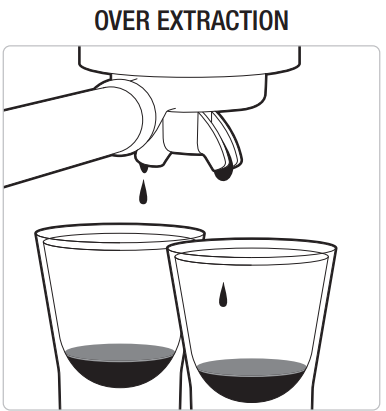
- Flowow starts after 13 seconds.
- Flow drips or not at all.
- Crema is dark and spotty.
- The espresso is very dark brown.
- Tastes bitter and burnt
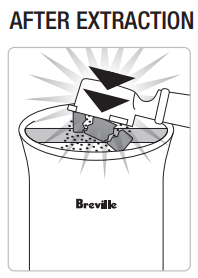
REMOVE USED GRINDS: Used grinds will form a coffee ‘puck’. If the puck is wet, refer to the ‘Under Extraction’ section.
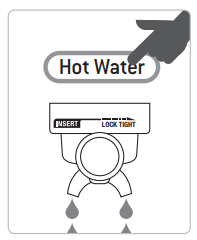
RINSE FILTER BASKET: Keep the filter basket clean to prevent
blockages. Without ground coffee in the filter basket, lock the
portafilter into the machine and run hot water through.

Care & Cleaning
REPLACING THE WATER FILTER

- Set the current month.h
- Assemble water filter parts
- Ensure parts are connected
- Install the filter in the tank
- Fill the tank and wait for 5 minutes to soak the filter
- Install water tank
- Replace the filter after 90 days or after 40L (10 US GAL)
The provided water filter helps prevent scale build-up in and on many of the inner functioning components. Replacing the water filter after three months or 10.6 USgal / 40L will reduce the need to descale the machine. The limitation of 10.6 USgal / 40L is based on water hardness level 4. If you are in the level 2 area, you can increase this to 16 USgal / 60L.
CLEANING CYCLE
There will be a message prompt when a cleaning cycle is required. This is a back-flushing cycle and is separate from descaling. Follow the instructions on the screen.
DESCALING
After regular use, hard water can cause mineral buildup in and on many of the inner functioning components, reducing the brewing flow, brewing temperature, power of the machine, and taste of the espresso. Even if you used the provided water filter, we recommend that you describe whether there is a separate water tank. Go to ‘Settings’ and select ‘Descale cycle’. Follow the instructions on the screen.
CLEANING THE CONICAL BURR GRINDER
This grinder cleaning cycle removes oil build-up on the burrs which can impede performance.

- Unlock hopper
- Empty hopper
- Replace hopper
- Lock hopper
- Run the grinder empty
- Unlock hopper
- Remove hopper

- Unlock top burr
- Remove top burr
- Clean the top burr with a brush
- Clean the lower burr with a brush
- Clean the chute with a brush
CLEANING THE STEAM WAND
- The steam wand should always be cleaned after texturing milk. Wipe the steam wand with a damp cloth.
- If any of the holes in the tip of the steam wand become blocked, it may reduce frothing performance.
- Go to ‘Settings’ > ‘Steam wand cleaning’ and follow the guide on the screen.
CLEANING THE FILTER BASKETS AND PORTAFILTER
- The filter baskets and portafilter should be rinsed under hot water immediately after use to remove all residual coffee oils.
- If any of the holes in the filter basket become blocked, use the pin on the end of the provided cleaning tool to unblock the hole(s).
- If the hole(s) remain blocked, dissolve a cleaning tablet in hot water and soak the filter basket and portafilter in the solution for approx. 20 minutes. Rinse thoroughly.
CLEANING THE SHOWER SCREEN
- The group head interior and shower screen should be wiped with a damp cloth to remove any ground coffee particles.
- Periodically purge the machine. Place an empty filter basket and a port filter into the group head. Touch the ‘Brew’ button and run a short flow of water to rinse out any residual coffee.
CLEANING THE DRIP & STORAGE TRAY
- The drip tray should be removed, emptied, and cleaned at regular intervals, particularly when the drip tray full indicator is showing EMPTY ME!
- Remove the grid from the drip tray. Lift the coffee grind separator and dispose of any coffee grounds. The EMPTY ME!The
The indicator can also be removed from the drip tray by pulling upwards to release the side latches. Wash all parts in warm, soapy water with a soft cloth. Rinse and dry thoroughly. - The storage tray (located behind the drip tray) can be removed and cleaned with a soft, damp cloth. Do not use abrasive cleaners, pads, or cloths that can scratch the surface.
CLEANING THE OUTER HOUSING & CUP WARMING TRAY
The outer housing and cup warming tray can be cleaned with a soft, damp cloth. Polish with a soft, dry cloth. Do not use abrasive CCleaner pads or cloths that can scratch the surface.
STORING YOUR MACHINE
Before storing, press the POWER button to switch the machine off and remove the plug from the power outlet. Remove unused beans
from the hopper, clean the grinder (see page 23), emand pty the water tank, and the drip tray. Ensure the machine is cool, clean, and dry.
Insert all accessories into the storage tray. Store upright. Do not place anything on top.
USING THE ALLEN KEY
Over time, the silicone seal surrounding the shower screen will need to be replaced to ensure optimum brewing performance.
- Press the POWER button to switch the machine off and unplug the cord from the power outlet.
- Carefully remove the water tank and drip tray, taking particular care if they are full.
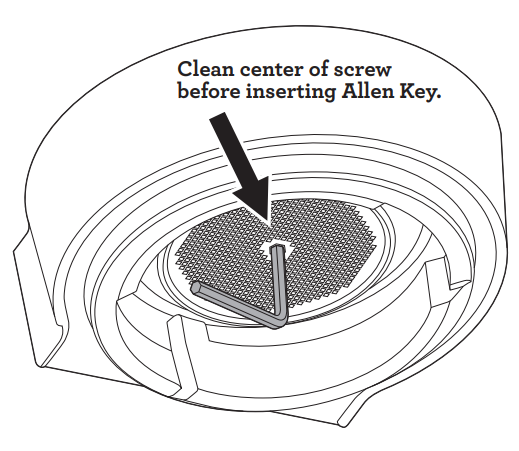
- Using a skewer or similar, clean the center of the screw of any residual coffee.
- Insert the shorter end of the Allen Key into the center of the screw. Turn counterclockwise to loosen the screw.

- Once loosened, carefully remove and retain the screw and the stainless steel shower screen. Make a note of the side of the shower screen that is downwards. This will make re-assembly easier. Wash the shower screen in warm, soapy water, then dry thoroughly.y
- Remove the silicone seal with your fingers or a pair of long-nose pliers. Insert the new seal, flat side first, so the ribbed side is facing you.

- Re-insert the shower screen, then the screw. With your fingers, turn the screw clockwise for 2-3 revolutions then insert the Allen Key to tighten until the screw is flush with the shower screen. Do not overtighten the screw.
- Re-insert the drip tray and water tank.
Troubleshooting
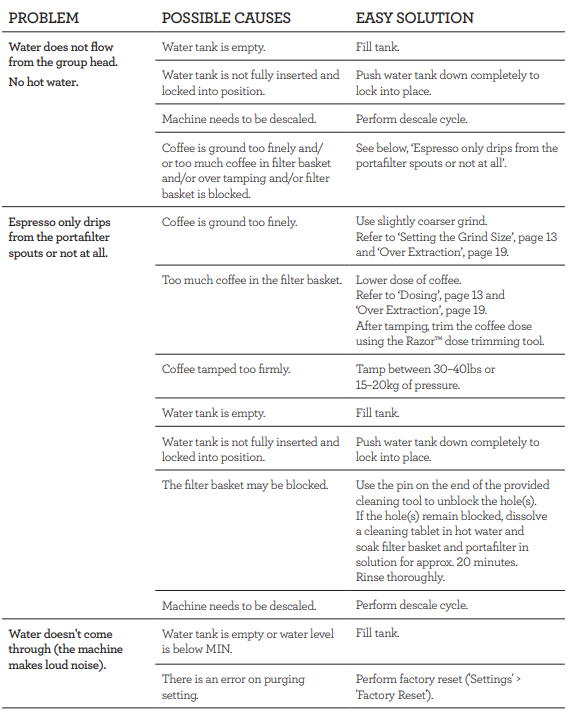
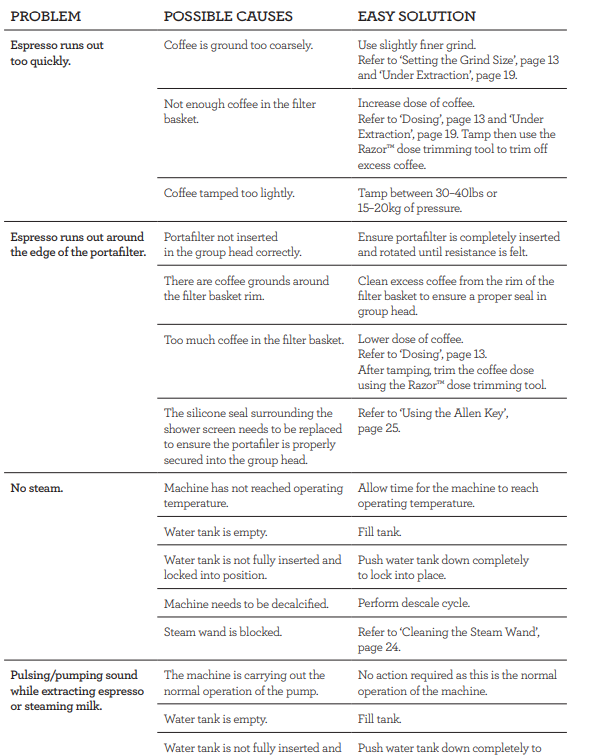
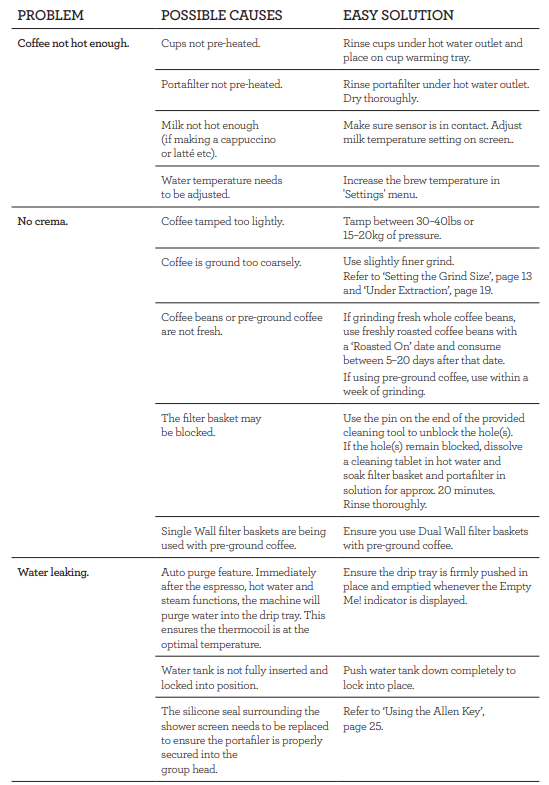
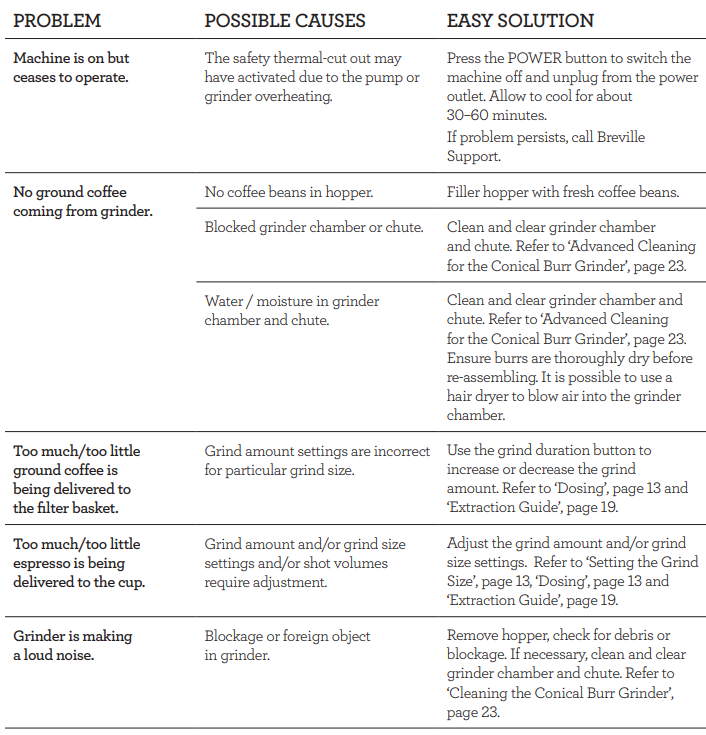
FOR MORE MANUALS BY BREVILLE, VISIT MANUALSLIBRARYY
Breville BES880BSS Barista Touch Espresso Machine-FAQs
Can I adjust the temperature on my Breville espresso machine?
Yes! The default brew temperature is 93°C/200°F, but you can adjust it in the settings. Lighter roasts may need slightly higher temps (up to 96°C/205°F) for better extraction.
Can I leave my Breville espresso machine on all the time?
No. Always turn off the machine using the POWER button, unplug it when not in use, and before cleaning or moving it.
How do I pull the perfect espresso shot on the Breville Barista Touch?
Grind size: Medium-fine (like table salt)
Dose: 18–20g for a double shot
Tamping: Apply 20–30 lbs of pressure
Extraction time: 25–30 seconds for 36–40g output
Pressure: Aim for 9 bars (machine shows real-time pressure)
What’s the best grind size for espresso?
A fine grind (similar to flour) works best for espresso, ensuring proper extraction and crema.
How do I descale my Breville Barista Touch?
Use Breville descaling solution (or white vinegar diluted 1:1 with water).
Follow the on-screen descaling prompts (under settings).
Run 2–3 cycles with clean water to rinse.
How long should an espresso shot take?
The ideal extraction time is 25–30 seconds for a balanced shot. If it’s too fast (<20s), grind finer; if too slow (>35s), grind coarser.
How often should I clean my espresso machine?
Daily: Wipe the steam wand, purge group head.
Weekly: Backflush with Cafiza or Breville cleaning tablets.
Monthly: Deep clean grinder & descale.
What’s the best temperature for espresso?
The ideal range is 90–96°C (195–205°F). Lighter roasts need higher temps, darker roasts slightly lower.
How do I increase espresso pressure on my Breville?
Use finer grind settings.
Ensure proper tamping (30 lbs pressure).
Check freshness of beans (stale beans reduce pressure).

