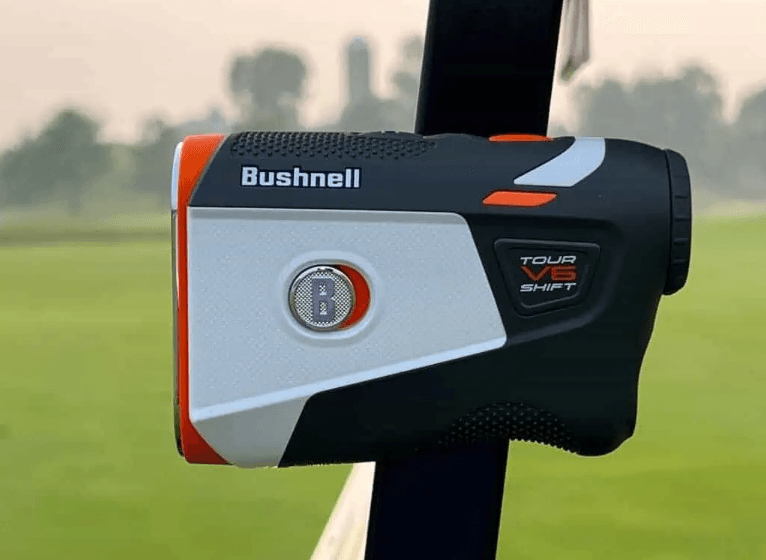
Bushnell Tour V6 Shift Golf Rangefinder
INTRODUCTION
Congratulations on purchasing your new Tour V6 Series Laser Rangefinder from Bushnell Golf. You are joining 98.6% of Tour players who trust their games to Bushnell Golf. The Tour V6 Series is packed with new and upgraded features. We have completely upgraded our electronic components, making the Tour V6 the most accurate, consistent, and fastest Tour Series Laser ever. Along with all the upgraded electronics, your Tour V6 features PinSeeker with Visual JOLT, BITE magnetic cart mount, and upgraded weatherproofing to IPX6.
WARNING: AS WITH ANY LASER DEVICE, IT IS NOT RECOMMENDED TO DIRECTLY VIEW THE EMISSIONS FOR LONG PERIODS WITH MAGNIFIED LENSES.
PARTS GUIDE
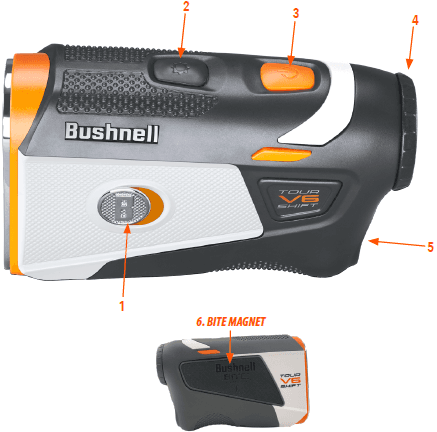
- Slope Switch (Shift model only)
- Mode Button
- Power/Fire Button
- Eyepiece Diopter Dial
- Battery Compartment
- BITE Magnet (see inset photo)

DISPLAY INDICATORS
The Tour V6 display incorporates the following indicators:
- Aiming Circle (surrounding crosshairs indicate laser transmission)
- Distance Units (Yards/Meters)
- Battery Level
- “Play As” Distance, based on Slope (Shift model only)
- Slope (% grade) (Shift model only)
- Line of Sight Distance
- Visual JOLT Indicator Ring
ACTIVATING/REPLACING THE BATTERY
Please remove the battery door by lifting the battery door tab and rotating it counterclockwise until it is loose. Then, activate the installed CR2 3-volt lithium battery by removing the battery door as described above. Next, remove the plastic protective disc from the top of the battery and replace the door.
Replacing a low battery: Insert a new CR2 3-volt lithium battery into the compartment negative (flat) end first (positive end facing out towards the battery cover), then replace the battery door.
WARNING: THIS PRODUCT USES A LITHIUM-BASED BATTERY. LITHIUM BATTERIES CAN OVERHEAT AND CAUSE DAMAGE IF PHYSICALLY ABUSED. DO NOT USE BATTERIES THAT ARE DAMAGED OR SHOW SIGNS OF PHYSICAL WEAR.
BASIC OPERATION
While looking through the Tour V6, depress the Power/Fire button once to activate the display. If the display icons and numbers are blurry, rotate the eyepiece in either direction until they are in focus (see “Adjusting the Eyepiece” below).
- Place the aiming circle (center of the display) over a target at least 5 yards away. Press and hold the Power/Fire button until the “line of sight” distance displays near the bottom of the display (see “Display Indicators” below). Crosshairs surrounding the aiming circle indicate that the laser is transmitted.
- After a range is acquired and displayed, you can release the Power/Fire button. The crosshairs surrounding the aiming circle will disappear once the Power/Fire button is released (i.e., the laser is no longer transmitting).
- Once activated, the display will remain visible and display the last distance measurement for 10 seconds. Press the Power/Fire button again to range to a new target. The maximum time the laser is transmitted (active) is 5 seconds. To re-fire, press the button down again.
ADJUSTING THE EYEPIECE
The Tour V6 is equipped with an adjustable Fast Focus eyepiece (+/- 3.5 diopter adjustment) that allows you to focus the displayed data and icons relative to the viewed image from the monocular optics. Rotate the eyepiece until the display is in focus.
ACTIVE LASER
Crosshairs surrounding the aiming circle indicate that the laser is transmitted. Once a range is acquired, you can release the Power/Fire button. The crosshairs surrounding the circle will disappear once the Power/Fire button is released (i.e., the laser is not transmitting).
SLOPE SWITCH TECHNOLOGY (TOUR V6 SHIFT ONLY)
Slope-Switch Technology lets the golfer easily turn Bushnell’s patented Slope function on and off. The switch allows the golfer to conveniently utilize Slope to get compensated distances around the course when they want it and have a USGA-conforming device that is legal for tournament play when they need it.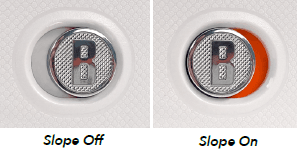
Slope mode is enabled by sliding the Slope Switch on the side of the Tour V6 Shift (model# 202321) to the left so the orange Slope indicator is visible and Bushnell’s patented Slope Technology is displayed. The Slope +/- mode will automatically compute an angle compensated range based on distance and Slope determined by the laser rangefinder and built-in inclinometer. This data is combined with internal algorithmic formulas dealing with average club use and ball trajectories. The angle compensated range provides direction on how to play the shot (i.e., add distance if an incline, subtract distance if a decline). Slide the Slope Switch right, and the Tour V6 now conforms to USGA Rule 14-3, with the Slope compensated ranging feature removed.
HOW TO USE SLOPE +/-™ (TOUR V6 SHIFT ONLY)
Move the Slope switch to the “Slope On” position. A second row of information appears on the display, confirming that you are now in slope mode. Next, press the Power/Fire button to obtain the distance to the flag or other objects. Once the range is displayed, release the Power/Fire button. Once the Power/Fire button is released, the grade percentage and compensated range will be displayed beneath the standard distance in the second row of numbers. For example, if the true distance is 160 yards, but with a slope of +6 percent, the Slope compensated (“play-as”) range is 168 yards.
THE ADVANTAGE OF SLOPE +/-™ (TOUR V6 SHIFT ONLY)
The distance to the black flag in the drawing (see below) is 160 yards. It is also 160 yards to the red flag, although it is on a slope with a 6% grade (uphill incline). However, if a golfer were to play this hole as 160 yards, the ball (X) would fall short of the hole/flag if the slope were not taken into account. Therefore, due to the slope, it should be played as a 168-yard shot. This distance displays the “play as” distance below the line of sight distance.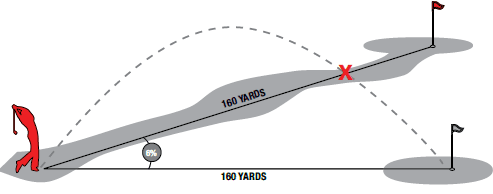
SETTING DISTANCE UNITS (Y OR M) & JOLT PREVIEW
To set the distance between Yards or Meters, press Fire/Power to turn the unit on, then press and hold the Mode button until the display blinks. Press the Mode to switch from Y (yards) or M (meters). Press the Fire/Power button to set the distance units.
This action initiates JOLT (vibration and visual ring in display), allowing you to preview/demo the effect of JOLT Technology without requiring you to fire the laser at a target.
BITE MAGNETIC MOUNT
The Tour V6 features a powerful BITE magnet incorporated into the right side of its housing, which allows the device to be securely attached to a golf cart bar or frame. Be sure to attach the rangefinder to the cart frame with the eyepiece at the one o’clock position. This positioning will ensure the magnet is properly aligned and engaged with the cart bar.
WARNING: THE BITE FEATURE INCLUDED WITH THE DEVICE CONTAINS A NEODYMIUM MAGNET. MAGNETS COULD AFFECT THE FUNCTIONING OF PACEMAKERS AND IMPLANTED HEART DEFIBRILLATORS. IF YOU USE THESE DEVICES, KEEP A SUFFICIENT DISTANCE FROM THE MAGNET. ALSO, WARN OTHERS WHO WEAR THESE DEVICES FROM GETTING TOO CLOSE TO MAGNETS.
- A magnet may permanently lose part of its adhesive force if exposed to temperatures above 175º F (80º C).
- Magnets produce a far-reaching, strong magnetic field. They could damage TVs, laptops, computer hard drives, credit and ATM cards, data storage media, mechanical watches, hearing aids, and speakers. Keep the unit away from devices and objects that have strong magnetic fields could damage.
- Magnets have strong magnetic fields that can pinch skin and fingers. So use caution when attaching the unit to a metal bar.
CLEANING AND GENERAL CARE
Your Bushnell Tour V6 laser rangefinder lenses are fully multi-coated for the highest light transmission. However, as with multi-coated optics, take special care to clean the lenses. Follow these tips for proper lens cleaning:
- Blow away any dust or debris on the lens (or use a soft lens brush).
- To remove dirt or fingerprints, clean with the supplied microfiber cloth rubbing in a circular motion. Using a coarse cloth or unnecessary rubbing may scratch the lens surface and cause permanent damage. The included washable microfiber cleaning cloth is ideal for cleaning your optics. First, breathe lightly on the lens to provide slight moisture, then gently rub the lens with the microfiber cloth.
- For a more thorough cleaning, photographic lens tissue and photographic-type lens cleaning fluid or isopropyl alcohol may be used. Always apply the fluid to the cleaning cloth – never directly on the lens.
- The rangefinder is water resistant but should not be exposed to heavy rain or other direct streams of water and will not withstand submersion in water or other liquids.
CAUTION: Use caution to avoid direct sunlight into the eyepiece to prevent damage to the display/internal components. When using the BITE magnet to attach the device to a cart bar or frame, tilt the device so the eyepiece aims towards the ground, not pointed upward towards the sun. When you are not using the device, please store it in the case for additional protection.
TROUBLESHOOTING
NEVER DISASSEMBLE YOUR LASER RANGEFINDER. IRREPARABLE DAMAGE CAN RESULT FROM UNAUTHORIZED SERVICE ATTEMPTS, VOIDING THE WARRANTY.
If the unit does not turn on or the display does not illuminate:
- Depress the Power/Fire button.
- Check and, if necessary, replace the battery. If the unit does not respond to button presses, replace the battery with a good quality CR2 3-volt Lithium battery.
If the unit powers down (the display goes blank when attempting to power the laser):
- The battery is either weak or low quality. Replace the battery with a new 3-volt lithium battery (CR2).
If target range cannot be obtained:
- Ensure the display is illuminated.
- Make sure that the Power/Fire button is being depressed.
- Ensure that nothing, such as your hand or finger, is blocking the objective lenses (lenses closest to the target) that emit and receive the laser pulses.
- Make sure the unit holds steady while depressing the Power/Fire button.
NOTE: The last range reading does not need to be cleared before ranging another target. Aim at the new target using the display reticle, depress the Power/Fire button, and hold until the new range reading is displayed.
TECHNICAL SPECIFICATIONS
| Dimensions | 4.5 x 3.07 x 1.61 in (114 x 78 x 41 mm) |
| Weight | Tour V6 – 8.5 oz (241 g) Tour V6 Shift – 8.7 oz (246 g) |
| Ranging Accuracy | Accurate to +/- 1 yd to 500 yds |
| Range | 5–1300 Yards / 5–1189 Meters |
| Magnification | 6x |
| Objective Diameter | 24 mm |
| Display | LCD w/illuminated Jolt indicator ring |
| Power Source | 3-volt lithium (CR-2) |
| Field Of View | 330 ft. @ 1000 yards / 110 meters @ 1000 meters |
| Extra Long Eye Relief | 16 mm |
| Exit Pupil | 4 mm |
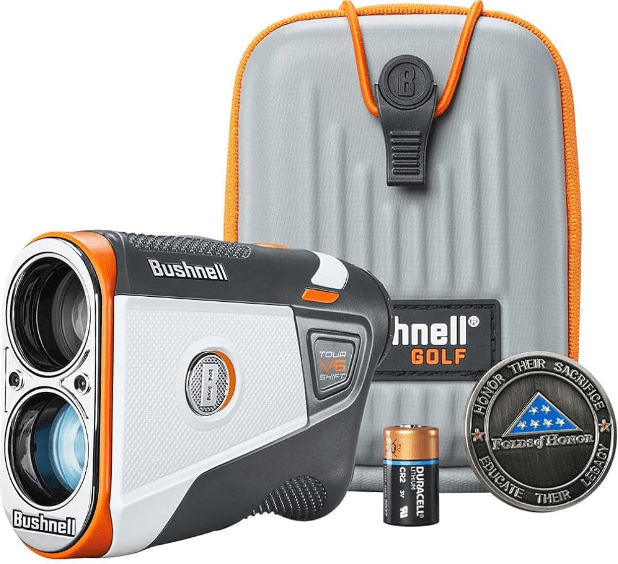
| Included Items | Premium Carrying Case and CR2 Battery |
http://bushnellgolf.com/patents
For more Manuals by Bushnell Golf, visit ManualsLibraryy
Bushnell Tour V6 Shift Golf Rangefinder-FAQs
What does the Bushnell Tour V6 Shift do?
The Bushnell Tour V6 Shift provides precise yardage within 1 yard, features PinSeeker with Visual JOLT for flag lock confirmation, and includes a magnetic cart mount for easy attachment.
How do I reset the Bushnell Tour V6?
To reset the device, press and hold both the bottom left-hand button and the power button for about 15 seconds until it turns off. Then, power it back on.
How do I switch between yards and meters on the Tour V6?
Use the side Y/M button—press the top for yards or the bottom for meters. The unit will display your selected measurement on the LCD screen.
How do I turn slope mode on or off?
Slide the slope switch to enable or disable slope mode. When slope mode is on, an extra row of information appears in the display.
Does the Bushnell Tour V6 have a built-in magnet?
Yes, the Tour V6 Shift includes a strong BITE magnetic mount that securely attaches the rangefinder to your golf cart.
What is slope on a rangefinder, and do I need it?
Slope calculates the adjusted distance based on elevation changes between you and the target. It’s helpful for more accurate club selection, especially on hilly courses.
Is the Bushnell Tour V6 Shift worth it?
Yes, it’s a top-tier rangefinder trusted by most PGA Tour professionals, known for its exceptional accuracy and reliability.
Why isn’t my Bushnell rangefinder reading distances correctly?
This may be due to physical impact or internal misalignment. Contact Bushnell customer support at 1-800-423-3537 for assistance.

