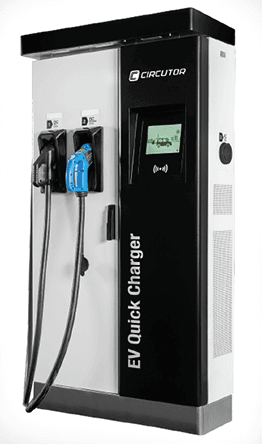
Circontrol Raption 50 Series EV Quick Charger
Read carefully all the instructions before using the Charge Point.
Important safety instructions
- Read all the instructions before using and configuring the Charge Point.
- Do not use the Charge Point for anything other than electric vehicle charging modes, are expected in IEC 61851.
- Do not modify the Charge Point. If modified, CIRCONTROL will reject all responsibility, and the warranty will be void.
- Comply strictly with the electrical safety regulations of your country.
- Do not make repairs or manipulations with the unit energized.
- Only trained and qualified personnel should have access to the electrical parts inside the Charge Point.
- Check the installation annually by a qualified technician.
- Remove from service any item that has a fault that could be dangerous for users (broken connectors, caps that don’t close…).
- Use only Circontrol-supplied spare parts.
- Do not use this product if the enclosure or the EV connector is broken, cracked, open, or shows any other indication of damage.
- Adaptors or conversion adapters, and cord extension sets are NOT allowed to be used.
Main features
- HMI: There is an 8-inch colour touch screen of 8 inches, which is the interface between the Charge Point and the user. Provides detailed information for starting and stopping the charge, including information concerning the recharge that is in progress (charge state of the battery, charging time remaining, etc).
- RFID: There is a radio frequency reader that allows user authentication to proceed with the recharging of the electric vehicle. At the discretion of the facility operator, the user’s recharge can also be allowed or denied.
- User Management: provides a database that associates users with one or more identification cards, and you can also assign consumption and charging logs.
- Beacon light: An LED beacon located above connectors, it is indicates the charging status of the socket/connector is indicated.
- Ethernet: the unit allows communication using TCP / IP on an Ethernet network, giving flexibility to the system operator and management of the Charge Point.
- Remote monitoring and control in real-time 3G/4G: it can be done through a remote device connection or make OCPP integrations thanks to the integrated modem. In addition, by using a standard Web browser, you can access the Charge Point to monitor the status of recharge and even run a Start / Stop remote.
- Historic charge transactions: The system is able to generate charging process reports, according to the historical database of the Charge Point.
- Energy metering: Integrated meter, independent for AC and DC, measures power and energy consumed by the EV during a charge session.
- OCPP integration: OCPP is a communication protocol between the Charge Point and management platforms (BackOffice) for comprehensive management of charging. This integration allows, among other things, management and user authentication as well as a variety of parameters to monitor during a recharge.
Features
Overview
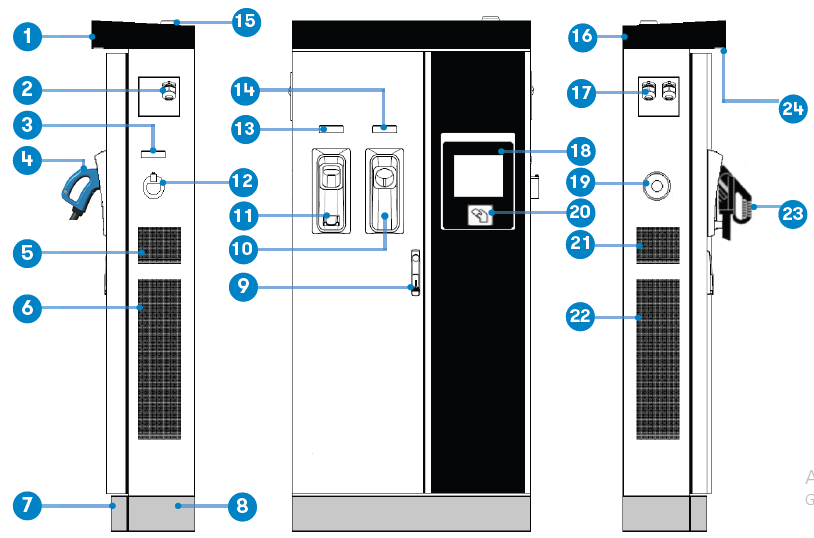
| 1- Cover | 2- Exit the AC cable | 3- AC light beacon | 4- CHAdeMO connector | 5- Unit air inlet |
| 6- Power Modules air outlet | 7- Decorative front panel | 8- Decorative rear panel | 9- Handle | 10- CHAdeMO holder |
| 11- CCS holder | 12- AC holder or socket 32A * | 13- CCS light beacon | 14- CHAdeMO light beacon | 15- Antenna |
| 16- Unit air outlet | 17- Exit DC cable | 18- Touch screen | 19- Emergency button | 20- RFID reader |
| 21- Unit air inlet | 22-PowerModules air inlet | 23- CCS connector | 24- Courtesy light |
Depending on the model, the components can vary.
Status Beacon lights
Over each connector, there is a beacon light that indicates the state of charge in which the socket/connector is located.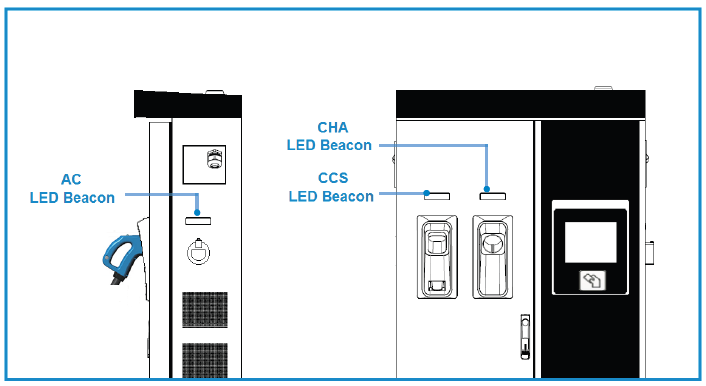
| Colour | Status | Description |
| Green | Available | The connector or socket is available to start a charging session |
| Blue | Charging | The connector or socket is performing a charging session |
| Cyan | Booked (OCPP 1.5) | The connector or socket has been booked by the system operator through OCPP.. |
| Red | Error | The Charging Station indicates that the emergency button has been activated or that some error has occurred. Check the HMI Screen and follow the instructions.. |
Connectors
The Charge Point is equipped with three connectors of different loads; these can recharge a large range of vehicles:
- AC (Mode 3): Type 2 tethered cable (63A/44kW) or Type 2 socket (32A/22kW)
- DC (Mode 4): CHAdeMO, Tethered cable, 3m. Until 125 A / 50 kW
- DC (Mode 4): Combo 2 (CCS), Tethered cable, 3m. Until 125 A / 50 kW
Depending on the model, the components can vary.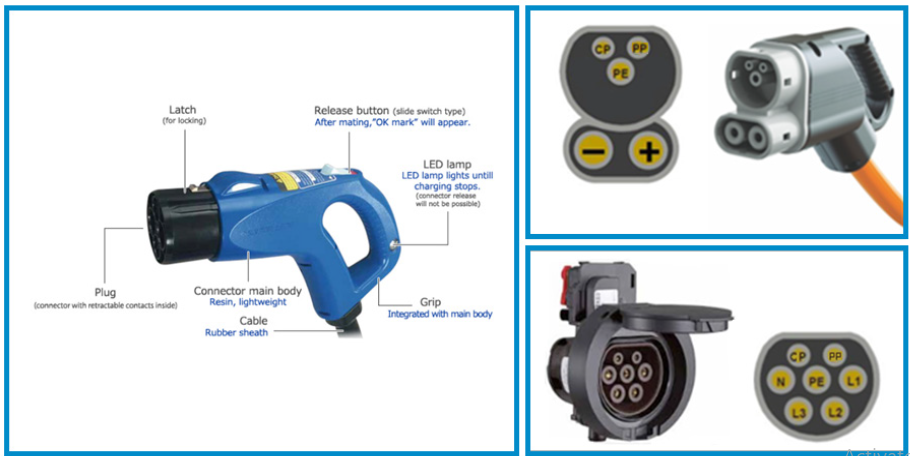
The following considerations, before using this Charge Point, must be considered.
Of the three types of charges that the Charge Point can perform, it can carry out:
- Only AC
- Only DC CHAdeMO
- Only DC CCS 2
- Simultaneously, AC and one DC connector at the same time
How to use it?
At this new screen, the Charge Point is asking to show the identification card or touch the screen, as you can see, there are two options.
The first option, showing the identification card, is the option that will allow initiating a ‘Charging session’ for the user who has been registered in advance or has the identification card.
The second option, touch the screen, is only to get information about the connector’s status and the charging process, to know the Charge Point availability, but you cannot start or do any action over the currently charging session.
Also, at this screen and during the entire process is possible to change the language, pressing on the top of the screen over the ‘Flag’ touch symbol.
The next screen will appear, press on your language’s flag.
Starting a charging session
Once you have shown your identification card, the HMI will show the next screen: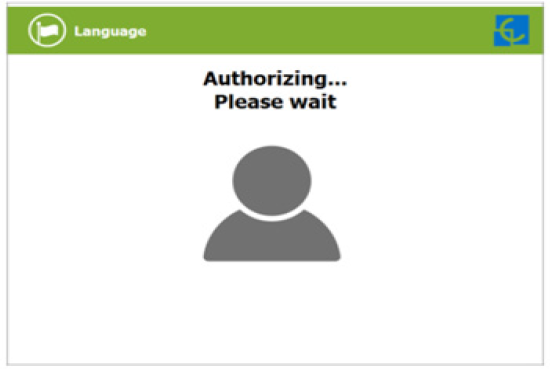
Wait while Charge Point performs identification.
If everything is correct and the user is authorized, the HMI will show the next screen: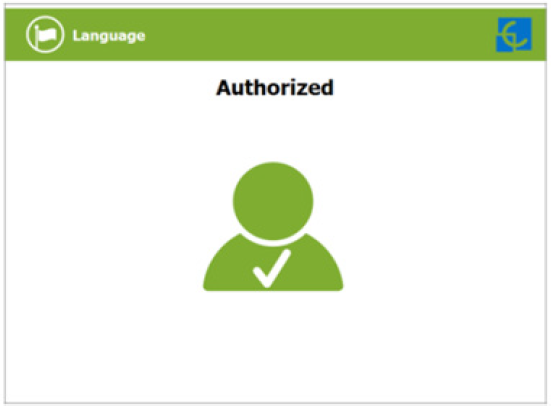
Now, the user can choose the connector, always depending on the sort of vehicle that they have, and if the connector status is available.
At any time is possible to press this button in order to go back to the “identification screen”.
Once you have chosen your connector, instruction screens will appear successively. Follow the instructions:
- Connect your vehicle and press the ‘Start’ button.
At any time is possible to press this button in order to go back to the previous screen.
- Checking vehicle connection… Please wait
In a few seconds, the charging session will start, and the HMI will show the charging process.
Pressing the home button, the screen will go back to the “identification screen”.
Special events start a charge.
- “Not authorized”: some Charge Points could be working under the supervision of the main management system, called Back Office. It can generate a whitelist in order to register new users, manage charging sessions, etc.
- “Authorization failed”: if there is a communication problem with the Back Office at the time.
- “Not authorized, Concurrent charge”: In this case, the identifier is already involved in another charge transaction.
- “Not authorized, Authorization expired”: The back office may have set the deadline for your identification card, and this date has already expired.
- “Not authorized, Authorization blocked”: It is possible that the back office has temporarily blocked your identification card.
- After the user has been properly authorized and just at the moment that they have to choose the connector, the screen will show the connector’s status, it could appear some problems may appear. It is possible to use the connector painted in dark grey, but it will be impossible to use any connector with another symbol or light grey, like the next one.
- Another issue that can occur is “Vehicle not detected”, unlock the connector, connect again, and press over ‘Retry’ button.
- Almost all vehicles cannot be charged if the shift lever is not in the parking mode position. This situation can be detected for the Charge Point, and it will be displayed by HMI as “Please, check vehicle shift position, put in parking mode”, after pressing over ‘Retry’ button.
- It is possible that the problem that appears is not a concrete one; the HMI will show the next screen, and press over ‘Retry’ button.
Stopping a charging session
- The HMI is showing the charging process, and the next message “Show your identification to stop”, the session can be stopped by the same user who started it.
- After showing your identification card, the Charge Point will allow you to stop the charging session by pressing the ‘Stop’ touch button.
- Once you have stopped the charging session, the HMI will show the summary screen, press the ‘Exit’ touch button, and disconnect your vehicle.
Charging information
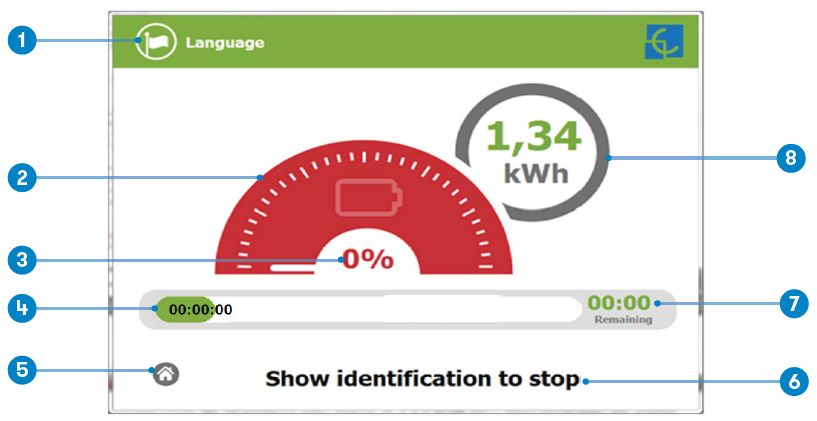
Depending on the kind of charging that has been done, either AC or DC, the HMI screen can show different process information.
There is different information for AC (mode 3), DC (CCS), and DC (CHAdeMO); the following images show the basic charging process information.
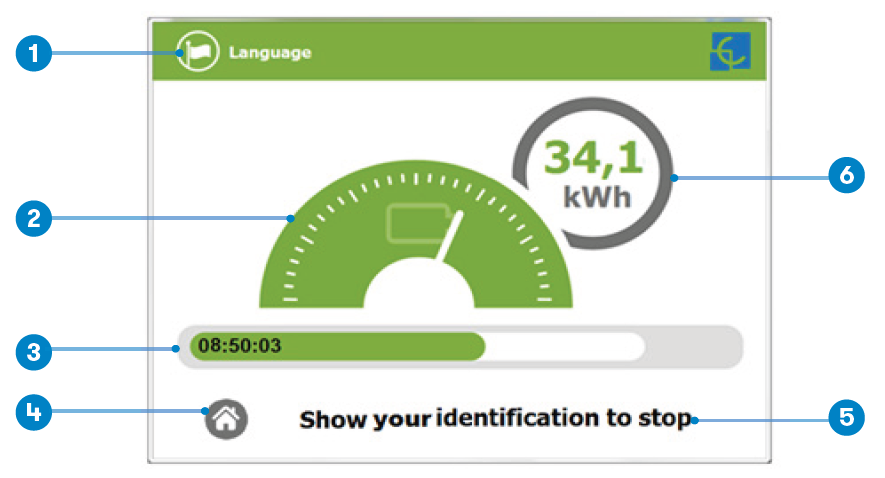
CHARGING AC (MODE 3)
- Language button: pressing this button, it is possible to change the HMI language.
- Analog process indicator: at first moment it is red, as the vehicle is charging, it will change to green, passing before for orange.
- Charge time with status bar: charging time elapsed so far.
- House touch button: it goes back to the “identification screen”.
- Additional information: current status, errors, battery status, etc.
- Energy charged: energy supplied to the vehicle so far.
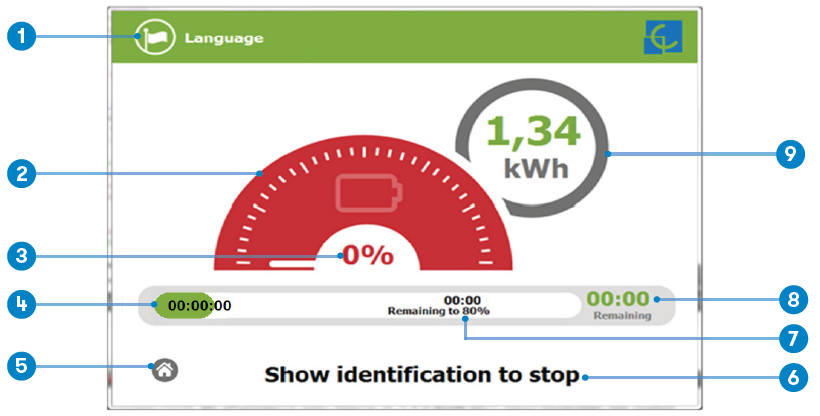
CHARGING DC (CCS)
- Language button: pressing this button, it is possible to change the HMI language.
- Analog process indicator: at first moment it is red, as the vehicle is charging, it will change to green, passing before for orange.
- Battery SOC: It indicates the current battery state of charge.
- Charge time with status bar: charging time elapsed so far.
- House touch button: it goes back to the “identification screen”.
- Additional information: current status, errors, battery status, etc.
- Remaining time until 80 %: remaining time until getting 80 % of the SOC.
- Remaining time until 100 %: remaining time until 100 % of the SOC.
- Energy charged: energy supplied to the vehicle so far.
CHARGING DC (CHADEMO)
- Language button: pressing this button, it is possible to change the HMI language.
- Analog process indicator: at first moment it is red, as the vehicle is charging, it will change to green, passing before for orange.
- Battery SOC: It indicates the current battery state of charge.
- Charge time with status bar: charging time elapsed so far.
- House touch button: it goes back to the “identification screen”.
- Additional information: current status, errors, battery status, etc.
- Remaining time until 100 %: remaining time until 100 % of the SOC.
- Energy charged: energy supplied to the vehicle so far.
Emergency button
If, for any reason, the Emergency button has been pressed, the beacon lights are red, and it will not be possible to do any charging. All the power modules will shut down to protect the user and their own Charge Point. The HMI screen will remain powered up in order to show the instructions.
At first, the ‘Restart’ touch button will be in light grey and it will not be able to be pressed. Once you have unlocked the emergency button, the ‘Restart’ touch button will be green and able to be used.
Errors
The Charge Point can report different sorts of errors, which can be from different parts or devices within it.
When the ‘Error screen’ appears, the ‘Information’ touch button has to be pressed to see the error message.
Introduction
The Charge Point can be configured and monitored to establish owner preferences or a specific setup using the integrated Ethernet communication port allocated in the HMI screen device.
Once Service PC is procedure belowding a to the procedure below the procedure a and connection established with the Charge Point, direct access to the main setup page will be shown.
The Charge Point is shipped from the factory with the default network setting of “DHCP enabled”. It means that the Charge Point will try to obtain an IP address from a DHCP server available on the network.
The step-by-step guide below details the setup of an IP address to the Charge Point in case there is no DHCP server available on the network.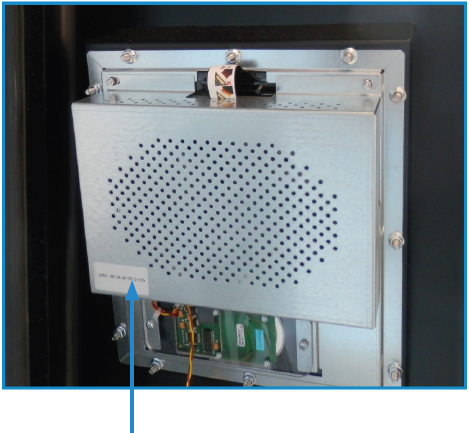
The Ethernet port is located at the bottom left side of the rear part of the HMI screen.
LAN connection procedure
This section provides a step-by-step guide to connect the Service PC to the Charge Point in order to see a real-time status.
- On the Service PC, click on the ‘Network icon’ next to the clock of the taskbar, and click on ‘Open Network and Sharing Center’.
- On the left pane, click on ‘Change adapter settings’.
- Make a right click on ‘Local Area Connection’ and then click on ‘Properties’.
- Select ‘Internet Protocol Version 4 (TCP/IP)’ option and click on ’Properties’.
- Set up the IP address and subnet mask as shown below, and click ‘OK’ twice to complete the IP address process for the computer.
- Now, execute the IPSetup.exe software provided on the Service PC.
- Enter the following parameters and click on ‘Configure’
- MAC of the Charge Point (see label on the cover screen)
- IP address: i.e.(192.168.1.50)
- Netmask: i.e. (255.255.255.0)
- Gateway: leave default settings.
- Wait 30 seconds approximately until the process is complete.
- The process will complete when the following message appears: click on ‘OK’.
- If the message shown is the next one, check the following parameters and click on ‘OK’.
- Check the IP address entered.
- Check the MAC of the device entered.
- Try with another UTP CAT5e cable.
Monitoring
CirCarLife client – Connection
Steps:
- Execute the CirCarLife Client software on your computer
- Push on ‘General’ tab, and after on ‘Connect’ tab
- Enter the IP address given to the Charge Point and port number 80, and press ‘Ok’
Once you have done the previous steps, it is possible to monitor the Charge Point.
CirCarLife client – Events
CirCarLife Scada client enables current events to be viewed in real time, both the simple events that are active and those that must also be acknowledged by the user.
NOTE: This option is not available for Raption’s Series because all these functions can be done by OCPP.
Need help?
In case of any query or need for further information, please contact our Post-Sales Department.
(+34) 937 362 940
(+34) 937 362 941
For more Manuals by Circontrol, visit ManualsLibraryy
Circontrol Raption 50 Series EV Quick Charger-FAQs
How do I start charging my EV with the Raption 50 charger?
Simply plug the charging cable into both the charger and your vehicle. Then, start the session using your RFID card or the E.ON Home app. Refer to your vehicle’s manual if you encounter issues.
Why isn’t my EV charging even though it’s plugged in?
The most common reason is a damaged charging cable or connector. Check the cable for visible wear or damage. Try a different cable to see if the issue resolves.
How do I know when my EV is fully charged?
Check your vehicle’s dashboard charge indicator. Start the car, tap the start button, and wait for the digital charge gauge to light up.
What are the most common EV charger problems?
Improper or faulty charger installation is a frequent issue. This can lead to poor connectivity, intermittent charging, or electrical faults.
How can I stop the charging process?
To stop charging, use the power button, touchscreen, app, or RFID card. Then, press the release button on the charger handle to unlock and disconnect the cable.
What should I do if my EV charger isn’t working?
Check the power supply first. Inspect your circuit breaker panel to ensure no breakers are tripped. A lack of power can prevent the charger from operating.
Is it better to charge an EV slowly or quickly?
Slow charging is better for long-term battery health, though it’s much slower. Use fast charging like the Raption 50 for quicker top-ups when you’re short on time.
What’s the difference between Type 1 and Type 2 connectors?
1. Type 1 (J1772): Single-phase, common in North America and Japan.
2. Type 2 (Mennekes): Common in Europe, supports both single- and three-phase charging, and offers faster speeds.

