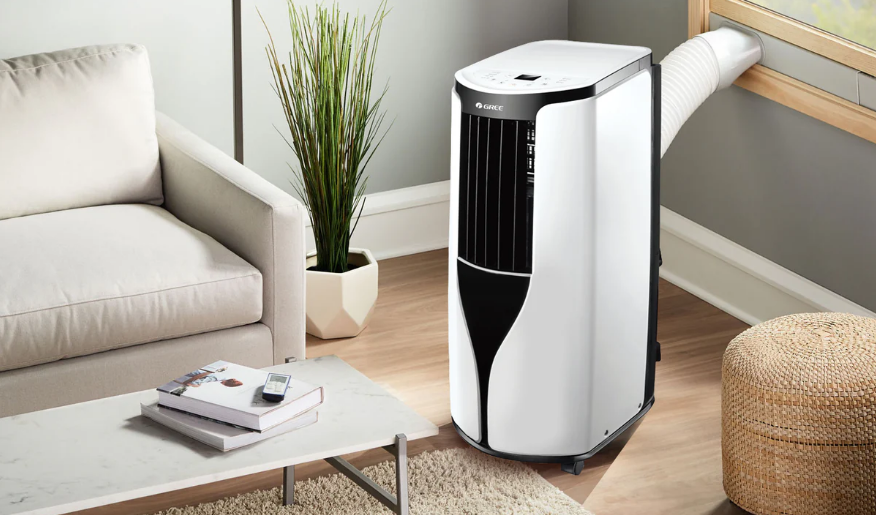
Gree G1712PACSHCA Portable Room Air Conditioner
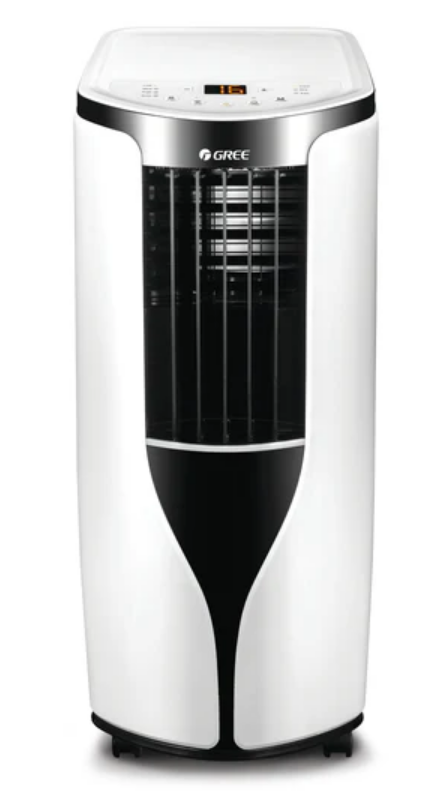
SAFETY INFORMATION
Electrical Information
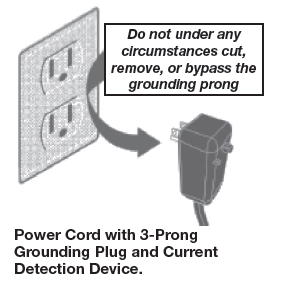
- The power cord is equipped with a 3-prong Grounding Plug, which can only be used with a standard 3-prong wall outlet to minimize the possibility of an electric shock hazard. Where a 2-prong outlet is encountered, it is your responsibility to have it
replaced with a properly grounded 3-prong wall outlet. - Do not use a power cord that shows damage or cracks along the length or at the connector. A damaged power cord should be replaced with a new cord obtained from the manufacturer. Please contact Customer Service for replacement options.
- Do not modify the power cord length or share an outlet with another appliance. This may cause an electric shock or fire.
- Always use a dedicated power circuit. The voltage on the outlet should match the voltage rating on the rating plate.
- Do not use the outlet if it is loose or damaged. It may cause an electric shock.
- Never use an extension cord, surge protector, or multi-outlet adapter with this unit.
Operation of Current Device
The power cord contains a current device that senses damage to the power cord. To test your power cord, do the following:
- Plug in the Air Conditioner.
- The power cord has TWO buttons on the 3-Prong Grounding Plug. Press the TEST button. You will notice a click as the RESET button pops out.
- Press the RESET button, and you will hear a click as the button engages.
- The power cord is now supplying electricity to the unit. (On some products, this is also indicated by a light on the 3-Prong Grounding Plug.)
NOTE:
- Do not use the power cord to turn the unit on or off.
- Always make sure the RESET button is pushed in for correct operation.
- The power cord must be replaced if it fails to reset when either the TEST button is pushed or it cannot be reset. Please contact Customer Service.
- If the power cord is damaged, then it cannot be repaired. It MUST be replaced with a new power cord. Please contact Customer Service.
INSTALLATION INSTRUCTIONS
Where to Install the Unit
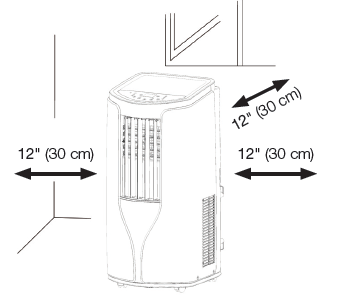
- Ensure there is no obstruction near the air inlet or air outlet.
- This unit is for indoor use only.
- This unit must be positioned so that the plug is accessible.
- Reserved space around the air conditioner should be at least 12″ (30 cm), see image.
- Place the air conditioner on a level and flat surface for operation and avoid inclining or tipping the unit.
- This unit is equipped with casters.
- Do not place the unit on an elevated surface
Unit Overview
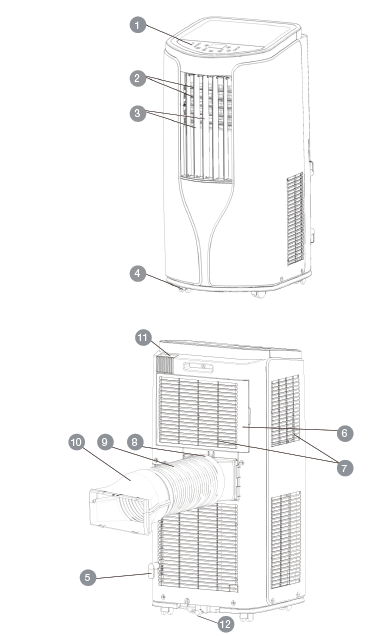
- Control Display
- Horizontal Louver Adjustment
- Vertical Louver Adjustment
- Caster
- Power Cord Storage Hook
- Filter Cover
- Air-inlet
- Exhaust Hose Connection
- Exhaust Hose
- Exhaust Nozzle
- Remote Control Storage Pocket
- Drainage Port
Parts and Tools Needed
Parts
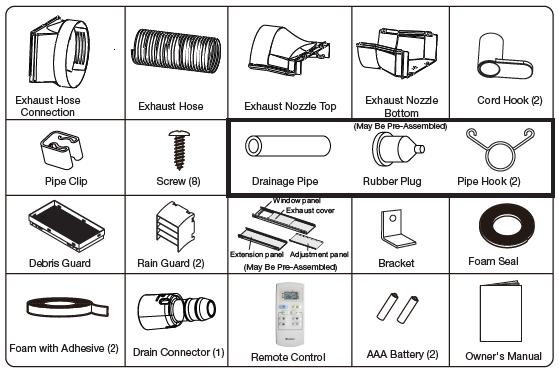
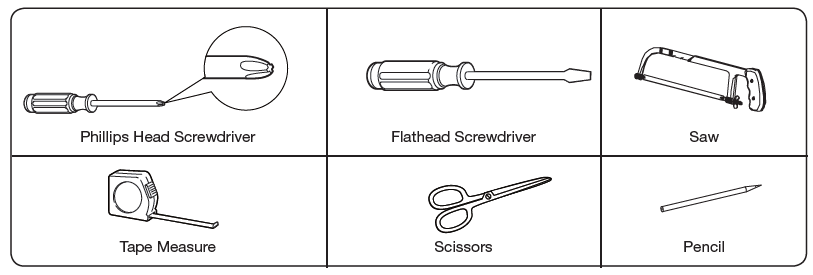
Tools
Cord Hook Installation
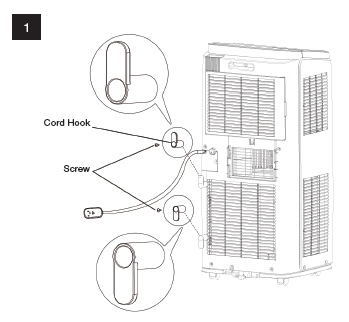
Install the Cord Hooks at the back of the unit with 2 screws. The top Cord Hook
should face upward, and the bottom Cord Hook should face downward.
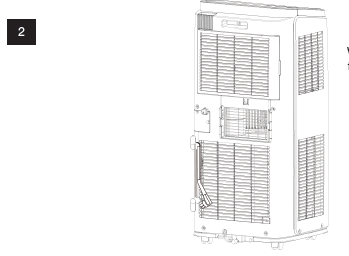
Wind the power cord around the Cord Hooks.
Drainage Pipe Installation

Remove the Rubber Plug at the Drainage Port, and fix the Pipe Clip on the right rear side of the unit near the Drainage Port. Fix the Pipe Clip with a Screw.
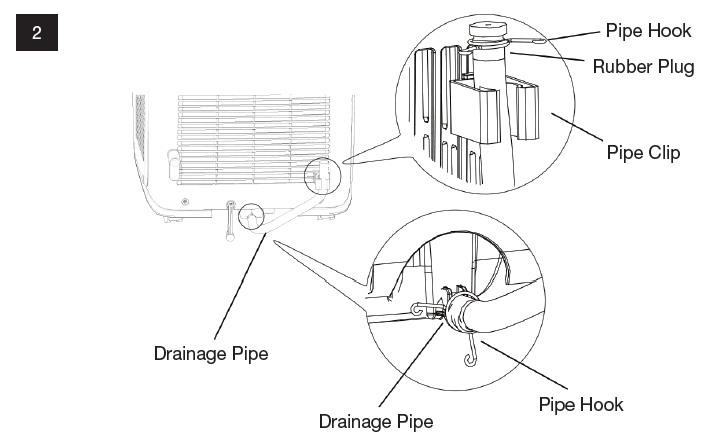
Put the Drainage Pipe into the Drainage Port, and tighten the Screw. Then bind with a Pipe Hook. Put the Rubber Plug into the other side of the Drainage Pipe, connect it with the Pipe Hook, and then connect it with the Pipe Clip.
Vertical Double Hung Window
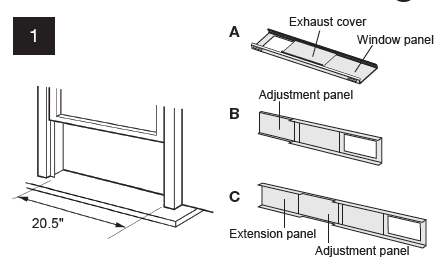
Open the window and measure the width inside the window frame.
- A) For windows with an inner width of 20.5″ (52.07 cm)
- B) For windows with inner widths over 20.5” (52.07 cm) up to 37.5” (95.2 cm), insert the Adjustment Panel
- C) For windows with inner widths over 37.5” (95.2 cm) up to 56.7” (144 cm), insert the Adjustment Panel and Extension Panel.
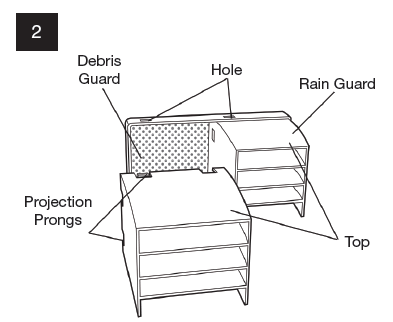
Connect both Rain Guards to the Debris Guard. Insert all 3 tabs on the Rain Guard
into the holes in the Debris Guard. Ensure the curved side is on TOP.
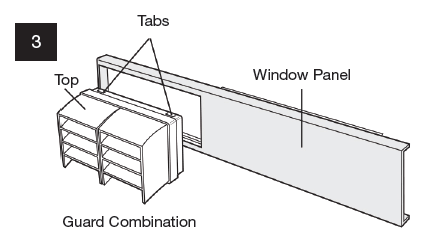
Attach the Guard Combination to the back side of the Window Panel. Push the Guard Combination securely into the Window Panel to ensure that it fits securely.
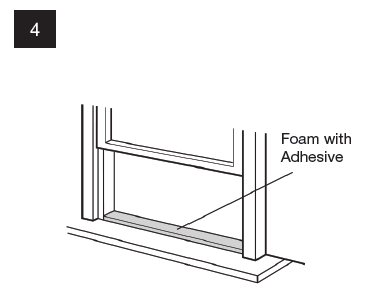
Cut the Foam with Adhesive to fit the length of the window and attach to a window sill.
Horizontal Sliding Window

- The Window Panel cannot be installed in windows less than 20.5″ (52.07 cm) high.
- Secure the Window Panel to the window sill with 2 Screws.
- Inner height of the window: 20.5″ (52.07 cm)- 37.5″ (95.2 cm)
- Adjustment Panel was added, secure the Window Panel to the window sill with 3 Screws.
- Inner height of the window: 37.5″ (95.2 cm) – 56.7″ (144 cm)
- Adjustment Panel and Extension Panel were added, secure the Window Panel to the window sill with 4 Screws.

- A) Cut Foam with Adhesive to the length of the window and attach to the top of the Window Panel.
- B) Close the window sash securely against the Window Panel.
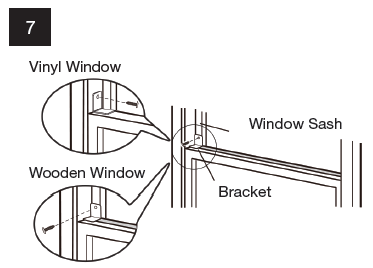
Fix the inner window with Bracket and 1 Screw, so that it cannot slide vertically. It is recommended that you attach the Bracket to the top of the window sash.
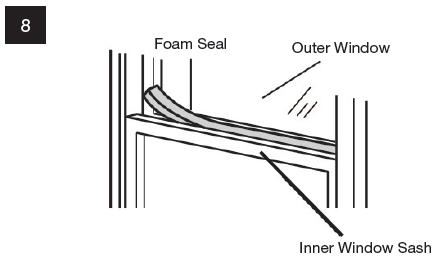
Cut the Foam Seal to a proper length and seal the gap between the upper part of the inner window sash and the outer window sash.
Horizontal Sliding Window
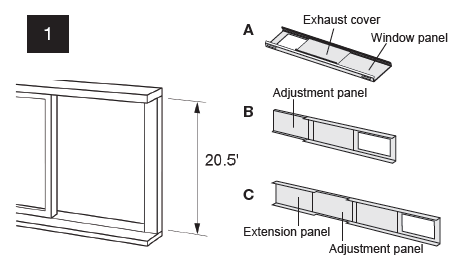
Open the window and measure the height inside the window frame.
- A) For windows with an inner height of 20.5″ (52.07 cm)
- B) For windows with inner height over 20.5” (52.07 cm) up to 37.5” (95.2 c,m) insert the Adjustment Panel
- C) For windows with inner height over 37.5” (95.2 cm) up to 56.7” (144 cm), insert the Adjustment Panel and Extension Panel.
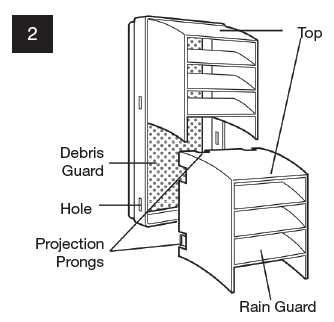
Connect both Rain Guards to the Debris Guard. Insert all 3 tabs on the Rain Guard into
the holes in the Debris Guard. Ensure the curved side is on TOP.
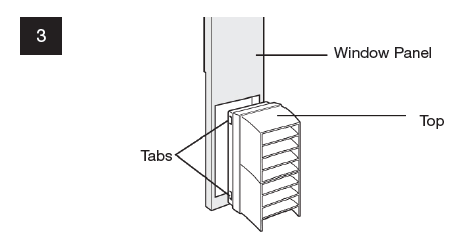
Attach the Guard Combination to the back side of the Window Panel. Push the Guard Combination securely into the Window Panel to ensure that it fits securely. Note: Ensure the TOP of the Guard Combination faces up. The Guard Combination faces the outside.
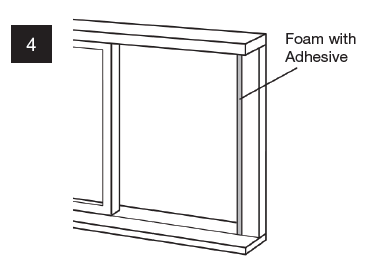
Cut the Foam with Adhesive to fit the length of the window and attach to the window sill.

- The Window Panel cannot be installed in windows less than 20.5″ (52.07 cm) high.
- Secure the Window Panel to the window sill with 2 Screws.
- Inner height of the window: 20.5″ (52.07 cm)- 37.5″ (95.2 cm)
- Adjustment Panel was added, secure the Window Panel to the window sill with 3 Screws.
- Inner height of the window: 37.5″ (95.2 cm) – 56.7″(144 cm)
- Adjustment Panel and Extension Panel were added, secure the Window Panel to
the window sill with 4 Screws.
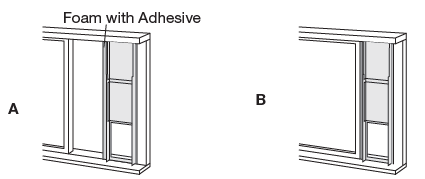
- A) Cut Foam with Adhesive to the length of the window and attach to the top of the Window Panel.
- B) Close the window sash securely against the Window Panel.
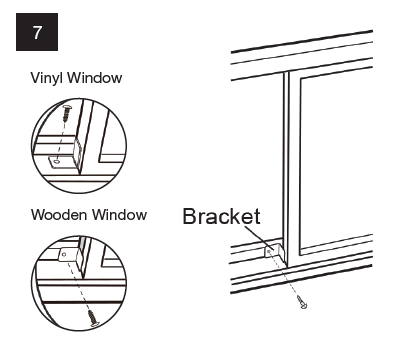
Fix the inner window with Bracket and 1 Screw, so that it cannot slide horizontally.
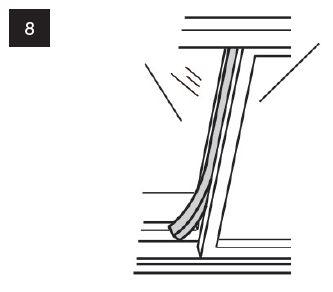
Cut the Foam Seal to a proper length and seal the gap between the upper part of the inner window sash and the outer window sash.
INSTALLATION AND DISASSEMBLY
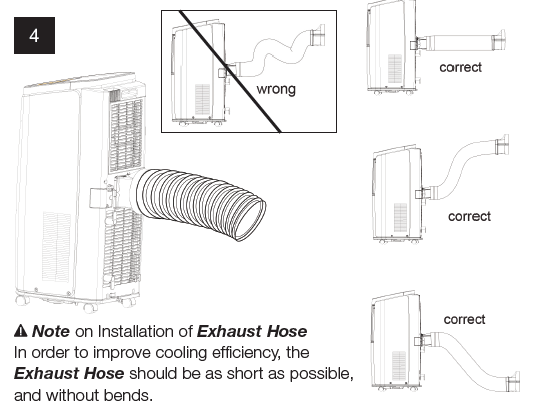
Exhaust Hose Connection
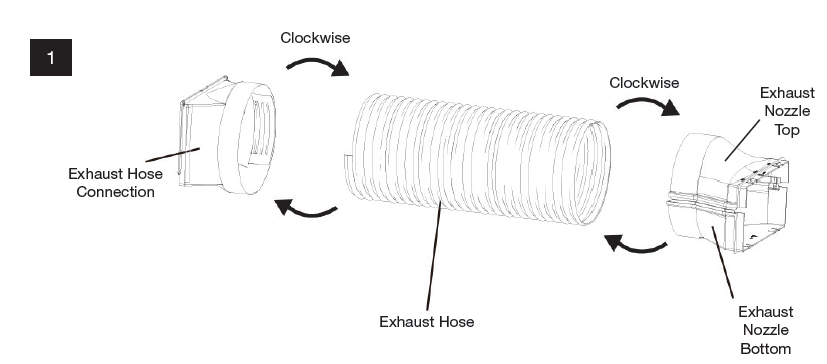
Rotate the Exhaust Hose Connection and the Exhaust Nozzle clockwise into the opposite ends of the Exhaust Hose.
Slide the Exhaust Hose Connection into the grooves located on the back of the unit.
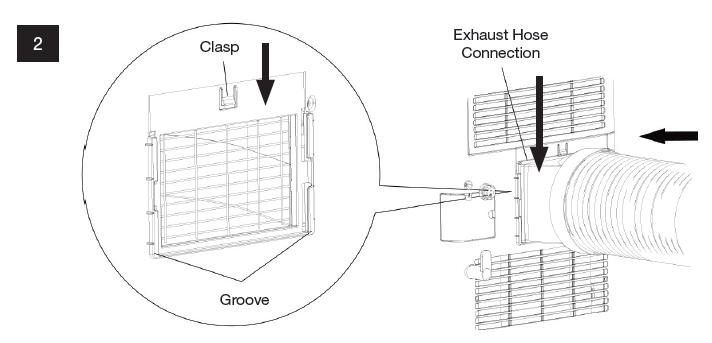
Exhaust Hose Connection
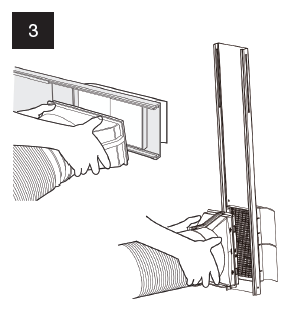
Slide open the Exhaust Cover on the Window Panel and attach the Exhaust Nozzle.
Exhaust Hose Removal
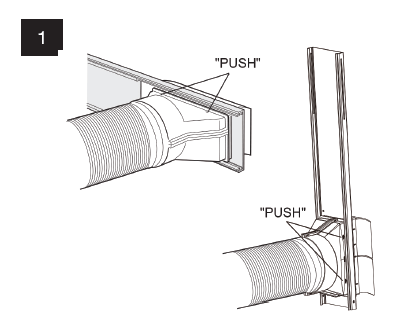
Remove the Exhaust Nozzle by pushing down on the sides marked “Push.” Slide the Exhaust Cover close on the Window Panel.
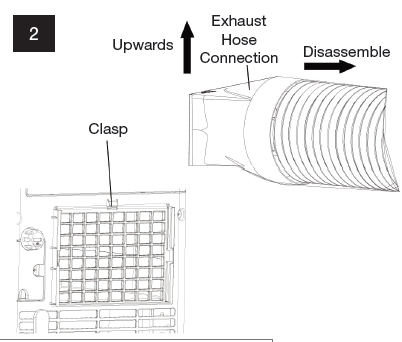
Remove the Exhaust Hose Connection by grasping and lifting the Exhaust Hose Connection upwards.
Features of Your Portable A/C
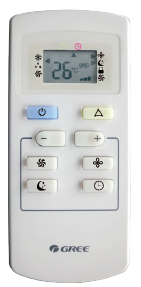
- LCD Remote Control: LCD remote control displays all settings.
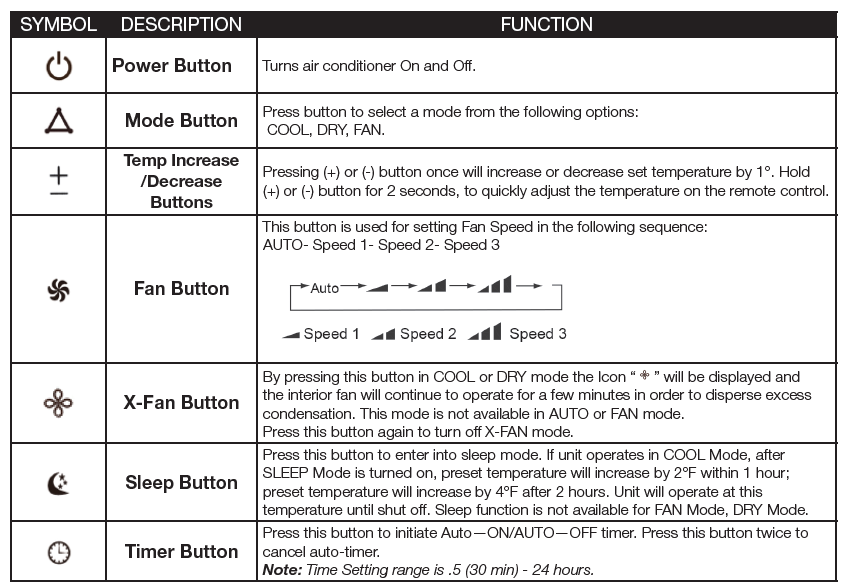
- X-Fan Button On Remote Control By pressing this button in COOL or DRY mode, the Icon will be displayed and the interior fan will continue to operate for a few minutes in order to disperse excess condensation. This mode is not
available in AUTO or FAN mode. Press this button again to turn off X-FAN mode. - Programmable Digital Thermostat.For precise comfort control. Select the exact desired temperature for maximum comfort.
- 24-Hour Programmable Clock Timer.. While in OFF mode, de enables the user to set a specific time for the unit to turn on. When in ON mode enables the user is enabled to set a specific time for the unit to turn off.
- 3 Speed Fan & Auto Fan allows for more comfort settings. The auto fan automatically sets the fan speed based on the current room temperature and thermostat setting for maximum comfort.
- Sleep Mode automatically increases the set temperature 2°F after the first hour and another 2°F after the second hour. This feature limits compressor usage and conserves energy.
- Loss of Power Protection with Auto Restart remembers all settings when power is interrupted. As soon as power is restored, the A/C will operate in the mode, temperature, and settings before power loss.
- Evaporative Exhaust Technology and Evaporative Dehumidifier (DRY Mode) Evaporative technology removes moisture from the air and drips onto the condenser. The condenser evaporates the water and blows it out of the exhaust hose with the hot air. If the water is not fully evaporated, it is dripped into a small pan and then pumped back up to be evaporated by the condenser.
- Child Lock Function: Pressing the “+” and “-” buttons simultaneously can turn on or turn off the child lock function. When the child lock function is started up, “ “ icon will be displayed on the remote control and will not send a signal.
OPERATING INSTRUCTIONS
Function & Control Display
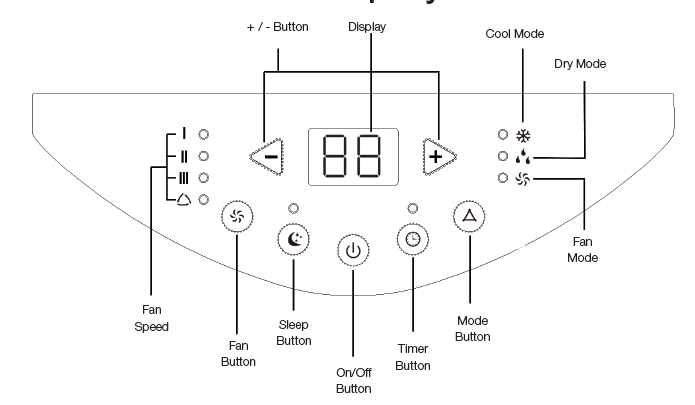
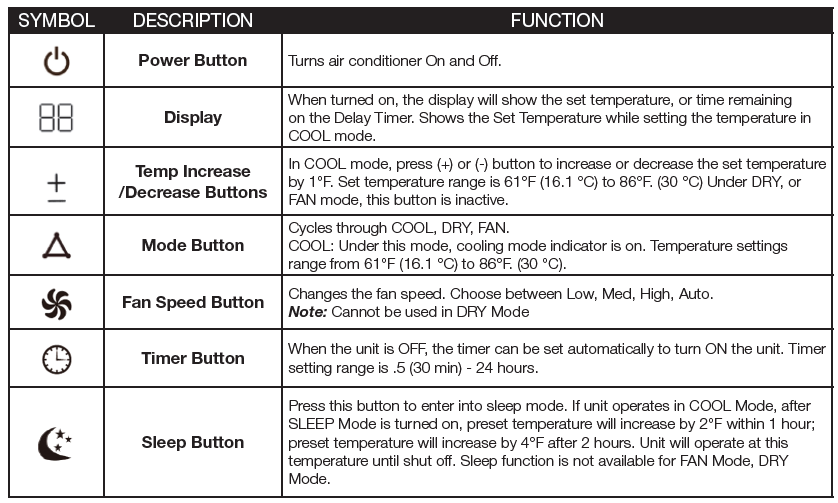
Remote Control Operation
To Change Air Flow Direction
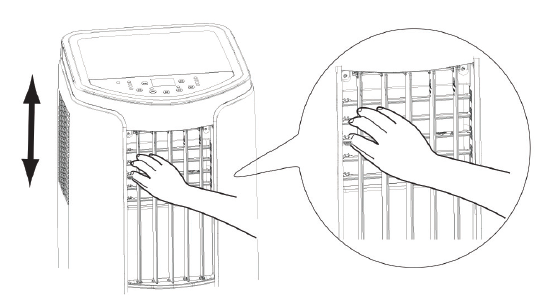
Horizontal Louver Adjustment: Hold the Horizontal Louver as shown in the diagram and adjust the air flow direction.
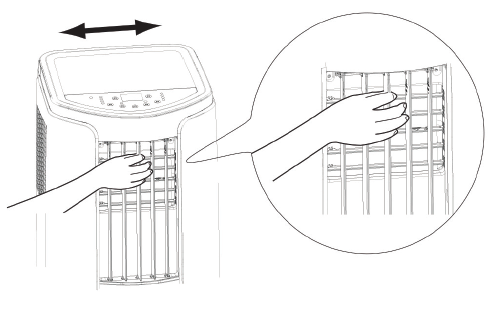
Vertical Louver Adjustment: Hold the Vertical Louver as shown in the diagram and adjust the air flow direction.
CLEANING AND MAINTENANCE
General Maintenance
- Make sure there is no accumulated water in the chassis and the heat discharge pipe is disassembled. If water appears, please see “Remove Collected Water” on page 22.
Cleaning the Filter
- Remove the filter(s) as shown in the figure below.
- Use cleaner or water to clean the filter(s). If the filter(s) are very dirty, use warm water to clean them, then place the filter(s) in a shady place to dry.
- After the filter(s) are clean and dry, reinstall the filter(s).
- The filters(s) should be cleaned once every three weeks. If there is a lot of dust in the operating environment, clean it more frequently.
- Do not use a hair dryer to dry filter(s).
- Do not operate the air conditioner when the filter(s) are not installed.
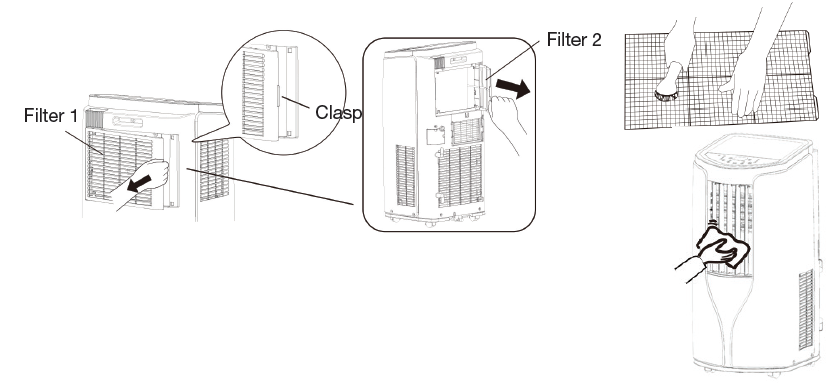
Cleaning the Outer Case
- If there is dust on the outer case, use a soft towel to wipe it off and remove the dust.
- If the outer case is dirty, then use mild detergent to wipe it.
- Use a cleaner or soft brush to clean the grill.
Remove Collected Water: Continuous Drainage Lower Hole Option
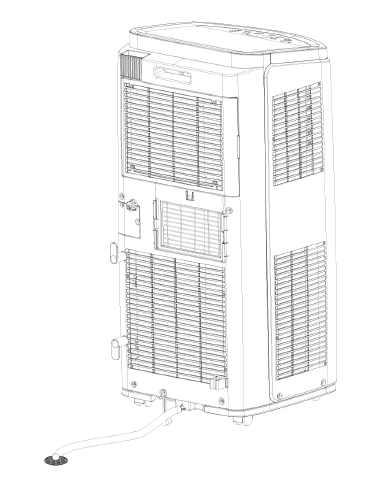
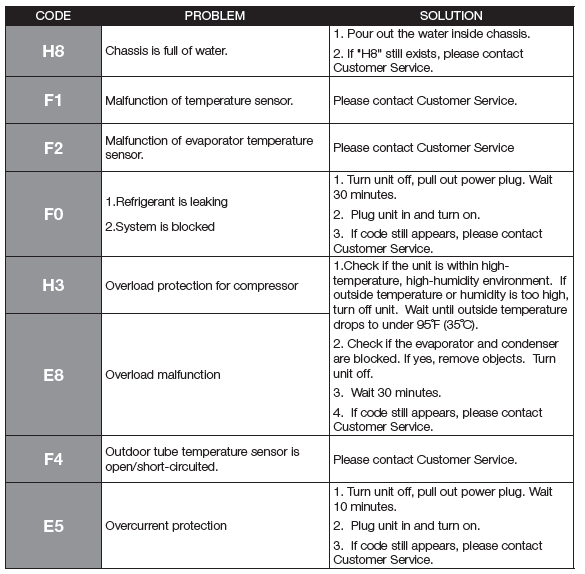
During cooling or drying operations, water will condense and drain into the chassis. When the chassis is full of water, a buzzer will sound and “H8” will display on the unit.
- Move the unit to a suitable place, and keep the unit horizontal.
- Take the Drainage Pipe from the Pipe Clip, and pull out the Rubber Plug in the Drainage Pipe to discharge the water.
- After discharging the water, replace the Rubber Plug in the Drainage Pipe and then place the Drainage Pipe onto the Pipe Clip.
- After the water is removed and the compressor has been stopped for 3 minutes, the unit will resume operation.
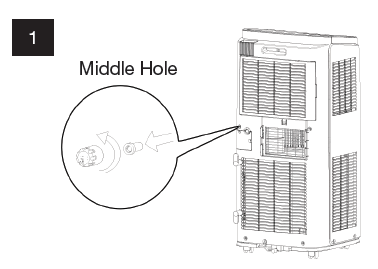
Remove the Continuous Drain Cap by turning it counterclockwise, then remove the Rubber Plug from the spout.
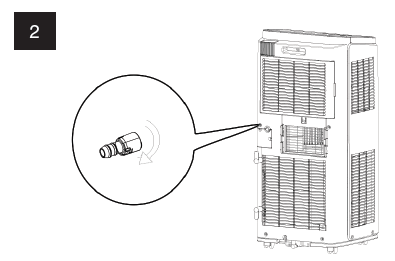
Screw the Drain Connector (included in the package) to the spout by turning clockwise.
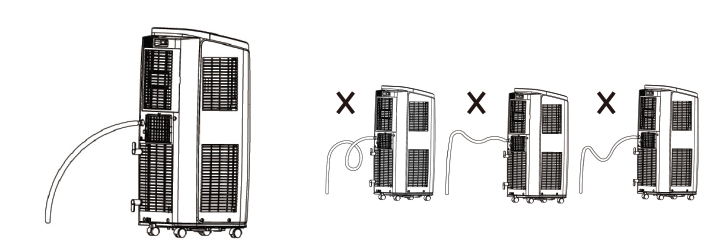
Insert the Drainage Hose into the Drain Connector.
Remote Control Battery Replacement
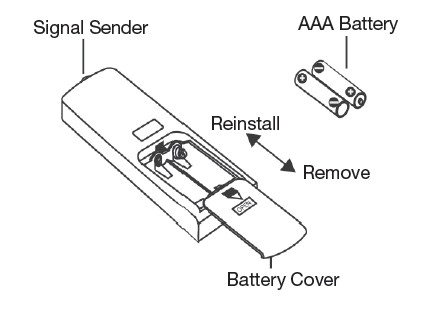
Replacement of Batteries in Remote Control
- Press the back side of the remote control marked with OPEN, as shown in the figure, and then push out the BATTERY COVER of the battery box along the arrow direction.
- Replace two (AAA 1.5V) dry batteries, and make sure the positions ofthe “+” polar and “-” polar are correct.
- Reinstall the BATTERY COVER of the battery box.
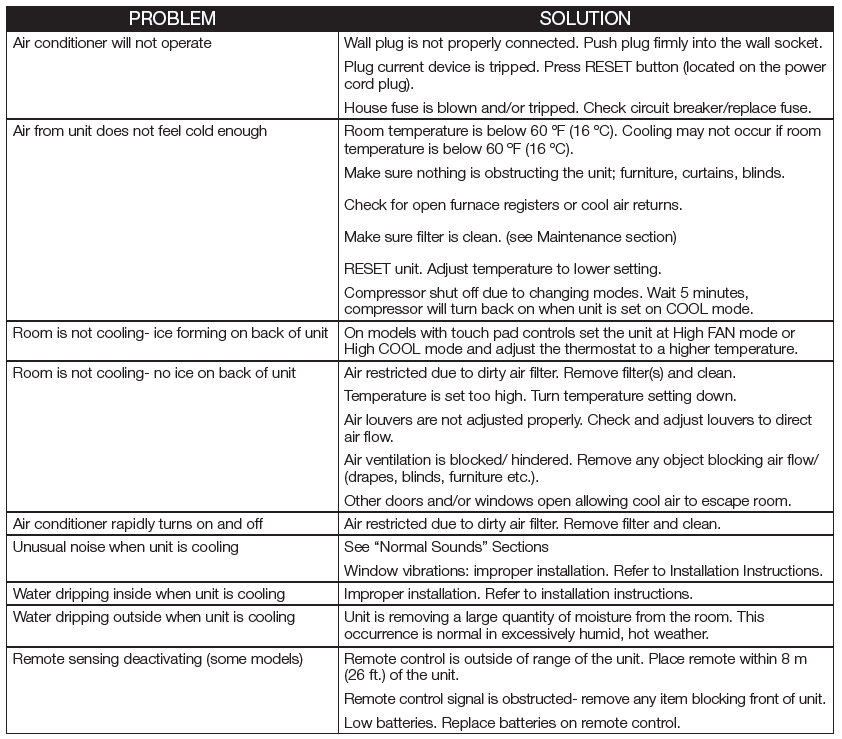
BEFORE YOU CALL
Malfunction Code
FOR MORE MANUALS BY GREE, VISIT MANUALSLIBRARYY
Gree G1712PACSHCA Portable Room Air Conditioner’s
What do the symbols on my Gree portable AC mean?
The symbols represent different modes:
🌞 Sun: Heat mode
❄️ Snowflake: Cool mode
💧 Raindrop: Dry mode (dehumidifier)
How can I use my Gree air conditioner without the remote?
Open the front panel of the unit and locate the AUX button on the right side. Press it to turn the unit ON or OFF.
Which AC mode should I use for the best cooling?
Use Cool mode in hot weather, Dry mode in humid conditions, and Eco mode to save energy. Turbo mode offers fast cooling, while Sleep mode provides comfort and energy savings at night.
How do I know if my portable AC needs to be drained?
If your unit suddenly stops cooling or shuts off unexpectedly, it likely needs to be drained.
Why won’t my Gree AC turn on?
Check thermostat settings, clean the air filter, and ensure the power supply is working. If problems persist, such as a refrigerant leak or faulty motor, contact a technician.
Why does my AC stop cooling after a few minutes?
This could be due to an overheating compressor caused by dirt buildup or a refrigerant issue. A faulty thermostat may also be the reason.
Why isn’t my AC cooling the room properly?
Clogged filters from dust, pollen, or pet hair can block airflow. Cleaning or replacing the filters usually resolves the problem.
When is it too cold outside to run the AC?
Avoid using the AC when the outdoor temperature drops below 60–65°F (15–18°C). Doing so may reduce efficiency and strain the system.
Which AC mode helps save electricity?
The Eco mode (or energy-saving mode) reduces compressor activity and power usage, making it the most efficient setting for lower energy bills.

