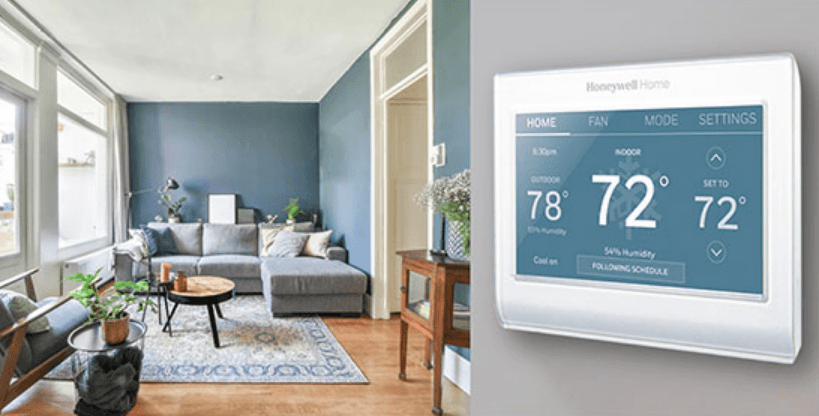
Honeywell WIFI Smart Color Touchscreen Programmable Thermostat
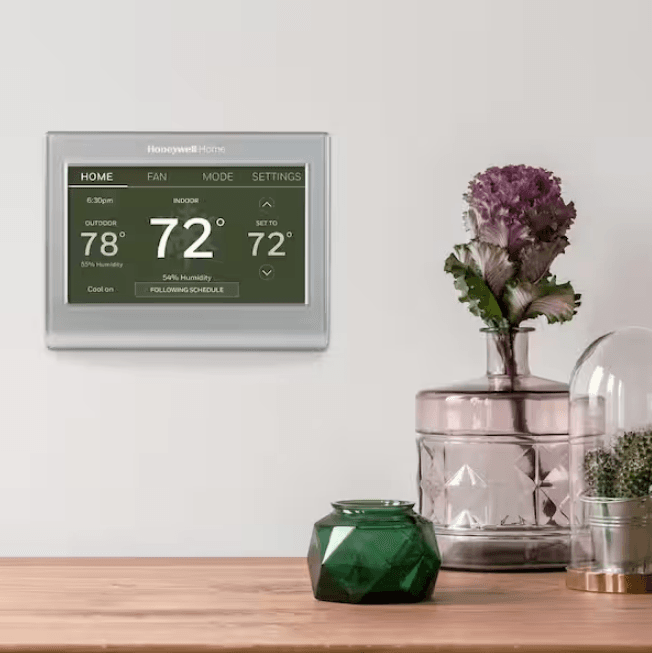
RTH9585WF Smart Series
Find rebates: HoneywellHome.com/Rebates
In the box, you will find
- Thermostat
- Wallplate
- Screws and anchors
- Quick Start Guide
- Wire labels
Features of your thermostat
With your new thermostat, you can:
- Connect to the Internet to monitor and control your heating/cooling system.
- View and change your heating/cooling system settings.
- View and set temperature and schedules.
- Receive alerts via email and get automatic upgrades.
- View outdoor temperature and humidity (requires Wi-Fi set up and registration).

Congratulations on your purchase of a color touchscreen programmable thermostat. When registered to Total Connect Comfort, you can remotely monitor and control the heating and cooling system in your home or business—you can stay connected to your comfort system wherever you go. Total Connect Comfort is the perfect solution if you travel frequently, own a vacation home, a business, or manage an investment property or if you are simply looking for peace of mind.

This thermostat works with common 24-volt systems such as forced air, hydronic, heat pump, oil, gas, and electric. It will not work with millivolt systems, such as a gas fireplace, or with 120/240-volt systems such as baseboard electric heat.
MERCURY NOTICE: Do not place your old thermostat in the trash if it contains mercury in a sealed tube. Contact the Thermostat Recycling Corporation at www.thermostat-recycle.org or 1-800-238-8192 for information on how and where to properly and safely dispose of your old thermostat.
NOTICE: To avoid possible compressor damage, do not run the air conditioner if the outside temperature drops below 50°F (10°C).
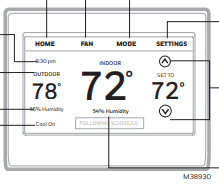
Quick reference: home use
- FAN. Select fan mode.
- HOME. Touch to display the Home screen. Current time.
- Outdoor conditions. Outdoor temperature and humidity appear after registration.
- Current status. Shows system mode (heat/cool).
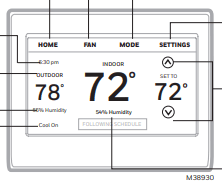
- MODE: Select system mode (heat, cool, auto, eem heat).
- SETTINGS: Touch to display options. Start here to set a program schedule.
- Current setting: Change temperature setting and select temporary or permanent hold.
- Indoor conditions: Shows indoor temperature and humidity.
Quick reference: business use
- FAN. Select fan mode.
- HOME. Touch to displaythe Home screen.
- Current time.
- Outdoor conditions. Outdoor temperature and humidity appear after registration.
- Current status. Shows system mode (heat/cool). Override. Touch to temporarily override the program schedule.
- MODE: Select system mode (heat, cool, auto, eem heat).
- SETTINGS: Touch to display options. Start here to set a program schedule.
- Current setting: Change temperature setting and select temporary or permanent hold.
- Indoor conditions: Shows indoor temperature and humidity.
Quick reference: business use
- FAN. Select fan mode.
- HOME. Touch to display the Home screen.
- Current time.
- Outdoor conditions. Outdoor temperature and humidity appear after registration.
- Current status. Shows system mode (heat/cool).
- Override. Touch to temporarily override the program schedule.
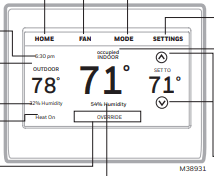
- MODE. Select system mode (heat, cool, auto, eem heat).
- SETTINGS. Touch to display options. Start here to set a program schedule.
- Thermostat location: Quickly identify which thermostat is in control of a specific area.
- Current setting: Change temperature setting and select temporary or permanent hold.
- Indoor conditions. Shows indoor temperature and humidity
Installing your thermostat
You might need the following tools to install this thermostat:
- No. 2 Phillips screwdriver
- Pen
- Pencil
- Level (optional)
- Drill and bits (3/16” for drywall, 7/32” for plaster)(optional)
- Hammer (optional)
- Electrical tape (optional)
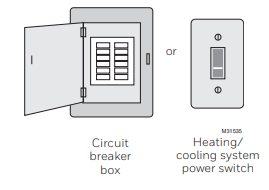
Switch OFF the power to your heating/cooling system.
Important! To protect your equipment, switch OFF the power to your heating/cooling system at the breaker box or the system switch.
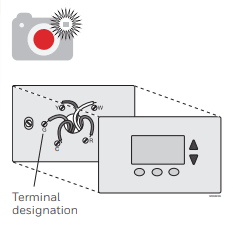
Remove the old thermostat faceplate and leave the wires connected.
- 2a Take a picture of the wire connections for later reference.
- 2b If no wire is connected to a terminal labeled C or no C terminal exists on the old thermostat, view the Alternate Wiring videos at honeywellhome.com/wifithermostat or reference the C-wire addendum in the box.
Important! A C wire is required and is the power source for your thermostat. Without a C wire, your thermostat will not power up.
Note: You will need a picture of your wire connections to wire the new thermostat.
Installing your thermostat
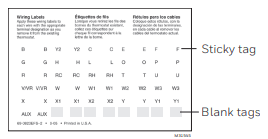
- Label the wires. Use the supplied sticky tags to label each wire as you disconnect it. Label wires according to the old thermostat terminal designations, not by wire color.
Note: If no tag matches a terminal designation, write the appropriate letter on a blank sticky tag. - Remove the wallplate. Remove the old wallplate from the wall after all wires have been labeled and disconnected.
- Mount the wallplate for the thermostat. Mount your new wallplate using screws and anchors included with the thermostat.
If necessary: Drill 3/16-in holes for drywall. Drill 7/32-in holes for plaster.
Note: Wrap the wires around a pencil to prevent them from falling back into the wall.
Installing your thermostat
Important! This thermostat requires a C, or common, wire for power. The C, or common, wire brings 24 VAC power to the thermostat. If you are replacing an existing thermostat, it might not have a C wire connected to it. Many older mechanical or battery-operated thermostats do not require a C wire. See the C Wire Addendum document included in this package for more information.
Note: Not all heating/cooling systems label the 24 VAC common C. Check your system manual or contact the manufacturer to find out which terminal is the 24 VAC common.
View the Alternate Wiring videos at honeywellhome.com/wifi-thermostat.
Wiring
- For conventional heating/cooling systems (natural gas, oil or electric furnace, air conditioner). “Glossary” for further definition.
- For a heat pump system.“Glossary” for further definition
Wiring (Conventional System)
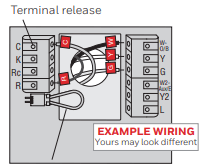
Wire the thermostat to your conventional system. Starting with the C Wire, match the sticky tag on the wire to the terminal labels. You must have a C wire. Straighten the wire and gently slide it into the terminal hole until it clicks into place. (If you need to remove a wire, use a pen tip to press the terminal release and then pull the wire out.)
Note: Refer to the wiring picture you took in Step 2.
Tip: To make it easier to slide the wire into place, use a pen tip to hold down the terminal release.
Note: The wiring for your application might be different than the wiring shown below.
Installing your thermostat
Wiring (Conventional System continued)
- In the image on the right, check the box next to each connection. You will use this checklist in Step 9.
- Verify the wire is firmly secured by gently pulling on the wire.
- Repeat steps a–d for all other wires.
- Push any excess wire back into the wall opening after all wires are installed.
Important!
Check the box for each wire you connect. You will need this information in Step 9.
Wiring (Heat Pump System)
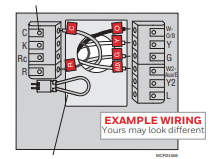
Wire the thermostat to your heat pump.
- Starting with the C Wire, match the sticky tag on the wire to the terminal labels.
- Slide the wire gently into the terminal hole until it clicks into place. (If you need to remove a wire, use a pen tip to press the terminal release and then pull the wire out.)
Note: The wiring for your application might be different than the wiring shown below.
Installing your thermostat
Wiring (Heat Pump System continued).
- c In the image on the right, check the box next to each connection. You will use this checklist in Step 9.
- d Verify the wire is firmly secured by gently pulling on the wire.
- e Repeat steps a–d for all other wires.
Note: If old thermostat has separate wires on AUX and E, use a wire nut to attach both wires to a separate wire. Slide this third wire into the W2-Aux/E terminal. - f Push any excess wire back into the wall opening after all wires are installed.
Alternate wiring (Conventional System)
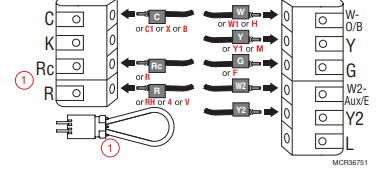
Use this if your wire labels don’t match the terminal labels.
Note: You must have a C wire or equivalent.
Alternate wiring key (Conventional System)
- If you have both an R and Rc wire, unplug the jumper loop by pulling on the wire loop.
- If your old thermostat had both R and RH wires, connect the R wire to the Rc terminal, the RH wire to the R terminal, and unplug the jumper loop.
Installing your thermostat
Use this if your wire labels don’t match the terminal labels.
Note: You must have a C wire or equivalent.
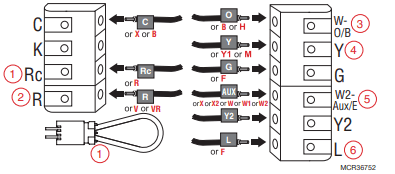
Alternate wiring key (Heat Pump System)
- If you have both an R and Rc wire, unplug the jumper loop by pulling on the wire loop.
- If your old thermostat had both R and RH wires, connect the R wire to the Rc terminal, the RH wire to the R terminal, and unplug the jumper loop.
- If your old thermostat had both V and VR wires, check honeywellhome.com/wifi-thermostat for help.
- If your old thermostat had separate O and B wires and is controlling a single-zone heat pump system, attach the B wire to the C.
- If there is more than one thermostat controlling the system, call Resideo zoning at 800-828-8367 for wiring assistance.
- If your old thermostat had separate Y1, W1, and W2 wires, check honeywellhome.com/wifi-thermostat for help.
- If the old thermostat has separate wires on Aux and E, use a wire nut to attach both wires to a separate wire. Slide this third wire into the W2-Aux/E terminal.
- This is the system monitor. If the monitor finds a problem, you will see an orange alert button on the thermostat home screen.
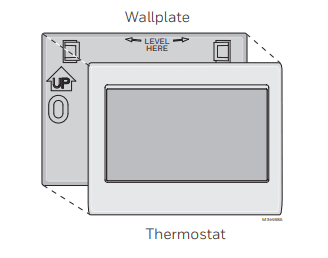
Attach the thermostat to the wallplate. Align the thermostat with the wallplate and then snap it into place.
Switch the heating/cooling system ON. Important!
- 8a Verify that the C wire is connected at the thermostat and at the heating/cooling system.
- 8b Make sure the heating/cooling system door is firmly secured.
- 8c Switch power back ON for your heating/cooling system at the breaker box or its power switch.
Before connecting to your Wi-Fi network,
You need to set initial thermostat options to define your heating/cooling system:
- Language
- Home or business
You can customize other options later
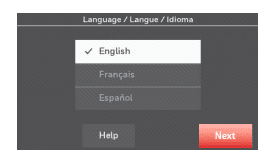
Follow prompts on the screen to select appropriate options.
- 9a Touch the language you want the thermostat to display, then touch Next.
- 9b Select Home or Business installation, then touch Next
- 9c Touch Next, or name the thermostat location—touch THERMOSTAT and follow the rest of the instructions.
- 9d Select what type of heating and cooling equipment your thermostat will control and touch Next.
Note: Touch the orange Help button on any screen for more information.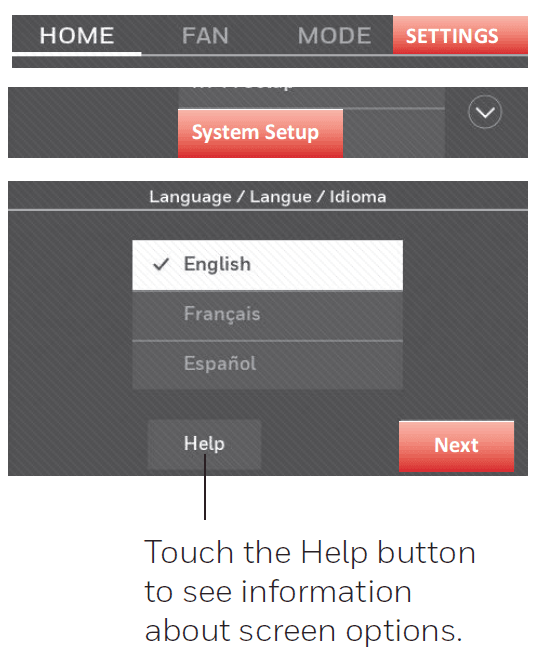
Changing system setup
If your needs change, you can change the basic system settings you chose during thermostat installation (page 9).
- Touch SETTINGS. The thermostat displays a list of options.
- Select System Setup. The thermostat displays the first screen of options that you can change.
- On each screen, make changes as needed, then touch Next to display new options. Repeat this step until you have made all changes. The table on page 29 explains the System Setup screens and options.
- When you have made all changes, press Done to save and exit.
Note: Touch the orange Help button on any screen for more information.
System Setup Options (SETTINGS > System Setup)
Screen Title | Settings and Options (Options vary depending on setup.) |
Language | English/Français/Español. |
Thermostat installed in | Home/Business (Thermostat is used in a residential (default) or commercial setting). |
Your thermostat location | Touch the THERMOSTAT button to display a screen where you can enter a custom name using a keypad. If you have only one thermostat, you can leave the name as THERMOSTAT. For business installations, you can check a box to display the thermostat name on the home screen. |
Your thermostat controls | Select Heating or Cooling, or both (default). |
Your system type | Select Forced Air (default), Heat Pump, Hot Water, or Steam. Each option offers different choices on the following screens. See Step 9e under Installing your Thermostat on page 10. |
Your forced air heating system type | Select the type of furnace. This menu option only appears if Forced Air is selected for “Your System Type”. |
The efficiency of your heating system | Select Standard Efficiency Forced Air (default) or High Efficiency Forced Air. |
Your heating system type | If you selected Hot Water or Steam on “Your system type,” select the specific heating system here. |
Number of cooling stages | Select 1 Stage (default) or 2 Stages. If you are unsure, note which wires you have connected: ‘Y’ wire only (1 stage) or ‘Y’ and ‘Y2’(refer to your checklist in Step 6 on page 5.) The number of cool stages does not appear if “Heat Pump” is selected or the cool stages are set to “0”. |
Number of heating stages | Select 1 Stage (default) or 2 Stages. If you are unsure, note which wires you have connected: ‘W’ wire only (1 stage) or ‘W’ and ‘W2’ (refer to your checklist in Step 6 on page 5). Several heat stages only appear if “Forced Air” is selected for “Your System Type”. |
Your fan control | Select whether your thermostat (default) or heating system controls the fan. Your fan control only appears if “Electric” is selected for “Your Forced Air Heating System Type”. |
Type of changeover valve | If you selected Heat Pump on “Your system type,“ select whether it uses a cooling changeover valve (default) or a heating changeover valve. If you are unsure, note which wires you have connected: refer to your checklist in Step 6 on page 6. |
Number of heat pump compressor stages | Select 1 Stage (default) or 2 Stages. If you are unsure, note which wires you have connected: ‘Y’ wire only (1 stage) or ‘Y’ and ‘Y2’(refer to your checklist in Step 6 on page 6.). |
Your backup heat | No or Yes (default), you can determine whether you have backup heat by referring to your checklist in Step 6 on page 6. Your backup heat only appears if “Your System Type” is set to Heat Pump. |
Troubleshooting
If you have difficulty with your thermostat, please try the following suggestions. Most problems can be corrected quickly and easily.
Display is blank
- Check the circuit breaker and reset if necessary.
- Make sure the power switch on the heating and cooling system is on.
- Make sure the furnace door is closed securely.
- Make sure the C wire is connected (see page 5).
Cannot change a system setting to Cool
- Check that the System Setup screen “Your thermostat controls” or “Your system type” is set to match your heating and cooling equipment (see page 29).
Fan does not turn on when heat is required
- Check that the System Setup screen “Your fan control” is set to match your heating equipment (see page 28)
“Wait” appears on the screen
- The compressor protection feature is engaged. Wait 5 minutes for the system to restart safely, without damage to the compressor.
Heat pump issues cool air in heat mode, or warm air in cool mode
- Check your settings for the System Setup screen “Type of changeover valve” to make sure it is properly configured for your system (see page 28).
The heating or cooling system does not respond
- Touch MODE to set the system to Heat. Make sure the temperature is set higher than the Inside temperature.
- Touch MODE to set the system to Cool. Make sure the temperature is set lower than the Inside temperature.
- Check the circuit breaker and reset if necessary.
- Make sure the power switch on the heating and cooling system is on.
- Make sure the furnace door is closed securely.
- If “Wait” is displayed, the compressor protection timer is on. Wait 5 minutes for the system to restart safely, without damaging the compressor (see page 26).
The heating system is running in cool mode
- Check that the System Setup screen “Your thermostat controls” or “Your system type” is set to match your heating and cooling equipment (see “System Setup Options (SETTINGS > System Setup)” on page 29).
For more manuals from Honeywell, visit ManualsLibraryy
Honeywell WIFI Smart Color Touchscreen Programmable Thermostat- FAQs
How does the Honeywell Smart Thermostat work?
The thermostat uses Smart Response Technology to learn your schedule and automatically adjust heating and cooling times to match your preferences. It also sends alerts for filter changes and extreme temperature warnings.
What does the MODE button do on the Honeywell thermostat?
The MODE button allows you to cycle through different system settings like heat, cool, auto, or off. Stop at your desired mode, and it will activate automatically.
How do I connect the Honeywell thermostat to WiFi?
Tap the Menu button on your thermostat, select the WiFi option, choose your network from the list, and enter your password. A success message will confirm the connection.
How is the smart thermostat powered?
Most smart thermostats, including Honeywell’s, require constant power supplied by a C-wire (common wire) from your HVAC system. Older systems may not have this wire.
What is the fan mode on the thermostat for?
Fan mode circulates air throughout your home, helping to balance temperatures and eliminate hot or cold spots—especially useful in rooms that don’t stay comfortable.
What components are inside a thermostat?
Thermostats contain sensors to detect temperature changes. Mechanical models use bimetallic strips, while smart models rely on electronic sensors for more accurate control.
How can I manually adjust the temperature?
Use the “+” and “–” buttons to set your preferred temperature. Press “Hold” to maintain that setting until you change it again manually.
Is the Honeywell thermostat WiFi-enabled?
Yes, it connects to your home WiFi, allowing remote control through the Honeywell Total Connect Comfort app on your smartphone or tablet.

