Insignia NS-AC08PWH1 Portable Air Conditioner
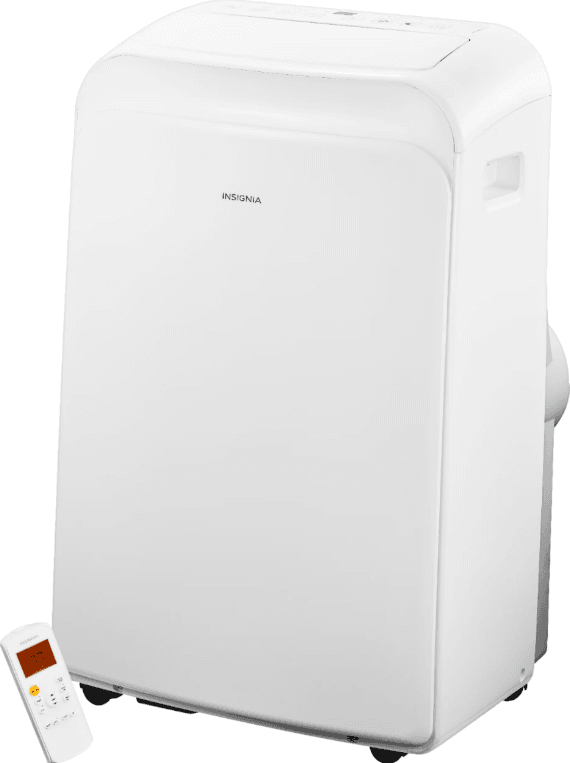
Features
- Enjoy 3 different fan speeds, a dehumidifier and a 62 ~ 95° F (16.6 ~ 35° C) temperature range for your comfort
- Remote with sensor lets you maintain or adjust the temperature even at a distance
- Timer functionality lets you set any temperature for a specific time of day or night
- Auto restart makes sure you’re ready to go after a power outage
- 6 ft. (1.8 m) cord for easy reach to any nearby outlet
- Caster wheels for easy transport
- Fits horizontal sliding windows with a height of 19.4 to 62.2 in. (49.3 to 158 cm)
- Fits vertical sliding windows with a width of 19.4 to 62.2 in. (49.3 to 158 cm)
- NS-AC06PWH1: 6,000 BTU cooling capacity ideal for 150-250 sq. ft. (14 to 23 sq. m)
- NS-AC07PWH1: 7,000 BTU cooling capacity ideal for 250-300 sq. ft. (23 to 28 sq. m)
- NS-AC08PWH1: 8,000 BTU cooling capacity ideal for 300-350 sq. ft. (28 to 32.5 sq. m)
Package contents
- Portable Air Conditioner (6,000 BTU, 7,000 BTU, or 8,000 BTU)
- Remote control with two AAA batteries
- Window installation kit
- User Guide
FRONT
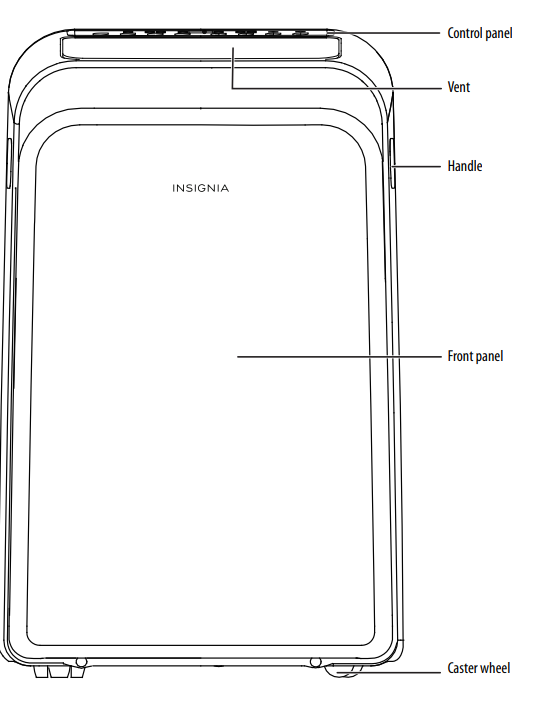
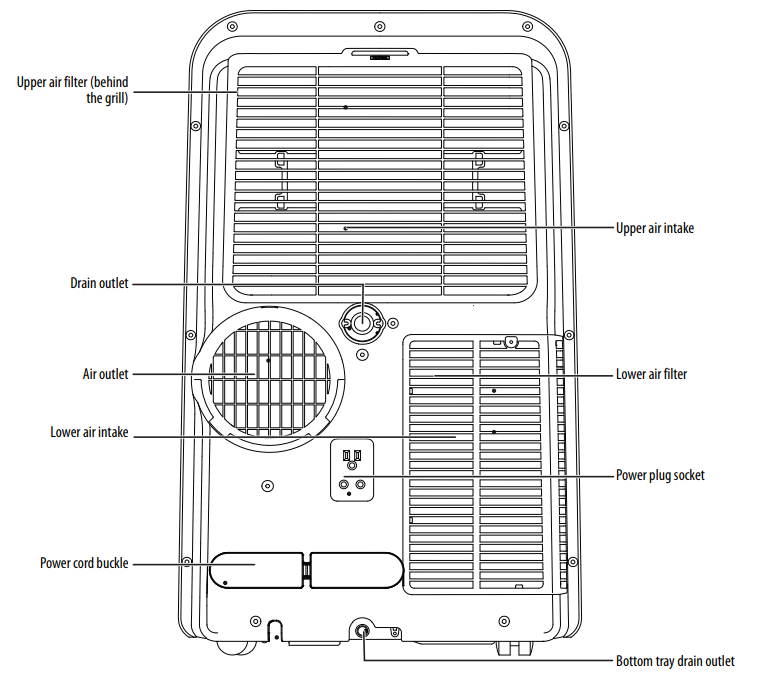
BACK
Control panel

| # | COMPONENT | DESCRIPTION |
| 1 | SWING button | Turns the vent swing movement on or off. |
| 2 | On/Off indicator | Lights when your air conditioner is turned on. |
| 3 | MODE indicators | Lights to indicate which operating mode is selected. |
| 4 | Follow Me indicator | Lights when the Follow Me feature is turned on. See Using the Follow Me feature on page 24. |
| 5 | Display | When setting the timers, shows the number of hours selected. When your air conditioner is running, shows the current temperature setting or room temperature. When a problem occurs, shows an error or protection code. |
| 6 | Temperature format indicator | Lights to indicate the temperature format. |
| 7 | Fan speed indicator | Lights to indicate the current fan speed. |
| 8 | Sleep indicator | Lights when the Sleep feature is turned on. See Using the Sleep feature on page 24. |
| 9 | (timer) button | Turns on the Timer feature. See Setting the timers on page 24. |
| 10 | MODE button | Selects the operating mode. You can select Dry, Auto, Fan, or Cool. As you cycle through the modes, the corresponding mode indicators light. See Selecting the operating mode on page 23. |
| 11 | – (decrease) button | Decreases the temperature setting. See Setting the operating temperature on page 23. |
| 12 | + (increase) button | Increases the temperature setting. See Setting the operating temperature on page 23. |
| 13 | (fan) button) | Selects the fan speed. You can select High, Cont. (continuous), Med, or Low. As you cycle through the speeds, the corresponding speed indicators light. See Adjusting the fan speed on page 23. |
| 14 | (sleep) button | Turns the Sleep feature on or off. When this feature is turned on the corresponding indicator lights. See Using the Sleep feature on page 24. |
| 15 | (power) button | Turns your air conditioner on or off. |
Ambient temperature range
| MODE | TEMPERATURE RANGE |
| Cool | 62° ~ 95° F (17° ~ 35° C) |
| Dry | 55° ~ 95° F (13° ~ 35° C) |
Remote control
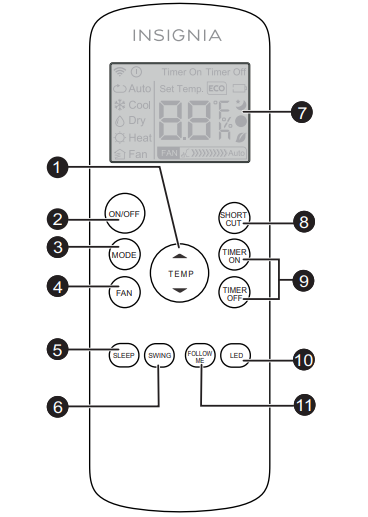
| # | BUTTON | DESCRIPTION |
| 1 | TEMP ▲/TEMP ▼ | Sets the temperature. This feature does not work in Fan mode. See Setting the operating temperature on page 23. |
| 2 | ON/OFF | Turns your air conditioner on or off. |
| 3 | MODE | Selects the operating mode. You can select: Auto, Cool, Dry, or Fan. See Selecting the operating mode on page 23. |
| 4 | FAN | Selects the fan speed. You can select: Auto, Low, Med, or High. See Adjusting the fan speed on page 23. |
| 5 | SLEEP | Reduces the amount of energy your air condition uses without changing the operating mode. This feature does not work in Dry or Fan mode. See Using the Sleep feature on page 24. |
| 6 | SWING | Starts and stops the vent movement. See Controlling the vent on page 23. |
| 7 | Display | Displays indicators and status information. See Remote control display on page 14. |
| 8 | SHORT CUT | Stores and activates your favorite settings. See Setting the shortcut on page 24. |
| 9 | TIMER ON/TIMER OFF | Turns the Timer feature on or off. See Setting the timers on page 24. |
| 10 | LED | Turns the display on your air conditioner on or off. See Turning the control panel display on or off on page 24. |
| 11 | FOLLOW ME | Lets the remote control measure and send the room temperature to your air conditioner. See Using the Follow Me feature on page 24. |
Installing remote control batteries
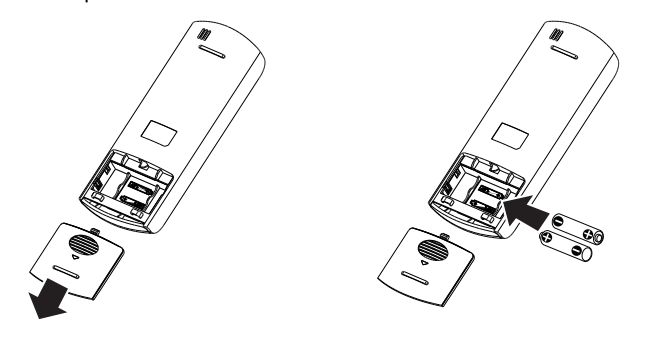
- Press down on the remote control battery cover and slide the cover off the remote control.
- Insert two AAA batteries (included) into the battery compartment. Make sure that the + marks on the batteries align with the + marks in the compartment.

- Replace the cover.
Remote control display
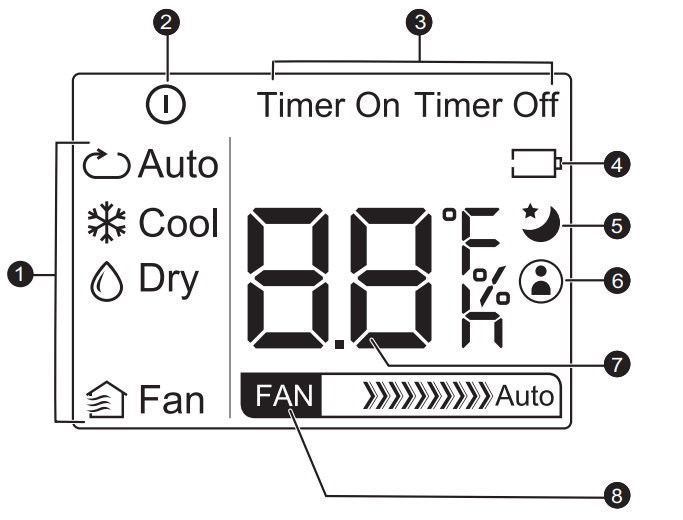
| # | INDICATOR | DESCRIPTION |
| 1 | Operating mode | Lights to indicate the selected mode: Auto, Cool, Dry, or Fan. |
| 2 | Power indicator | Lights when your air conditioner is turned on. |
| 3 | Timer On/Timer Off | Timer On appears when the timers are set. Timer Off appears when the timers are not set. |
| 4 | Low battery indicator | Lights when your air conditioner detects low battery power in the remote control batteries. |
| 5 | Sleep indicator | Lights when the Sleep feature is turned on. |
| 6 | Follow Me | Lights when the Follow Me feature is turned on. |
| 7 | Display | Show the current temperature setting. When a timer is turned on, shows the timer setting. |
| 8 | Fan speed | Shows the current fan speed setting. >>>>>>>>>> indicates high. >>>>>>> indicates medium. >>> indicates low. This indicator does not appear in Auto mode. |
Before installing your air conditioner
Finding a suitable location
Make sure that:
- You install your air conditioner on an even surface to minimize noise and vibration.
- Your air conditioner is installed near a grounded plug.
- You can access the collection tray drain on the back of your air conditioner.
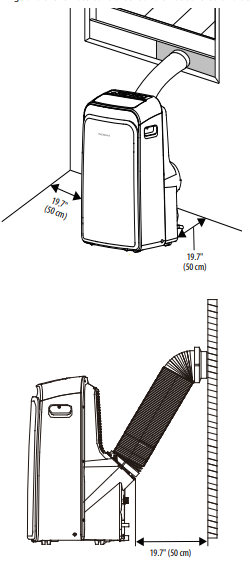
- Your air conditioner is at least 19.7 in. (50 cm) for the nearest walls.
- The horizontal vent is 19.7 in. (50 cm) away from any obstacles.
- The intake and outlet openings and the remote control sensor are not covered or blocked.
Providing the correct power source
Check your local power source. Your air conditioner requires a 115V, 60Hz power supply.
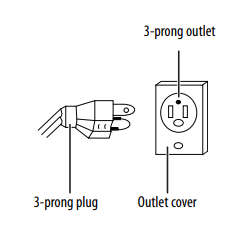
Using a 3-prong plug and outlet
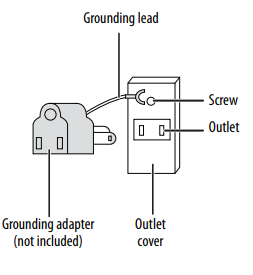
Using a grounding adapter
Installing your air conditioner
Tools you need (not included)

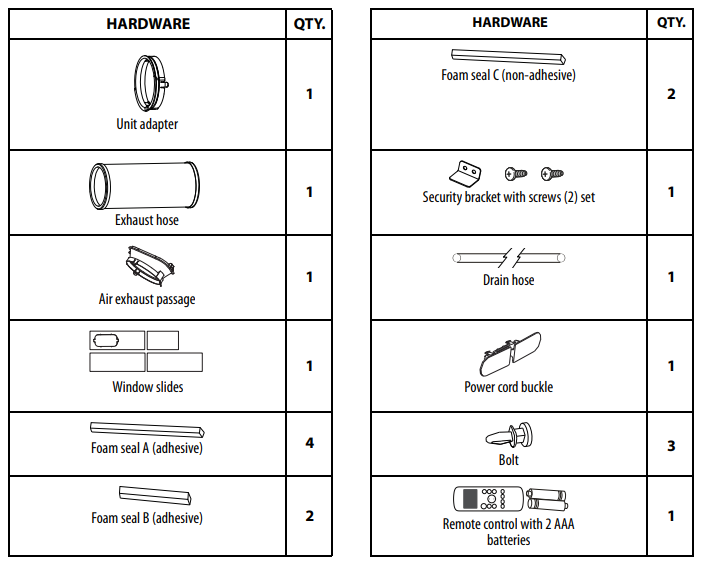
Window installation kit
The window installation kit fits windows 19.4” ~ 62.2” (49.3 ~ 158.1cm).
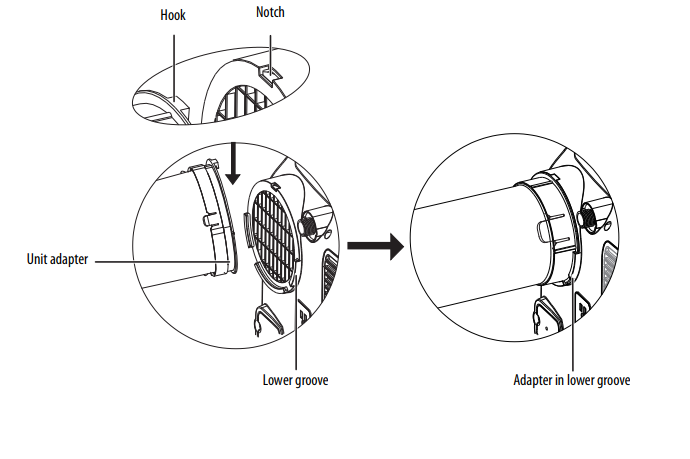
STEP 1: Connect the exhaust hose to your air conditioner You need

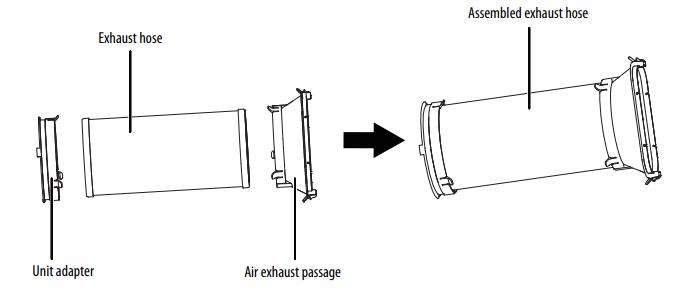
- Press the exhaust hose into the air exhaust passage and the unit adapter. The elastic buckles on the adapters automatically secure the hose to the adapters.

- Insert unit adapter on the assembled exhaust hose into the lower groove on the air outlet on your air conditioner.
3 Make sure that the hook on the adapter aligns with the notch on the air outlet, then press the adapter into the notch to lock it in place.
STEP 2: Assembling the adjustable window slides

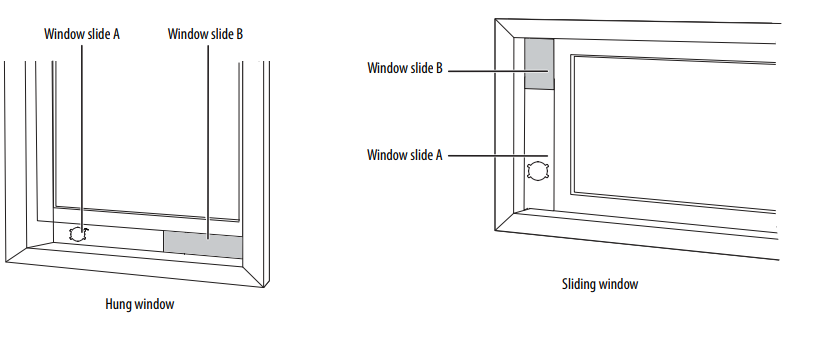
- Select the window slides that fit your window. You may need to trim the slides to fit your window.
- After you adjust the slides to the correct length, use bolts to secure them.
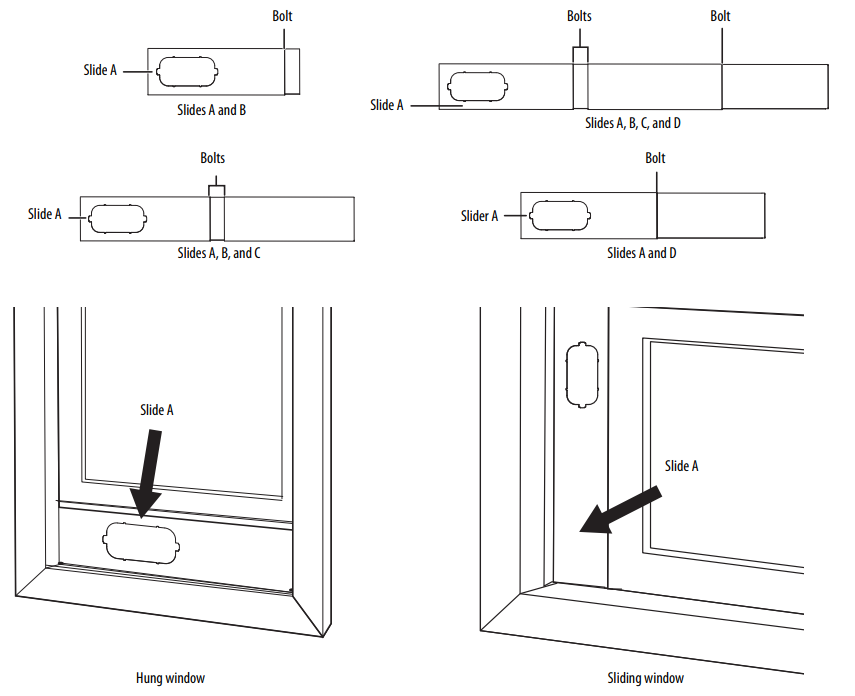
STEP 3: Preparing the window frame and sash

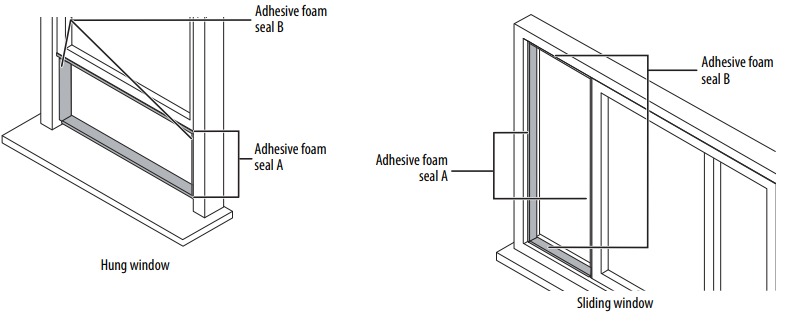
- Cut the adhesive foam seals A and B to fit the window frame and sash.
- Remove the seal backings, then press the adhesive sides onto the frame and sash.

- Insert the assembled window slide into the window.

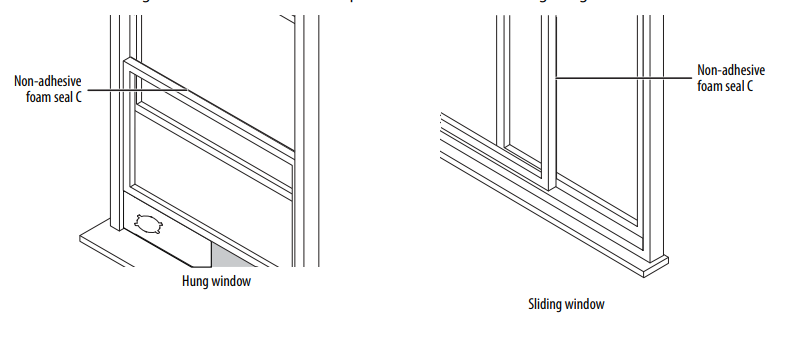
- Cut the non-adhesive foam C to fit the width (hung window) or height (sliding window) of the window, then insert the foam between the glass and the window frame to prevent air and insects from getting into the room.

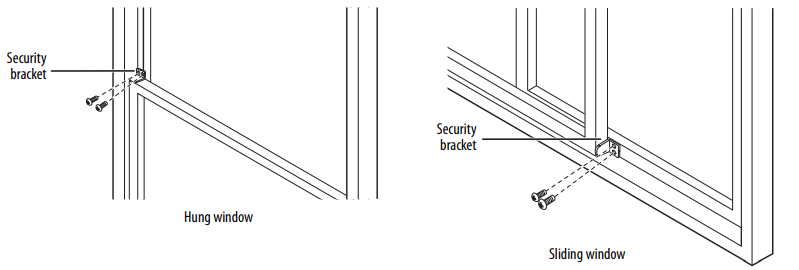
- Optional: Install the security bracket using two screws. The security bracket helps keep the window from moving.

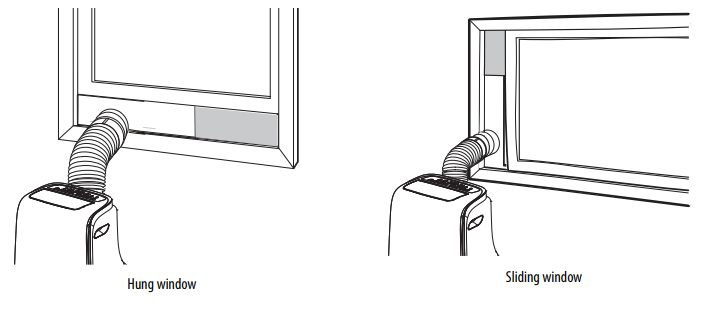
STEP 4: Connecting the assembled exhaust hose to the window
Using the dehumidifier feature
- Make sure that all windows and doors are closed.
- Set your air conditioner to the Dry operating mode. See Selecting the operating mode on page 23.
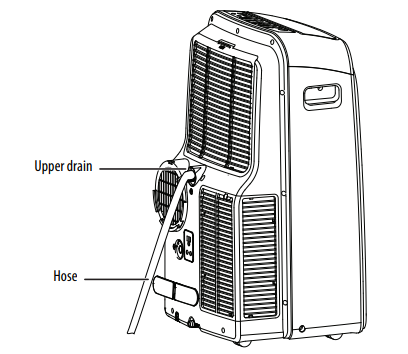
- Remove the upper drain plug, then connect a 3/4 in. hose (not included) to the drain hole.

- Place the other end of the hose into a drain or other type of container for the water to drain into.
- Turn your air conditioner on.
Troubleshooting
| PROBLEM | POSSIBLE CAUSE | POSSIBLE SOLUTION |
|
My air conditioner doesn’t turn off when I press the or ON/OFF button | P1 Error Code. | The water collection tray is full. Turn off your air conditioner, drain the water from the tray, then restart your air conditioner. See Emptying the drain tray on page 27. |
| Your air conditioner is set to the Cool mode, and the room temperature is lower than the set temperature. | Reset the temperature. See Setting the operating temperature on page 23. |
| PROBLEM | POSSIBLE CAUSE | POSSIBLE SOLUTION |
|
My air conditioner doesn’t cool well | The temperature setting is too high. | Set the temperature to a lower setting. See Setting the operating temperature on page 23. |
| The air filter is blocked with dust or animal hair. | Turn off your air conditioner, then clean the filter. See Cleaning the air filter on page 26. | |
| The windows or doors in the room are open. | Close the windows or doors. | |
| There are heat sources in the room. | Remove the heat sources. | |
| The room area is too large. | The recommended room areas are:
| |
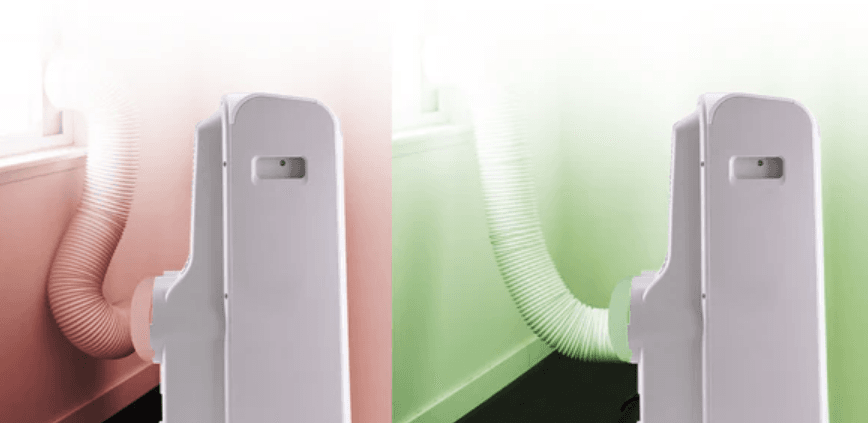
| The exhaust hose isn’t connected or is blocked. | Turn off your air conditioner, disconnect the hose, check for blockage, then reconnect the hose. See STEP 1: Connect the exhaust hose to your air conditioner on page 17. | |
| The refrigerant level is low. | Contact a qualified service technician to check your air conditioner and add refrigerant. | |
| My air conditioner is noisy and vibrates | The floor is not level. | Place your air conditioner on a flat, level surface. |
| The air filter is blocked with dust or animal hair. | Turn off your air conditioner, then clean the filter. See Cleaning the air filter on page 26. | |
| My air conditioner makes a gurgling sound | This sound is caused by the flow of refrigerant inside your air conditioner. | This is normal. |
Error codes
Your air conditioner displays error and protection codes on the control panel display to help you resolve problems.
| ERROR CODE | DESCRIPTION |
| E1 | Room temperature sensor error. |
| E2 | Evaporator temperature sensor error. |
| E3 | Condenser temperature sensor error. |
| E4 | Display panel communication error. |
| EC | Refrigerant leakage detection malfunction. |
| P1 | Bottom tray is full. Connect the drain hose and drain the collected water away. See Emptying the drain tray on page 27. |
Specifications
Specifications are subject to change without notice.
| Dimensions (W × D × H) | 27.5 H × 17.8 W × 14.3 D in. (70 × 45.4 × 36.5 cm) |
| Weight | NS-AC06PWH1 (6,000 BTU): 59 lbs. (26.8 kg) NS-AC07PWH1 (7,000 BTU): 61.9 lbs. (28.1 kg) NS-AC08PWH1 (8,000 BTU): 68.1 lbs (30.9 kg) |
| Operating temperature range | 62° to 86° F (17° to 30° C) |
| Power requirements | AC115V ~ 60Hz |
| Power cord length | 74.8 in. (1.9 m) |
FOR MORE MANUALS BY INSIGNIA, VISIT MANUALSLIBRARYY
Insignia NS-AC08PWH1 Portable Air Conditioner-FAQ’s
What is the voltage requirement for the Insignia portable AC?
The Insignia NS-AC08PWH1 operates on a standard 120-volt power supply.
What does Sleep Mode do on the Insignia air conditioner?
Sleep Mode gradually adjusts the temperature during the night for added comfort and energy efficiency. It does not turn off the AC but fine-tunes the cooling.
How can I switch the temperature display from Fahrenheit to Celsius?
Press the ▲ and ▼ buttons together, or use the °F/°C button on the remote control to toggle between Fahrenheit and Celsius.
How many watts are needed to start a portable air conditioner?
An 8,000 BTU portable air conditioner typically requires about 1,500 starting watts. Higher BTU units may need up to 3,000 watts.
What’s the best AC mode to use while sleeping?
Sleep Mode is ideal. Start with a comfortable temperature—usually between 75°F to 78°F (24°C to 26°C)—to ensure restful sleep.
What do the symbols on the control panel mean?
1. Snowflake: Cool mode
2. Sun: Heat mode
3. Fan: Fan mode
4. Droplet: Dehumidifier (Dry) mode
Is it safe to leave a portable air conditioner running overnight?
Yes, it’s completely safe to use your portable AC while sleeping. In fact, it can improve sleep quality by maintaining a cool environment.
What does Mode “C” mean on my air conditioner?
Mode “C” refers to Cool Mode, where the AC cools the room by circulating air through the compressor and blower.

