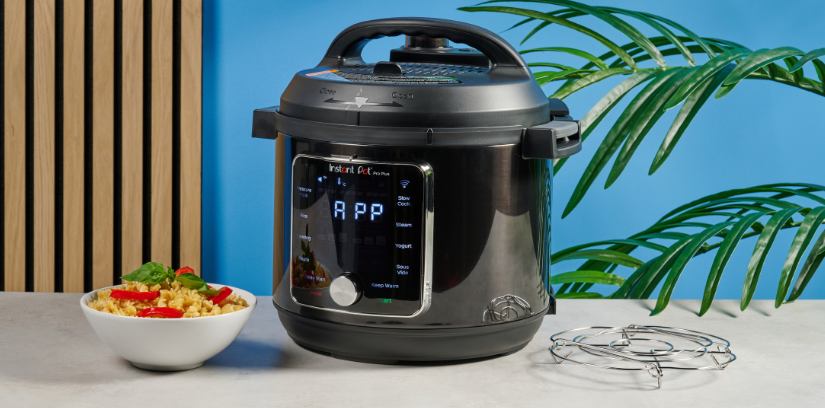
Instant Pot Pro Plus 10-in-1 Wi-Fi Smart Pressure Cooker

WARNING
Safety Instructions
At Instant™, we want you to feel comfortable using our products. This Instant Pot Pro Plus was designed with you and your safety in mind.
Read all instructions before using and only use this appliance as directed. Failure to follow these Important Safeguards may result in personal injury and/or property damage and will void your warranty.
When using electrical appliances, basic safety precautions should always be followed to reduce the risk of fire, electric shock, and injury to persons.
IMPORTANT SAFEGUARDS
READ ALL INSTRUCTIONS
Placement
- DO place the appliance on a countertop only. Always operate the appliance on a stable, noncombustible, level surface.
- DO make sure all parts are dry and free of food debris before placing the cooking pot on the cooker base.
- DO NOT place the appliance on or close to a hot gas or electric burner, or a heated oven.
- DO NOT use the appliance near water or flame.
- DO NOT use outdoors. Keep out of direct sunlight.
- DO NOT place on anything that may block the vents on the bottom of the appliance.
General Use
The removable inner cooking pot is extremely hot during use, and can be extremely heavy when full of ingredients.
- DO use oven mittens when handling the inner cooking pot and removing accessories.
- DO place hot accessories on a heat-resistant surface or cooking plate.
- DO use care when lifting the cooking pot from the cooker base to avoid burn injury.
- DO use extreme caution when the cooking pot contains hot food, hot oil, or other hot liquids.
- DO use only the Instant Brands lid that came with this cooker base. Using any other pressure cooker lids may cause personal injury and/or property damage.
- DO NOT use the appliance without the removable inner cooking pot installed.
- DO NOT touch the metal portion of the lid, the appliance’s hot surfaces, or any accessories during or immediately after cooking because they will be hot. Only use the side handles for carrying or moving.
- DO NOT use this appliance for deep frying or pressure frying with oil.
- DO NOT move the appliance while it is in use, and use extreme caution when disposing of hot grease.
- DO NOT allow children or persons with reduced physical, sensory, or mental capabilities to operate this appliance. Close supervision is necessary when any appliance is used by or near children and persons with reduced physical, sensory, or mental capabilities. Children should not play with this appliance.
- DO NOT use the appliance for anything other than household use. It is not intended for commercial use.
- DO NOT leave the appliance unattended while in use.
Product, parts, and accessories
Before using your new Instant Pot Pro Plus, make sure everything is accounted for, then see Care, cleaning, and storage: Removing and installing parts to find out how everything fits together.
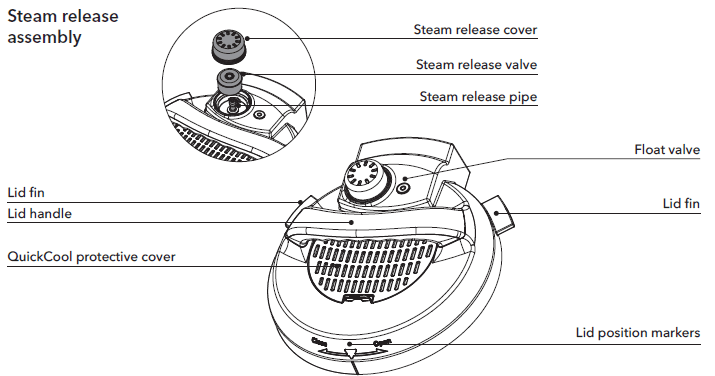
Top of the lid
Instant Tip: Stand the pressure cooking lid up to keep it off your countertop. Insert the left or right lid fin into the corresponding lid holders on the base to stand it up and save some space!
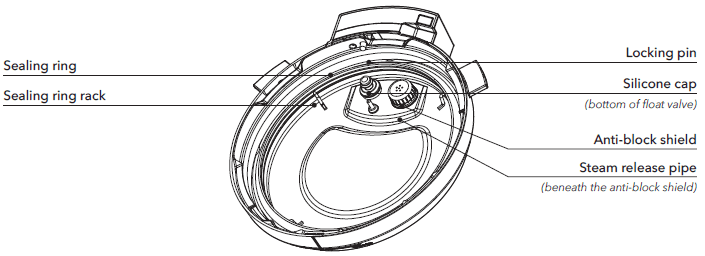
Bottom of the lid
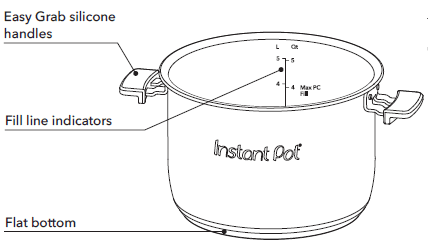
Cooking pot
Instant Tip: Stove top and oven-friendly up to 204 °C. The cooking pot features a cookware-grade impact bonded tri-ply bottom, which sounds complicated, but really just means you can use it just about anywhere — from the multicooker base to any electric, ceramic, gas, or induction cooktop.
Multicooker base
Accessories
Get started
Initial setup
- Pull that Instant Pot Pro Plus out of the box!
- Remove the packaging material and accessories from in and around the multicooker and make sure all the parts are accounted for. See Product, parts, and accessories for a full parts breakdown. Make sure to check under the cooking pot!
- Wash the cooking pot in a dishwasher or with hot water and dish soap. Rinse it well with warm, clear water and use a soft cloth to thoroughly dry the outside of the cooking pot.
- Wipe the heating element with a soft, dry cloth to make sure there are no stray packaging particles left in the multicooker base. Don’t remove the safety warning stickers from the lid (unless specified on the sticker!) or the labels from the back of the multicooker base.
- You may be tempted to put the Pro Plus on your stovetop — but don’t do it! Place the multicooker base on a stable, level surface, away from combustible material and external heat sources.
Is something missing or damaged?
Get in touch with a Customer Care Advisor by email at [email protected] (if located in the UK) or [email protected] (if located in the EU), and we’ll happily make some magic happen for you!
Initial test run (water test)
Before using your new Pro Plus for the first time, you must perform a pressure cooking test run to ensure everything is working correctly.
Stage 1: Setting up the Pro Plus for pressure cooking
- Remove the cooking pot from the multicooker base and fill it to the first line (1) with water.
- Insert the cooking pot into the multicooker base.
- Connect the power cord to a 220-240 V power source. The display shows OFF.
- Place and close the lid as described in Pressure control features: Pressure cooking lid. The lid automatically seals for pressure cooking.
Stage 2: “Cooking” (…but not really, this is just a test!)
- Touch Pressure Cook.
- When the minutes field flashes, turn the dial to adjust the cook time to 5 minutes (00:05). Customisations are saved to the Smart Programme when cooking begins.
- Touch the Venting field to toggle between Natural, Pulse, and Quick release options. Select Quick for a quick pressure release after the test finishes. See Releasing pressure for more information.
- Touch Keep Warm to turn automatic warming off after the test finishes.
- Touch Start to begin. The display shows On, and the cooking progress bar shows Pre-heating.
Stage 3: Releasing pressure
When the Smart Programme finishes, the quick release icon flashes until venting is finished.
- Check the pressure indicator on the control panel to make sure the lid is safe to open, then carefully open and remove the lid as described in Pressure control features: Pressure cooking lid.
- Using proper hand protection, remove the cooking pot from the multicooker base, discard the water, and thoroughly dry the cooking pot.
You’re ready to start cooking with your Instant Pot® Pro Plus!
CAUTION
Pressurised steam releases through the top of the steam release valve. Keep exposed skin away from the steam release valve to avoid burn injury.
DANGER
DO NOT attempt to remove the lid while the pressure indicator is on and NEVER attempt to force the lid open. Contents are under extreme pressure. Pressure indicator light must be off before attempting to remove the lid. Failure to follow these instructions may result in serious personal injury and/or property damage.
CAUTION
The cooking pot will be hot after cooking. Always use appropriate heat protection when handling a hot cooking pot to avoid burn injury.
Control panel
The Pro Plus has a touch screen control panel that’s easy to use and understand.
- Pressure indicator: Lights up when there is pressure in the multicooker to show that the lid is locked and cannot be removed.
- Status icons: Shows if sounds are on or off, as indicated. Indicates if the temperature scale is showing in Fahrenheit (°F) or Celsius (°C). See Control panel: Settings for details. Delay Start or the cooking timer is running. Appears when Keep Warm is running, or is set to turn on after cooking finishes.
- WiFi indicator: Lights up when paired with the Instant Brands Connect App and connected to a device. See WiFi for more information.
- Smart Programmes: Pressure Cook, Rice, Canning, Sauté, Slow Cook, Steam, Yoghurt, Sous Vide.
- Cooking progress bar: Shows when the multicooker is in Pre-heating, Cooking, and Keep Warm modes. See Control panel: Cooking progress bar for more information.
- Time display: In standby, it shows OFF. In a Smart Programme, it counts up or down, depending on the programme. Some Smart Programmes display the temperature in ºC (Celsius) or ºF (Fahrenheit).
- Pressure: Choose between Low, High, and Max.
- Temperature: Choose between Low, High, and Custom.
- Venting: Choose between 3 venting methods: Natural release, Pulse release, Quick release.
- NutriBoost: Toggles the NutriBoost setting on and off. See Cooking: NutriBoost for more information.
- Control dial: Turn the dial to adjust the time and temperature.
- Delay Start: Delay the start of cooking. Doubles as a kitchen timer!
- Keep Warm: Turns Keep Warm on or off. Can only be used with Pressure Cook, Rice, Cannin,g, and Slow Cook, or as a standalone programme when in standby.
- Cancel: Stops a Smart Programme at any time and returns the multicooker to standby.
- Start: Begins the selected Smart Programme.
Pressure cooking
Pressure cooking uses pressure to raise the boiling point of water above 100ºC. These high temperatures allow you to cook food much faster than normal.
When pressure cooking, the Instant Pot Pro Plus goes through 3 stages.
How pressurising works
Pre-heating
| What you see | What you don’t see | Tips |
| The cooking progress bar shows preheating. The display shows On. | While the multicooker preheats, it vaporises liquid to create steam. Once enough steam has built up, the float valve pops up and locks the lid in place. | The time it takes the multicooker to pressurise depends on things like food and liquid temperature and volume. Frozen foods have the longest preheating time. For the fastest results, thaw your food before cooking it. |
Cooking
| What you see | What you don’t see | Tips |
| The cooking progress bar moves over to Cooking. The display switches to the cooking countdown timer. | When the Instant Pot reaches the required pressure level, cooking begins. The Instant Pot Pro Plus automatically maintains at Low, Hi, Med, or Max pressure throughout cooking. | A higher pressure means a higher temperature. Smart Programme settings (e.g., cooking time, pressure level, etc.) can be adjusted at any time during cooking. |
Depressurisation
| What you see | What you don’t see | Tips |
| If Keep Warm is on after cooking, the cooking progress bar moves over to Keep Warm, and the timer counts up from 00:00. If not, the multicooker begins venting, and the venting icon flashes until finished. |
Although the food has finished cooking, the multicooker is still pressurised and hot. | Follow your recipe instructions when choosing a venting method. Venting releases pressure, lowers the temperature, and allows you to safely remove the lid. See Releasing pressure: Venting methods on the next page for information on safe venting techniques. |
Pressure control features
See Care, cleaning, and storage for the installation and removal of parts.
Pressure cooking lid
When it’s plugged in, the Pro Plus plays a little jingle when you open and close the lid.
| What we love about it | What you should know about it |
| When you close the lid, it automatically gets ready to seal for seriously easy pressure cooking. It closes over the handles on the cooking pot. The lid handle is comfortable to use whether you’re left or right-handed, and, stands up in the multicooker base! | The lid is removable during non-pressure cooking, so you can taste-test as you go. When pressure cooking, the lid only locks into place once the multicooker has pressurised. Try not to remove the lid unnecessarily. |
Pressure control features
Steam release assembly
The steam release assembly must be fully installed before use.
| What we love about it | What you should know about it |
|
The steam release cover disperses the steam, so the pressure releases gently. | The steam release valve sits loosely on the steam release pipe. When releasing pressure, steam travels up from the cooking pot, through the steam release pipe and steam release valve, and out the top of the steam release cover. It’s important to keep the area clean and clear. |
| WARNING | |
| Do not cover or block the steam release assembly in any way to avoid personal injury and/or property damage. | |
Anti-block shield
The anti-block shield prevents food particles from coming up through the steam release pipe, which assists with pressure regulation. The anti-block shield is integral to product safety and necessary for pressure cooking, so it must be installed before use.
Sealing ring
When the pressure cooking lid is closed, the sealing ring creates an air-tight seal between the lid and the cooking pot.
The sealing ring must be installed before use.
Only one sealing ring should be installed in the lid at a time.
Instant Tip: Silicone is porous, so it absorbs strong aromas and certain flavours. Keep extra sealing rings on hand to limit the transfer of those aromas and flavours between dishes. Visit our store to start colour coding your cooking!
Pressure indicator
The pressure indicator on the control panel indicates when the lid is safe to open.
- Pressurised
The pressure indicator icon will highlight in red, indicating it is not safe to open the lid.
- Depressurised
When the pressure indicator icon is not lit, the unit is safe to open.
The float valve and silicone cap work together to seal in pressurised steam. Do not attempt to operate the Instant Pot without the float valve properly installed.
Care, cleaning, and storage
Clean your Instant Pot Pro Plus and its parts after each use. Failure to follow these cleaning instructions may result in catastrophic failure, which may lead to property damage and/or severe personal injury.
Always unplug your multicooker and let it cool to room temperature before cleaning. Never use metal scouring pads, abrasive powders, or harsh chemical detergents on any of the Instant Pot’s parts or accessories.
Let all surfaces dry thoroughly before use and before storage.
| Parts | Cleaning methods and instructions |
| Accessories • Steam rack | Dishwasher safe if placed on the top rack. |
| Lid and parts • Steam release valve • Steam release cover • Anti-block shield • Sealing ring • QuickCool cover • Condensation collector | Dishwasher safe if placed on the top rack. Remove all the parts from the lid before cleaning. See Care, cleaning and storage: Removing and installing parts. • With the steam release valve and anti-block shield removed, clean the interior of the steam release pipe with a pipe cleaner to prevent clogging. • To drain water from the lid after dishwashing, grasp the lid handle and hold the lid vertically over a sink, then turn it 360°— like turning a steering wheel. • After cleaning and draining, store the lid upside down on the multicooker base to allow it to air dry completely. • Store sealing rings in a well-ventilated area to decrease residual odour of flavourful meals. To eliminate odours, add 250 mL water and 250 mL white vinegar to the cooking pot, then run Pressure Cook for 5 to 10 minutes and QR pressure. • Check the condensation collector after each use and empty and clean it as needed. Do not allow food or moisture to sit in the condensation collector, as harmful bacteria may result. |
| Cooking pot | Dishwasher safe. • Acute hard water staining (rainbow, bluish, or white discoloration) may require scrubbing with a sponge dampened with vinegar or a nonabrasive cleanser. • For tough or burned food residue, add boiling water and dish soap to the cooking pot and let it sit for a few hours for easy cleaning. • Make sure all exterior surfaces are dry before placing the cooking pot in the multicooker base. |
| Power cord | Wipe only. • Use a barely damp cloth to remove particles from the cord. • Wrap it around the multicooker base and tuck the end into the cord holder. |
| Multicooker base | Wipe only. • Wipe the inside of the outer pot as well as the condensation rim with a barely damp cloth. Allow them to dry completely before inserting the cooking pot. • Clean the multicooker base and control panel with a soft, barely damp cloth or sponge. |
Troubleshooting
| Problem | Possible reason | Try this |
| Occasional clicking or light cracking sound. | The sound of power switching, or the pressure board, may be expanding due to changing temperatures. | This is normal; no action needed. |
| The bottom of the cooking pot is wet. | Wipe exterior surfaces of the cooking pot. Make sure the heating element is dry before inserting the cooking pot into the multicooker base. | |
| Difficulty closing the lid. | The sealing ring is not properly installed. | Reposition the sealing ring. Make sure it is snug behind the sealing ring rack. |
| The float valve is in the popped-up position. | Gently press the float valve downward with a long utensil. | |
| Contents in the multicooker are still hot. | Lower the lid onto the multicooker base slowly, allowing heat to dissipate. | |
| Difficulty opening the lid. | Contents may be under pressure. To avoid scalding injury, DO NOT attempt to force the lid open. | |
| Pressure inside the multicooker. | Release pressure according to a recipe. Only open the lid after the pressure indicator is off. | |
| The float valve stuck due to food debris or residue around the float valve. | Make sure steam is completely released by quickly releasing pressure. Open the lid cautiously, then thoroughly clean the float valve, the surrounding area, and the lid before next use. | |
| The cooking pot is stuck to the lid when the multicooker is opened. | Cooling of the cooking pot may create suction, causing the cooking pot to adhere to the lid. | Select the quick release to release all the pressure from the cooking pot. |
For more Manuals by Instant Pot, visit ManualsLibraryy
Instant Pot Pro Plus 10-in-1 Wi-Fi Smart Pressure Cooker-FAQs
How many cups can the Instant Pot hold?
The 6-quart Instant Pot can cook around 6 to 8 cups of rice. When pressure cooking, avoid filling the pot beyond the halfway mark, especially with foods that expand.
What safety features does the Instant Pot Pro Plus offer?
It includes overheat protection, a secure lid lock, a quick release button, and timed venting reminders to ensure safe and worry-free cooking.
Why does my Instant Pot start counting up?
After cooking, the Instant Pot begins counting up to show how long it has been in natural pressure release mode. You can switch the valve to venting for a quicker release.
What are the temperature settings on the Instant Pot?
There are three sauté heat levels:
1. Less (275–302°F): For simmering or thickening sauces
2. Normal (320–349°F): Ideal for sautéing
3. More (347–410°F): Best for browning or stir-frying
How much water is needed for pressure cooking?
The minimum required liquid for pressure cooking is 2 cups of water, broth, or another thin liquid.
How do I know when it’s safe to open the Instant Pot?
The silver float valve will drop once all pressure is released. Only then is it safe to open the lid.
Can I use the Instant Pot without pressure?
Yes, you can use the “Sauté,” “Slow Cook,” and “Keep Warm” functions without pressure. These settings make it versatile for everyday cooking needs.
Can I cook rice in the Instant Pot?
Absolutely! In a 6-quart model, it’s best to cook at least 2 cups of rice to avoid burning. A 3-quart pot can handle smaller amounts like 1 cup just fine.


