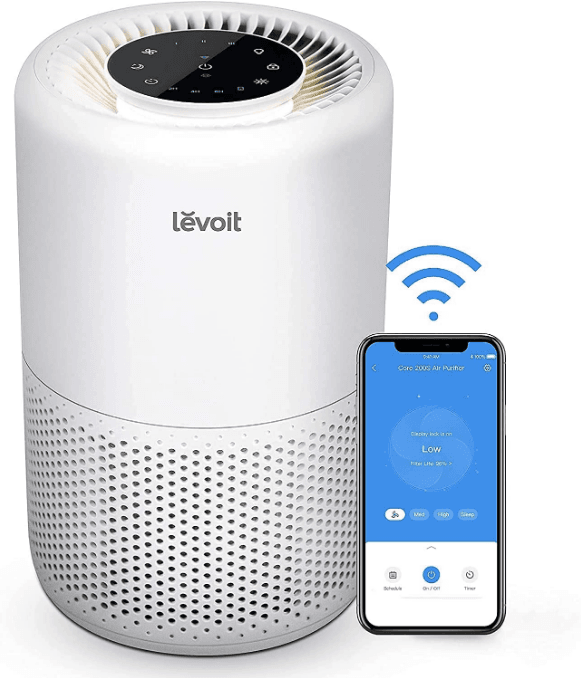
LEVOIT Core 200S Smart Air Purifier
READ AND SAVE THESE INSTRUCTIONS
SAFETY INFORMATION
- To reduce the risk of fire, electric shock, or other injury, follow all instructions and safety guidelines. Keep the air purifier near the outlet it is plugged into. Never place the cord near any heat source.
Power & Cord
- Do not cover the cord with a rug, carpet, or other covering. Do not place the cord under furniture or appliances.
- Keep the cord out of areas where people walk often. Place the cord where it will not be tripped over.
- This appliance has a polarized plug (one blade is wider than the other). To reduce the risk of electric shock, this plug is intended to fit in a polarized outlet only one way. If the plug does not fit fully in the outlet, reverse the plug. If it still does not fit, contact a qualified electrician. Do not attempt to defeat this safety feature.
- This air purifier uses standard US 120V, 60Hz outlets. If using outside the US, check for compatibility.
- If the supply cord is damaged, it must be replaced by the manufacturer, its service agent, or similarly qualified persons in order to avoid a hazard.
GETTING TO KNOW YOUR SMART AIR PURIFIER
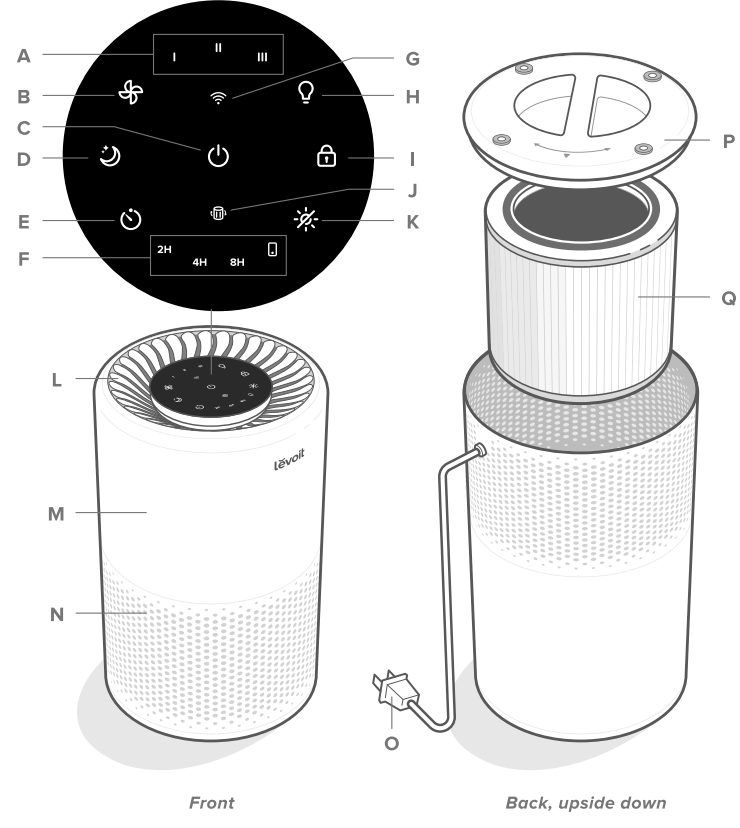
- A. Fan Speed Indicators
- B. Fan Speed Button
- C. On/Off Button
- D. Sleep Mode Button
- E. Timer Button
- F. Timer Indicators
- G. WiFi® Indicator
- H. Night Light Button
- 1. Display Lock Button
- J. Check Filter Indicator
- K. Display Off Button
- L. Air Outlet|
- M. Housing
- N. Air Inlet
- O. Power Cord
- P. Filter Cover
- Q. Main Filter
CONTROLS
- On/Off Button
- Turns the air purifier on/off.
- Press and hold to configure the air purifier. See the VeSync in-app instructions for more information.
- WiFi Indicator
- Turns on, off, or blinks to indicate configuration status. See the VeSync in-app instructions for more information.
- Fan Speed Button
- Cycles through fan speeds: I (low), II (medium), and Ill (high).
- Tapping the Fan Speed Button while the air purifier is in Sleep Mode will exit Sleep Mode.
- Sleep Mode Button
- Turns Sleep Mode on (see page 8).
- Press and hold for 3 seconds to reset the Check Filter Indicator.
- Timer Button
- Cycles through timer options (see page 8).
- Night Light Button
- Turns the night light on/off (see page 9).
- Display Off Button
- Turns the display off (not including the night light).
- Tap any button (except U) to turn the display back on.
- Display Lock Button
- Prevents current settings from being changed (see page 9).
- Blinks when any other button is tapped to indicate that Display Lock is on.
GETTING STARTED
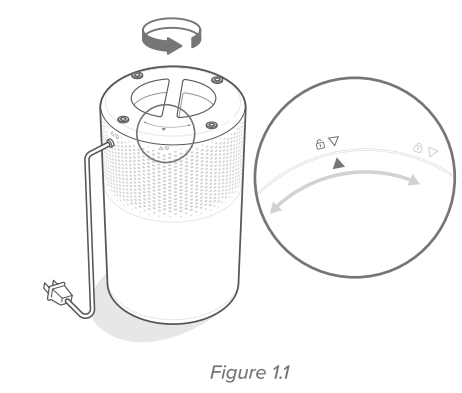
- Flip the air purifier over. Twist the filter cover counterclockwise and remove it. [Figure 1.1]

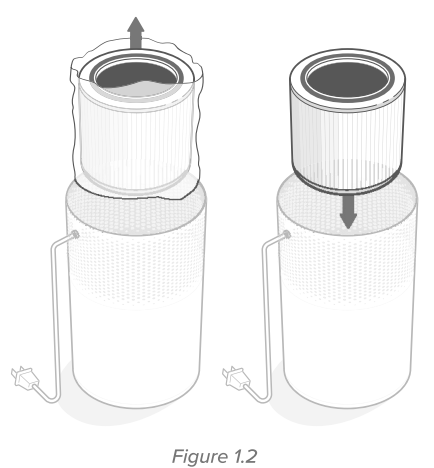
- Remove the filter from its plastic packaging and place the filter back into the air purifier. [Figure 1.2]

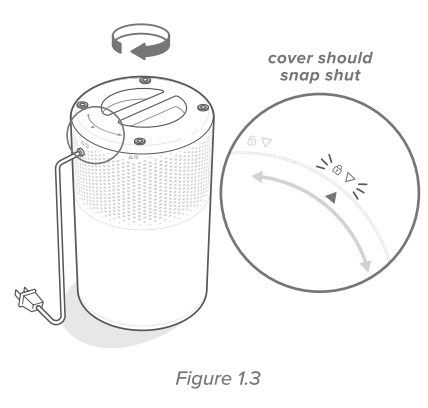
- Replace the filter cover and twist clockwise to lock. [Figure 1.3]

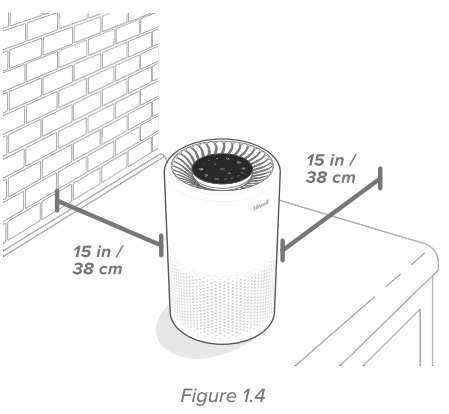
- Place the air purifier on a flat, stable surface with the display facing up. Allow at least 15 in / 38 cm of clearance on all sides of the air purifier. Keep away from anything that would block airflow, such as curtains. [Figure 1.4]

VESYNC APP SETUP
- To download the VeSync app, scan the QR code or search “VeSync” in the Apple App Store® or Google Play Store.
- Open the VeSync app. Log In or Sign Up.
- Follow the in-app instructions to set up your smart air purifier.

- Note:
- To disconnect Wi-Fi, press and hold the On/Off button for 15 seconds until the Wi-Fi indicator turns off. This will restore the smart air purifier’s default settings and disconnect it from the VeSync app.
- To reconnect, please follow the instructions in the VeSync app for adding a device.
USING YOUR SMART AIR PURIFIER
General Operation
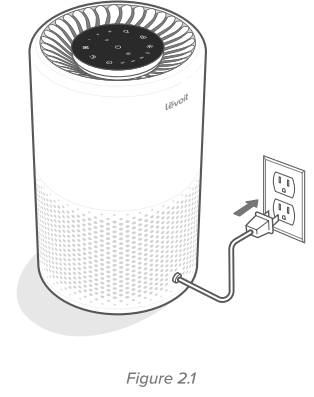
- Plug in and tap U to turn on the air purifier. The fan will start on level l. (Figure 2.1)
- Optionally, tap & to change fan speed between I, II, and III.
- Note:
- The indicators are not buttons and cannot be used to change the fan speed.
- The fan speed indicators will light up when active.
- Fan speed Ill is the loudest, but cleans the air the quickest.
- For best results, or to address a specific air quality issue, such as smoke, run the air purifier at high speed (level III) for 15-20 minutes before using a lower speed.
- To effectively clean the air, keep windows and doors closed while the air purifier is on.
- Tap U to turn off the air purifier

Display Lock
Locking the display prevents settings from being accidentally changed. Buttons will not respond to being tapped.
- Press and hold & for 3 seconds to lock/unlock the display.
- While the display is locked,the Lock icon will light up. If other buttons are tapped, the Lock icon will blink 3 times.
Memory Function
- Even while turned off, as long as the air purifier is plugged in, it will remember its previous fan speed, Sleep Mode, and Display Lock settings.
- When unplugged, the air purifier will remember the fan speed and Sleep Mode, but not Display Lock or Display Off.
ABOUT THE FILTER
The air purifier uses a 3-stage filtration system to purify the air.
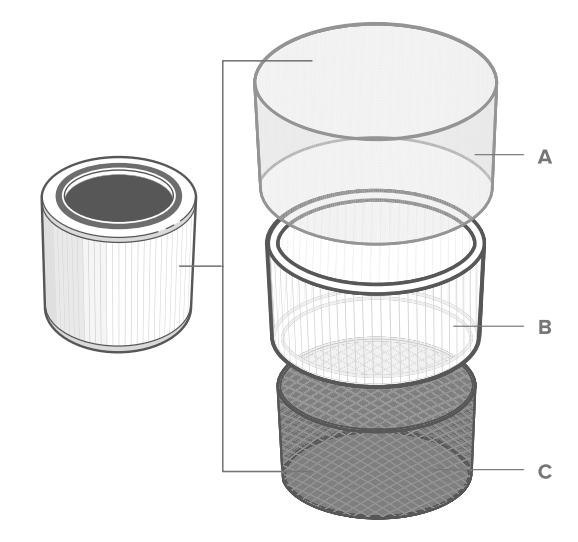
- A. Nylon Pre-Filter
- Captures large particles such as dust, lint, fibers, hair, and pet fur.
- Maximizes the filter’s life by protecting it.
- B. Main Filter
- Filters small particles such as fine dust, smoke particles, pollen, and pet dander.
- C. High-Efficiency Activated Carbon Filter
- Physically adsorbs smoke, odors, and fumes.
CARE & MAINTENANCE
Cleaning the Smart Air Purifier
- Unplug before cleaning.
- Wipe the outside of the air purifier with a soft, dry cloth. If necessary, wipe the housing with a damp cloth, then immediately dry.
- Vacuum the inside of the air purifier.
- Do not clean with abrasive chemicals or flammable cleaning agents.
Cleaning the Filter
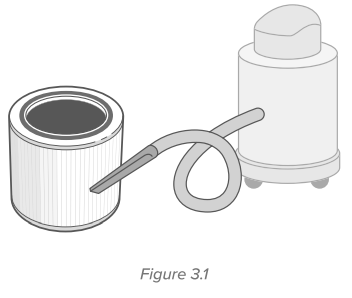
- The outer pre-filter should be cleaned every 2-4 weeks to increase efficiency and extend the life of your filter. Clean the pre-filter using a soft brush or vacuum hose to remove hair, dust, and large particles. Do not clean the filter with water or other liquids. [Figure 3.1)

Nylon Pre-Filter
Every
2-4 weeks
Use a soft brush or vacuum hose [Figure 3.1]
Main Filter &
6-8 months High-Efficiency Activated
Do not clean Carbon Filters
Replacing the Filter
- Unplug the air purifier. Flip the air purifier over and remove the filter cover (see Getting Started, page 6).
- Remove the old filter.
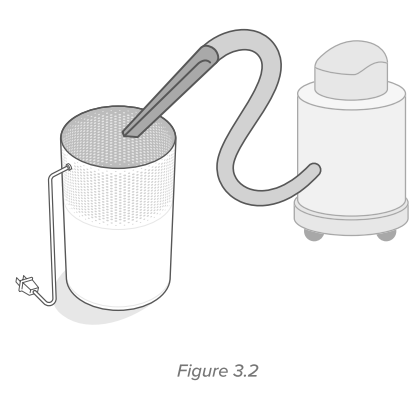
- Clean out any remaining dust or hair inside the air purifier using a vacuum hose. Do not use water or liquids to clean the air purifier. [Figure 3.2]

- Unwrap the new filter and place it into the housing (see Getting Started, page 6).
- Replace the cover. Plug in the air purifier.
- Reset the Check Filter Indicator (see page 11)
Storage
- If not using the air purifier for an extended period of time, wrap both the air purifier and the filter in plastic packaging and store in a dry place to avoid moisture damage.
TROUBLESHOOTING
| Plug in the air purifier. | |
| An air purifier will not turn on or respond to button controls. | Check to see if the power cord is damaged. If so, stop using the air purifier and contact Customer Support (see page 19). |
| Plug the air purifier into a different outlet. | |
| The air purifier may be malfunctioning. Contact Customer Support (see page 19). | |
|
Airflow is significantly reduced. | Make sure the filter is removed from its packaging and properly in place (see page 6). |
| Tap fir to increase the fan speed. | |
| Make sure there are at least 15 in/ 38 cm of clearance on all sides of the air purifier. | |
| The pre-filter may be clogged by large particles, such as hair or lint, blocking air flow. Clean the pre-filter (see page 11). | |
| Replace the filter (see page 12). | |
|
The air purifier makes an unusual noise while the fan is on. | Make sure the filter is properly in place with plastic packaging removed (see page 6). |
| Make sure the air purifier is operating on a hard, flat, level surface. | |
| Replace the filter (see page 12). | |
| The air purifier may be damaged, or a foreign object may be inside. Stop using the air purifier and contact Customer Support (see page 19). Do not try to repair the air purifier. | |
| A strange smell is coming from the purifier. | Clean the filter or replace if necessary. |
| Make sure not to use your air purifier in an area with high humidity or while diffusing essential oils. | |
|
Poor air purification quality. | Tap |
| Make sure no objects are blocking the sides or top of the air purifier (the inlet or outlet). | |
| Make sure the filter is removed from its packaging and properly in place (see page 6). | |
| Close doors and windows while using the air purifier. | |
| Replace the filter (see page 12). | |
| Reset the Check Filter Indicator (see page 11). | |
|
| you don’t use your air purifier often,,@, will take longer to turn on. |
|
| you run your air purifier frequently, 1@1 will turn on sooner. |
WARRANTY INFORMATION
| Product Name | Levoit Core 200S-P Smart Air Purifier | |
| Models | Core 200S, LAP-C201S-AUSR | |
| For your own reference, we strongly recommend that you record your order ID and date of purchase. | ||
| Date of Purchase I | ||
Levoit Limited Product Warranty
- Register your products at https://warranty.levoit.com/warranty to stay up to date with important product information such as product updates, limited warranties, usage and maintenance recommendations, and notifications concerning safety warnings or product recalls. Registration is not required to claim your limited warranty.
- Two (2) Year Limited Consumer Product Warranty
- Arovast Corporation (“Arovast”) warrants that the product shall be free from defects in material and workmanship for a period of 2 years from the date of original purchase (“Limited Warranty Period”), provided the product was used in accordance with its use and care instructions (e.g., in the
intended environment and under normal circumstances). - Your Limited Warranty Benefits
- During the Limited Warranty Period and subject to this limited Warranty Policy, Arovast will, in its sole and exclusive discretion, either
- (i) refund the purchase price if the purchase was made directly from the online Levoit store
- (ii) repair any defects in material or workmanship,
- (iii) replace the product with another product of equal or greater value
- (iv) provide store credit in the amount of the purchase price.
For more manuals by Levoit, visit ManualsLibraryy
LEVOIT Core 200S Smart Air Purifier-FAQs
Can I leave my Levoit Core 200S air purifier on all the time?
Yes! You can run it 24/7. It’s designed for continuous use and will clean the air in a closed room within a few hours.
How often should I change the filter?
Check the filter every 6 months and replace it if airflow seems reduced or the filter looks dirty.
Should I run my air purifier all day?
Yes. For best results, run it continuously, especially if it has an Auto Mode that adjusts fan speed based on air quality.
Does the Levoit humidifier shut off automatically?
Yes. All Levoit humidifiers have an auto shut-off feature that turns the unit off when the water runs out.
What does Sleep Mode do on the Core 200S?
Sleep Mode dims the display lights and uses a quieter, lower fan speed for undisturbed rest. You can also set a timer using the buttons or the VeSync app.
Where is the humidity sensor located on a Levoit humidifier?
The humidity sensor and air inlet are located inside the aroma box. Keep the humidifier away from walls for proper airflow and sensor accuracy.
What is Pet Mode on the Levoit air purifier?
Pet Mode switches between different fan speeds to maintain fresh air efficiently while saving energy.
Does the Levoit Core 200S produce ozone?
No. The Core 200S is 100% ozone-free and does not produce ions, making it safe for indoor use.

