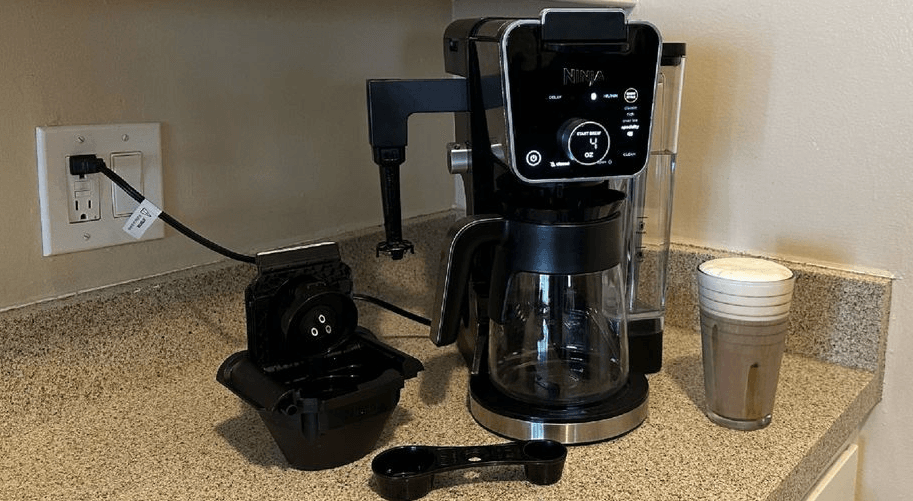
Ninja DualBrew Pro CFP200 Series Coffee Maker
IMPORTANT SAFEGUARDS
- READ ALL INSTRUCTIONS BEFORE USE (HOUSEHOLD USE ONLY)
General Precautions
- To eliminate a choking hazard for young children, discard all packaging materials immediately upon unpacking.
- This appliance can be used by persons with reduced physical, sensory or mental capabilities or lack of experience and knowledge if they have been given
supervision or instruction concerning the use of the appliance in a safe way and understand the hazards involved. - To reduce the risk of electric shock, this appliance has a polarized plug (one blade is wider than the other). As a safety feature, this plug will fit into a
polarized outlet only one way. If the plug does not fit fully into the outlet, reverse the plug. If it still does not fit, contact a qualified electrician. DO NOT force it into an outlet or try to modify to fit. - Keep the appliance and its cord out of reach of children. DO NOT allow the appliance to play or be used by children. Close supervision is necessary when used
near children - To protect against fire, electric shock, and injury to persons, DO NOT immerse the cord, plugs, or body of the machine in water or other liquid.
- NEVER carry the appliance by the power cord or pull it to disconnect it from the electrical socket; instead, grasp the plug and pull to disconnect.
PARTS
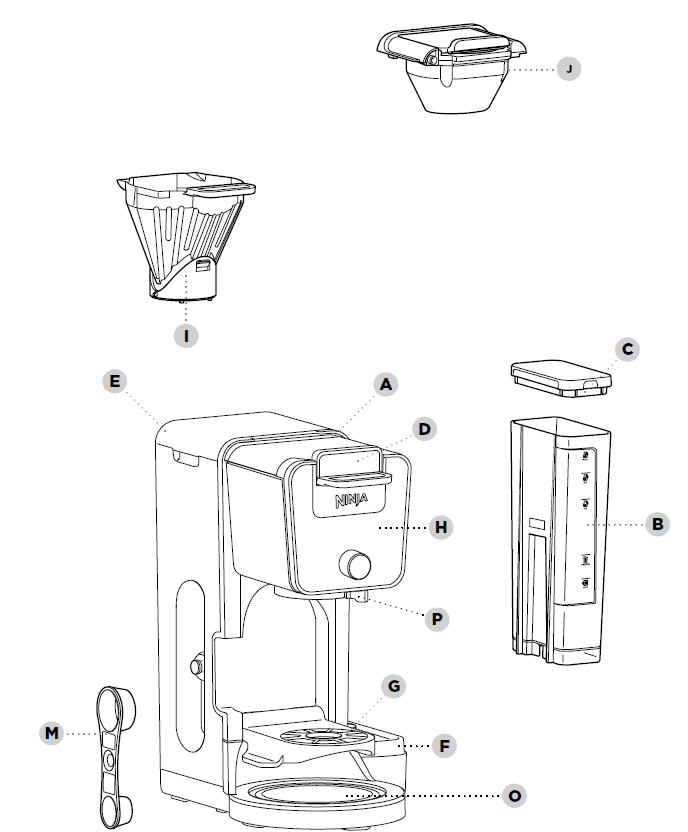
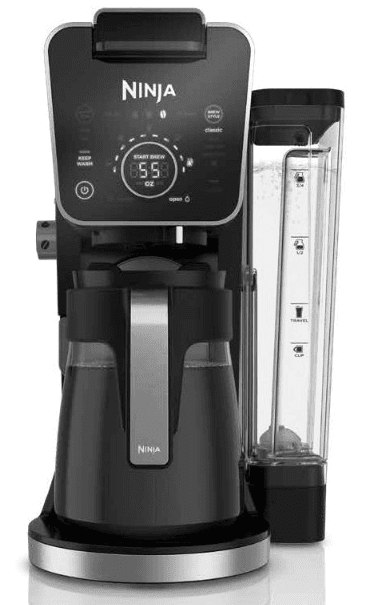
- A Brewer (Power cord not shown)
- B 60 oz. Removable Water Reservoir
- C Removable Water Reservoir Lid
- D Sliding Lid
- E Hinged Hood
- F Water Reservoir Base
- G Single-Serve Cup Platform
- H Control Panel
- I Brew Basket
- j Ninja Pod Adapter
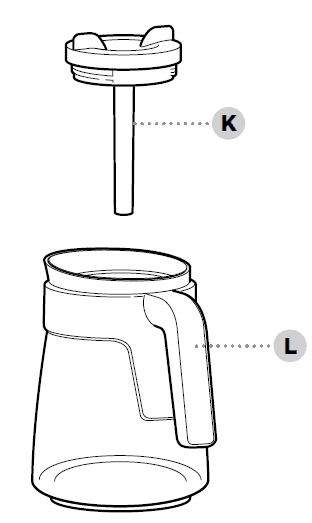
- K Brew-Through Lid
- L Ninja Glass Carafe
- M Ninja Smart Scoop™
- O Intelligent Warming Plate
- P Drip Stop
USING THE CONTROL PANEL
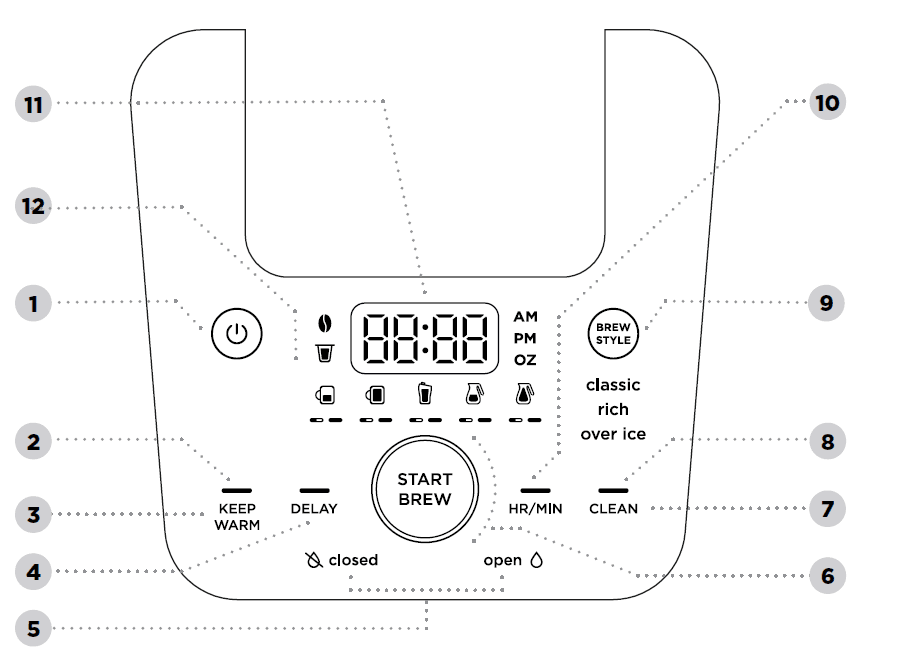
- Power Button
- Keep Warm Indicator (Orange)
- Keep Warm Button
- Delay Brew Button
- Drip Stop Indicators
- Multi-Serve Dial and Start/Stop Button
- Intelligent Clean Cycle Button
- Intelligent Clean Cycle Indicator (Orange)
- Brew Style Button
- Hour/Minute Button
- Programmable Digital Clock and Ounce Display
- Smart Sensing Mode Indicators
SMART SENSING MODE INDICATORS
|
| Grounds: The Sliding Lid is slid all the way forward over the brew basket until it is completely closed and the brewer is ready to brew grounds. |
| Pods: The Ninja® Pod Adapter is inserted, locked, and shut, and the brewer is ready to brew pods. |
| No State: One of the above criteria has not been met. |
PREPARING FOR USE
SETTING THE CLOCK
When the brewer is first plugged in, the time will need to be set.
- Press the HR/MIN button to set the clock.
- Use the Multi-Serve Dial to select the correct hour. Then, press the START BREW button to toggle to minutes.
- Use the dial again to select the correct minute, and press the START BREW button to set the clock at the displayed time.
HIGH-ALTITUDE CALIBRATION BREW
Required for users in high-altitude areas. Not running the high-altitude calibration brew in a high-altitude area will result in excessive steaming during brewing.
Because water boils at a lower temperature at higher altitudes, running a calibration cycle before your first brew allows the brewer to detect the boiling point of water at your location. Running a calibration cycle will help deliver a consistent brew each time.
- Fill the water reservoir up to, but not exceeding, the Full line.
- Insert the brew basket and slide the sliding lid closed, then place an empty carafe on the base.
- Press and hold both BREW STYLE and HR/MIN until you hear a confirmation sound.
- A calibration cycle will begin, and the display will count down until the Altitude calibration is complete. When complete, the brewer will beep and display “End”
on the dial. Discard the water in the carafe
PRIMING YOUR NINJA® DUALBREW COFFEE MAKER
- Clean all accessories before your first brew.
- Plug the brewer in and turn it on by pressing the power button.
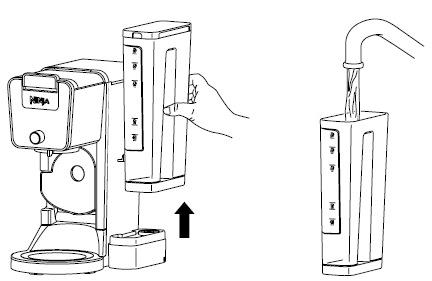
- Lift the water reservoir off of its base. Remove the reservoir lid. Add water up to, but not exceeding the Full line. Return the water reservoir to the brewer. DO NOT fill the water reservoir with anything other than water, as other liquids may damage your brewer.

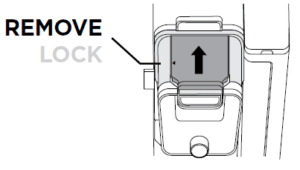
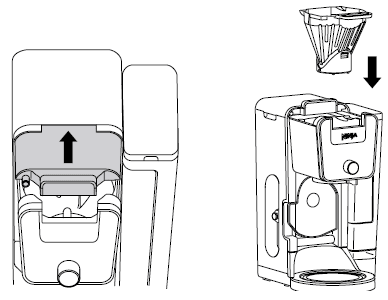
- Remove the Ninja Pod Adapter by pushing the handle away from you so that the position indicator is in the REMOVE position. Then, using the handles on the left and right, lift the adapter out of the brewer

USING THE NINJA® DUALBREW COFFEE MAKER
BREW VOLUMES AND MEASUREMENTS
- Each size and brew style produces a different amount of coffee to optimize strength and flavor
APPROXIMATE BREW VOLUMES
| GROUNDS | |||
| Size | Classic | Rich | Over Ice (filled with ice) |
| Sm Cup | 8 oz. | 7 oz. | 8 oz. |
| Cup | 10 oz. | 8oz. | 10 oz. |
| XL Cup | 12 oz. | 10 oz. | 12 oz. |
| Travel | 15 oz. | 12 oz. | 14 oz. |
| XL Travel | 18 oz. | 16 oz. | 18 oz. |
| 1/4 Carafe | 28 oz. | 26 oz. | 28 oz. |
| 1/2 Carafe | 37 oz. | 33 oz. | 37 oz. |
| 3/4 Carafe | 46 oz. | 41 oz. | 46 oz. |
| Full Carafe | 55 oz. | 47 oz. | 55 oz. |
| PODS | |||
| Size | Classic | Rich | Over Ice (filled with ice) |
| 6 oz. | 6 oz. | 6 oz. | 6 oz. |
| 8 oz. | 8 oz. | 8 oz. | 8 oz. |
| 10 oz. | 10 oz. | 9 oz. | 10 oz. |
| 12 oz. | 12 oz. | 11 oz. | 12 oz. |
USING THE NINJA® DUALBREW COFFEE MAKER CONT.
MEASURING YOUR COFFEE GROUNDS
- For best results, use the measurements on the Ninja Smart Scoop™ or in the chart to determine how much ground coffee to use for each brew size. Always use level scoops when measuring ground coffee. The amount of ground coffee for each size will remain the same for any brew type you select. For example, if you select Cup and Classic, you will use the same amount of coffee grounds as if you were to select Cup and Over Ice.
| COFFEE MEASUREMENT CHART | ||
| Serving Size | Ninja Smart Scoop | Tablespoons |
| Sm Cup |
2–3 small scoops |
2–3 tablespoons |
| Cup | ||
| Xl Cup | ||
| Travel |
3–5 small scoops |
3–5 tablespoons |
| Xl Travel | ||
| 1/4 Carafe |
3–5 big scoops |
6–10 tablespoons |
| 1/2 Carafe | ||
| 3/4 Carafe | 4–7 big scoops | 8–14 tablespoons |
| Full Carafe | ||
BREWING GROUND COFFEE
USING THE BREW BASKET AND SLIDING LID
- To prepare for brewing, open the sliding lid by sliding it back under the hood and ensure the brew basket is installed.

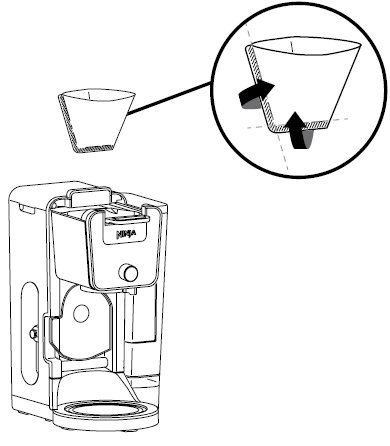
- Place a #4 paper cone filter or permanent filter (not included on all models, sold separately) in the brew basket.

- NOTE: Fold the paper filter along the seams, open the top fully, and firmly press it into the brew basket, making sure it is fully seated
BREW STYLES
CLASSIC BREW & RICH BREW
- Use the Multi-Serve dial to select the brew size. Place the empty vessel under the brew basket

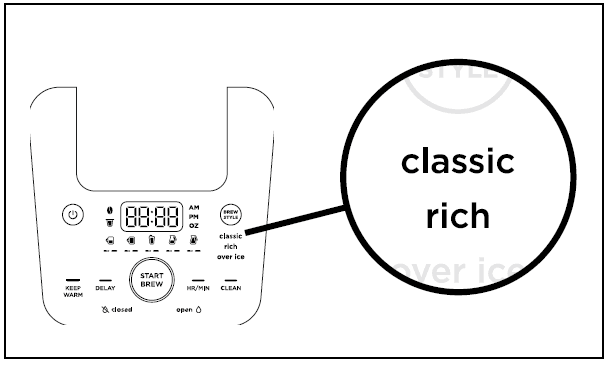
- Press the BREW STYLE button to choose either Classic Brew or Rich Brew.
- Press the START BREW button on the dial to start the brew. To cancel the brew at any time, press the START BREW button on the dial again or press the Power button
- The brewer will beep to signal the brew has started. The progress bar above the dial will illuminate to indicate the status of the brew. When the brew is finished, the machine will beep again and End will appear on the display.
NOTE: Rich Brew will use slightly less water and yield slightly less brewed coffee than Classic Brew. See the Approximate Brew Volume chart for additional information.
INTELLIGENT WARMING PLATE
- The Intelligent Warming Plate will automatically turn on during Classic or Rich brews when a 1/4, 1/2, 3/4, or full carafe size is selected. The Intelligent Warming Plate is set to a specific temperature setpoint to avoid burning the coffee over time. To turn the warming plate on at any time, turn the dial to one of the carafe sizes, select Classic or Rich, and press the KEEP WARM button

- IMPORTANT: The light on the base of the brewer will illuminate only when the warming plate is hot and will remain illuminated until the plate has cooled down.
SETTING THE DELAY BREW
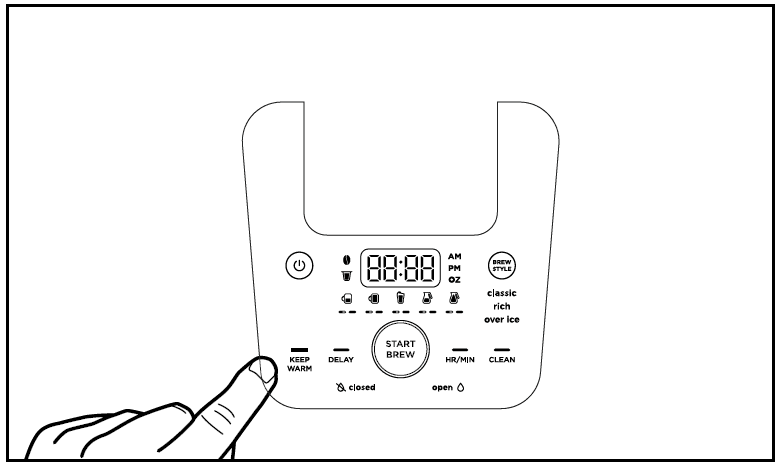
- Plug the brewer in and turn it on by pressing the Power button.
- After filling the water reservoir and adding ground coffee to the filter or inserting a pod in the Ninja Pod Adapter, close the sliding lid or adapter handle,
and place the appropriate-size vessel under the brew basket. - Press DELAY. DELAY will illuminate and the clock will begin to flash “12:00” or the last time that was set.
- While the clock is flashing, turn the Multi-Serve dial to adjust the hour. The AM or PM indicator will illuminate under the clock display when you set the
desired time. Press START BREW on the dial and turn the Multi-Serve dial to adjust the minute. Press START BREW on the dial to lock in the time. - Once the desired time has been set, use the Multi-Serve dial to select the size of the vessel you would like to brew into.
- Press the BREW STYLE button to choose your brew style.
- Once the time, brew size, and brew style have been set, press the STARTBREW button to activate. When the brewer will beep and DELAY and your selected options will remain illuminated. To cancel, press DELAY again.
CLEANING & MAINTENANCE
CLEANING AFTER A BREW
- After the brewer has cooled, remove the brew basket. If using pods, remove the Ninja Pod Adapter and brew basket. Wash the used parts thoroughly with
soap and warm water. - Wash the carafe and brew-through lid with soap and warm water. Use a bottle brush or cloth to wash the inside of the carafe. DO NOT use a wire brush
CLEANING THE WATER RESERVOIR
- Empty the reservoir and hand-wash or place it in the dishwasher. For a better clean, we recommend placing it in the bottom rack of the dishwasher standing upright with the opening facing downward. We recommend doing this weekly.
- CLEANING THE CARAFE
- We recommend cleaning your carafe after each use with warm, soapy water. To clean the carafe more thoroughly, we recommend using a soft foam brush. DO NOT use a wire brush
- CLEANING THE BREW BASKET
- If brewing grounds, allow the brewer to cool, then remove the brew basket by pinching the handle and lifting it straight up. If using a paper filter, discard the filter by dumping the brew basket upside down into a waste bin. If brewing pods, first remove the Ninja Pod Adapter, then remove and wash the brew basket.
- CLEANING & DESCALING YOUR BREWING SYSTEM
- Your Ninja DualBrew coffee maker offers two modes to choose from, Grounds and Pods. Each mode that you use will eventually need to be cleaned with a clean cycle. The clean cycle is used for descaling the brewer when calcium scale buildup is affecting the performance of the brewer and/or the flavor of your coffee.
The Intelligent Clean Cycle Indicator will automatically illuminate orange when a cleaning cycle is recommended for your brewer. If the indicator is ignored, your brewer may stop mid-brew and display “CLn,” indicating it needs immediate cleaning on the current mode.
CHOOSING WHICH MODE TO CLEAN
- When the Intelligent Clean Cycle Indicator turns on for the first time, run a clean cycle on the mode you use most. For example, if you primarily brew with grounds, run the clean cycle on the Grounds mode with the Sliding Lid closed. If you primarily use pods, ensure the Ninja Pod Adapter is installed, and run the clean cycle through the Ninja Pod Adapter. The next time the Intelligent Clean Cycle Indicator illuminates orange, run a clean cycle on the remaining way to brew coffee. For example, if you run a clean cycle on the grounds mode first, run a clean cycle on the Pods mode next.
To clean and descale your Ninja DualBrew Coffee Maker:
- Place the empty carafe beneath the brew basket.
- Use a descaling solution specifically formulated for coffeemaker cleaning and follow the directions on the package. Fill the water reservoir up to, but not
exceeding, the Full line.
TROUBLESHOOTING GUIDE
- There’s sediment in my coffee.
- If using a permanent filter (sold separately), this may be due to using finely ground coffee.
- To reduce the amount of sediment in the brewed coffee, use a slightly coarser grind or use a paper filter.
- NOTE: DO NOT use a paper filter in conjunction with a permanent filter, as water and/or coffee can back up and clog the filter basket.
- Over Ice Brew is not cold.
- Ensure your cup, travel mug, or carafe is filled all the way to the top with ice cubes before brewing. The brewer will brew at elevated temperatures to lock in the best flavor, then the ice will cool the brewed coffee to the perfect temperature.
- Coffee is too weak.
- For stronger coffee, use the Rich brew setting. For an even bolder flavor, you can add more coffee grounds to the filter.
- Coffee is too strong.
- For milder coffee, use the Classic brew setting. For an even milder flavor, use fewer coffee grounds in the filter.
- The brew cycle is too slow.
- The brew time will vary based on size and brew style. Full carafe sizes and Rich brews will take longer to brew than single-serve and classic brews. The progress bar on the control panel will indicate the brewing status.
- Cup or travel mug overflowed.
- Refer to the Approximate Brew Volumes chart on page 10.
- The brew basket overflowed.
- The bottom of the brew basket may be clogged. This can happen with finely ground coffee or too many coffee grounds in the filter. Medium-grind coffee is recommended.
For more manuals by Ninja visit, ManualsLibraryy
Ninja DualBrew Pro CFP200 Series Coffee Maker-FAQs
Does the Ninja coffee maker turn off automatically?
No, but the warming plate turns off after 2 hours, which can be adjusted to 4 hours.
How much coffee grounds do I need per cup?
Use 1 ½ to 2 tablespoons of coffee grounds per cup, equivalent to approximately 10.6 grams.
Why does my Ninja coffee maker keep shutting off?
Check if the drip stop and brew basket are properly installed. Ensure the brew basket is fully inserted and the drip stop is open.
Can I adjust the temperature on my Ninja coffee maker?
No, the temperature is automatically adjusted based on the brew type and cup size.
Will my coffee maker turn off automatically after a certain time?
Yes, according to household appliance legislation, coffee makers with a hot plate must switch off automatically after 40 minutes.
Can I turn off the sound on my Ninja coffee maker?
No, the sound cannot be turned off on this model.
What is the specialty setting on my Ninja coffee maker?
The specialty setting yields a concentrated 4-ounce cup for use in lattes, macchiatos, and other coffee drinks.
How does the brew-over-ice feature work?
The coffee maker brews with hot water to extract flavor, then switches to cool water to minimize ice melt.
What is the ideal coffee-to-water ratio?
The golden ratio is 1:18, meaning 1 part coffee to 18 parts water, which produces a balanced cup.

