
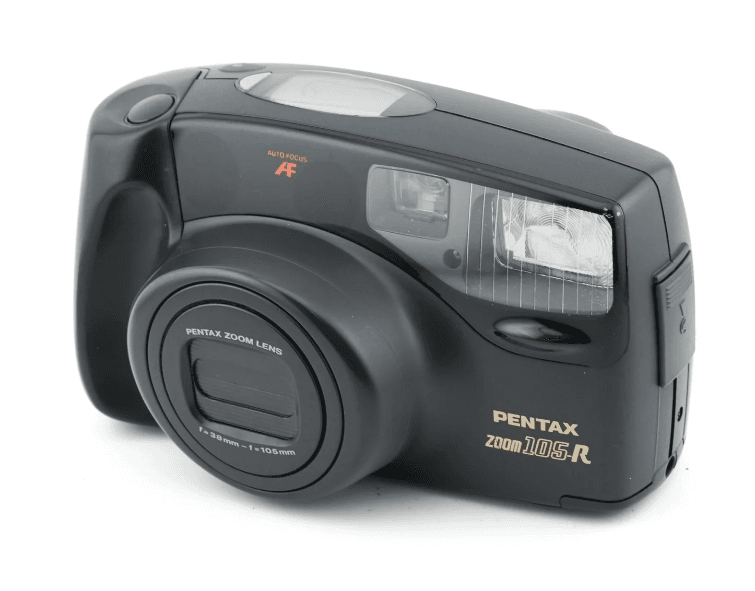
Pentax Zoom 105R Film Camera
NAMES OF WORKING PARTS
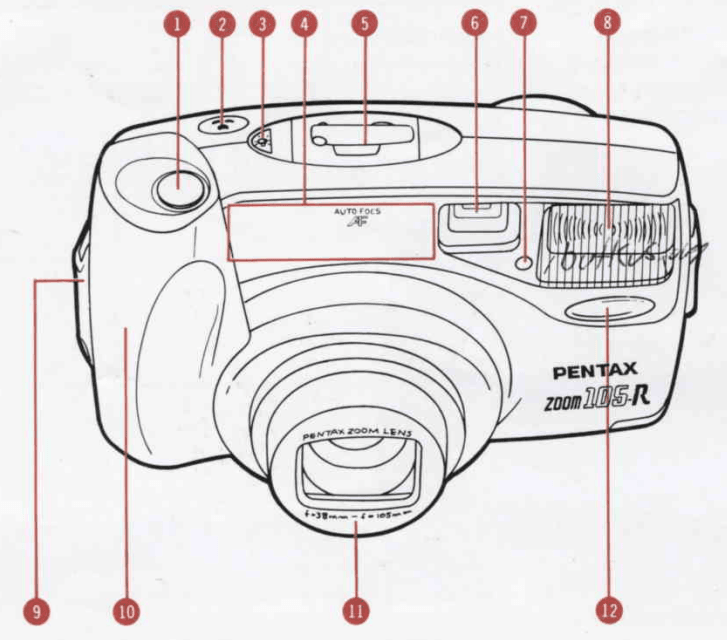
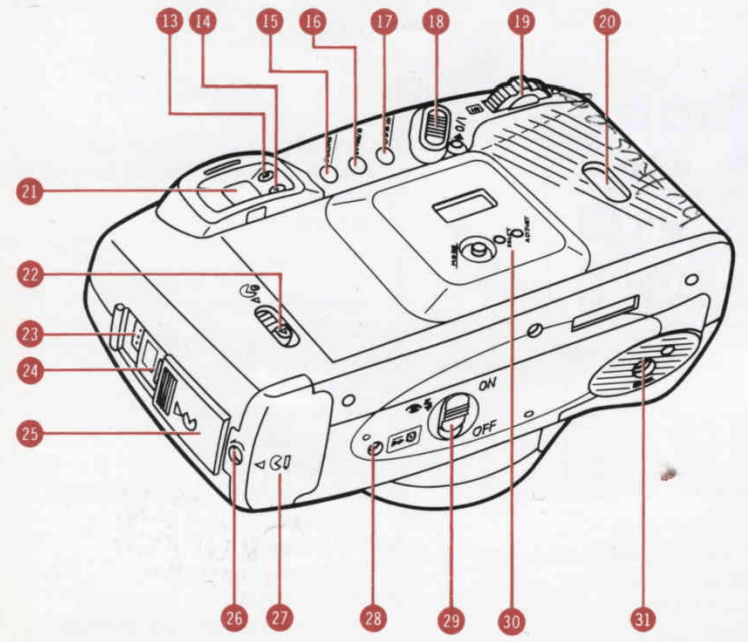
- Shutter release button
- Macro button
- Illumination button
- Autofocus window
- LCD panel
- Viewfinder window
- Light-sensor window
- Built-in flash
- Strap lug
- Grip
- Zoom lens
- Self-timer lamp

- AF (green) lamp
- Flash (red) lamp
- Mode (yellow) button
- SETTING (black) button
- Drive (blue) button
- Power switch (timer reset)
- Zooming lever
- Film information window
- Viewfinder eyepiece
- Back cover release lever
- Release socket
- Super Macro button
- Sliding cover
- Battery chamber cover fixing screw
- Battery chamber cover
- Auxiliary rewind button
- Red-eye reduction flash switch
- Back cover
- Tripod socket
LCD PANEL
All indications will not appear simultaneously as shown.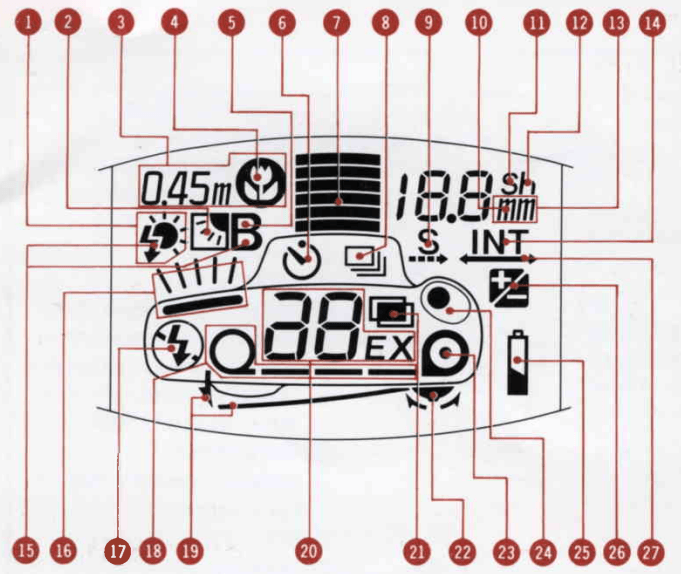
- Flash-On mode
- Backlight Compensation mode
- Super Macro mode
- Macro mode
- Bulb mode
- Self-Timer Shooting mode
- Zoom lens
- Consecutive Shooting mode
- Interval Shooting starting time setting
- Minute
- Second
- Hour
- Millimeter (focal length)
- Interval Shooting mode
- Bulb-Sync mode
- Flash emission
- Flash-Off mode
- Frame advanced
- Back cover open
- Exposure counter
- Multi-Exposure Shooting mode
- Zooming lever
- Film cartridge
- Shutter release button
- Battery exhaustion warning
- Exposure Compensation mode
- Interval Shooting time setting
Notes:
- At a high temperature of approximately. At 60°C, the LCD panel may blacken It returns to normal when the normal temperature is restored.
- At lower temperatures, the response speed of the LCD panel may be slower. This is an LCD characteristic, not a defect.
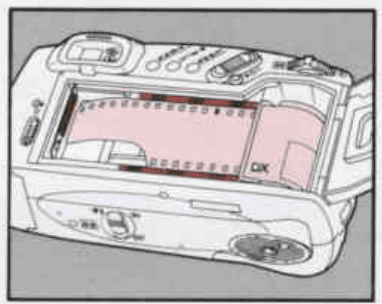
- Open the back cover (see page 8).

- Load the film and close the back cover.

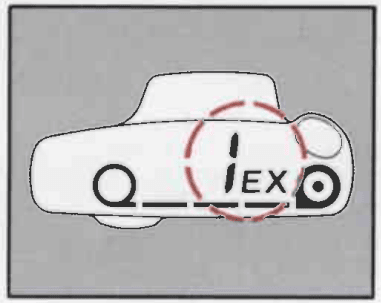
- The film automatically advances to the first frame.

- Switch on the power (see page 4).

- Frame your subject and operate the zooming lever to determine the composition (see page 6).

- Focus your subject (see page 14)

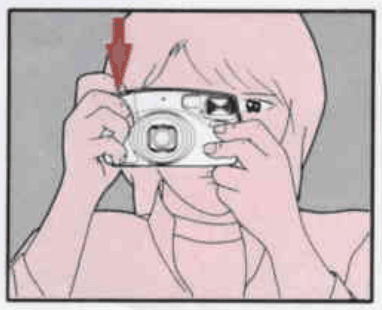
- Press the shutter release button. In dark conditions, the flash fires automatically.

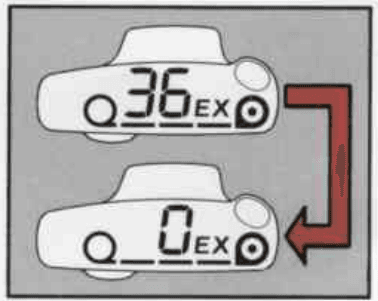
- When the film reaches its end, the camera automatically rewinds it (see page 18).

CATION
- Shield the camera from salty air and water at the beach, splashing liquid of any kind, and rain. If immersed in water, the camera will be rendered inoperable.
- If the camera is exposed to dirt, mud, sand, dust, moisture, toxic gases, or salt water, it may be damaged or rendered inoperable.
- Avoid leaving the camera for extended periods where temperature and humidity are high, such as in a car.
- Never use solvents such as paint thinner, alcohol, or benzine to clean the camera.
- Be careful not to drop or otherwise subject the camera to strong vibrations, shock, or pressure.
- Do not apply force to the zoom lens; do not place the camera with the lens facing down.
- The electric circuitry inside the camera contains high-voltage working parts. Never attempt to disassemble the camera.
- Keep the batteries out of the reach of children.
- Replace all batteries at the same time. Do not mix battery brands, types, or old batteries with new ones. Otherwise, overheating or fire might result.
- The misuse of batteries causes hazards such as leakage, heating, explosions etc. Batteries should be inserted with the “+” or “~” sides facing the correct direction.
- Never try to break up or recharge the batteries. Also, do not dispose of the battery in a fire, as the battery may explode.
PREPARATIONS BEFORE TAKING PHOTOGRAPHS
You should be aware of certain fundamentals to make it easier to use this camera in the best way.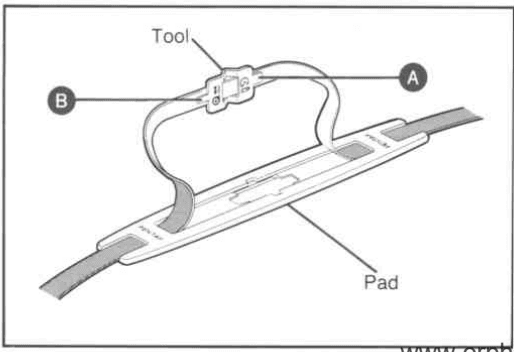
STRAP ATTACHMENT
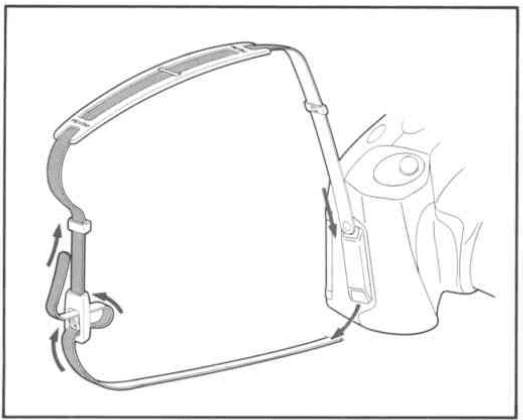
Attach and adjust the camera strap as illustrated. Use the tool’s protrusion A![]() as a screwdriver to open the battery chamber cover. Use protrusion
as a screwdriver to open the battery chamber cover. Use protrusion![]() to press the film auxiliary rewind button (if you want to remove the film before the roll is completed)
to press the film auxiliary rewind button (if you want to remove the film before the roll is completed)
Note: Adjust the strap so that the camera is positioned above your waist 1g minimize camera sway when you walk.
POWER SWITCH AND BATTERY CHECK
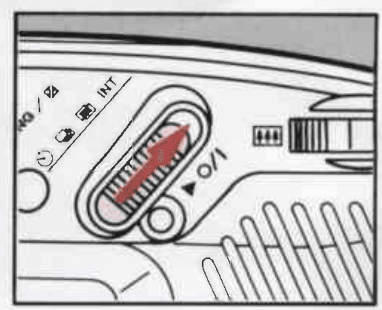
Power switch
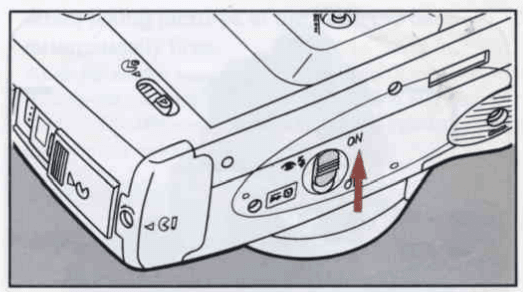
To switch on, slide the power switch upward. The lens cover opens, and the LCD indications appear. The camera is now ready for setting and shooting. To switch off, slide the power switch upward again. Make sure to switch it off when the camera is not in use.
Caution: The lens cover automatically opens when the power switch is turned on, and closes when the power switch is turned off. Never attempt to open the lens cover by hand.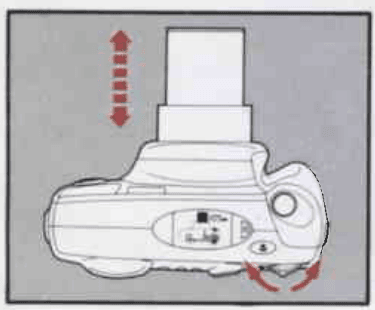
Battery check
After power is switched on, the lens extends slightly, and the lens cover opens. The camera is then ready to shoot.
Notes:
- When the camera is left unused with the power on for over 3 minutes, its power automatically switches off.
- If you have a DATE model, do not remove the batteries until they are exhausted, since they are used by the date function to keep constant track of time.
- Refer to page 41 for directions on battery insertion.
HOW TO HOLD THE CAMERA

When shooting, hold the camera securely with both hands. Keep the camera as still as possible, and gently press the shutter release button. (If pressed forcefully, the camera is likely to shake, and the picture will be blurred.) Try to brace your elbows against your body or support yourself and the camera against a stable, stationary object, such as a wall. When using flash with the camera in a vertical position, hold the camera so that the flash is above the lens.
Caution: Do not hold the zoom lens because it moves back and forth when zooming.
Note: Keep your fingers and hair away from the lens, autofocus window, sensor window, flash, etc.
TAKING PHOTOGRAPHS
After reading through this section to familiarize yourself with operations, you’re ready to insert the film.
USABLE FILM
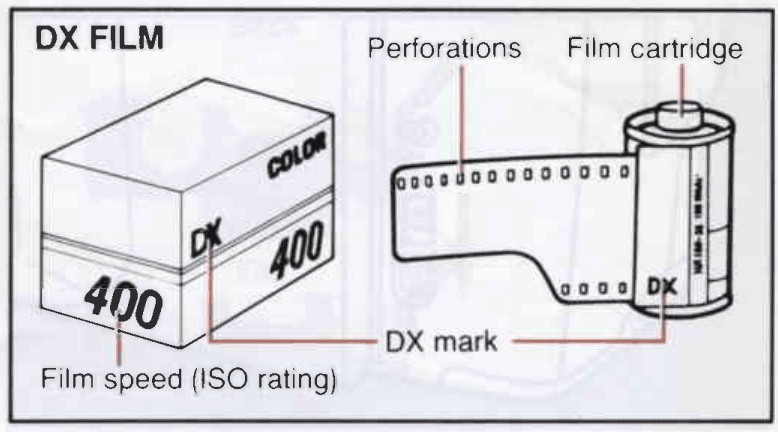
Automatic film speed setting
This camera is designed to use DX-coded films with ISO ratings from 25 to 3200. When such a film is loaded, the camera automatically adjusts to the film’s speed.
Notes:
- When buying DX film, make sure the package bears the “DX” mark.
- If non-DX film is loaded, the film speed will be set automatically to ISO 25, regardless of the film’s actual speed.
- Use high-speed film with an ISO rating of 1000 ~~ 3200 for shooting indoors or in dimly lit conditions.
FILM LOADING
First, make sure that the power is off.
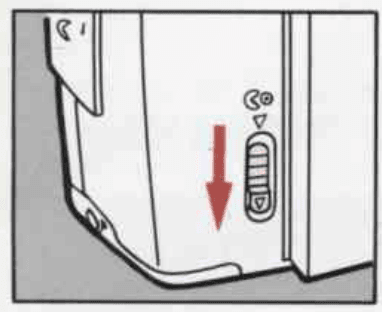
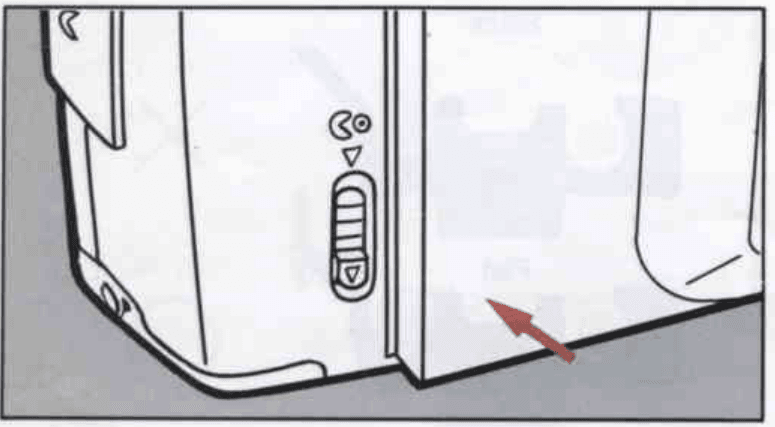
- Slide the back cover release lever in the direction of the arrow, as illustrated, to open the back cover.

- Place the film cartridge in the film chamber, fitting its fiat side on the top of the rewind shat.

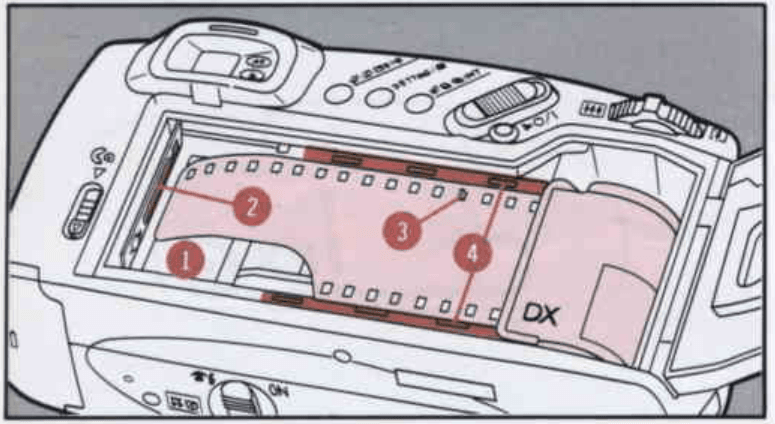
- Pull the film leader out far enough from the cartridge to reach the take-up spool 1. Align the film’s tip with the film leader end mark 2.
Notes:- Make sure the film perforations properly engage the sprocket teeth 3.
- Make sure the film is properly placed between the guide rails 4.
- Make sure the film is taut as illustrated. Take up any slack in the film by pushing it back into the cartridge.
- If the end of the film leader is extremely bent, straighten it or cut off the bent portion.

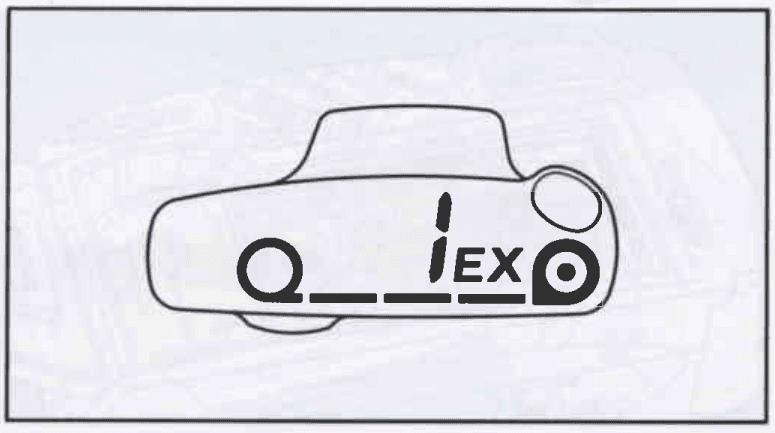
- Close the back cover. The film automatically advances to the first frame.

- When
 appears in the exposure counter on the Leo panel, the film automatically stops winding. If
 does not appear on the LCD panel, the film is not properly loaded. Reload the film.
Notes: - Even if no film is loaded, the motor operates for a second or two after the back cover is closed.
- The exposure counter remains visible even when the power is off.
VIEWFINDER DISPLAYS AND SHOOTING RANGES
First, make sure the power is on.
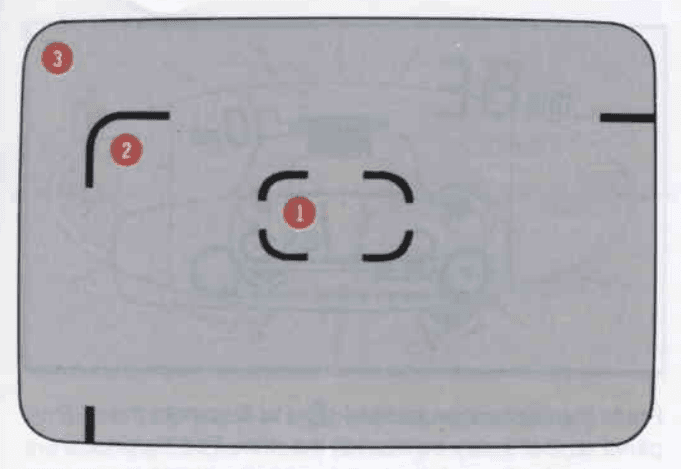
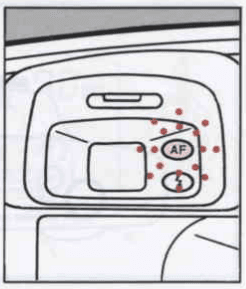
- Autofocus frame
Position the whole at the subject of focus. - Macro frame
When taking a Macro picture, compose the picture within this frame. - Picture area
When taking a normal picture, compose the picture within this.

Shooting ranges (effective camera-to-subject distance)
- Ordinary setting: = (infinity) ~ 1.35 m (4.4 ft).
- Macro setting: 1.35 m (4.4 ft) ~ 0.75 m (2.5 ft).
- Super macro: 0.45 m (1.4 ft).
GREEN/RED LAMPS
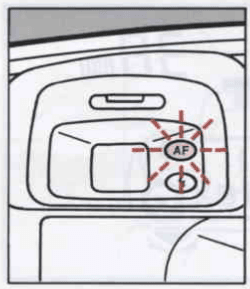
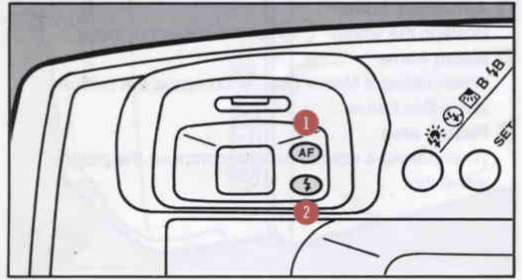 When you press the shutter release button halfway, the lamps 1 (AF) and/or 2 shown above glow or flicker.
- Green lamp ( AF)
When it glows, the subject is in focus. Or, with the focus lock function, focus and exposure are temporarily locked (refer to page 16). - Red lamp
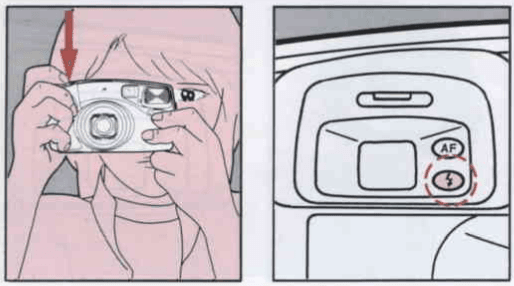
When it glows, the flash is ready to fire. When it flickers, the flash is being charged.
Note: If the green lamp ( AF) flickers, the subject is too close. Adjust the camera-to-subject distance so that the green lamp ( AF ) glows, then release the shutter.
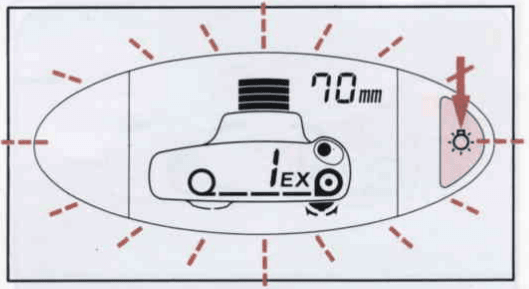
Press the illumination button to illuminate the LCD panel so that it may be seen in the dark. The illumination continues for approximately. 8 seconds after the button is pressed. While the zooming lever and the mode, drive, SETTING, and shutter release buttons are being operated, the LCD panel illumination remains on even after 8 sec. pass.
ORDINARY PHOTOGRAPHY
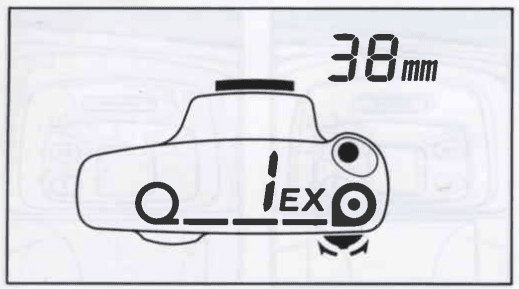
When the LCD panel is as shown above, the camera is in the Auto and Single-Frame Shooting modes. These modes are used for ordinary picture-taking situations. The flash fires automatically in dimly lit places.
Notes:
- If the LCD panel displays indications other than those above, switching the power off, then on again, resets the LCD panel to appear as above.
- The shutter speed when the flash fires automatically is approximately 1/40 sec. (wide-angle) and 1/60 sec. (telephoto).
Red-eye Reduction Flash Mode
When the Red-eye reduction flash switch is set to the position, the flash fires two consecutive times in all flash modes. The first flash fires just before the shutter is released (low-power output), which causes the irises of the eye to close down (contract). Then the second flash fires (normal flash output), which reduces the possibilities of the red-eye effect significantly. (See “Red-eye phenomenon in flash shooting” on page 43)
TAKING PICTURES
Shooting Distance: 1.35 meters (4.4 ft) ~ © (infinity)
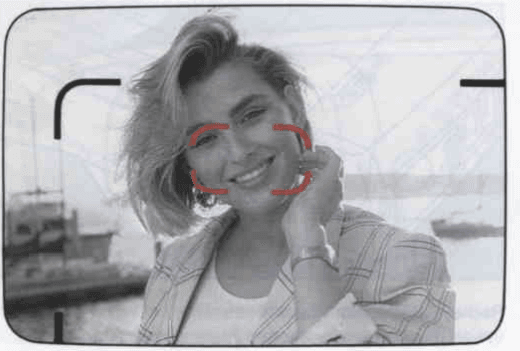
- After zooming and composing your shot, position the autofocus frame on the subject.

- Press the shutter release button halfway with your subject in focus. The green lamp ( AF ) should glow.

- If the subject is closer than 1.35 meters (4.4 ft), the green lamp ( AF ) flickers, and the shutter cannot be released.
Notes:- If you wish to shift subject focus, release your finger from the shutter release button and repeat steps 1 and 2 above.
- When the subject is 20 ~ 30 cm (0.7 ~ 1 ft) from the camera, the green lamp ( AF ) may not flicker.

- Press the shutter release button down. The shutter will be released, and the film will automatically advance to the next frame.
Notes:- When the shutter is released, the self-timer lamp glows momentarily to indicate that a shot has been taken.
- When the green lamp flickers, the macro mark on the LCD panel also flickers to recommend the use of macro settings.
- The shutter cannot be released while the lens is zooming.
* When taking pictures in the dark, the flash automatically fires.
When the shutter release button is pressed lightly in dim lighting, the red lamp glows, indicating that flash is ready to fire. Make sure the red lamp glows continuously before shooting.
Flash-effective ranges (Nega-color film used)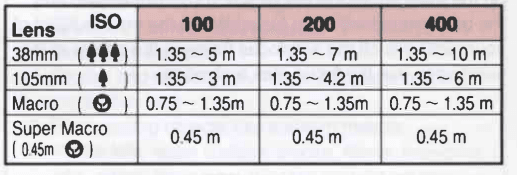
FOCUS-LOCK SHOOTING
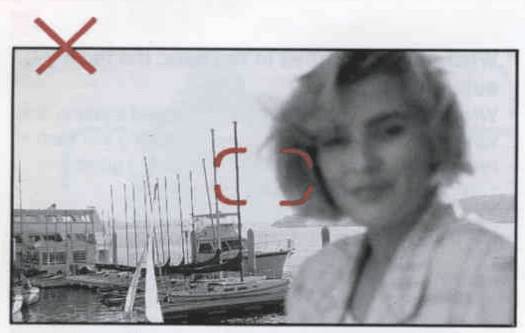 If you shoot without positioning the autofocus frame on the main subject of the picture as shown above, only the background will be in focus. When the main subject of your picture is off the autofocus frame in the center of the viewfinder, use the focus-lock technique.
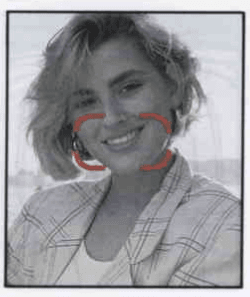
- First, position the autofocus frame on the main subject.
- As you press the shutter release button halfway, the green lamp ( AF ) glows, and focus and exposure are temporarily locked.

- While continuing to press the shutter release button halfway, re-aim the camera or recompose the picture, then fully depress the shutter release button.
Notes:- You can cancel focus lock simply by taking your finger off the shutter release button.
- When in the Consecutive Shooting mode, focus lock cannot be used.
Hard-to-autofocus subjects
Like many other autofocus cameras, this camera’s autofocus system is highly precise, but it may not focus as you wish on certain subjects. In such cases, use the focus-lock technique on a subject that is both near the actual one and at an equal distance from the lens. Subjects that are hard to autofocus include:
- Black objects like hair, which don’t reflect much light (and therefore don’t reflect infrared autofocus beams).
- Wire netting, latticework, iron exercise bars, etc.
- Flickering light sources such as neon signs, fluorescent lamps, TV images, sunlight coming through trees, etc., and subjects illuminated by these light sources.
- Glossy and reflective surfaces like glass, mirrors, car bodies, etc.
- Fast-moving objects, like trains in motion.
- Water jets, water surface, smoke, flame, fireworks, etc., which have no distinct or consistent form, or a subject in mist.
TROUBLESHOOTING
For details, refer to 10 prospective pages.”
What appears troublesome might be easily remedied. Here are some problems and their remedies.
- The shutter cannot be released.
- Is the power switch turned off? If so, turn it on. (See page 4.)
- Are the batteries exhausted or are they loaded?
Replace them or insert new batteries. (See page 41.) - Is your subject out of the focusing range? Shoot in the range of 1.35 meters (4.4 ft) to =< (infinity) for ordinary photography. (See page 14.)
- Are you pressing the zooming lever? If so, release your fingers from the zooming lever, then shoot. (See page 6.)
- Is the rewound film left inside? If so, replace it with a new roll. (See pages 18 and 8 ~ 10.)
- Is the camera set to the Interval Shooting mode?
Cancel the Interval Shooting mode.
- My printed pictures don’t look very clear.
- Did you position the autofocus frame (C o) on your subject? (See page 14.)
- Did you press the shutter release button gently while taking care not to obstruct the autofocus window with your fingers or hair? (See page 5.)
- Are you shooting in a dark place using the Flash-On mode? As the shutter release speed is slow, you should avoid camera shake or subject movement. If slow-speed synchro is not necessary, shoot in the Auto mode. The flash fires at higher shutter speeds. (See pages 13 and 24.)
- The zoom lens does not move.
- Are you depressing the shutter release button halfway? If so, the zoom lens cannot operate. Lift your finger off the shutter release button.
- The zoom lens is restored automatically.
- Did you leave the camera with the power switch on and not operate it for over three minutes? If so, the camera switches off the power automatically and stores the lens in the lens cover to protect it. (See page 4.
- When the power is switched on, the zoom lens automatically extends.
- The camera holds in memory for approximately. 30 minutes the settings before the power was automatically switched off. Therefore, switching the power back on within 30 minutes restores the previous shooting state automatically.
- The flash emission mark is flickering on the LCD panel.
- Did you just use the Flash-Off or the Backlight Compensation modes in a dark place? This is a warning against underexposure. You cannot take a well-lit picture while this mark is flickering. (See pages 25 and 26.) ‘
- The correct camera-to-subject distances when flash shooting is employed using films other than ISO 100, 200 or 400 are indicated in the table below.
 * Because of high film speed, overexposure may occur at close range.
—: Correct exposure cannot occur.
SPECIFICATIONS
- Type:
35 mm fully automatic leaf-shutter camera with built-in zoom lens. - Film:
35 mm perforated DX-coded film with ISO rating from 25 to 3200 (EV1 step). 24 x 36 mm format. - Film loading:
Auto film loading. Closing the rear lid will automatically wind film to the first exposure. - Film movement:
Auto winding: single-frame advance mode; Consecutive Shooting mode (1.3 sec. interval between shots). Auto rewinding starts at the end of the roll. Auto stops upon completion of rewinding. With the auxiliary rewind button, the film roll can also be rewound in mid-roll. - Frame number:
Automatic readout of successive frame numbers in ascending order when shooting, and descending order when rewinding. - Lens:
Pentax 38 to 105 mm, /4 to {/7.8, power zoom lens (with Macro), 11 elements in 9 groups, angle 59° to 23.5° - Focusing system:
Infrared active autofocusing with focus-lock. Range: 1.35 m (4.4 ft) ~ eo (infinity); 0.75 m (2.5 ft) ~ 1.35 m (4.4 ft) in Macro; 0.45 m (1.5 ft) fixed in Super Macro. - Zooming:
2 modes: Continuous Zoom and Step Zoom - Shutter:
Programmed AE electronic shutter; approx. 1/250 to 1/3 sec.; Bulb (1/2 sec. to 60 min.); Bulb-Timer (1 to 60 sec.); electromagnetic release. - Self-timer:
Electronic red lamp indication. Approx. 10-sec. delay. Cancellation after activation is possible. Multi-frame self-timer can take up to 5 frames. - Viewfinder:
Actual image zoom viewfinder. 87% field-of-view ratio. Magnification 0.45X (38 mm position), 1.16X (105 mm position, 1.09X (Macro), 0.97X (Super Macro). - Exposure:
Programmed auto-exposure, range (ISO100) in Auto mode: EV9 ~ EV16.5 (38 mm), EV11.5 ~ EV16.5 (105 mm and Macro). - Flash On and Flash Off: EV6 ~ 16.5 (38 mm), EV8 ~ 16.5 (105 mm and Macro)
- Exposure compensation: +3EV (0.5EV steps)
- Backlight compensation: +1.5EV compensation
- Multi-exposure: Possible
- Flash:
Built-in zoom flash with red-eye reduction flash mode. Automatic low-luminance firing in Auto mode.
Charging time — Approx. 3 sec. (using fresh lithium batteries at normal temperature). - Interval shooting:
Electronically controlled, started by pressing the shutter release button. - Power source:
Two 3V lithium batteries (equivalent to CR123A). - Size and weight:
1435 (W) x 82.5 (H) x 66.5 (D) mm (5.6 x 3.2″ x 2.6″); 480 g (16.9 oz.) without batteries - Accessory: Strap
DATE model
- Data mechanism:
Crystal quartz controlled; LCD with digital clock. - Imprinting mode:
“Year, Month and Day”, “Day, Hour and Minute” or blank. - Size & weight:
143.5 (W) x 82.5 (H) x 68.5 (D) mm (5.6” x 3.2″ x 2.7″); 490 g (17.3 oz.) without batteries.
SPECIFICATIONS ARE SUBJECT TO CHANGE AT ANY TIME WITHOUT NOTICE OR ANY OBLIGATION ON THE PART OF THE MANUFACTURER.
For more manuals by Pentax, visit ManualsLibraryy
Pentax Zoom 105R Film Camera-FAQs
How do I turn on the Pentax Zoom 105R?
Slide the power switch upward to turn on the camera. This will open the lens cover and activate the LCD screen, making the camera ready to use.
What type of film does the Pentax Zoom 105R use?
It uses standard 35mm DX-coded film with ISO ratings from 25 to 3200. The camera automatically loads the film.
What does the “E96” error mean on the Pentax Zoom 105R?
The E96 error typically signals a mechanical or motor issue, such as problems with the lens movement or zoom function.
What is the shutter speed range of the Pentax Zoom 105R?
While not officially listed, similar models like the Zoom 90 have a range from 1/5 to 1/250 seconds.
What batteries does the Pentax Zoom 105R require?
It runs on one 6V lithium battery (2CR5), which powers both the camera and zoom motor.
Can I zoom in and out with the Pentax Zoom 105R?
Yes, it features a power zoom lens with a 38–105mm focal length that can zoom smoothly or in steps.
When was the Pentax Zoom 105R released?
This compact film camera was launched in 1991.
What does a flashing “E” on the display mean?
A flashing “E” usually indicates that no film is loaded or that the camera cannot detect the film properly.
Can I charge the Pentax Zoom 105R with a USB cable?
No. This film camera uses a disposable lithium battery and does not support USB charging.
Is the Pentax Zoom 105R a full-frame camera?
Yes, it uses 35mm film, which is considered a full-frame format in film photography.



 * Because of high film speed, overexposure may occur at close range.