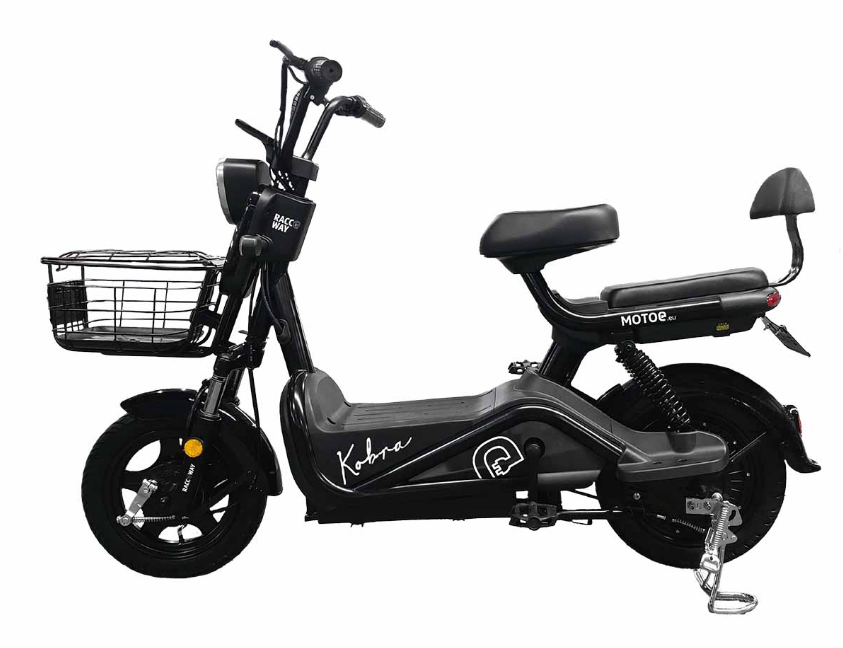
RACCeWAY Kobra Electro Scooter
GENERAL SAFETY GUIDELINES & RESTRICTIONS
- Don’t weave through traffic or make any moves that may surprise people with whom you are sharing the road.
- Never carry anything that obstructs your vision or your complete control of the E-SCOOTER or which could become entangled in the moving parts of the E-SCOOTER.
- Never hitch a ride by holding on to another vehicle.
- By any physically or mentally challenged person
- By any person with vision, balance, hearing, or coordination impairments
- By any person using headphones or a cellular phone, they mask traffic sounds and emergency vehicle sirens, distract you from concentrating on what’s going on around you, and their wires can’t tangle in the moving parts of the E-SCOOTER, causing you to lose control.
- To carry more than 15 kg of cargo in the cargo compartment (in addition to the rider).
- Don’t run over 25 km/h (with or without the motor activated).
- Don’t use a vehicle barefoot or by those wearing sandals, open-toed, high-heeled, or platform shoes, or slip-on footwear.
- By any person who has ingested any alcohol or drug that could impair their ability to operate the E-SCOOTER.
- Without 2 hands on the handlebars.
- Please sit on the seat while running.
- Don’t jump ramps, curbs, or objects, or attempt any stunts.
- Don’t go beyond your ability or prior experience.
- Don’t stop with only the front brake. Use both brakes simultaneously.
- Do not try to accelerate and have the brake(s) on at the same time. [This may cause damage to the motor or drive train, or cause the motor or drive train to overheat.]
BEFORE EACH RIDE:
- Make sure you properly wear a helmet.
- Wear protective clothing and gloves.
- Wear eye protection that does not interfere with your peripheral vision.
- Check local and state laws before operating the E-SCOOTER in any area.
- Make sure all tail/brake lights, turn signals, and headlights are operational.
- Make sure the horn is operational.
- Make sure the brakes are properly adjusted and working correctly (see further detailed instructions).
- Make sure you understand how the brakes work and that your hands can reach and squeeze the levers comfortably and hard enough to stop the E-SCOOTER safely.
- Make sure all parts of the E-SCOOTER are properly and securely fastened and adjusted, including but not limited to wheels, all controls, and cargo (Please refer to Assembly Instructions).
- Make sure the tires are not excessively worn, do not have tears or cuts, and are properly seated on the rim and inflated to the proper pressure on the sidewall.
- Make sure the wheels spin straight and that the rims are not bent or damaged (front wheel must be undamaged for the front brake to work properly).
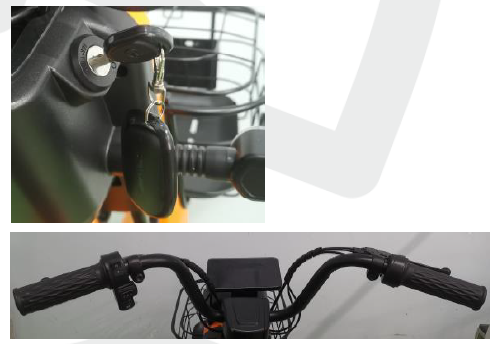
- Make sure the throttle is in the “OFF” position before turning the E-SCOOTER key on. This will prevent the E-SCOOTER from moving forward without notice once the ignition key is turned on.
- Make sure the “Air Switch” under the seat is in the “On” position before turning the key on.
AFTER EACH RIDE:
- Make sure that the ignition key is turned OFF and that all keys are removed and kept in a safe place.
- Make sure to plug the battery in to charge.
- Make sure the throttle is rotated to the off position.
- Ensure the E-SCOOTER is not kept outdoors or where moisture can damage it.
- Do not charge or store the E-SCOOTER closer than 20 feet from any flame (e.g., furnace, fireplace, water heater, space heater).
- Do not allow children under 16 to play on or near the unattended E-SCOOTER.
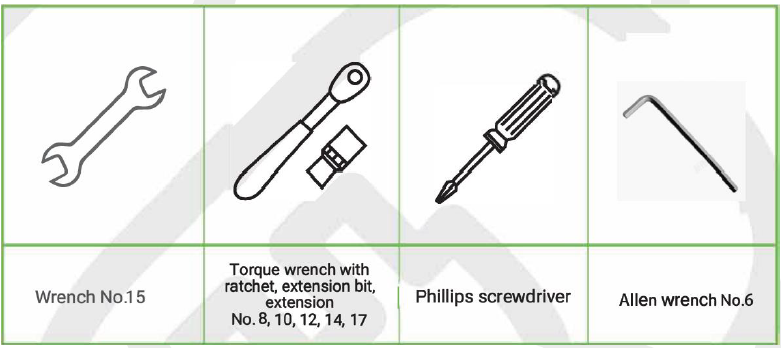
Assembly tools (not included):
VEHICLE INSTRUCTIONS AND ASSEMBLY INSTRUCTIONS
- Each electric scooter was carefully assembled and inspected before leaving the factory.
- You have to install the pedals.
- Follow the installation instructions.
- Tools Required: Key; hex key; screwdriver, etc.

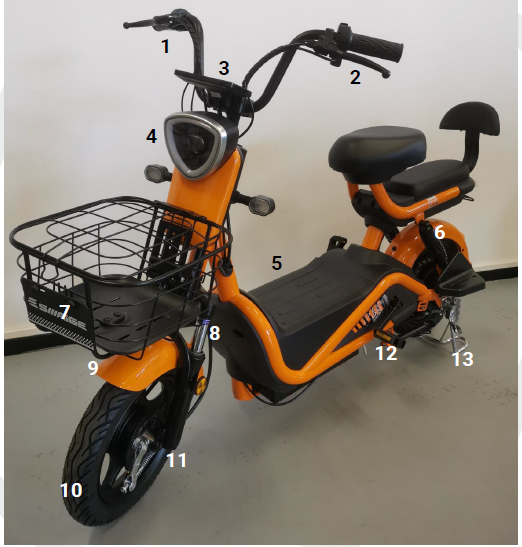
List of Parts.
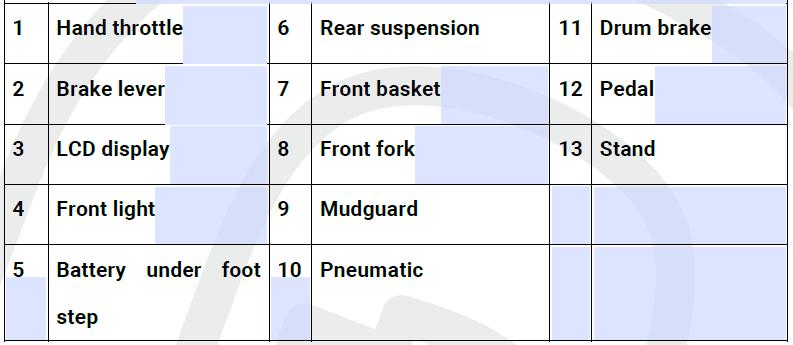
INSTALLING THE WHEEL AND FRONT BRAKE
Installation tools: Wrench No. 14\2
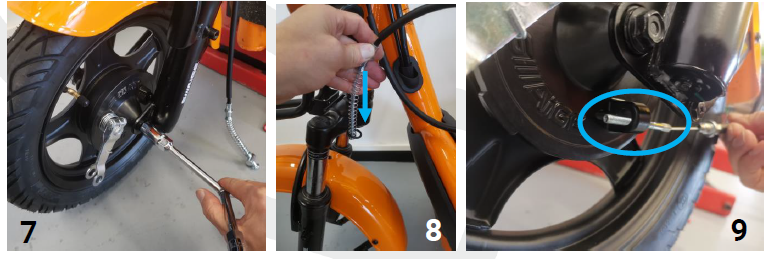
- Install the drum brake in the hub → install the bushing on the other end of the hub → install the front wheel into the front fork, pay attention to the drum brake being clamped to the positioning post of the front fork → install the axle and lock it with two No. 14 wrenches.
- Pass the brake cable tube into the fork shoulder cable hole → put the brake cable end into the drum brake hole → put on the long spring and install the hollow column → put the brake cable end through the hollow column and twist the brake nut (if the wire core is not long enough, please check if the brake cable is not stuck in the brake lever).


INSTALLING THE HANDLEBAR
Installation tools: Allen Wrench No. 6
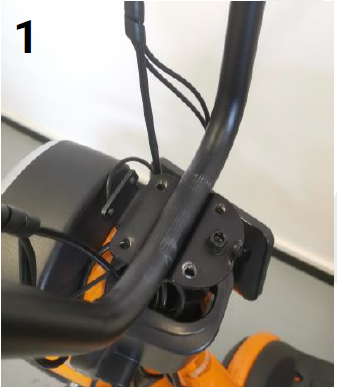
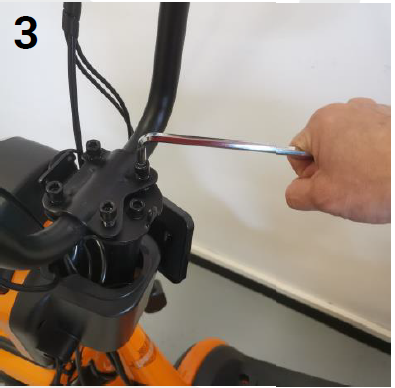
- Place the handlebar module on the steering column.

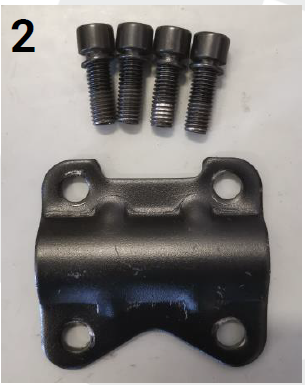
- Connect the handlebar module to the steering column using 4 screws with a front cover.

- Adjust the proper handlebar angle and lock the handlebar cover with an Allen wrench No. 6.

INSTALLING THE DISPLAY AND HANDLEBAR COVER
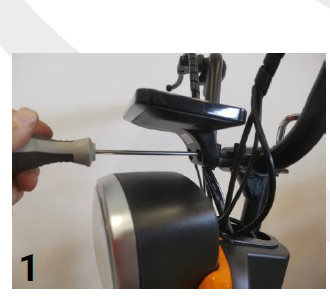
Installation tools: Phillips screwdriver
- The display is fixed by two Phillips screws.

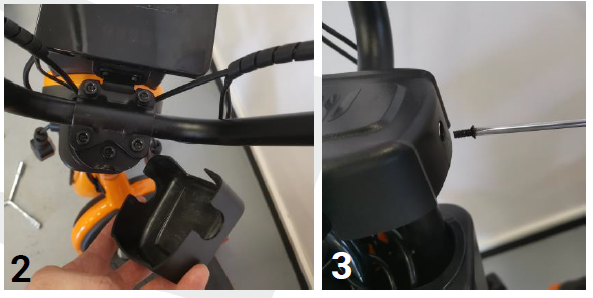
- Install the plastic handlebar cover and tighten the set screws.

INSTALLING THE TURN LIGHT AND REFLECTOR
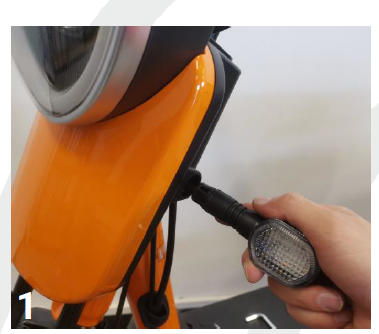
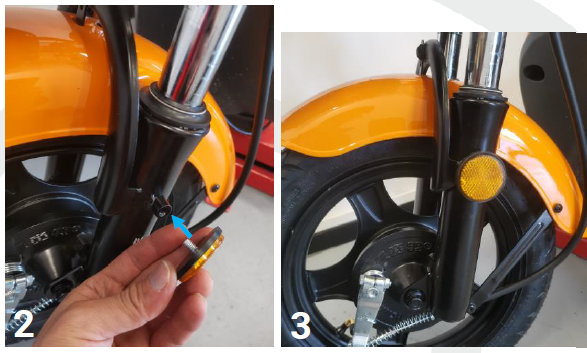
- Push directly into the hole until you hear a click.

- Yellow reflectors should be installed on both sides of the front fork.

INSTALLING THE FRONT BASKET
Installation tools: Phillips screwdriver
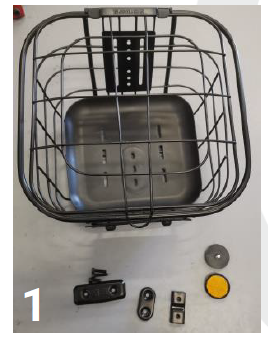
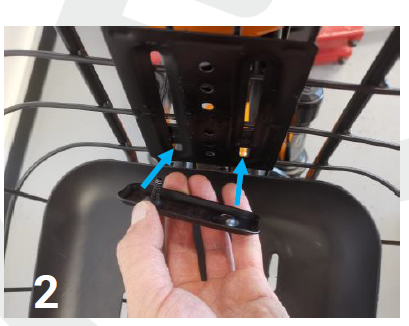
- Position the front storage basket on the front frame.

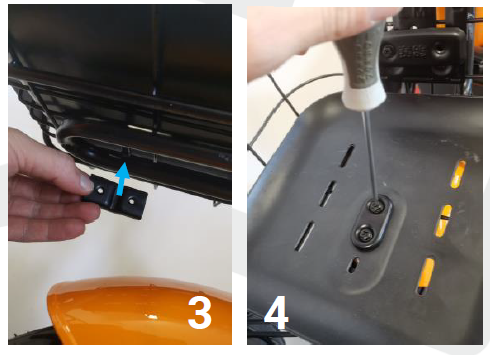
- Use the two screws and the longer metal to fix the back of the basket.

- Use the two longer screws and the shorter metal screw to fix the bottom of the basket.

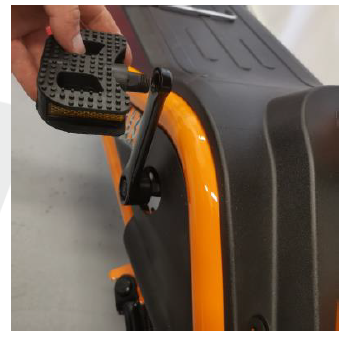
INSTALLING THE PEDALS
Installation tools: Wrench No. 15
Warning: Do not tighten by force, as the handles are made of aluminum alloy.
- The right pedal (marked “R” on the pedal shaft) must be mounted on the crank on the right and tightened clockwise.
- The left pedal (marked with the symbol “L”) is mounted on the crank on the left and tightened firmly counterclockwise.

INSTALLING THE BACKREST OF THE TAILSTOCK
Installation tools: Wrench No. 10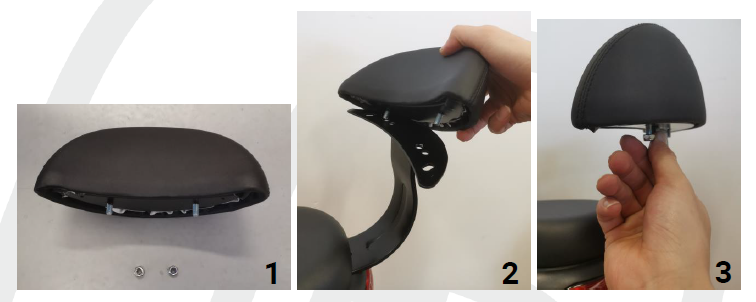
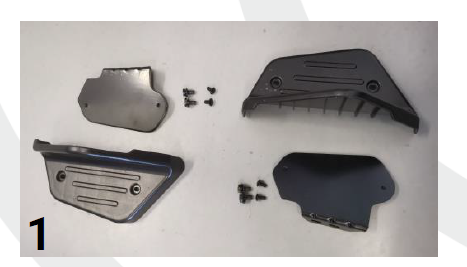
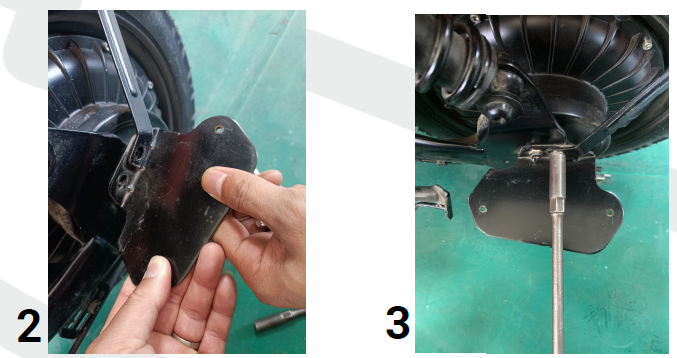
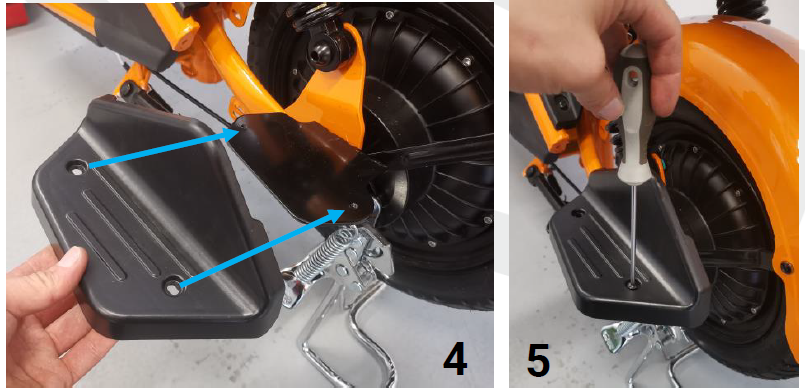
INSTALLING THE FEET PADS FOR THE TAILSTOCK
Installation tools: Phillips screwdriver
- There are two sets; need to make clear which set is the left side and right side.

- First, to install the metal parts, you need to sandwich the bracket of the rear fender, and use wrench No. 10 to fasten the iron plate to the frame.

- Use a screwdriver to attach the plastic pedal to the iron plate.

BATTERY AND CHARGING INSTRUCTIONS
- For 12Ah

- For 20Ah

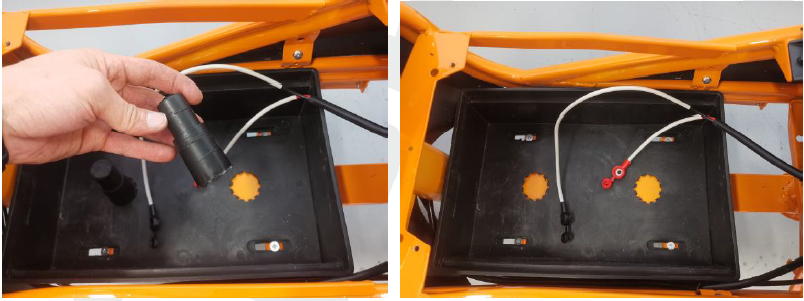
Two plastic posts in the middle need to be removed.
WARNING!
- Store batteries in a dry, warm environment.
- Keep the batteries charged at all times.
- If you park in an outdoor or cold environment, the battery must always be charged; otherwise, it will be irreversibly damaged.
- If the scooter is not used for a long time, the battery will self-discharge, so it is recommended to check the battery condition continuously so that the voltage does not drop below the critical value when the battery can no longer be charged.
- Any claims concerning a battery damaged due to such improper treatment will not be accepted.
- Use only the charger designed for this electric scooter (never use a charger from another model). Before charging, set the switch to the OFF position and remove the key. Use the charger in a dry and well-ventilated area.
- The charger is for indoor use only. Protect the charger from water to avoid short-circuiting. Do not use in wet, flammable, or explosive environments. Do not remove the plug by pulling the cord. Always grasp the charging port by the metal body.
- First, plug the charger’s output plug securely into the battery receptacle, and then insert the input plug into a power outlet. The charger indicator lights up to indicate that charging is in progress.
- When the light changes from red to green, it indicates that the battery is fully charged. Typically, it will take approximately 6-10 hours for the battery to fully charge. If you have time, it is recommended to charge it for 2 more hours after the indicator light turns green. (This will positively affect battery life.)
- When the green light is on, the charger is in a maintenance charging state. If you are away for a long time, you should remove the charger plug, especially in hot weather.
- The charger heats up during charging, so keep it away from heat. Always keep the charger dry and clean. The electronics inside are under high voltage, so never disassemble it yourself.
- After charging, first unplug the power plug and then remove the output connector from the battery. Do not leave the charger plugged into a battery or wall outlet for an extended period of time, as this may damage the charger and cause a fire.
- Keep the charger out of the reach of children while charging. Do not place anything on the charger or allow any liquid to come into contact with the charger.
- The first 10-15 charges are unstable, the charging time can be up to 12 hours, and the charge indicator on the scooter display can show a partially discharged battery. After formatting the battery, everything will be fine.
- Furthermore, the battery is protected by its own 30A fuse, which is stored on the side of the plastic battery pack and secured with a plastic screw cap.
DRIVING POWER SYSTEM INSTRUCTIONS
DESCRIPTION OF REMOTE CONTROL WITH ALARM
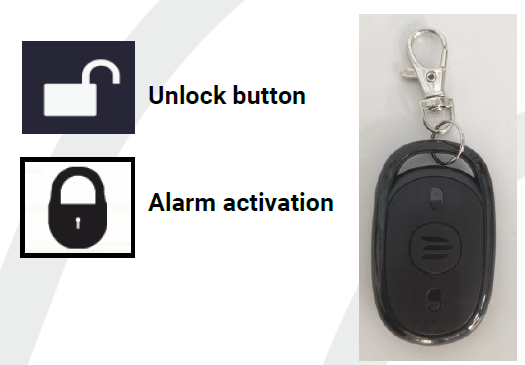
After pressing the stop button, if the rear wheel is completely locked and cannot be pushed when the vehicle is pushed, even if the throttle is turned in the Key On state, the motor will not rotate, and the alarm will not sound. Press the lock button of the remote control car to release the parking.
DRIVING
First, turn the ignition key to the “ON” position. You will see the battery charge level on the battery status indicator.
Pointer location:
- [H]: The battery is sufficiently charged
- [L]: The battery is not charged enough

The position of the pointer in the red box indicates that the battery is low and needs to be recharged. You can then easily start the electric scooter by turning the throttle handle (anti-clockwise). Accelerate gradually; do not attempt to reach maximum speed immediately, which would overload electrical components and the battery. Gradual acceleration saves both battery and engine.
The brake has the function of cutting off the power supply. If one of the brakes is pressed, the power supply is automatically cut off and the motor is switched off. Using the parking brake or releasing the throttle automatically cuts off the power to the engine. However, you should avoid attempting to use the throttle at the same time as braking to avoid overloading the engine.
The electric scooter control unit is equipped with an overvoltage protection. If the battery is running low and you are going uphill or against a strong wind, the surge protector will limit the speed. If you can use the pedals in such a situation, this will help the electrical system function properly.
This electric scooter is also equipped with low-voltage protection. If the battery is running low and the accelerator pedal is still used, the battery may be seriously damaged. Therefore, in this case, the power supply is automatically cut off.
MAINTENANCE
Technological breakthroughs have made components more complex than ever before, and the pace of innovation is increasing. This ongoing revolution makes it impossible for this manual to provide all the information required to properly repair and/or maintain your E-SCOOTER. In order to help minimize the chances of an accident and possible injury, it is critical that you have all repair and maintenance work performed regularly.
For more detailed maintenance instructions or for ordering replacement parts, please contact your E-SCOOTER dealer. Local bicycle retail stores, which have service facilities in your area, can also assist you with certain non-electrical repairs or adjustments that you are not qualified to make or for which you do not have the specific or specialized tools needed for repair. The fact that these vehicles have no combustion engine, no clutch, no ignition plugs, no carburetor, and use no gasoline means they require basically no maintenance.
In general, all the regular mechanical maintenance is to:
- Adjust the brakes
- Check the nuts and bolts
- Check tire pressure
Brake adjustment:
Proper adjustment of the brakes will promote the correct operation of the warning lights and increase driver safety. The brakes are adjusted in a similar way to each normal wheel. It is important that the brakes work properly and that the electrical disconnect devices are in working order (cable to the brake levers). There is a micro-adjustable rear drum brake nut that allows you to very easily adjust the response of the brakes to the push. Once the brakes are set, turn the wheels to see if there is any chafing. Also, make sure that if any of the brakes are pressed, the power cut function will be activated, and the motor will stop.
Lubrication:
To ensure the long life of your electric scooter, the following components should be regularly lubricated every 6 months: Front axle, chain; rear axle; the idle, front fork, and other moving parts must be lubricated only with grease, and the brake must not be filled with grease at all. Electrical components do not need to be specially cleaned as they have been lubricated at the factory. If any defect is found, contact an authorized service center.
Cleaning:
The electric scooter should be cleaned with a damp sponge, but care should be taken to avoid electrical parts coming into contact with water (battery connection, engine (rear axle), electrical cables, handlebar controls, etc.). Dry with a cloth. Do not use a strong stream of water when cleaning the electric scooter. Use a cloth to avoid short-circuiting electrical components. Your electric scooter is durable and does not require waxing. If necessary, clean with a mild detergent and rinse aid to restore its original shine.
TROUBLESHOOTING
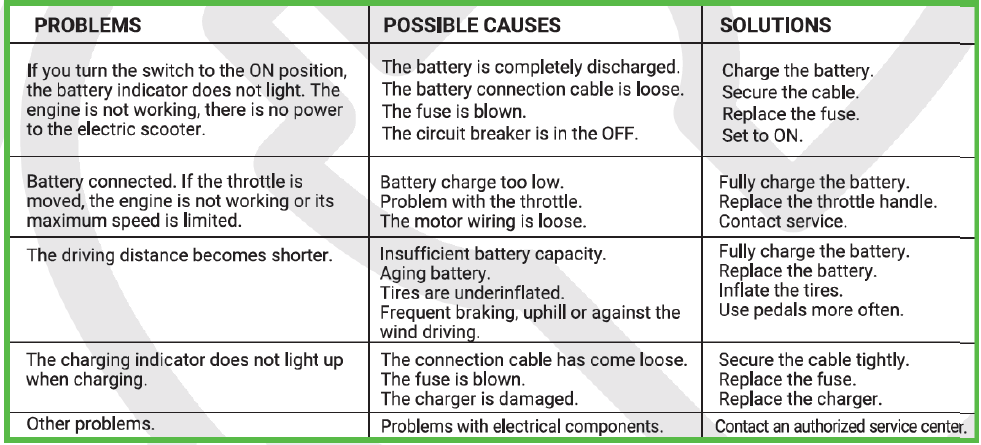
WARRANTY INFO
Manufacture warrants to the original retail purchaser (“you”) that the E-SCOOTER for which this warranty has been issued and is free from defects in material and workmanship as follows:
12 months warranty – Frame, Electric Motor, Controller, and electric circuits, Battery, and charger.
This warranty is not transferable to a subsequent purchaser. The manufacturer’s sole obligation under this warranty is to repair or replace the product at the manufacturer’s option. Manufacture must be notified in writing of any claim under this warranty within 15 days of any claimed lack of conformity of the product. An immediate report to the E-SCOOTER dealer is required if abnormal behavior of the product is noticed.
WARRANTY LIMITATIONS:
The duration of any implied warranty or condition, of merchantability for a particular purpose, or otherwise, on this product shall be limited to the duration of the express warranty set forth above. In no event shall E-SCOOTER dealers be liable for any loss, inconvenience, or damage, whether direct, incidental, consequential, or otherwise, resulting from breach of any express or implied warranty or condition, of merchantability for a particular purpose, or otherwise with respect to this product, except as set forth herein.
Some provinces or countries do not allow limitations on how long an implied warranty lasts, and some do not allow exclusions or limitations of incidental or consequential damages, so the above limitations or exclusions may not apply to you.
This warranty gives you specific legal rights, and you may also have other rights, which may vary from location to location. This warranty will be interpreted pursuant to the laws of EUROPE or NA. This warranty is not intended to confer any additional legal, jurisdictional, or warranty rights to you other than those set forth herein or required by law. If any portion of this warranty is held to be invalid or unenforceable for any reason, such finding will not invalidate any other provision. For products purchased in countries, please contact an E-SCOOTER authorized distributor in that respective country.
WARRANTY SERVICE OPTIONS:
To obtain service under this warranty, you must call the E-SCOOTER dealer for the Customer Service/Technical Support on your Product BEFORE returning your Product to the place of purchase. If you return your Product for warranty service, you must obtain a return authorization number by contacting the dealer. Send your product (with the return authorization number on the outside of the shipping container and affixed to the product, together with the retail seller’s original receipt or other satisfactory proof of the date of purchase) to the dealer you purchased it from.
THE PRODUCT MUST BE RETURNED IN ITS ORIGINAL BOX, ALONG WITH ALL KEYS, CHARGER, MIRRORS & LOCKS, FLOOR MATS, AND ANY OTHER ACCESSORIES THAT CAME WITH YOUR UNIT. DUE TO TRANSPORTATION AND RECLAMATION ISSUES, IF THE PRODUCT IS NOT IN THE ORIGINAL PACKAGE, IT MAY NOT BE RETURNED UNDER ANY CIRCUMSTANCES.
Any postage, insurance, or other shipping costs incurred in sending your product for service under either option above are your responsibility. Manufacture will not be responsible for products lost or damaged in shipping. Warranty Exclusions are listed below:
- Retailers and sellers are not authorized to modify this warranty in any way. It is your responsibility to regularly examine the product to determine the need for normal service or replacement. This warranty does not cover the following:
- Products that have been modified, neglected, or poorly maintained, used for commercial purposes, misused or abused, or involved in accidents.
- Damage occurring during shipment of the products (such claims must be presented directly to the shipper).
- Damage to products resulting from improper assembly or repair, the use or installation of parts or accessories not compatible with the original intended use of the product, or the failure to follow the product warnings and usage instructions.
- Damage or deterioration to the surface finish, aesthetics, or appearance of the product.
- The labor required to remove and/or re-fit and re-adjust the item covered by this warranty.
- Normal wear to the product.
- Light bulbs and tubes
- Any products for which the consumer does not follow the warranty procedures outlined above.
Technical support and service: e-mail: [email protected] / [email protected] More informations on: www.motoe.eu
For More Blogs, Visit ManualsLibraryy.
RACCeWAY Kobra Electro Scooter-FAQs
Q1. How do I use the RACCeWAY Kobra Electro Scooter?
Turn on the power switch, place one foot on the deck, push off slightly, and press the throttle to accelerate. Always hold the handlebars firmly.
Q2. How do I control the scooter?
Use the throttle to increase speed, the hand brake to stop, and shift your body weight slightly for balance and smooth turns.
Q3. How do I set up the scooter for the first ride?
Unfold the scooter, lock the frame securely, charge the battery fully, and check the brakes and tires before riding.
Q4. What are common problems with electric scooters?
Issues may include power not turning on, weak battery, blown fuse, or motor not engaging. Check the switch, reset button, or fuse for quick fixes.
Q5. Can the Kobra Electro Scooter be used manually?
Yes, you can kick-push it like a traditional scooter if the battery runs out, but it won’t be as smooth as powered riding.
Q6. How do I check the scooter’s battery health?
Inspect for swelling or cracks, test the voltage with a multimeter, and monitor how long it holds charge during use.
Q7. What are the rules for riding an electric scooter?
Wear a helmet, follow speed limits, ride in bike lanes where required, and avoid sidewalks. Laws may vary by location.
Q8. How do I troubleshoot if the scooter turns on but doesn’t move?
Check the battery charge, reset the scooter, inspect the fuse, and ensure the motor connection is secure.


