Sportspower Bounce Pro TR0123BGA168 Trampoline

Before you start to assemble…
- Check the package and make sure you have all of the parts listed in the Parts List section of this user manual. IF ANY PARTS ARE MISSING, please call the Customer Service toll-free number listed on the cover page for assistance.
- Do not install or use the product if any parts are missing or damaged. Store in a safe place until ready to install.
- Make sure that you have plenty of space and a clean, dry area suitable for the assembly of this trampoline. THE INTENDED SITE FOR THIS TRAMPOLINE MUST BE COMPLETELY FLAT AND LEVEL. If the ground is uneven, this could cause movement in the frame and stress on the joined sections of the frame that could damage the trampoline and/or can cause serious injury.
- Three adults are needed to assemble this trampoline.
- Heavy gloves must be used to protect your hands from pinch points during assembly, and goggles must be worn to avoid injuries to the eyes.
- Never modify the construction or the design of the product. Do not use any unauthorized Sportspower parts with this trampoline.
- This pack may contain small parts and is not suitable for children under six (6) years of age to be nearby during assembly.
- IMPORTANT: Save this manual for future reference.
Before using the product…
- Use of this trampoline requires constant adult supervision. Use the trampoline only with mature and knowledgeable ADULT supervision.
- Ensure that the trampoline enclosure has been assembled correctly, as per the instructions in this manual, and that the zip and attachment system are fully attached before use.
- Trampolines over 20 in. (51 cm) tall are not recommended for use by children under 6 years of age.
- There must be no more than one person at a time on the trampoline.
- The maximum weight of the user shall NOT exceed 220lbs/100kg for this product.
- This product is for household and family domestic use only– It is not for use in schools, playgrounds, rental, or commercial use.
Important Warnings
- Only one user at any one time! Multiple users can cause loss of control, collision, or falls on the trampoline. This could result in serious injury to legs, arms, back, neck, or head.
- Do not use the trampoline when under the influence of alcohol, drugs, or medication, which may impair the jumper’s judgment.
- Always consult your physician before performing any kind of physical activity.
- Do not use the trampoline if you have high blood pressure.
- Do not use the trampoline if you have a medical history of neck or back injuries or mental or physical conditions that could cause injury.
- Do not use if the user has any broken bones (casts) or has recently been in the hospital for extensive treatments (operations, severe wounds, stitches, back injury, or concussion).
- Do not use without the consent of your physician if pregnant.
- Do not use the trampoline during windy conditions or if the user or the trampoline surface is wet. These conditions can cause the user to lose control and fall, resulting in serious injury.
- Damage from the wind or other severe weather is not covered by the manufacturer’s warranty. Because the manufacturer’s warranty does not cover wind or weather-related damage, and damage can be caused to your property or the property of others by a windblown trampoline, it is strongly advised that you provide site-specific anchoring through a licensed local contractor.
- Maintenance of Trampoline Enclosure Net, Mat, and Pad
Enclosure nets and padding are prone to wear and tear like tires on a car. Gradual deterioration of the material will occur; the speed of which will depend on the level of exposure to UV rays, airborne pollution, and outdoor weather conditions such as rain and wind. The net and padding need to be properly maintained and checked by following the Maintenance Schedule set out in these instructions. When the material shows any signs of weakness, you must stop using the trampoline immediately, properly store the trampoline, and restrict access by users until a new replacement net or padding is properly installed. - Maintenance Requirement for Enclosure Net
Your trampoline enclosure netting is manufactured with UV-resistant material. Despite this, the netting is exposed to the outdoor elements, including sunlight, wind, rain, and wildlife. The net surrounding the trampoline must be checked before each use. This includes, but is not limited to, inspecting the net for cracks, excess wear, brittleness, and stretching. Also, inspect all connections and the entire enclosure for overall integrity. The net must be immediately replaced if it shows any signs of wear, damage, stretching, cracking, looseness, brittleness, or other losses in integrity. The following Maintenance Schedule must be followed:
- 1 to 3 Months: Inspect the enclosure (net, net hanger, and straps) before every use.
- 3 to 6 Months: Thorough inspection for UV damage and prior to every use for net, net hanger and straps.
- 6 to 12 Months: Thorough inspection before every use on net, net hanger, straps, zippers, ties, and strings. Replace after 12 months or earlier if necessary.
How to Inspect the Trampoline Net for Proper Use
Always check the enclosure netting for signs of UV damage, deterioration, brittleness, cracking, and tearing every time before using the trampoline and enclosure. Step 1 – Inspect the enclosure netting before EACH use for wear or tear by pinching and pulling a section of the netting between fingers and pulling downward. Please see the diagram below.

If it produces any tearing or cracking, or ripping sound, then the net is unsafe and MUST be taken down immediately. STOP USING THE TRAMPOLINE ENCLOSURE IF YOU FIND ANY SIGNS OF WEAR OR TEARING ON THE NETTING. Step 2 – Walk around the whole perimeter of the trampoline to visually check for material deterioration or other damage.
3. Maintenance Requirement for Trampoline Pad
Walk around the whole perimeter of the trampoline to visually check for material deterioration, tears, looseness, loss of elasticity or other damage in the pad.
Trampoline and Enclosure Parts List
Trampoline

Enclosure

Hardware Parts List

Assembly and Installation Instructions
WARNINGS
- Adequate overhead clearance is needed. A minimum of 24ft (7.3 meters) from ground level is recommended. Provide clearance for wires, tree limbs, and other possible hazards.
- Lateral clearance is essential. Place the trampoline away from walls, structures, fences, and other play areas. Maintain a clear space on all sides of the trampoline.
- Place the trampoline on a flat and level surface before use.
- Do not install this trampoline on hard surfaces. Suitable surfaces include grass or sand.
- Use the trampoline in a well-lit area. Artificial illumination may be required for shady areas.
- The trampoline should be installed in an area where access can be restricted from unauthorized and unsupervised use.
- Ensure there is nothing beneath the trampoline that could cause injury or obstruct the movement of the jump mat.
- Remove any obstructions from beneath the trampoline.
- The trampoline enclosure is only to be used as an enclosure for a trampoline of a size for which the enclosure is designed.
- The owner and supervisors of the trampoline are responsible for making all users aware of the practices specified in the use instructions section.
- Users may become entangled in or strangled by loose cords or in gaps between the trampoline and the enclosure. Keep the enclosure tightly fastened to the trampoline under the manufacturer’s instructions. Failure to properly assemble and maintain a tight, secure trampoline/enclosure boundary may result in serious injury, strangulation, or death.
Trampoline Frame Assembly
BEFORE YOU BEGIN: Review all steps before assembly and read all precautions before using the trampoline. At least two adults are required to assemble this trampoline. Protective gloves should be used during assembly to avoid injuries during installation. Goggles should be worn to avoid injuries to the eyes.
Step 1 – Frame Assembly
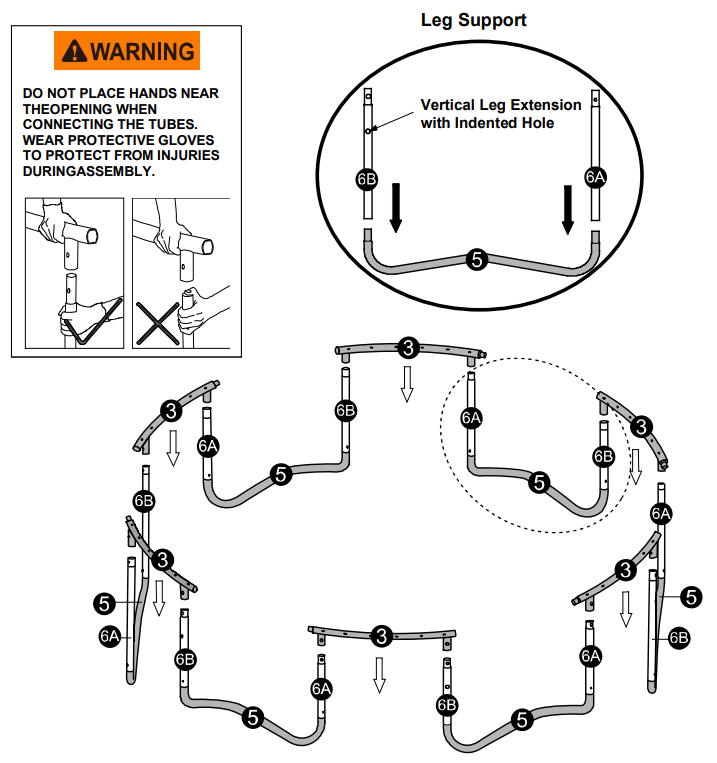
- Locate the following 30 pieces of steel tubing parts that are needed to assemble the trampoline frame: 6 – Top Rail with Leg Sockets (# 3), 6 – Top Rails (# 4), 6 – Leg Bases (# 5), 6 – Vertical Leg Extensions (# 6A), 6 – Vertical Leg Extension with Indented Hole (# 6B)
- Lay out all the parts on a dry flat surface as shown below.

Step 2 – Leg Support and Top Rail with Leg Socket Assembly. At this point, two people will be needed to assemble the trampoline.
- Connect Vertical Leg Extensions (# 6A and # 6B) to Leg Base (# 5) as shown below (the assembled parts will be hereinafter referred to as “Leg Support”).
- Lift two sets of the assembled Leg Supports to a vertical (standing) position. Connect one end of Top Rail with Leg Socket (# 3) to Vertical Leg Extension (# 6A) and the other side to Vertical Leg Extension with Indented Hole (# 6B) as shown below. Repeat in the same manner to assemble all Leg Supports.
Hint: Make sure the larger indented hole on Vertical Leg Extension (# 6B) is facing outward. This is important for installing the enclosure later.

Step 3 –Top Rail Assembly:
- Complete the trampoline frame by inserting all of the Top Rails (# 4) in between the Top Rail with Leg Sockets (# 3) as shown below.

Step 4 –Secure Leg Support to Top Rail
- Secure Vertical Leg Extension (# 6A) to the frame using Self-Locking Screw (# I), Small Spring Lock Washer (# 10) and Allen Wrench (# K) as shown below. If the holes do not match up, rotate the Vertical Leg Extension back and forth until the holes are aligned. Repeat in the same manner for all Leg Supports.

Trampoline Mat Assembly
Step 5 –Spring Assembly
- To install the springs, hook one end of the Spring (# 7) into the triangle-ring on the Mat (# 1), then pull the other end with the Loading Tool (# 9) underhand and latch it into the corresponding hole on the frame. Tap on the spring with the handle of the Spring Loading Tool to make sure it is securely latched.
- There are a total of 72 springs. For even distribution of spring tension and ease of assembly, the springs must always be installed on opposite sides of the mat in an alternating manner, i.e., 1, then 37, followed by 19 and 55 as shown below. Hint: The number of triangle rings sewn onto the Mat is equal to the number of holes on the frame. If you notice that you have miscounted a hole or triangle-ring, remove and reinstall the springs as necessary while maintaining an even distribution of tension as explained above.

Step 6 – Spring Assembly
- Continue to attach springs in the same manner. For even distribution of tension and ease of assembly, the springs must be placed on opposite sides of the mat in an alternating manner, i.e., 10 then 46, 28 then 64, etc. In addition to the previously installed springs, you should now have springs at 10, 28, 46, and 64 as shown below.

Step 7 – Spring Assembly
- Continue to attach springs in the same manner. For even distribution of tension and ease of assembly, the springs must be placed on opposite sides of the mat in an alternating manner, i.e., 5 then 41, 14 then 50, 23 then 59, 32 then 68, etc. In addition to the previously installed springs, you should now have springs at 5, 14, 23, 32, 41, 50, 59, and 68 as shown below.

Step 8 – Spring Assembly
- Continue to attach the remaining springs in the same manner as the previous step, i.e., the springs must be placed on opposite sides of the mat in an alternating manner to ensure even distribution of tension.

Frame Pad Assembly
Step 9
- Lay Frame Pad (# 2) over the trampoline so that the springs and steel frame are fully covered.

Trampoline Enclosure Assembly
Step 10 – Assemble the Enclosure Poles
- Attach End Cap (# O) to the Lower Frame Tube with Foam (# A1) – the side with the larger opening.
- Place Gap Spacer (# E) in between Lower Frame Tube with Foam (# A1) and Vertical Leg Extension with Indented Hole (# 6B) and secure them together using Bolt (# F), Arc Washer (# J), Large Spring Lock Washer (# G) and Cap Nut (# H) in the order shown below. Repeat this step for all the frame tubes.
IMPORTANT:
- The smaller arc of the Gap Spacer (# E) must face the Lower Frame Tube with Foam (# A1).
- The small hole located at the top of #B2 must face outward for connection to the enclosure frame in a later step.
- There may be some deformation of the foam on the enclosure tubes due to compression during transport. This is normal and the shape of the foam should recover naturally over time.

Step 11 – Connect the Enclosure Upper Frame to the Lower Frame
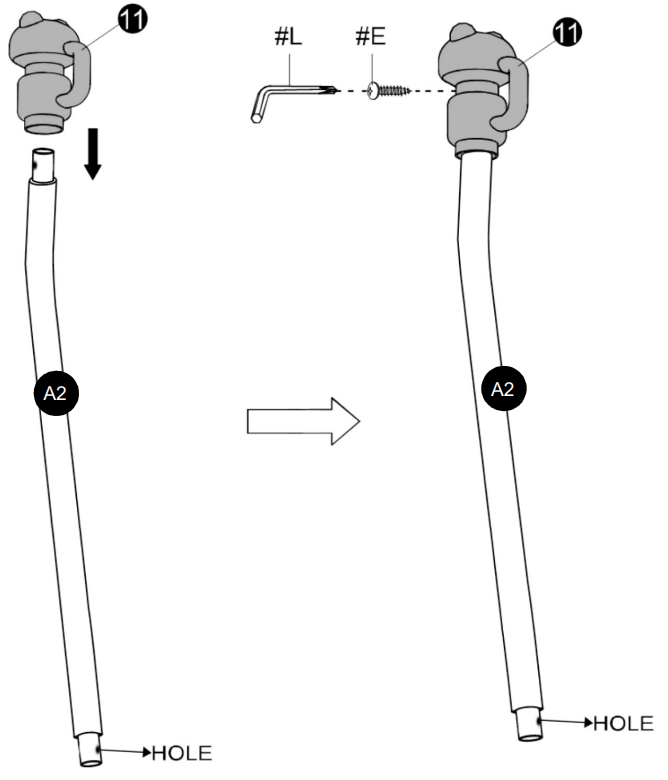
- Attach Tube Cap (# 11) to Upper Frame Tube with Foam (# A2) using Self-Locking Screw (# I) and Allen Wrench (# K) as shown below.
- Repeat this step for all of the frame tubes.

- Secure the buckles located at the top of the netting enclosure through Tube Cap (# 11) as shown below.

Step 12 – Connect the Enclosure Upper Frame to the Lower Frame Tubes
- Connect all six Upper Frame Tubes with Foam (# A2) to the Lower Frame Tube with Foam (# A1). Secure with Self-Locking Screw (# I) using Allen Wrench (# K) as shown below.

Step 13 – Tie the Enclosure to the Mat
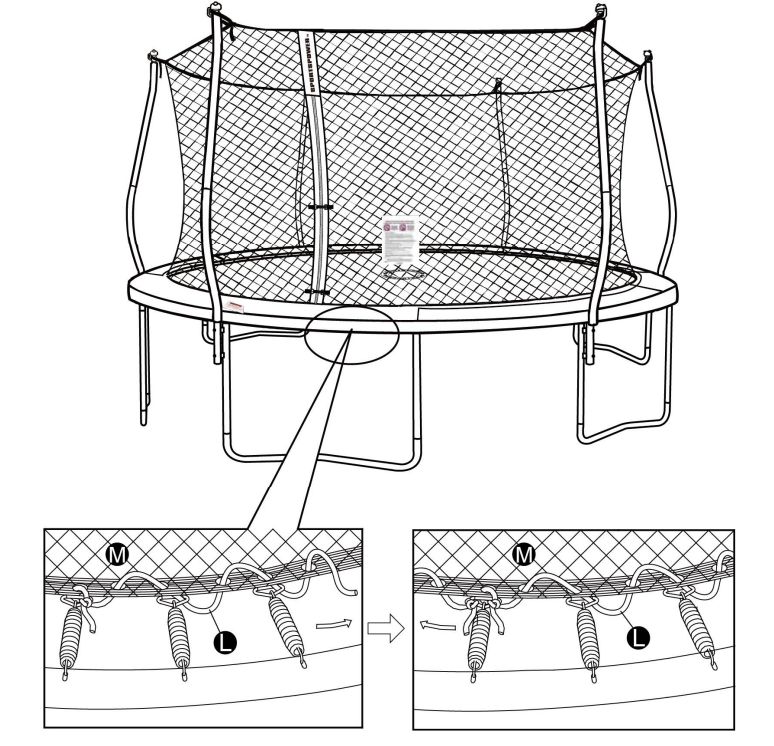
- Secure the trampoline netting to the trampoline frame using the Cords (# L). Lift the frame pad and tie one end of the cord to any one of the triangle rings on the trampoline mat as shown below.
- Loop the other end of the cord through the next hole on the mat and then the adjacent triangle-ring. Continue in the same manner until the end of the cord is reached and tie it to a triangle ring. Repeat the same process for all the cords provided until the enclosure netting is fully secured to the trampoline mat.

- For the elastic straps near the leg sockets, wrap them BEHIND the leg sockets and then tie a one-sided bow in front as shown below.


Care and Maintenance
- The springs, trampoline legs, and enclosure netting must be inspected before every use. The legs should be locked securely into place, all the springs attached to the frame, and there should be no tears in the enclosure netting. If any part becomes damaged or worn, please stop using the trampoline immediately until this part is replaced with authorized Sportspower parts.
- If you see any signs of stretched or damaged springs, do not use the trampoline until replacement springs are properly installed. Please contact our customer service representatives to order original Sportspower replacement parts.
- Please do not use unauthorized Sportspower parts to assemble the trampoline. This may damage the integrity of the product and can cause injuries during use.
- To move the trampoline, it is recommended that the trampoline be disassembled and then reassembled in the new location. However, if you need to move the trampoline a short distance for any reason, you must use duct tape or heavy-duty tape to tape all leg joints together. Moving the trampoline requires two or more people to lift the trampoline from contact with the ground. Do not drag the trampoline along the ground. The trampoline must be kept steady and horizontal to the ground during the move. Failure to follow these instructions may result in the leg support coming loose, which may cause serious injury or death.
- The trampoline and enclosure must be stored away during harsh weather conditions, including extreme wind, heat, and freezing temperatures.
- Always properly store away the trampoline and enclosure when not in use, and secure it from any unauthorized use.
- Inspect the trampoline before each use and replace any worn, defective, or missing parts. The following conditions could represent potential hazards:
- Missing, improperly positioned, or unsecured enclosure support system, frame padding, and pole caps
- Punctures, frays, tears, or holes in the trampoline mat or enclosure support system, or frame padding
- Deterioration in the stitching or fabric of the mat, enclosure netting, or frame padding
- Ruptured or loose springs
- Bent or broken support system(frame)
- Sagging trampoline mat and/or sagging enclosure netting
- Sharp protrusions on the support (frame) or suspension system
- If you live in area with high salt and moisture content in the air, we strongly recommend that you paint the trampoline frame and springs with a rust resistant clear coat paint to add protection to the steel components.
BASIC TRAMPOLINE BOUNCES
THE BASIC BOUNCE

- Start from the standing position, with your feet shoulder width apart and with your head up and eyes on the mat.
- Swing arms forward and up in a circular motion
- Bring feet together while in mid-air and point toes downwards.
- Keep the feet shoulder-width apart when landing on the mat
THE KNEE BOUNCE

- Start with the basic bounce and keep it low.
- Land on your knees while keeping your back straight and body erect, while using your arms to maintain balance
- Bounce back to the basic bounce position by swinging your arms up.
THE SEAT BOUNCE
- Land in a flat sitting position
- Place hands on mat beside hips, but do not lock your elbows
- Return to the erect position by pushing with your hands
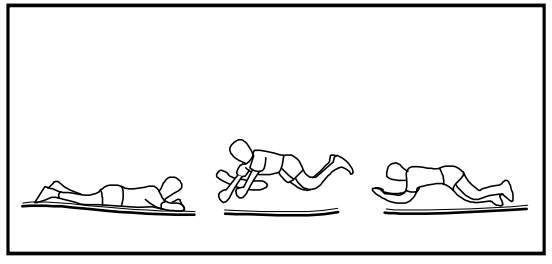
THE 180 DEGREE BOUNCE

- Start with the Front Bounce position.
- Push off with left or right hands and arms (depending on which way you wish to turn)
- Maintain head and shoulders in the same direction while keeping your back parallel to the mat and your head uup
- Land in the Prone position and return to the standing position.
FOR MORE MANUALS BY SPORTSWEAR, VISIT MANUALSLIBRARYY
Sportspower Bounce Pro TR0123BGA16 Trampoline- FAQs
What is the weight limit for the Bounce Pro TR0123BGA168 trampoline?
The Bounce Pro TR0123BGA168 has a maximum weight capacity of 220 lbs (100 kg).
Can multiple people jump at the same time?
No, this trampoline is designed for one user at a time to ensure safety and prevent accidents.
What happens if I exceed the weight limit?
Exceeding the limit increases the risk of:
Frame or mat damage
Spring failure
Loss of stability
Always follow the manufacturer’s guidelines.
How long does it take to assemble?
Assembly typically takes 2-3 hours with two adults. Follow the included manual carefully.
Can one person assemble it alone?
No, at least two people are recommended for safe and efficient assembly.
Does it come with all necessary tools?
Yes, the package includes all required tools and hardware.
What age is this trampoline suitable for?
Recommended for kids aged 6+, but always supervise younger children.
Does it include a safety net?
Yes, it comes with a zipper-entry safety enclosure to prevent falls.
Can adults use this trampoline?
Yes, as long as the user’s weight is under 220 lbs (100 kg).
How do I maintain the trampoline?
Regularly check springs, mat, and frame for wear.
Keep it clean and dry to prevent rust.
Store away in harsh weather (snow, heavy rain).

