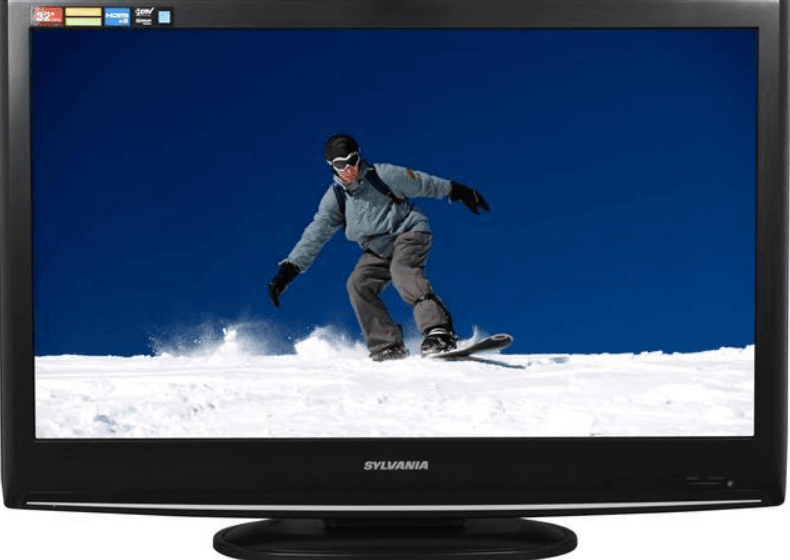
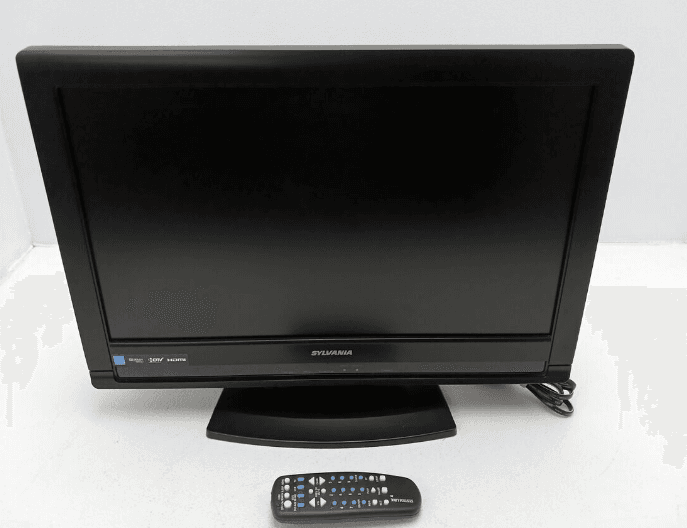
Sylvania LC320SL1 32-inch 720p LCD HDTV
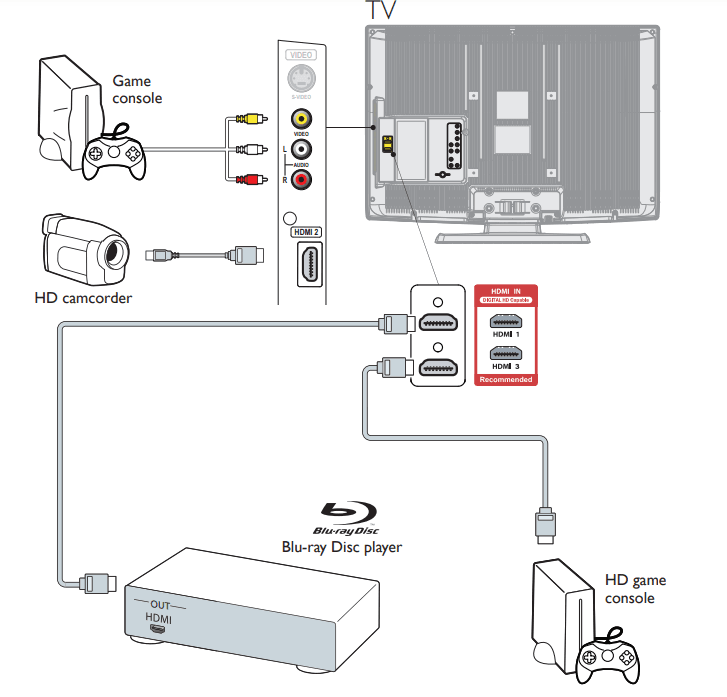
HD camcorder, game console, Blu-ray Disc player, HD game console
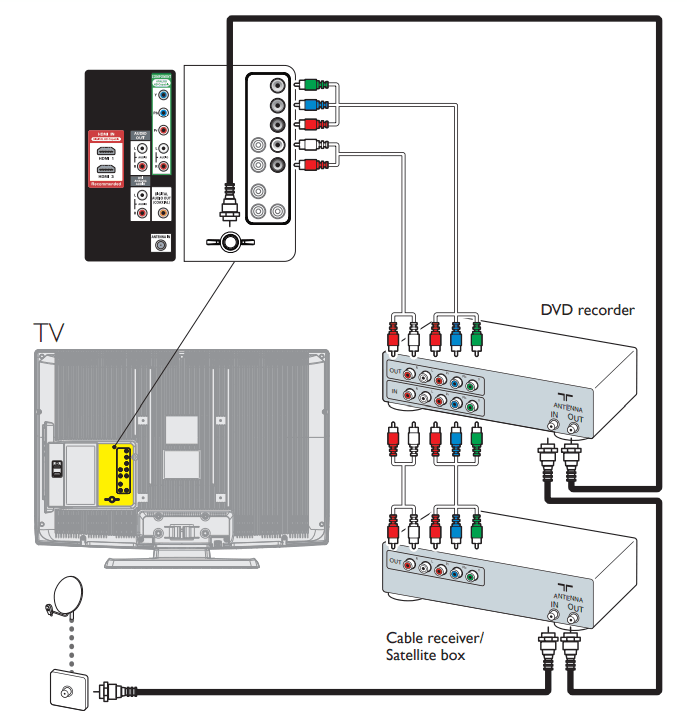
DVD recorder, cable receiver, satellite box
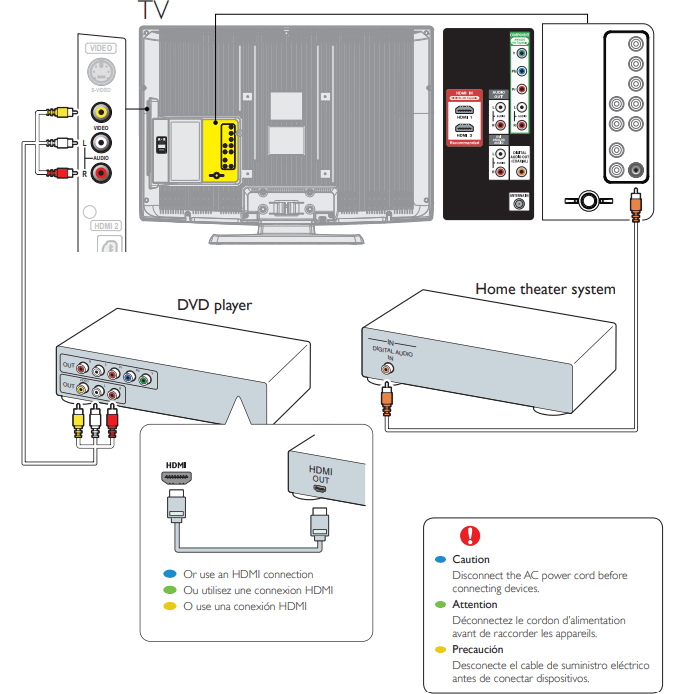
DVD player, home theater system
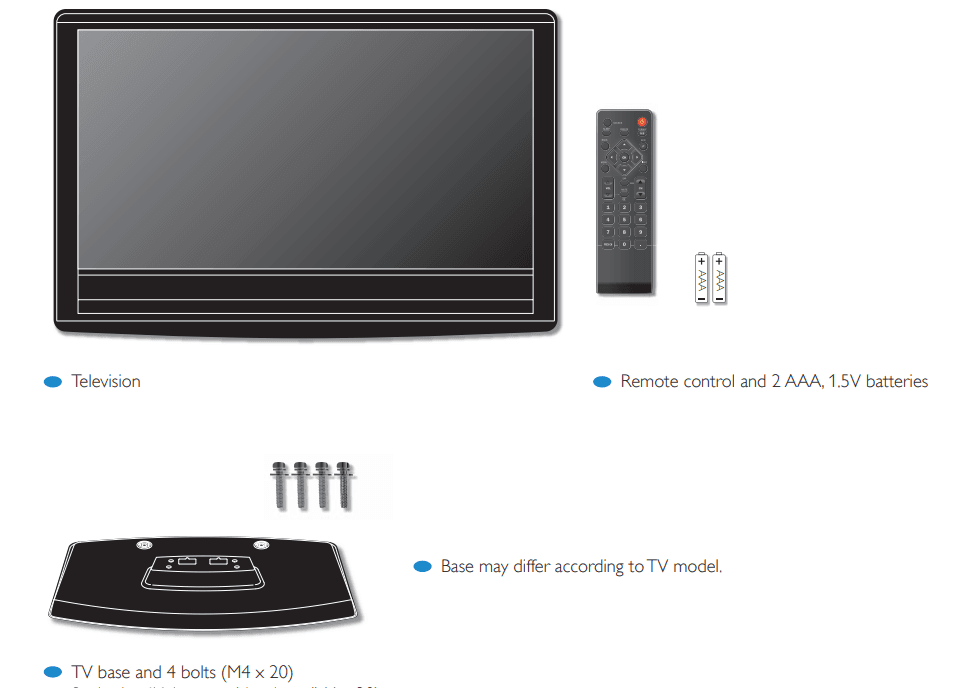
What’s in the box

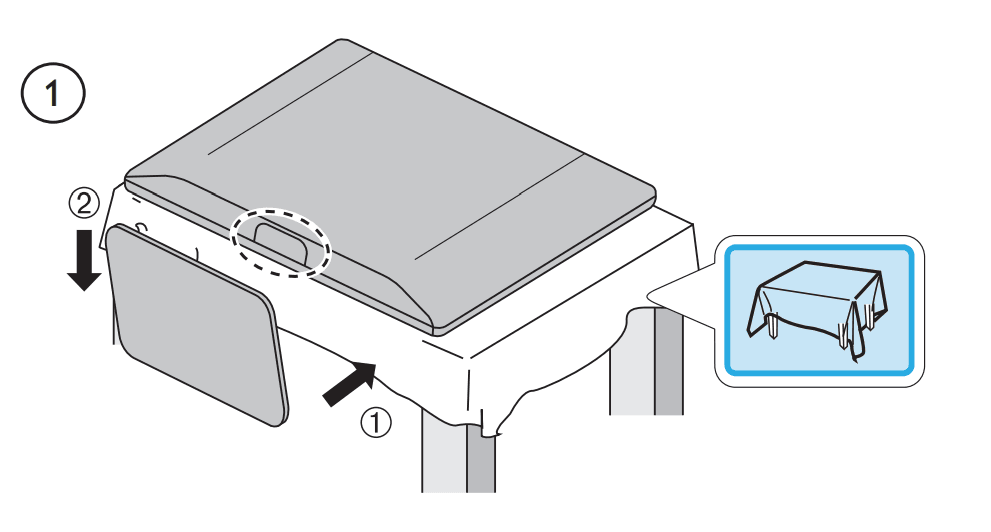
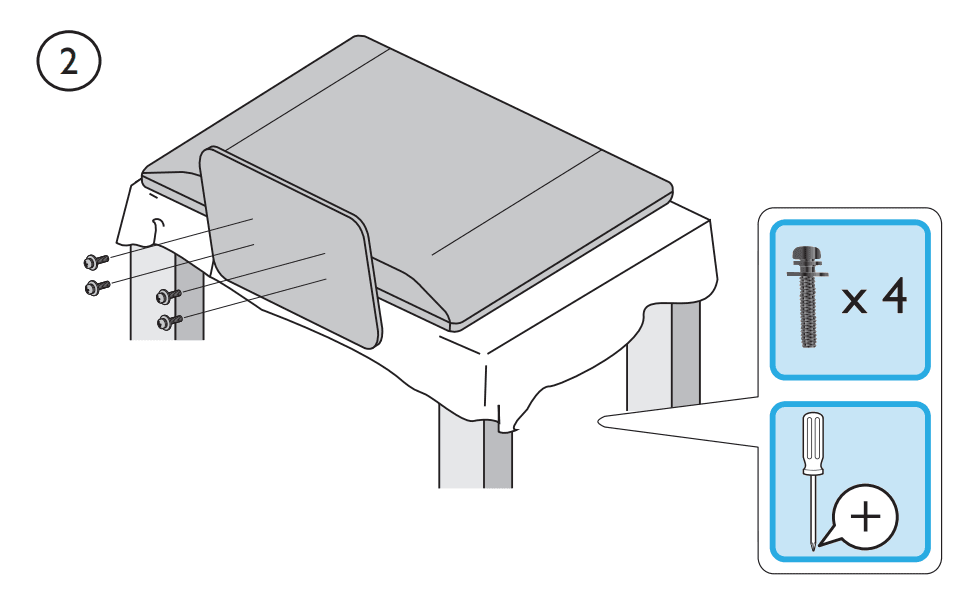
Mount base onto TV
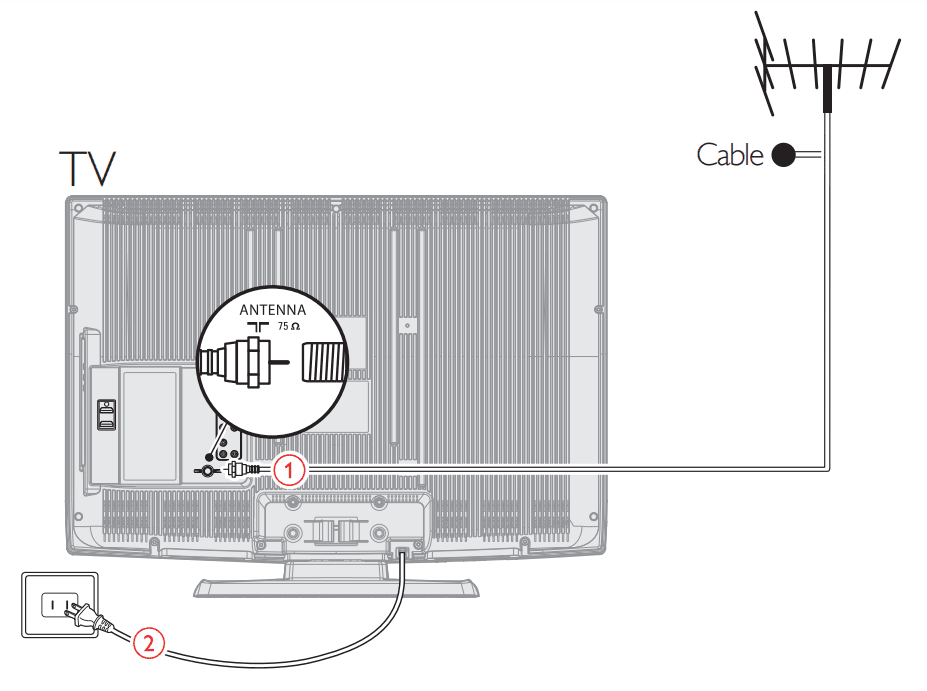
Connect the power and antenna or cable
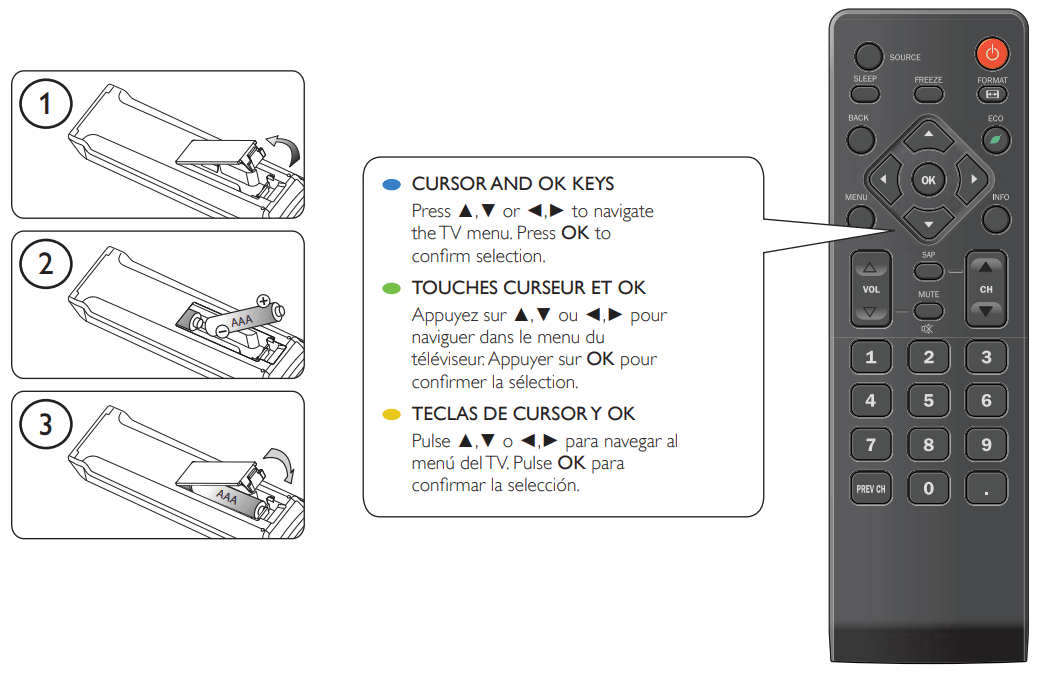
Use the remote control
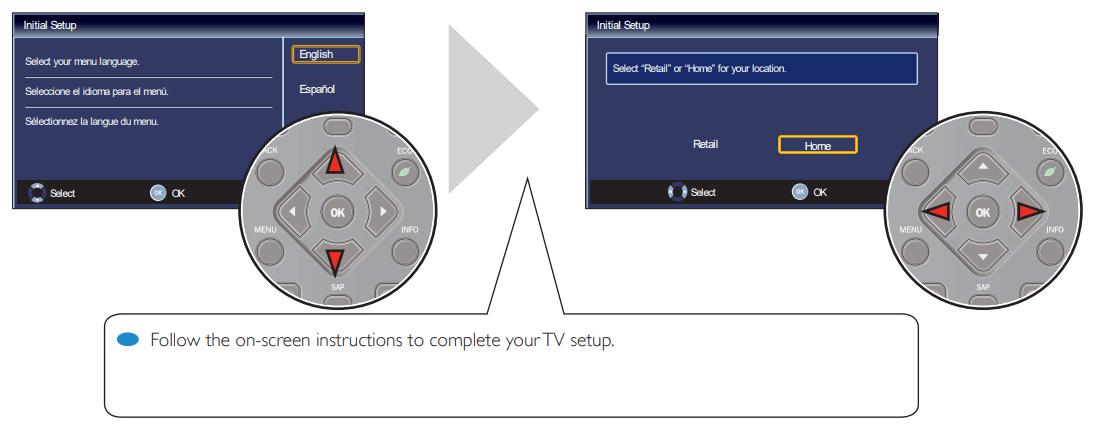
First-time setup
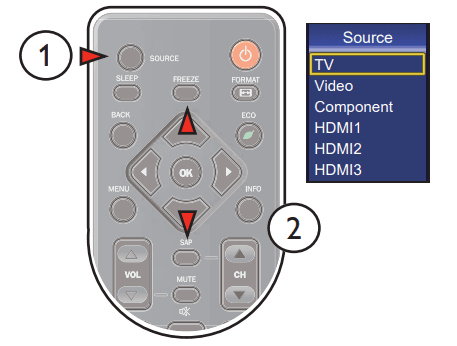
Select source
Important Safety Instructions
- Read these instructions.
- Keep these instructions.
- Heed all warnings.
- Follow all instructions.
- Do not use this apparatus near water.
- Clean only with a dry cloth.
- Do not block any ventilation openings. Install in accordance with the manufacturer’s instructions.
- Do not install near any heat sources such as radiators, heat registers, stoves, or other apparatus (including amplifiers) that produce heat.
- Do not defeat the safety purpose of the polarized or grounding-type plug. A polarized plug has two blades one wider than the other. A grounding-type plug has two blades and a third grounding prong. The wide blade or the third prong is provided for your safety. If the provided plug does not fit into your outlet, consult an electrician for the replacement of the obsolete outlet.
- Protect the power cord from being walked on or pinched particularly at plugs, convenience receptacles, and the point where they exit from the apparatus.
- Only use attachments/accessories specified by the manufacturer.
- Use only with the cart, stand, tripod, bracket, or table specified by the manufacturer, or sold with the apparatus. When a cart is used, use caution when moving the cart/apparatus combination to avoid injury from tip-over.
- Unplug this apparatus during lightning storms or when unused for long periods of time.
- Refer all servicing to qualified service personnel. Servicing is required when the apparatus has been damaged in any way, such as a damaged power supply cord or plug, liquid spilled or objects fallen into it, exposed to rain or moisture, does not operate normally, or has been dropped.
NOTE ABOUT RECYCLING
- This unit’s packaging materials are recyclable and can be reused. Please dispose of any materials per your local recycling regulations.
- Batteries should never be thrown away or incinerated but disposed of per your local regulations concerning chemical wastes.
WHEN CARRYING THIS UNIT
- At least 2 people are required to carry this unit.
- Make sure to hold the upper and bottom frames of the unit firmly as illustrated.
TO AVOID THE HAZARDS OF ELECTRICAL SHOCK AND FIRE
- Do not handle the AC power cord with wet hands.
- Do not pull on the AC power cord when disconnecting it from an AC outlet. Grasp it by the plug.
- Do not put your fingers or objects into the unit.
LOCATION AND HANDLING
- Do not install the unit in direct sunlight, near strong magnetic fields, or in a place subject to dust or strong vibration.
- Avoid a place with drastic temperature changes.
- Install the unit in a horizontal and stable position. Do not place anything directly on the top or bottom of the unit. Depending on your external devices, noise or disturbance of the picture, and/or sound may be generated if the unit is placed too close to them. In this case, please ensure enough space between the external devices and the unit.
- Depending on the environment, the temperature of this unit may increase slightly. This is not a malfunction.
- Be sure to unplug the AC power cord from the AC outlet before carrying the unit.
Supplied Accessories
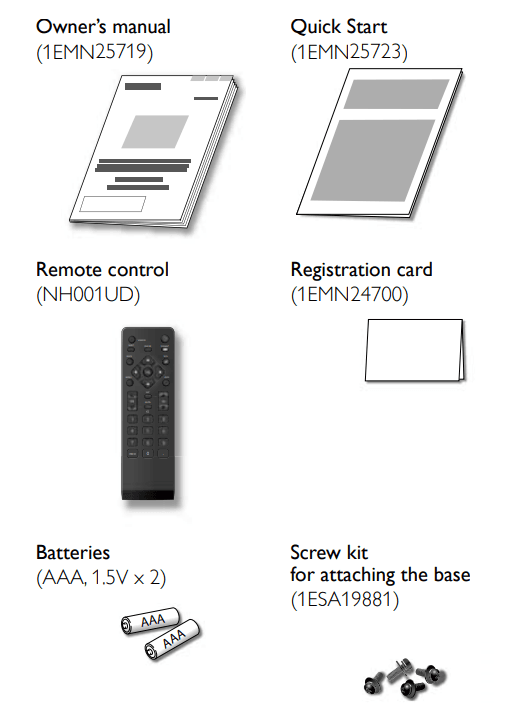
- If you need to replace these accessories, please refer to part No. with the illustrations and call our toll-free customer support line found on the cover of this manual.
Symbols Used in this Manual
The following is the description of the symbols used in this manual. The description refers to:
ATSC: Digital TV operation
NTSC: Analog / Cable TV operation
- If neither symbol appears, the operation is applicable to both.
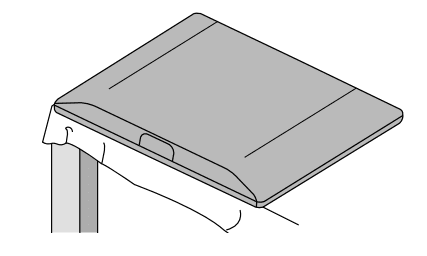
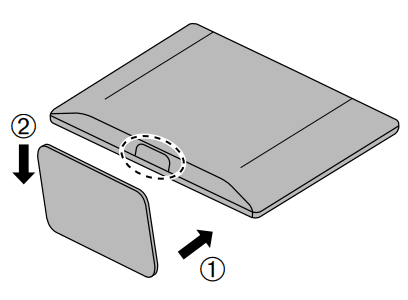
Attaching the Base
You must attach the base to the unit to have it as a tabletop unit. Be sure the front and rear of the base match the proper direction.
- Spread a thick and soft cloth over a table as shown. Place the main unit face down onto it. Make sure not to damage the screen. At least 2 people are required for this step.

- Insert 2 hooks under the bottom of the main unit into base holes. (shown by arrow ➀), then move the base in the direction as shown by the arrow ➁ until it stops and the 4 mounting holes are aligned.

- Drive Phillips pan screws into the 4 threaded holes at the bottom of the base until they are tight.
To remove the base from this unit
- Unscrew the Phillips pan screws on step 3. After the screws are removed, move the base in the opposite direction as shown by arrow ➁ on step 2, then pull the base up toward the rear of the unit. Be careful not to drop the base when you remove it.
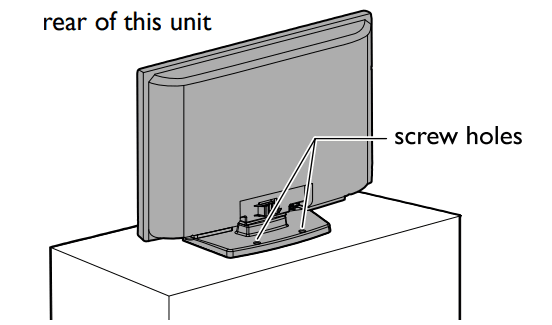
Fixing the Unit on Your Furniture
Screw this unit on your furniture tightly using wood screws (not supplied) in the 2 holes at the back of the base as shown.
- Recommended screw dimension: 5.1 x 20 mm
Note
- When you remove this unit make sure to unscrew the wood screws from your Wood Stand, Furniture, and other wood item.
Control Panel
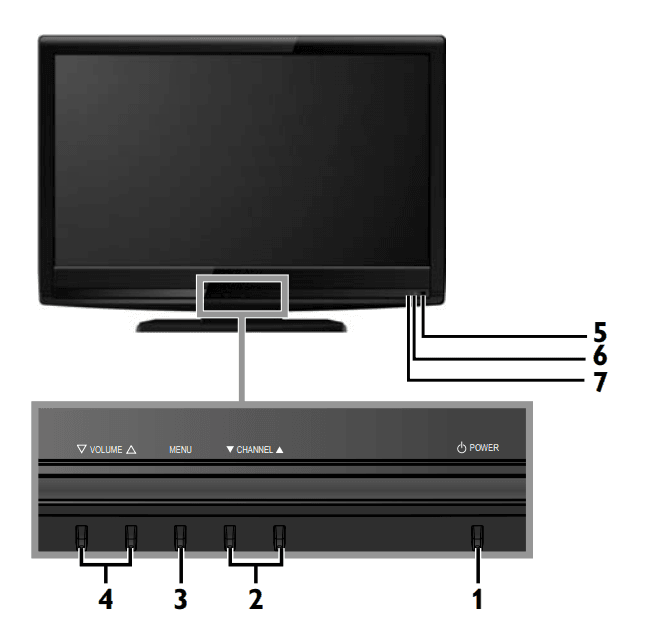
- POWER ➠ p. 15
- CHANNEL ▲/▼ ➠ p. 17
Press to select channels or move up (▲) / down ( ▼) through the main menu items. - MENU ➠ p. 19
- VOLUME ▲/▼ ➠ p. 16
Press to adjust the volume or move right (▲) / left (▼) through the main menu items. - Infrared sensor window
Receives infrared rays transmitted from the remote control. - POWER ON indicator
Lights up green when power is on. - STAND-BY indicator
Lights up red when the power is off.
Terminals
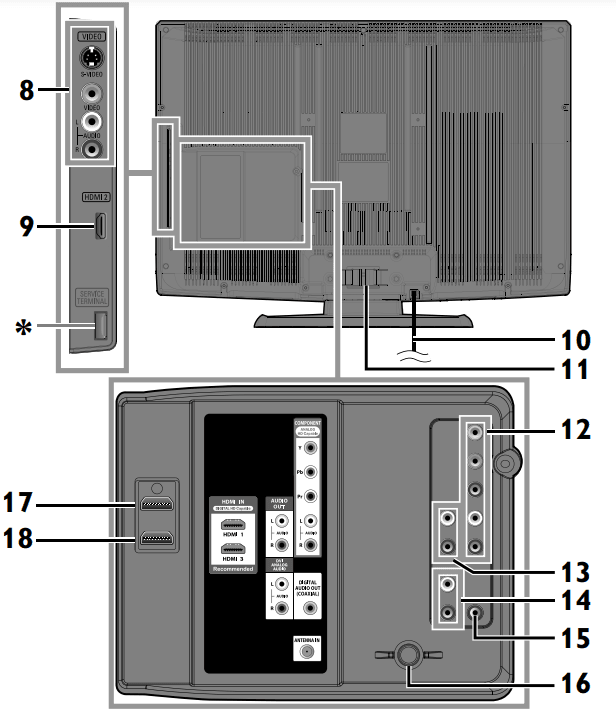
Side Panel
- 8 S-Video / Composite Video / Audio (L/R) Input jacks for VIDEO ➠ p. 11, 12
- 9 HDMI 2 Input jack ➠ p. 9, 10
Rear Panel
- 10 AC power cord ➠ p. 14
- 11 Cable management ➠ p. 14
- 12 Component Video and Audio (L/R) Input jacks ➠ p. 9, 11
- 13 Audio (L/R) Output jacks ➠ p. 12
- 14 Audio (L/R) Input jacks for HDMI 1 ➠ p. 10, 13
- Audio cable connection from a DVI device. When you connect your PC that has a DVI terminal, use a stereo mini plug conversion cable as well. (For HDMI 1 Input jack only)
- 15 Digital Audio Output jack ➠ p. 12
- 16 Antenna Input jack ➠ p. 9
- 17 HDMI 1 Input jack ➠ p. 9, 10, 13
HDMI connection for HDMI or DVI devices. When you connect your PC that has a DVI terminal, you can enjoy this unit as a PC monitor. - 18 HDMI 3 Input jack ➠ p. 9, 10
Remote Control Function
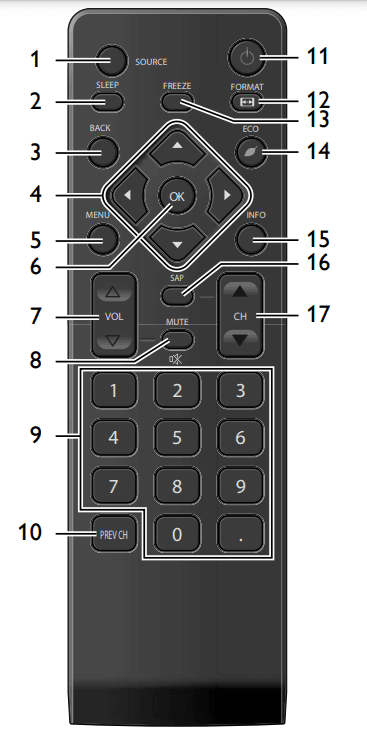
- SOURCE ➠ p. 16
- SLEEP ➠ p. 16
- BACK ➠ p. 18
Press to return to the previous menu operation. - ▲/▼/◄/►(cursor) ➠ p. 15
- MENU ➠ p. 19
- OK ➠ p. 15
- VOL / ➠ p. 16
- MUTE ➠ p. 16
- Number buttons ➠ p. 17
• (dot)
Press to shift the subchannel from the main channel. - PREV CH ➠ p. 17
Press to return to the previously viewed channel. - (power) ➠ p. 15
- FORMAT ➠ p. 17
Press to select the aspect ratio available for the TV screen. - FREEZE ➠ p. 17
Press to freeze the screen image. - ECO ➠ p. 18
Press to reduce the brightness. - INFO ➠ p. 18
- SAP ➠ p. 16
- CH ▲/▼ ➠ p. 17
Installing the Batteries
Install the batteries (AAA, 1.5V x 2) matching the polarity indicated inside the battery compartment of the remote control.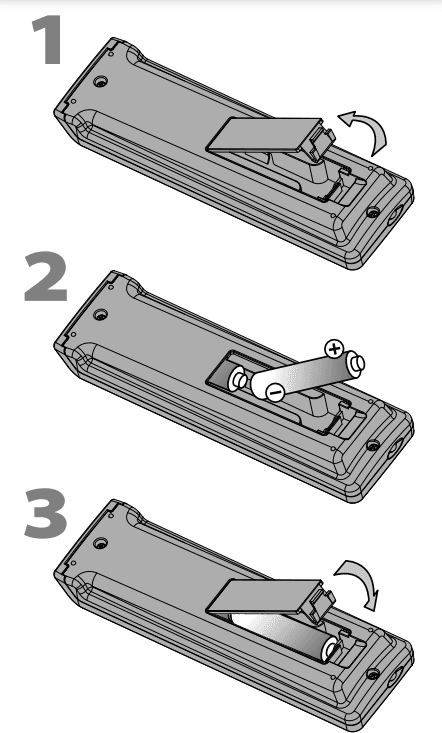
PREPARATION
Antenna Connection
Connect the RF coaxial cable on your home outlet to the antenna input jack of this unit.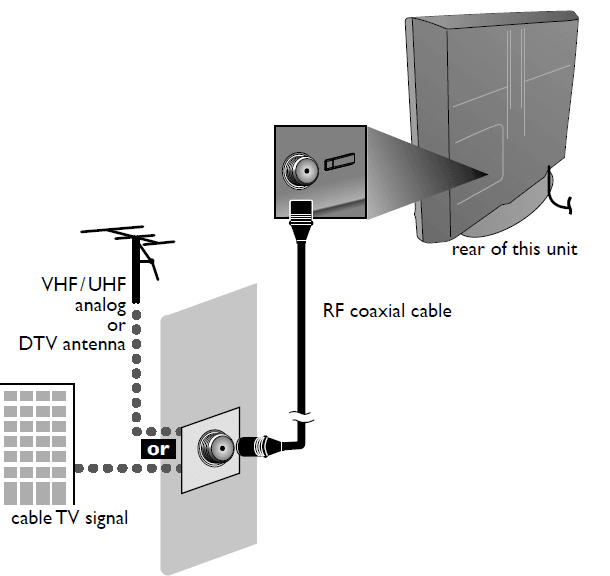 Once connections are completed, turn on the unit and begin the initial setup. Channel scanning is necessary for the unit to memorize all available channels in your area. [Initial Setup] ➠ p. 15
OPTIONAL SETTING
Main Menu
This section describes the overview of the main menu displayed when you press MENU. The main menu consists of the function setting items below.
Press MENU.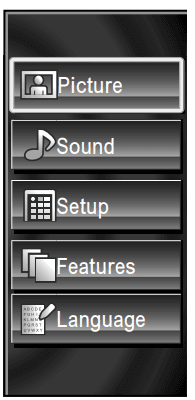
- Picture [Picture Adjustment] ➠p. 22
- Sound [Sound Adjustment] ➠p. 23
- Setup [Autoprogram] ➠p. 19
- You can automatically scan the viewable channels.
[Channel List] ➠p. 20 - The Channels that were auto-programmed are in this Channel list, use CH ▲/▼ to access them.
[Add Channels] ➠p. 20 - You can add TV channels that were not found by the autoprogram scan.
- You can automatically scan the viewable channels.
- Features [Closed Caption] ➠p. 24
- You can change the display closed caption format which displays the dialogue of a TV program or other text information across the TV screen.
[Child Lock] ➠p. 27 - You can set viewing limitations.
[Fun-Link] ➠p. 29 - You can set Fun-Link options.
[Energy Saving Mode] ➠p. 30
[Location] ➠p. 30 - Switch the setting from [Retail] to [Home] to allow the desired [Picture] and [Sound] mode to be kept in memory.
[Current Software Info] ➠p. 30
Language [Language Selection] ➠p. 21 - Change the Main Menu language.
- You can change the display closed caption format which displays the dialogue of a TV program or other text information across the TV screen.
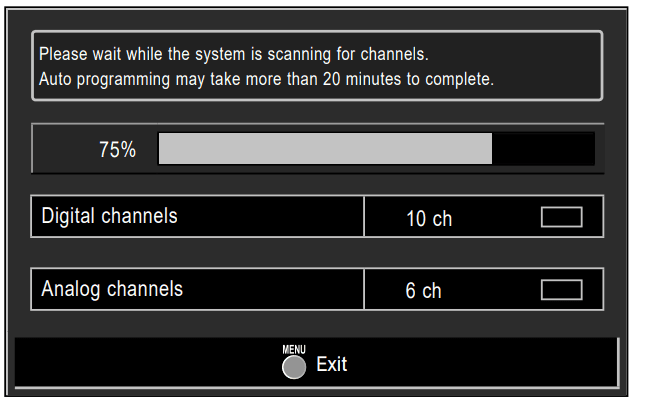
Auto program
If you switch wires (e.g. between antenna and CATV) if you move the unit to a different area after the initial setting, or if you restore the DTV channels you deleted, it is recommended to use Autoprogram to perform a new channel search.
Before you begin:
Make sure the unit is connected to an antenna or cable.
- Press MENU to display the main menu.
- Use ▲/▼ to select [Setup], then press OK.
- Use ▲/▼ to select [Autoprogram], then press OK.
- Use ▲/▼ to select an appropriate option, then press OK.
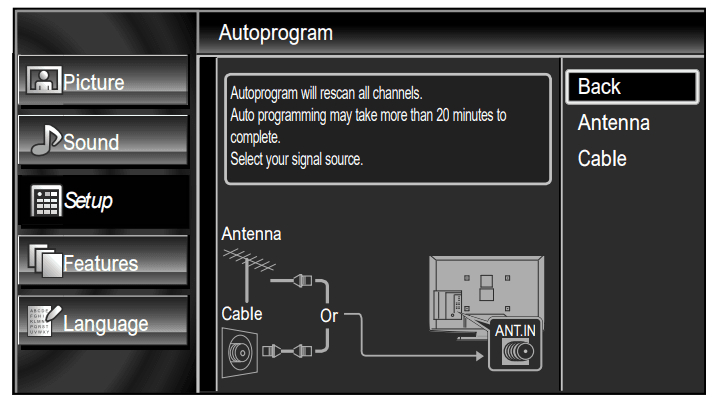
- When connected to a VHF / UHF antenna, select [Antenna].
- When connected to CATV, select [Cable].
- [Autoprogram] will begin.

- When the scanning and memorizing are completed, the lowest memorized channel will be displayed.
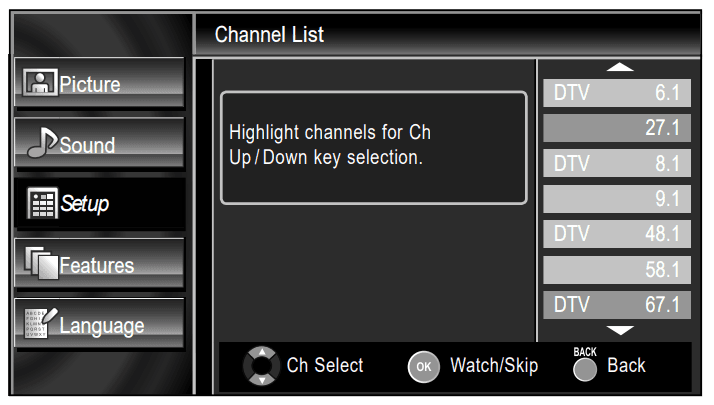
Channel List
The channels selected here can be skipped when selecting the channels using CH ▲/▼. Those channels can still be selected with the Number buttons.
- Press MENU to display the main menu.
- Use ▲/▼ to select [Setup], then press OK.
- Use ▲/▼ to select [Channel List], then press OK.
- Use ▲/▼ to select the channel you want to remove, then press OK.

- The channel display for the removed channel darkens. You will not be able to select the channel again using CH ▲/▼.
- To reactivate a removed channel, use ▲/▼ and press OK. The registered channels are highlighted.
- When you remove a main channel, its subchannels are removed as well.
- Press MENU to exit.
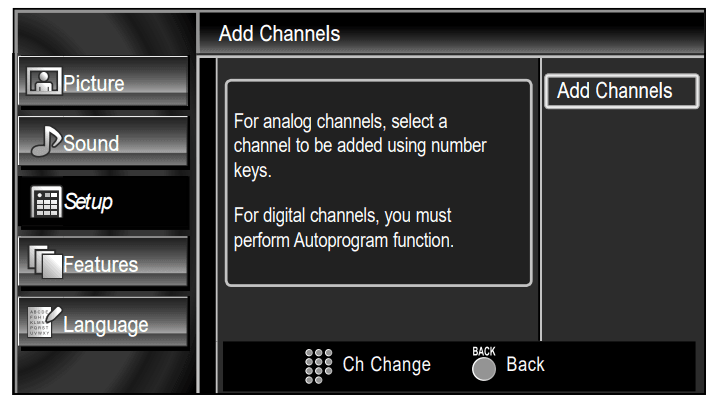
Add Channels
This function lets you add the channels that were not added by the auto program due to reception conditions at the initial setting.
- Press MENU to display the main menu.
- Use ▲/▼ to select [Setup], then press OK.
- Use ▲/▼ to select [Add Channels], then press OK.
- Use the Number buttons to enter the number of the channel you want to add, then press OK.

- Press MENU to exit.
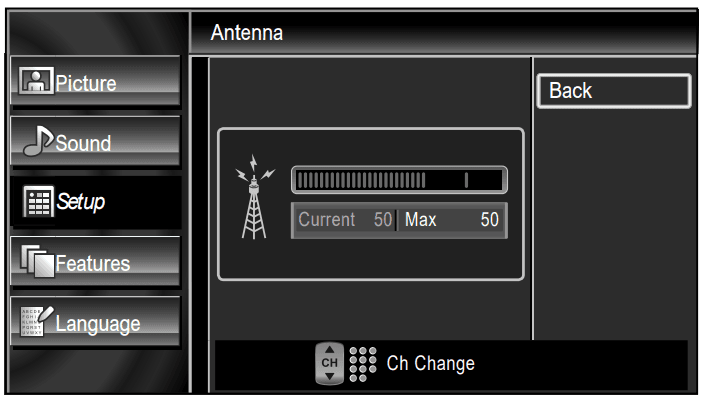
Antenna Confirmation ATSC
This function lets you check the digital signal strength of each channel.
- Press MENU to display the main menu.
- Use ▲/▼ to select [Setup], then press OK.
- Use ▲/▼ to select [Antenna], then press OK.
- Use the Number buttons or CH ▲/▼ to select the channel for which you want to check the digital signal strength.

- If the channel is set to an analog (cable) channel or external input, you cannot confirm the antenna condition.
- Press MENU to exit.
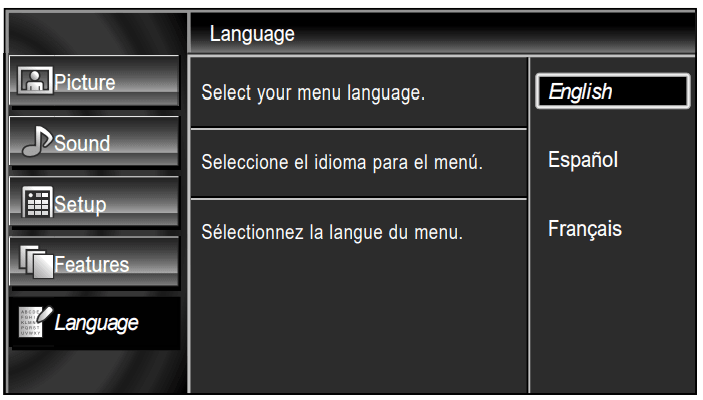
Language Selection
You can choose English, Spanish, or French as your on-screen language.
- Press MENU to display the main menu.
- Use ▲/▼ to select [Language], then press OK.
- Use ▲/▼ to select [English], [Español] or [Français], then press OK.

- Press MENU to exit.
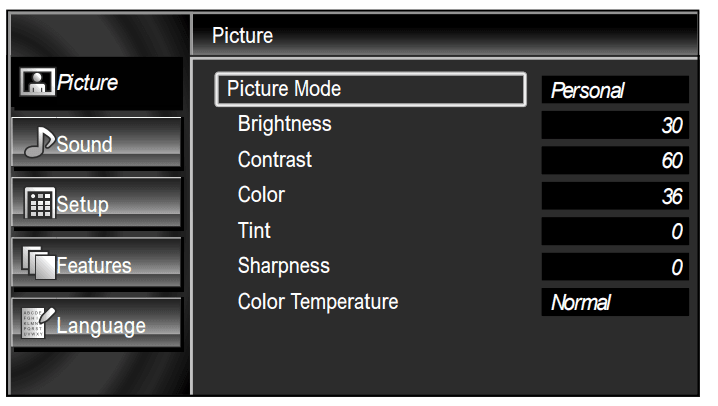
Picture Adjustment
You can adjust the picture mode, or customize the picture quality as your preference.
Before you begin:
You must set [Home] in [Location]. ➠ p. 30. Otherwise, the settings you adjusted will not be memorized
after you turn off the unit.
- Press MENU to display the main menu.
- Use ▲/▼ to select [Picture], then press OK.
- Use ▲/▼ to select the item you want to adjust, then press OK.

- Adjust the following items.
Picture Mode
Use ▲/▼ to select the desired setting, then press OK. ([Personal], [Standard], [Sports], [Movie], and [Game])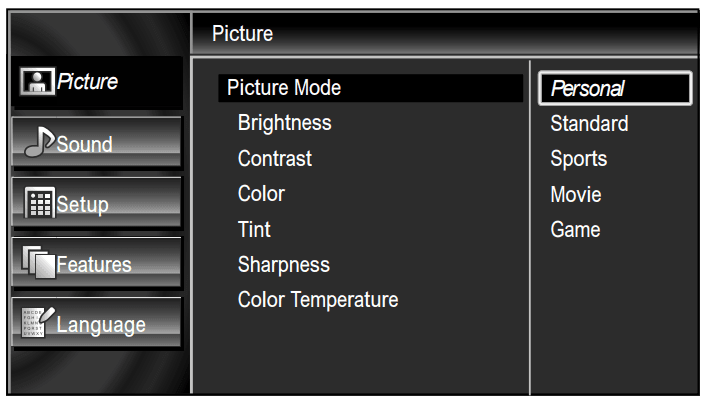
Brightness, Contrast, Color, Tint, Sharpness, Color Temperature
You can only adjust the following options when you set it to [Personal] in [ Picture Mode]. Use ▲/▼ to select the desired setting, then use ◄/► to adjust.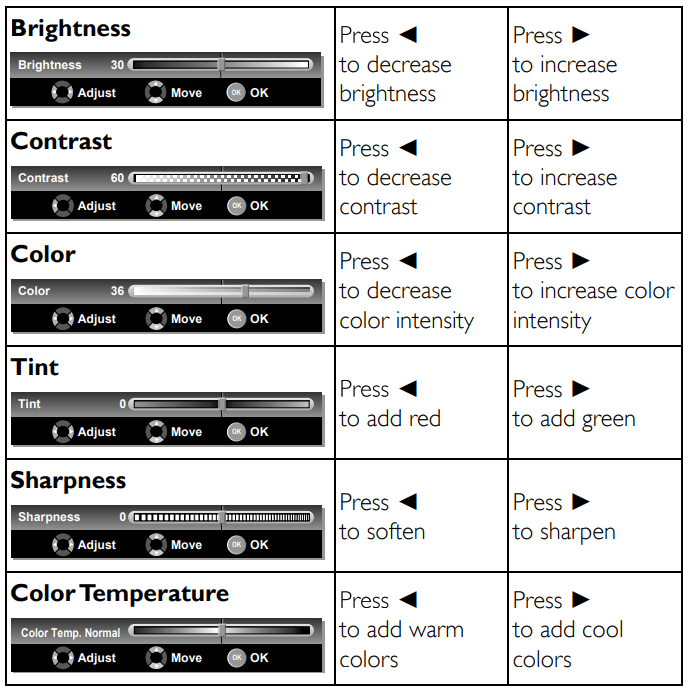
- Press MENU to exit.
TROUBLESHOOTING
FAQ
| Question | Answer |
|
My remote control does not work. What should I do? | Check the antenna or cable connection to the main unit Check the batteries of the remote control Check if there is an obstacle between the infrared sensor window and the remote control Test the signal output. If OK, then possible infrared sensor trouble. [IR Signal Check] p.34 Aim the remote control directly at the infrared sensor window on the front of the unit. Reduce the distance to the unit Re-insert the batteries with their polarities (+/– signs) as indicated. When there is an infrared-equipped device such as a PC near this unit, it may interrupt the remote control signal of this unit. Move the infrared-equipped device away from this unit, change the angle of the infrared sensor, or turn off the infrared communication function |
| How come the Initial setup appears every time I turn on this unit? | Connect the RF coaxial cable to the unit directly and run the initial setup. Make sure to complete the channel scan before turning off the unit. |
|
Why I not watch some RF signal TV programs? | Make sure [Autoprogram] has been completed. .19 Autoprogram must be completed when you set up the unit for the first time or move it to a location where previously unavailable channels are broadcast. The selected channel may not be broadcasting. When [Autoprogram] is interrupted and not completed, some channels will not be received. Make sure to complete it. p.19 The selected channel cannot be viewed by the [Child Lock] setting. p.27 The unit requires some kind of antenna input. An indoor antenna (VHF /UHF), an external antenna (VHF /UHF) or an RF coaxial cable from your wall cable/satellite box needs to be plugged into the unit. |
| How come there is no image from the connected external devices? | Check if the right input mode is selected by pressing SOURCE or using CH / [Switching Each Input Mode] p.16 Check the antenna or cable connection to the unit When using the Component Video Connection check that the Green (Y), Blue (Pb/Cb), and Red (Pr/Cr) connectors are connected to their corresponding colored jacks on the unit |
| Whenever I entered the channel number, it changes automatically. | Many digital channels have alternate channel numbers. The unit changes the numbers automatically to the ones signifying the broadcasting station channel number. These basic numbers are used for previous analog broadcasts. (e.g., input ch#30 auto change to ch#6.1) |
| Why are captions not displayed entirely? Or, captions are delayed behind the dialogue. | Captions that are delayed a few seconds behind the actual dialogue are common for live broadcasts. Most captioning production companies can display a dialogue to a maximum of 220 words per minute. If a dialogue exceeds that rate, selective editing is used to ensure that the captions remain up-to-date with the current TV screen dialogue. |
| How can I set the clock? | There is no clock function on this unit |
Troubleshooting Guide
If the unit does not perform properly when operated as instructed in this manual, check the following chart and all connections once before calling for service.
| Symptom | Remedy |
| No power | • Make sure the AC power cord is plugged in. • Make sure that the AC outlet supplies the proper voltage, plug another electrical appliance into the AC outlet to ensure that AC outlet operates normally. • If a power failure occurs, unplug the AC power cord for 1 minute to allow the unit to reset itself |
| Control button does not work | • Press only one button at a time. Do NOT press more than one button at the same time. • Ensure that no buttons on the remote are depressed and move freely. |
|
The power is ON but no screen image. | • Check whether the connection of the antenna, cable receiver, or satellite box is connected correctly. • Check whether all the cables to the unit are connected to the correct output jack of your device like a BD / DVD recorder. • Make sure that the selected input mode is connected to the working input jack. • Check if your computer is NOT in sleep mode when the input mode of this unit is in PC mode. Tap any key on the keyboard to wake up your computer. |
|
No picture or sound | • Check if the power is on. • Check if the right input mode is selected. • Check whether all the cables to the unit are connected to the correct output jack of your device like a BD / DVD recorder. • View other TV channels. The problem might be limited to the broadcasting station or weak signal strength. • Turn off the unit and wait for about 1 minute, then turn on the unit again. • Check whether the connection of the antenna, cable receiver, or satellite box is connected correctly. • Make sure that the selected input mode is connected to the working input jack. • Check if your computer is NOT in sleep mode when the input mode of this unit is in PC mode. Tap any key on the keyboard to wake up your computer. • Make sure that the sound is not muted. Press MUTE so that the volume bar and current volume level will appear on the TV screen. • Make sure that the volume is NOT set to [0] o [Mute]. If so, use VOL / to adjust the desired volume |
| No color | • View other TV channels. The problem might be limited to the broadcasting station. • Adjust [Color] in the main menu |
| Adjusted [Picture] o [Sound] settings are not effective every time the unit is turned on | • You must set [Home] in [Location]. p.30 Otherwise, the settings you adjusted will not be memorized after you turn off the unit. |
|
Sound OK, picture poor | Electrical interference from nearby appliances may affect picture quality. Adjust [Contrast] and [Brightness] in the main menu View other TV channels. The problem might be limited to the broadcasting station or weak signal strength. For the best picture quality, watch “High Definition” wide-screen programs. If the HD content is not available, watch “Standard Definition” programs instead. |
| Picture OK, sound poor | View other TV channels. The problem might be limited to the broadcasting station or weak signal strength. Check if the audio cable is connected incorrectly. |
| You see a distorted picture or hear an unusual sound | You may be getting interference from electrical appliances, automobiles, motorcycles, or fluorescent lights. Try moving the unit to another location to see if this is the cause of the problem. |
| Ghosts, lines, or streaks in the picture | Electrical interference from nearby appliances may affect picture quality. View other TV channels. The problem might be limited to the broadcasting station. |
| Symptom | Remedy |
| You see “noise” or “trash” on the screen | When the capabilities of the unit exceed the capabilities of the digital broadcasting, the signal will be increased to match the capabilities of the display of the unit. This may cause noise or trash |
| Different color marks on the TV screen | View other TV channels. The problem might be limited to the broadcasting station, missing data, or pixelation. |
| You switch to a different input and the volume changes. | This unit will memorize the volume level from the last time you adjusted it. If the volume of the sound from another device is higher or lower, then the loudness will change. |
| You switch to a different input and the screen size changes. | This unit will memorize the viewing mode from the last time you used the particular input modes. |
| The display image does not cover the entire screen | If you are watching TV or using Composite Video, S-Video, Component Video or HDMI with 480i Input, press FORMAT repeatedly to switch various screen modes. |
| Captions are displayed as a white box No caption is displayed in the Closed Caption-supported program | Interference from buildings or weather conditions may cause captioning to be incomplete. Broadcasting stations may shorten the program to insert advertisements. The closed caption decoder cannot read the information of the shortened program. |
| The black box is displayed on the TV screen | The text mode is selected for caption. Select [CC-1] [CC-2] [CC-3] [CC-4] o [Off] |
Note
- The LCD panel is manufactured to provide many years of useful life. Occasionally a few nonactive pixels may appear as a fixed point of blue, green, or red. This is not to be considered a defect in the LCD screen.
- Some functions are not available in specifi c modes, but this is not a malfunction. Read the description in this manual for more details on correct operations.
For more manuals by Sylvania, visit ManualsLibraryy
Sylvania LC320SL1 32-inch 720p LCD HDTV-FAQs
How do I program channels on my Sylvania LC320SL1 TV?
Go to the Menu, select Channel Setup, and run the Auto Program function. This will scan and save available channels automatically.
Why is my Sylvania TV not turning on?
Ensure the power cord is securely plugged in and try using a different outlet. If the standby light is on but the TV won’t power up, try using the power button on the TV instead of the remote.
How do I reset my Sylvania LC320SL1 TV to factory settings?
Navigate to Menu > Setup > Restore Default to reset your TV to its original factory settings.
Why is there no sound on my Sylvania TV?
Check if the TV is muted or if the volume is too low. Also, verify that external speakers or devices are properly connected and set to the correct audio output mode.
How do I change the input source on my Sylvania LC320SL1?
Press the Input button on the remote and select the desired input source (e.g., HDMI, AV, Component).
What should I do if my TV has a blurry or distorted picture?
Ensure the cables are securely connected, adjust the picture settings, and make sure you’re watching content in the correct resolution.
How do I fix a remote control that’s not working?
Replace the batteries, ensure there are no obstructions between the remote and the TV sensor, and try pairing the remote again if necessary.
Does the Sylvania LC320SL1 support HDMI connections?
Yes, it has HDMI ports for connecting external devices like gaming consoles, streaming devices, and Blu-ray players.

