Weider 2980 X Home Gym Weight System
BEFORE YOU BEGIN
- For your benefit, read this manual carefully before you use the weight system. If you have questions after reading this manual, please see the front cover of this manual. To help us assist you, note the product model number and serial number before contacting us. The model number and the location of the serial
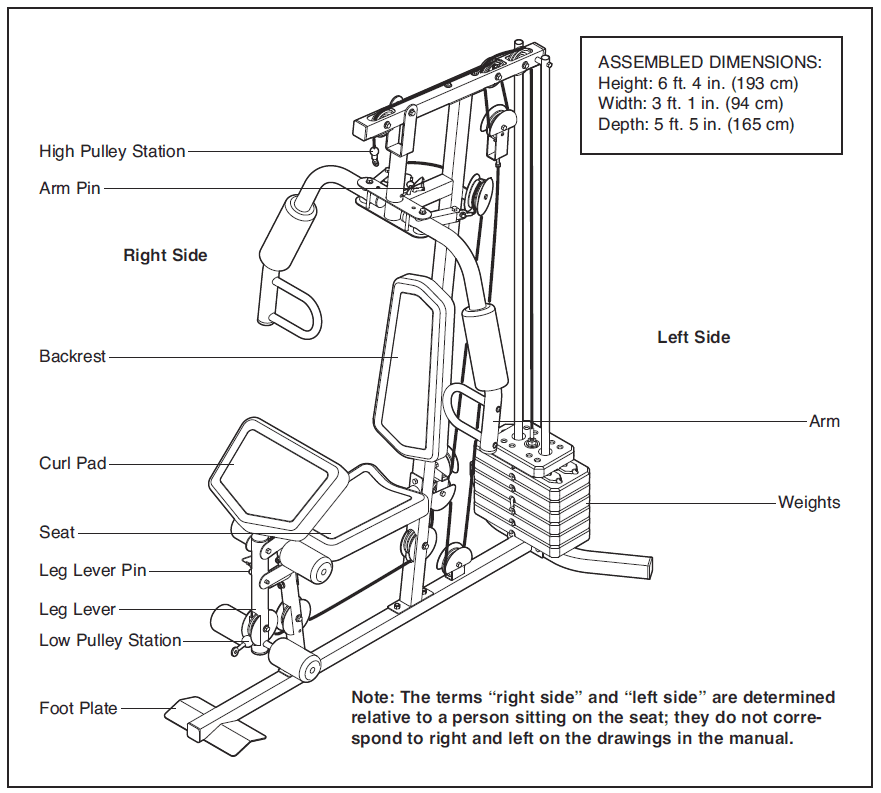
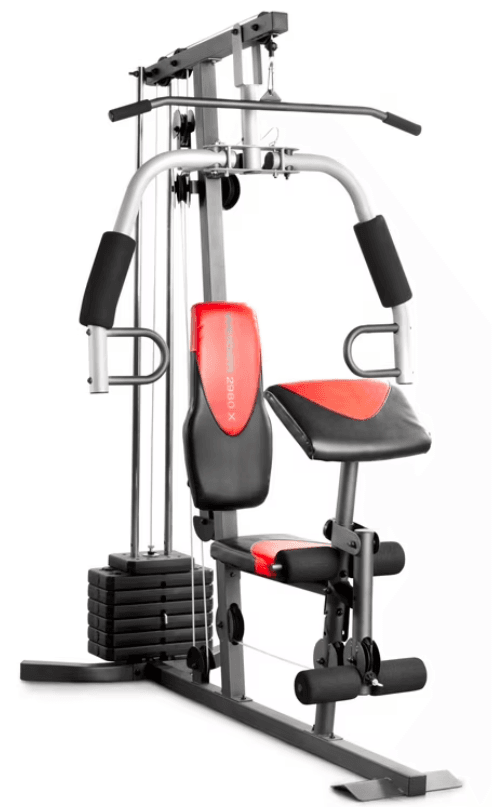
number decals are shown on the front cover of this manual. Before reading further, please familiarize yourself with the parts labeled in the drawing below.
ASSEMBLY
The Four Stages of the Assembly Process
- Frame Assembly—You will begin by assembling the base and the uprights that form the skeleton of the weight system.
- Arm Assembly—During this stage you will assemble the arms and the leg lever.
- Cable Assembly—During this stage you will attach the cables and pulleys that connect the arms to the weights.
- Seat Assembly—During the final stage you will assemble the seat and the backrest
Frame Assembly
- To make assembly easier, read the information on page 6 before you begin. Insert four M8 x 63mm Carriage Bolts (64) up through the Base (1). Note: It may be helpful to place a piece of tape over the bolt heads to hold them in place
- Orient the two Weight Guides (21) as shown, so the indicated holes are closer to the lower ends. Attach the Weight Guides and the Stabilizer (2) o the Base (1) with two M10 x 67mm Bolts (71), two M10 Washers (57), and two M10 Nylon Locknuts (56). Fully tighten the Nylon Locknuts.
- Attach the Front Leg (7) to the Base (1) with the wo M8 x 63mm Carriage Bolts (64) and two M8 Nylon Locknuts (58). Do not tighten the Nylon Locknuts yet.
Attach the Leg Bumper (60) to the Front Leg (7) with an M4 x 20mm Self-tapping Screw (69) and an M4 Washer (33). Make sure that the end of the Leg Bumper is pointing upward. - Attach the Seat Frame (6) to the Upright (3) with two M8 x 65mm Bolts (68), two M8 Washers (59), and two M8 Nylon Locknuts (58). Do not tighten the Nylon Locknuts yet. Attach the Seat Frame (6) to the Front Leg (7) in the same way
- Slide the two Weight Bumpers (27) onto the Weight Guides (21). Orient the six Weights (22) with the pin holes on the bottom as shown. Slide the Weights onto the Weight Guides. Insert the Weight Selector Cap (23) into the Weight Selector (24). Insert the Weight Selector into the six Weights (22). Make sure that the pin on the Weight Selector is oriented as shown. Apply some of the included grease to the indicated holes in the Top Weight (25). Slide the Top Weight onto the Weight Guides (21).
Arm Assembly
- Grease an M10 x 77mm Bolt (79). Orient the Leg Lever (8) with the welded support on the side shown. Attach the Leg Lever to the Front Leg (7) with the Bolt and an M10 Nylon Locknut (56). Do not overtighten the Nylon Locknut; The leg Lever must pivot easily.
- Grease an M10 x 77mm Bolt (79). Attach the Pivot Frame (5) to the Top Frame (4) with the Bolt and an M10 Nylon Locknut (56). Do not overtighten the Nylon Locknut; the Pivot Frame must pivot easily. Attach the two Arm Pins (40) to the Pivot Frame (5) with two M4 x 20mm Self-tapping Screws (69). Insert the Arm Pins into the two holes in the Upright (3).
- Grease an M10 x 51mm Bolt (66). Attach a Cable Pivot (39) to the Left Arm (10) with the Bolt and an M10 Nylon Locknut (56). Do not overtighten the Nylon Locknut; the Cable Pivot must pivot easily. Wet the inside of a Large Foam Pad (42) with soapy water. Slide the Large Foam Pad onto the Left Arm (10).
Attach a Handle (11) to the Left Arm (10) with two M10 x 25mm Button Screws (77) and two M10 Washers (57). Assemble the Right Arm (9) in the same way.
Cable Assembly
- See the CABLE DIAGRAM on page 21 to identify and route the cables. Identify the Arm Cable (54). Grease an M8 x 22mm Shoulder Bolt (65). Attach the Cable to the indicated Cable Pivot (39) with the Shoulder Bolt and an M8 Nylon Locknut (58). Make sure that the cable end can pivot easily on the Shoulder Bolt.
- Route the Arm Cable (54) over a V-pulley (46). Attach the V-pulley, a Large Cable Trap (50), two Full Guards (41), and an M10 Washer (57) to the Upright (3) with an M10 x 63mm Bolt (75) and an M10 Nylon Locknut (56). Make sure that the Cable Trap is oriented to hold the Cable in the groove of the V-pulley.
- Route the Arm Cable (54) under a 90mm Pulley (48). Attach the Pulley and two Half Guards (43) to the Double U-bracket (63) with an M10 x 46mm Bolt (81) and an M10 Nylon Locknut (56). Make sure that the Half Guards are on the outside of the U-bracket as shown
- Route the Arm Cable (54) over a V-pulley (46). Attach the V-pulley, a Large Cable Trap (50), two Full Guards (41), and an M10 Washer (57) to the Upright (3) with an M10 x 63mm Bolt (75) and an M10 Nylon Locknut (56). Make sure that the Cable Trap is oriented to hold the Cable in the groove of the V-pulley.
- Route the Low Cable (53) under a 90mm Pulley (48) and through the Upright (3). Attach the Pulley inside the Upright with an M10 x 67mm Bolt (71), two M10 Washers (57), two 12mm Spacers (52), and an M10 Nylon Locknut (56).
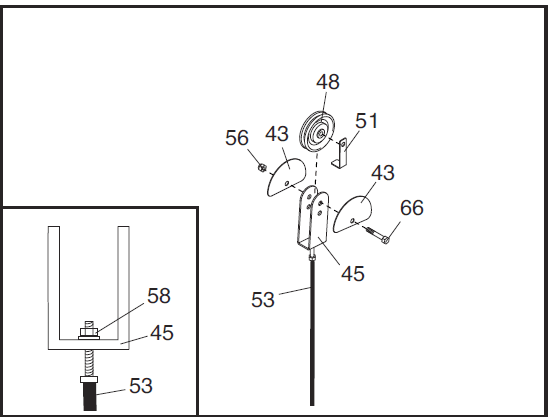
- Wrap the High Cable (55) under a 90mm Pulley (48). Attach the Pulley, a Cable Trap (51), and two Half Guards (43) at the upper hole in the Ubracket (45) with an M10 x 51mm Bolt (66) and an M10 Nylon Locknut (56). Make sure that the Cable Trap is oriented to hold the Cable in the groove of the Pulley and that the Half Guards are on the outside of the U-bracket.
- Route the High Cable (55) up through the Top Frame (4) and over a 90mm Thin Pulley (47). Attach the Pulley inside the Top Frame with the M10 x 67mm Bolt (71) used in step 23, an 11mm Spacer (49), an M10 Washer (57), and an M10 Nylon Locknut (56).
- Route the High Cable (55) over a 90mm Pulley (48) and down through the Top Frame (4). Attach the Pulley inside the Top Frame with an M10 x 67mm Bolt (71), two M10 Washers (57), two 12mm Spacers (52), and an M10 Nylon Locknut (56).
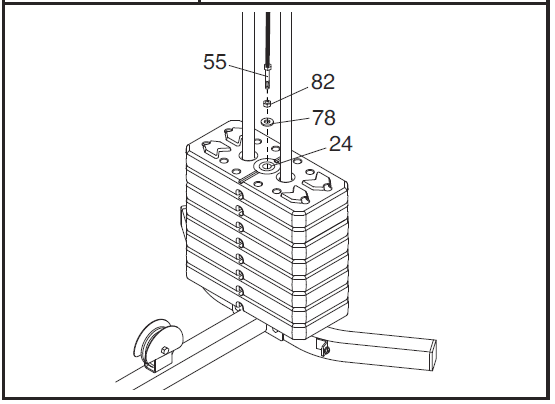
- Completely thread an M12 Nut (82) onto the High Cable (55). Place a Large Washer (78) on top of the Weight Selector (24). Tighten the High Cable (55) into the Weight Selector (24) until all the slack is removed from the cables. Tighten the M12 Nut (82) against the Large Washer (78).
Seat Assembly
- Attach the Backrest (16) to the Upright (3) with two M6 x 63mm Screws (70) and two M6 Washers (80).
- Attach the Seat (15) to the Seat Frame (6) with four M6 x 16mm Screws (62) as shown.
- Attach the Lock Plate (73) to the Front Leg (7) with an M10 x 70mm Bolt (72), an M10 Washer (57), and an M10 Nylon Locknut (56). Do not overtighten the Nylon Locknut; the Lock Plate must pivot easily. Attach the Leg Lever Pin (38) to the Front Leg (7) with an M4 x 20mm Self-tapping Screw (69). Insert the Leg Lever Pin through the Leg Lever (8) and the Lock Plate (73).
- Insert the Pad Tube (29) into the Front Leg (7). Slide two Small Foam Pads (28) onto the ends of the Pad Tube. Slide two Small Foam Pads (28) onto the Leg
Lever (8). - Make sure that all parts have been properly tightened. The use of the remaining parts will be explained in ADJUSTMENT, beginning on page 18. Before using the weight system, pull each cable a few times to make sure that the cables move smoothly around the pulleys. If one of the cables does not move smoothly, find and correct the problem.
- IMPORTANT:
- If the cables are not properly installed, they may be damaged when heavy weight is used. See the CABLE DIAGRAM on page 21 for proper cable routing. If there is any slack in the cables, you will need to remove the slack by tightening the cables. See MAINTENANCE on page 22.
ADJUSTMENT
- This section explains how to adjust the weight system. See the EXERCISE GUIDELINES on page 23 for important information about how to get the most benefit from your exercise program. Also, refer to the accompanying exercise guide to see the correct form for each exercise.
- Make sure all parts are properly tightened each time the weight system is used. Replace any worn parts immediately. The weight system can be cleaned with a damp cloth and a mild, non-abrasive detergent. Do not use solvents.
ATTACHING THE ACCESSORIES TO A PULLEY STATION
- Attach the Lat Bar (35) to the High Cable (55) at the high pulley station with a Cable Clip (37). For some exercises, the Chain (19) should be attached between the Lat Bar and the Cable with two Cable Clips. Adjust the length of the Chain between the Lat Bar and the Cable so that the Lat Bar is in the correct starting position for the exercise to be performed.
- The Lat Bar (35) or the Handle Strap (not shown) can be attached at either pulley station in the same way. Always engage the Lock Plate (not shown) before using the low pulley station (see USING THE LOCK LEVER on page 19).
ARM CONVERSION
- To use the Arms (9, 10) as butterfly arms, insert the Arm Pins (40) into the holes in the Upright (3) and the Pivot Frame (5) as shown. To use the Arms (9, 10) as press arms, insert the Arm Pins (40) into the holes in the Pivot Frame (5) and the Arms.
LOCKING THE WEIGHT STACK
- Lock the weight stack by inserting the Lock Pin (18) through a Weight Guide (21) and securing the Lock (17) onto the Lock Pin.
WEIGHT RESISTANCE CHART
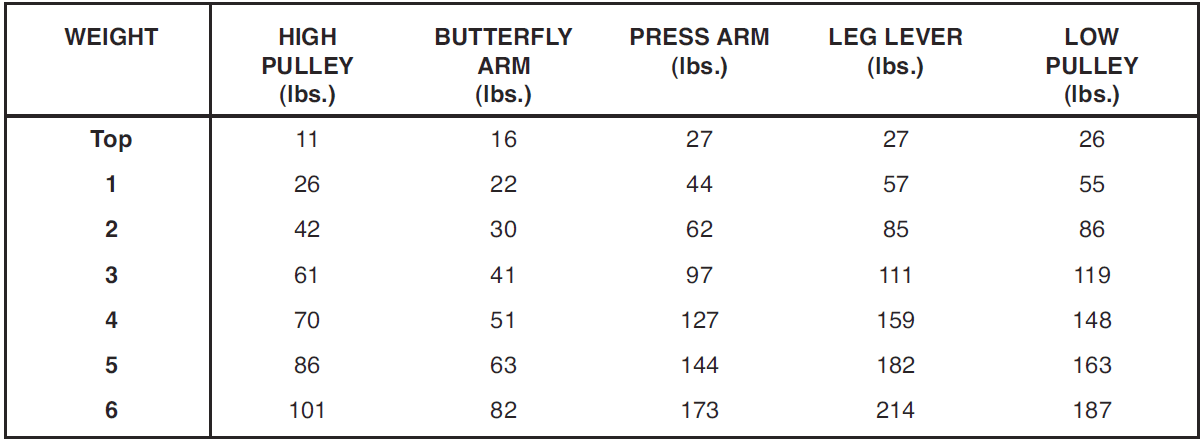
- The chart below shows the approximate weight resistance at each exercise station. The numbers in the left column refer to the 12.5-lb. weights. Note: The weight resistance shown for the butterfly arms station is for each arm. The actual resistance at each station may vary due to differences in individual weights as well as friction between the cables, pulleys, and weight guides

CABLE DIAGRAM
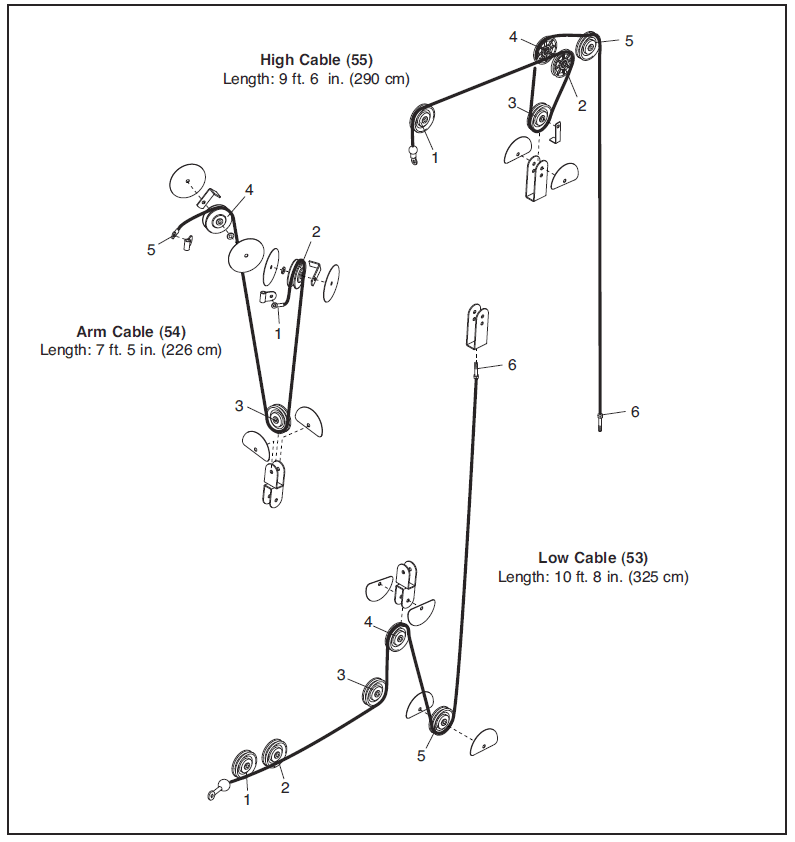
- The diagram below shows the proper routing of the cables. The numbers in each drawing show the proper route of that cable. Use the diagram to make sure that the cables, cable traps, pulleys, and guards are assembled correctly. If the cables are not assembled correctly, the weight system will not function properly and damage may occur. Make sure that the cable traps do not touch or bind the cables

MAINTENANCE
- Make sure that all parts are properly tightened each time the weight system is used. Replace any worn parts immediately. The weight system can be cleaned with a damp cloth and a mild, non-abrasive detergent. Do not use solvents.
TIGHTENING THE CABLES
- Woven cable, the type of cable used on the weight system, can stretch slightly when it is first used. If there is slack in the cables before resistance is felt, the cables should be tightened. To tighten the cables, first, insert the weight pin into the middle of the weight stack. Slack can be removed from these cables in several ways:
- See the inset drawing. Tighten the M8 Nylon Locknut (58) that connects the end of the Low Cable (53) to the U-bracket (45). Remove the M10 Nylon Locknut (56) and the M10 x 51mm Bolt (66) from the Cable Trap (51), the 90mm Pulley (48), the two Half Guards (43), and the U-bracket (45). Reattach the Pulley, Cable Trap, and Half Guards to the other hole in the U-bracket.

- Make sure that the Cable Trap is in the proper position and that the Low Cable (53) and Pulley move smoothly. Loosen the M12 Nut (82) on the High Cable (55). Tighten the Cable into the Weight Selector (24) until the slack is removed from the Cable. Then, retighten the M12 Nut against the Large Washer (78).

EXERCISE GUIDELINES
FOUR TYPES OF STRENGTH WORKOUTS
- Note: A “repetition” is one complete cycle of an exercise, such as one sit-up. A “set” is a series of repetitions.
- Muscle Building—Work your muscles near their maximum capacity and progressively increase the intensity of your exercise. Adjust the intensity level of an individual exercise as follows:
- Change the amount of resistance used.
- Change the number of repetitions or sets performed
- Weight Loss—To lose weight, use a low amount of resistance and increase the number of repetitions in each set. Exercise for 20 to 30 minutes, resting for a
maximum of 30 seconds between sets. - Cross Training—Combine strength training and aerobic exercise by following this type of program:
- Strength workouts on Monday, Wednesday, and Friday.
- 20 to 30 minutes of aerobic exercise on Tuesday and Thursday.
- One full day of rest each week to give your body time to regenerate.
- WORKOUT GUIDELINES
- Familiarize yourself with the equipment and learn the proper form for each exercise. Use your own judgment to determine the appropriate length of time for each workout, and the number of repetitions and sets to complete. Progress at your own pace and be sensitive to your body signals. Follow each strength workout with at least one day of rest.
- STAYING MOTIVATED
- For motivation, keep a record of each workout. Write the date, the exercises performed, the resistance used, and the number of sets and repetitions completed.
Record your weight and key body measurements once a month. To achieve good results, make exercise a regular and enjoyable part of your life.
For more manuals by Weider visit, ManualsLibraryy
Weider 2980 X Home Gym Weight System-FAQs
Are Weider home gyms a good choice?
Yes! Weider home gyms are affordable, space-efficient, and offer a variety of exercises. Models like the Weider Advantage and Weider Max have positive reviews, making them a great value. However, as economy gyms, they may lack some durability compared to high-end brands.
Who manufactures Weider gym equipment?
Weider Health and Fitness sold its equipment business to Icon Health and Fitness in 1994, which now manufactures and markets Weider fitness equipment.
Which brands are best for gym equipment?
Some of the top fitness equipment brands include Life Fitness, Precor, Nautilus, Cybex, Technogym, Matrix, Hammer Strength, Star Trac, True Fitness, and Hoist Fitness. These brands are known for durability, quality, and advanced features.
Who founded Weider weights?
Joe Weider was the pioneer behind Weider weights and a key figure in promoting modern health, strength training, and fitness worldwide for over 70 years.
What are the three main types of workouts?
A well-rounded fitness routine includes:
1. Aerobic exercise (cardio)
2. Muscle-strengthening (resistance training)
3. Balance and flexibility exercises
Why is it called a gym?
The term “gym” is short for gymnasium, derived from the Greek word gymnasion, meaning a public place for exercise. In Ancient Greece, athletes often trained without clothing, which is why the term originated from gymnos, meaning “naked.”
What is Weider’s principle of progressive overload?
This principle states that to build muscle strength and endurance, you must gradually increase resistance by:
1. Lifting heavier weights
2. Increasing reps or sets
3. Challenging muscles with new exercises
What are Weider weights made of?
Weider Cast Iron Hex Dumbbells are made from durable cast iron with textured knurling, ensuring a secure, non-slip grip, even during sweaty workouts.
Is Weider Fitness still in business?
Yes! The Weider® brand remains a global leader in health and fitness, with its products sold in over 120 countries.

