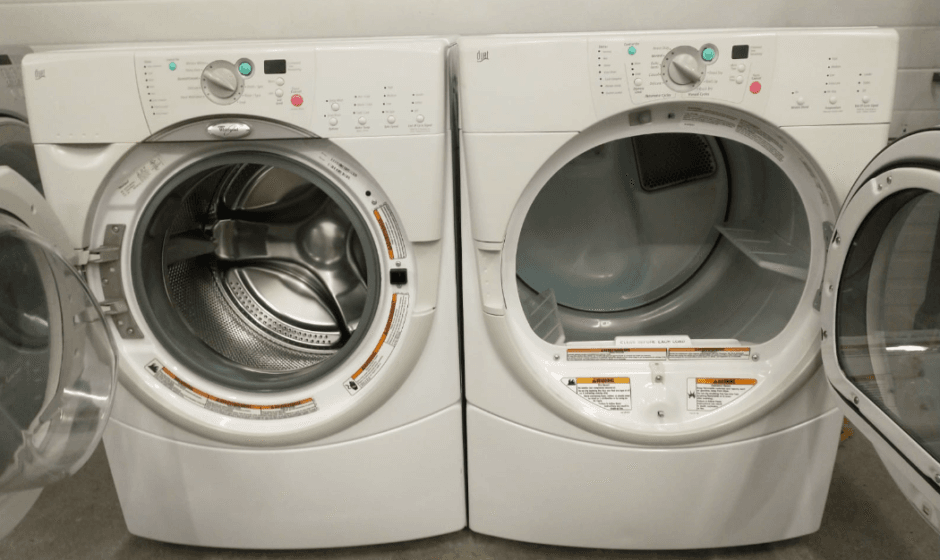
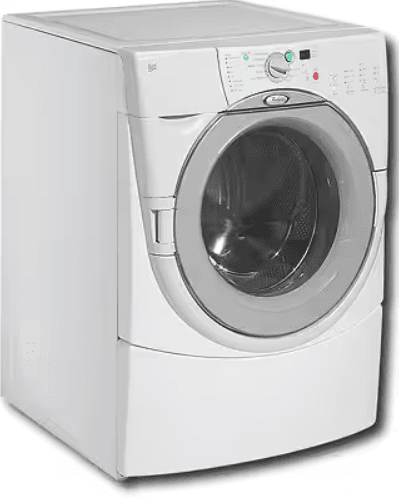
Whirlpool duet HT GHW9250ML1 Front Load Automatic Washer
IMPORTANT SAFETY INSTRUCTIONS
WARNING: To reduce the risk of fire, electric shock, or injury to persons when using the washer, follow basic precautions, including the following:
- Do not wash articles that have been previously cleaned in, washed in, soaked in, or spotted with gasoline, dry-cleaning solvents, or other flammable, or explosive substances as they give off vapors that could ignite or explode.
- Do not add gasoline, dry-cleaning solvents, or other flammable, or explosive substances to the wash water. These substances give off vapors that could ignite or explode.
- Under certain conditions, hydrogen gas may be produced in a hot water system that has not been used for 2 weeks or more. HYDROGEN GAS IS EXPLOSIVE. If the hot water system has not been used for such a period, before using the washing machine, turn on all hot water faucets and let the water flow from each for several minutes. This will release any accumulated hydrogen gas. As the gas is flammable, do not smoke or use an open flame during this time.
- Do not allow children to play on or in the washer. Close supervision of children is necessary when the washer is used near children.
- Before the washer is removed from service remove the door or lid.
- Do not reach into the washer if the drum, tub, or agitator is moving.
- Do not install or store the washer where it will be exposed to the weather.
- Do not tamper with controls.
- Do not repair or replace any part of the washer or attempt any servicing unless specifically recommended in this manual or in published user-repair instructions that you understand and have the skills to carry out.
INSTALLATION REQUIREMENTS
Tools and Parts
Assemble the necessary tools and supplies before beginning the washer installation. The parts supplied are in the washer drum.
Tools needed for connecting the water inlet hoses
- Pliers (that open to 1⁹⁄₁₆ in. [39.5 mm])
- Flashlight (optional)
Tools needed for installation
- Open-end wrench 17 mm and 13 mm
- Level
- Woodblock (2″ x 4″)
- Ruler or measuring tape
Parts supplied: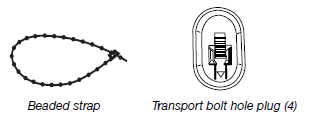
Installation clearances
- The location must be large enough to allow the washer door to be fully opened.
- Additional spacing should be considered for ease of installation and servicing.
- Additional clearances might be required for wall, door, and floor moldings.
- Additional spacing of 1 in. (2.5 cm) on all sides of the washer is recommended to reduce noise transfer.
- Companion appliance spacing should also be considered.
Washer Dimensions
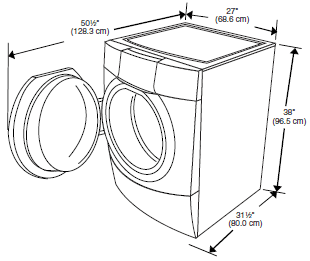
Drain System
- The washer can be installed using the standpipe drain system (floor or wall), the laundry tub drain system, or the floor drain system. Select the drain hose installation method you need.

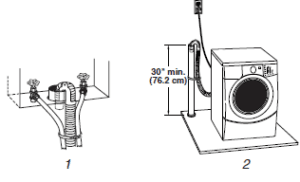
- Standpipe drain system – wall or floor (view 1 & 2) The standpipe drain requires a minimum diameter standpipe of 2 in. (5 cm). The minimum carry-away capacity can be no less than 17 gal. (64 L) per minute. The top of the standpipe must be at least 30 in. (76.2 cm) high and no higher than 96 in. (2.4 m) from the bottom of the washer.
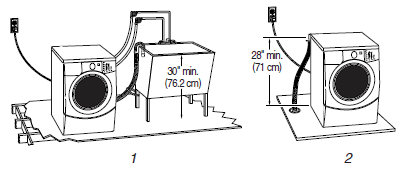
- Laundry tub drain system (view 1) The laundry tub needs a minimum of 20 gal. (76 L) capacity. The top of the laundry tub must be at least 30 in. (76.2 cm) above the floor.
- Floor drain system (view 2) The floor drain system requires a siphon break that may be purchased separately. The siphon break must be a minimum of 28 in. (71 cm) from the bottom of the washer. Additional hoses might be needed.
Electrical Requirements
Electrical Shock Hazard
- Plug into a grounded 3-prong outlet.
- Do not remove the ground prong.
- Do not use an adapter.
- Do not use an extension cord.
- Failure to follow these instructions can result in death, fire, or electrical shock.
- A 120-volt, 60-Hz., AC-only, 15- or 20-ampere, fused electrical supply is required. Time-delay fuse or circuit breaker is recommended. It is recommended that a separate circuit serving only this appliance be provided.
- This washer is equipped with a power supply cord having a 3-prong grounding plug.
- To minimize possible shock hazard, the cord must be plugged into a mating, 3 prong, grounding-type outlet, grounded in accordance with local codes and ordinances. If a mating outlet is not available, it is the personal responsibility and obligation of the customer to have the properly grounded outlet installed by a qualified electrician.
- If codes permit and a separate ground wire is used, it is recommended that a qualified electrician determine that the ground path is adequate.
- Do not ground to a gas pipe.
- Check with a qualified electrician if you are not sure the washer is properly grounded.
- Do not have a fuse in the neutral or ground circuit.
Connect the Inlet Hoses
Connect the inlet hoses to the water faucets. Make sure the washer drum is empty.
- Using pliers, check the tightness of the hose couplings already attached to the washer.
NOTE: Do not overtighten. Damage to the coupling can result.
- Attach the hose with the red color indicator to the hot water faucet. Screw on the coupling by hand until it is seated on the washer.
- Attach the hose with the blue color indicator to the cold water faucet. Screw on the coupling by hand until it is seated on the washer.
- Using pliers, tighten the couplings with an additional two-thirds turn.
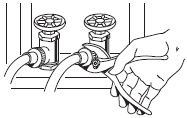
- Turn on the water faucets and check for leaks.
NOTE: Replace inlet hoses after 5 years of use to reduce the risk of hose failure. Record hose installation or replacement dates on the hoses for future reference. Periodically inspect and replace hoses if bulges, kinks, cuts, wear, or leaks are found.
Route the Drain Hose
- Proper routing of the drain hose protects your floors from damage due to water leakage. Carefully read and follow these instructions. The drain hose is connected to your washer.
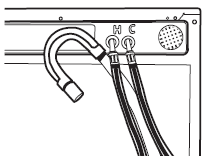
To prevent drain water from going back into the washer:
- Do not straighten the drain hose, and do not force the excess drain hose into the standpipe. Hose should be secure, but loose enough to provide a gap for air.
- Do not lay excess hose on the bottom of the laundry tub.
FEATURES AND BENEFITS
Woolmark
- The wool wash cycle of this machine has been approved by Woolmark for the washing of machine washable Woolmark products provided that the products are washed according to the instructions on the garment label and those issued by the manufacturer of this washing machine, M0301.
Electronic Controls
- Flexible electronic controls are easy to use whether you are a beginner or an expert.
Smart Dispensers
- The Smart Dispensers make your washer truly automatic. This washer provides a four-compartment dispenser which includes separate compartments for main wash detergent, fabric softener, bleach, and auto pre-wash or auto soak. The dispenser has large pour zones, is self-cleaning, and can be easily removed. Laundry products are diluted with fresh water and added to the load at the proper time in the wash cycle.
Auto Water Level
- This washer automatically adjusts water level for best cleaning and rinsing performance. Two sensors determine load size, load composition, and suds level, then the sensors adjust the water level to the proper setting. This eliminates guesswork. The water level is just right for every wash load size.
Larger Load Size
- Since there is no agitator, you can wash larger, bulkier items like a king-sized bedspread. You are also able to wash more clothes at one time, which means fewer loads.
Suspension System
To reduce washer “walk” and “off-balance” conditions, your new washer combines:
- 2 Springs to isolate vibration
- 4 Shock absorbers at the washer base to minimize movement
Stainless Steel Drum
- The Stainless Steel drum eliminates corrosion and enables higher spin speeds for more water extraction, reducing drying time.
High-Efficiency Wash System
- Your new front-loading, high-efficiency washer saves time with fewer, larger loads, and lowers your water and energy bills by helping conserve resources.
Spin Speeds
- This washer automatically selects the spin speed based on the cycle selected. This factory setting can be changed, however. This washer offers up to five different spin speed choices.
Heating Element
- This washer has a heating element that automatically heats the water to the best temperature on select cycles. This enables stepped cleaning, a process in which warm water is brought in and mixed with detergent first, then the water is heated. The warm water cleans stains such as blood and eggs, and the heated water removes oily stains such as perspiration and dirty mechanical oil. This heater is active in the Sanitary, Whitest Whites and Heavy Duty cycles, and in the Stain Treat option.
ACCUWASH™ Automatic Temperature Control
- The ACCUWASH™ control electronically senses and maintains a uniform water temperature. ACCUWASH control regulates incoming hot and cold water. ACCUWASH control is automatically turned On when a cycle is selected.
Add A Garment
- At the beginning of the Sanitary, Whitest Whites, Heavy Duty, Normal and Quick Wash cycles, this washer allows an 8-minute period in which forgotten garments may be added to a load. The ADD A GARMENT status light will glow during this 8-minute period.
CATALYST® Cleaning Action with Direct Injection
- This washer channels 100% of the water through the dispensers to ensure thorough rinse-out and mixture of all the additives before they touch any garments. The water is then sprayed from the top front onto the center of the load, providing even distribution and optimum cleaning performance. It is normal for small amounts of water to remain in the dispensers when the wash cycle is complete.
Efficient Detergent System
- This washer has a specially designed valve that closes during the wash portion of the cycle so that 100% of the water and detergent mixture is used on the load. The Efficient Detergent System ensures that no water or detergent is wasted.
Dynamic Off-Balance Detection
- This washer uses two sensors to detect load size and the amount of off-balance within the load. The suspension system and controls are specially designed to redistribute the load automatically.
WASHER USE

Starting Your Washer
First Wash Cycle Without Laundry
- Before washing clothes for the first time, choose NORMAL cycle and run it without clothes. After installation, if a complete cycle has not been run without clothes, use ¹⁄₂ the normal recommended amount of powdered or liquid High Efficiency (HE) detergent. This initial cycle serves to ensure the interior is clean before washing clothes.
To load washer Open the washer door by pulling on the handle. Sort laundry according to color and type of fabric. Place a load of sorted clothes in the washer. Do not overload washer. Overloading can cause poor cleaning.
- The washer can be fully loaded, but not tightly packed. The washer door should close easily.
- Mix large and small items and avoid washing single items. Load evenly.
- It is recommended that you wash small items such as infant socks in a mesh garment bag.
- When unloading garments, occasionally check under the rubber rim at the front of the tub for small items.
- Close the washer door by pushing it firmly until the lock clicks. The washer door will remain locked during the wash cycle.
- Open the Dispenser Drawer and add laundry products to the detergent, bleach, or fabric softener compartments. Close the drawer slowly to avoid spills.
- Turn on the washer by selecting CONTROL ON. Select one of the cycles by turning the cycle selector. The indicator light for the selected cycle will glow. When selecting a wash cycle, the preset Options, Water Temp, Spin Speed, and Soil Level for the selected cycle will glow. The display shows the estimated time remaining. The preset settings provide the recommended fabric care for the selected cycle.
- Select the desired OPTIONS. Not all options are available with all cycles.
- Select the desired MODIFIERS. Not all modifiers are available with all cycles and options.
- If desired, select the END OF CYCLE SIGNAL. The signal is helpful when you are washing items that should be removed from the washer as soon as it stops. Select LOUDER or SOFTER.
To begin the wash cycle immediately select HOLD TO START.
- If you do not select HOLD TO START within 5 minutes of choosing a cycle, the washer automatically shuts off.
- When the wash cycle is complete, the CYCLE COMPLETE status light glows, the door unlocks, and the wash load can be removed from the washer. The washer powers down automatically 5 minutes after the cycle is complete and the CYCLE COMPLETE light goes off. To power down the washer manually after the wash cycle is complete, select PAUSE/CANCEL once.
To begin the wash cycle later select DELAY WASH until the desired delay time (in hours) shows in the Estimated Time Remaining display. Select START. The countdown to the wash cycle will show in the display window.
Cycles
Cycles can be selected by turning the Cycle control knob to the desired cycle. Each cycle is designed for different types of fabric and soil levels.
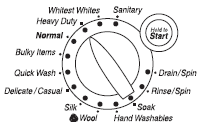
- Each cycle has a preset Soil Level (cycle time), Water Temperature, and Spin Speed, and may have preset options. The preset settings provide the recommended fabric care for the selected cycle.
- The preset settings can be changed anytime before HOLD TO START is pressed. Not all options and modifiers are available with all cycles. (To change settings after the cycle has started, press PAUSE/CANCEL, then select the desired settings. Press HOLD TO START to continue the cycle.)
TROUBLESHOOTING
The washer won’t start
Check the following:
- Is the power cord plugged into a grounded 3-prong outlet? Is the washer door firmly closed?
- Has a cycle been selected, but HOLD TO START has not been selected and held for one second?
- Was the door open after the completion of the last cycle?
The washer won’t fill, wash, or rinse
Check the following:
- Is the power cord plugged into a grounded 3 prong outlet?Is there power at the plug? Check electrical source or call electrician.
- Are the hot and cold water faucets turned on?
- Is the water inlet hose kinked?
- Are the water inlet valve screens clogged?
Washer leaks
- Check household plumbing for leaks.
The washer won’t drain or spin.
- Is the drain hose clogged, or the end of the drain hose more than 96 in. (2.4 m) above the floor?
- Is your voltage low?
Check the electrical source or call an electrician. Do not use an extension cord.
- Is the “SUD” routine active?
The cycle will be completed once extra suds are removed.
- Is the load balanced?
A single or bulky item may cause an imbalance. Add more items or redistribute the load.
ASSISTANCE OR SERVICE
- Before calling for assistance or service, please check “Troubleshooting.” It may save you the cost of a service call. If you still need help, follow the instructions below.
- When calling, please know the purchase date and the complete model and serial number of your appliance. This information will help us to better respond to your request.
- If you need to order replacement parts, we recommend that you only use FSP® factory-specified parts. These parts will fit right and work right because they are made with the same precision used to build every new WHIRLPOOL® appliance.
To locate FSP replacement parts in your area: In the U.S.A., call the Customer Interaction Center at 1-800-253-1301, or your nearest designated service center.
- In Canada, call 1-800-807-6777, or your nearest designated service center.
For more Manuals by Whirlpool, visit ManualsLibraryy
Whirlpool duet HT GHW9250ML1 Front Load Automatic Washer FAQs
How many amps does the Whirlpool Duet washer use?
This washer requires a 120-volt, 60-Hz, AC-only electrical supply with either a 15- or 20-amp circuit. A time-delay fuse or circuit breaker is recommended.
Does the Whirlpool Duet washer have a filter?
Yes, there is a filter on the pump housing, but accessing it requires removing the top and front panels of the washer.
What is Whirlpool’s diagnostic mode?
The service diagnostic mode is used to test and verify all machine control inputs. It allows for a quick system check before conducting specific troubleshooting steps.
How do I turn off the FanFresh® option on my Whirlpool washer?
To turn off the FanFresh® option, simply touch the FanFresh button. The washer will remember the last setting for future cycles.
How do I start the Clean Washer cycle?
1. Close the washer lid or door.
2. Do not add detergent or other chemicals.
3. Select the CLEAN WASHER cycle.
4. Press and hold the START/PAUSE button for 3 seconds to begin.
What is the sensor cycle on a Whirlpool washer?
The Auto Sensing feature adjusts water levels based on the load size, optimizing water and energy usage for efficient cleaning.
How do I choose the right washer capacity?
1. A king-size comforter requires at least 3.8 cubic feet of washer capacity.
2. A queen-size comforter needs about 3.5 cubic feet.
3. High-efficiency top-load and front-load washers can handle 24-pound loads.
What does the “Sud” code mean on a Whirlpool Duet washer?
The Sd or Sud error indicates excessive suds. The washer will automatically run a suds reduction cycle. Using HE (High-Efficiency) detergent in the correct amount can help prevent this issue.

