
![]()
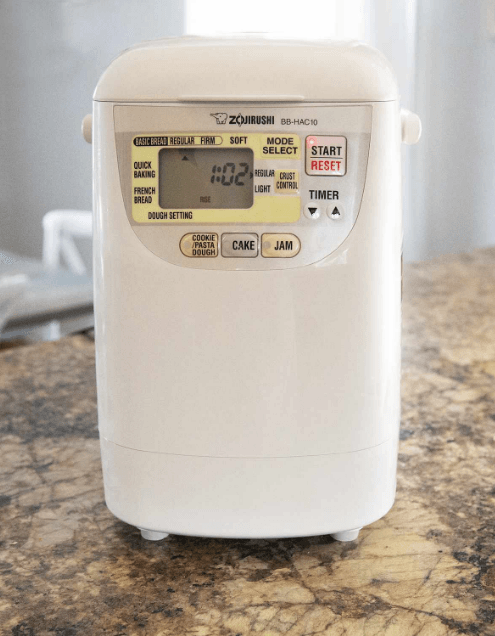
Zojirushi BB-HAC10 Programmable Mini Breadmaker
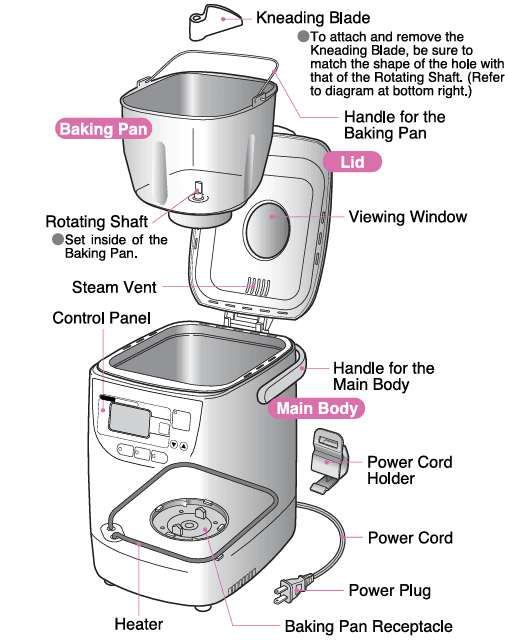
PARTS NAMES AND HANDLING INSTRUCTIONS
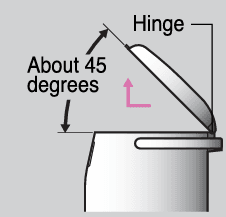
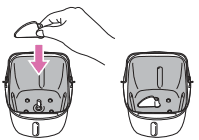
How to remove and attach the Lid
- Open the Lid at an angle of 45 degrees, then pull and lift it up towards you to remove it.
- Insert the Lid into focus the Hinge of the t Main Body to attach.

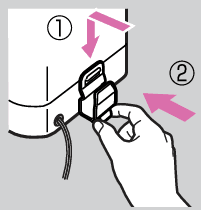
How to attach and detach the Power Cord Holder
- Afix the hole of the Power Cord Holder (0 the projected part of the. Main Body and press it down. Then, press the bottom part of the holder towards the Is KK Main Body. Do the reverse to remove.

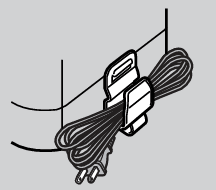
How to store the Power Cord
Fold the Power Cord and store it in the Power Cord Holder.
- Be sure 10 take the Power Cord out of the holder before use.
- Do not forcefully pull the Power Cord when storing or unplugging.

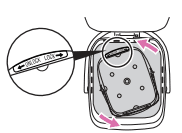
How to Remove the Baking Pan
Turn the Baking Pan counterclockwise to release and remove.
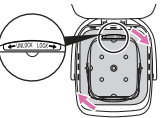
How to Attach the Baking Pan
- Set the Baking Pan at the center of the Main Body. Be careful not to hit the Heater.
- Turn the Baking Pan clockwise 10 set the Baking Pan.
How to Attach the Kneading Blade
Match the shape of the Kneading Blade’s hole with that of the Rotating Shaft to attach. Be sure to insert the Kneading Blade securely; otherwise will not knead properly.
CONTROL PANEL
DISPLAY
Indicates the remaining time for pressing this key 10 to start a process or Timer baking completion, the crust color, and operation. Press and hold the key slightly, etc. The display below longer to cancel a process or when the shows all menus and information, the process is completed. Which is for reference only and will “The operation lamp turns on while baking. Not appear during actual use.
START/RESET key
Press this key to start a process or Timer operation. Press and hold the key slightly longer to cancel a process or when the
process is completed. “The operation lamp turns on while baking.”
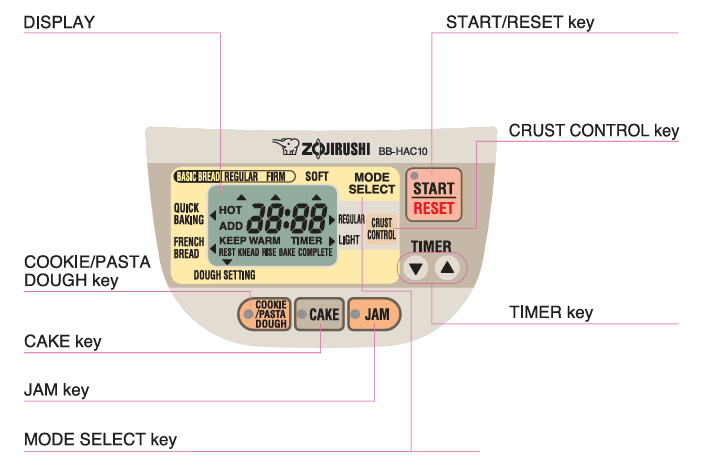
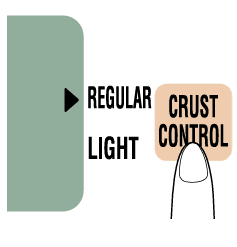
CRUST CONTROL key
For choosing the desired crust color: LIGHT and REGULAR (lor BASIC (REGULAR / FIRM) Broad, QUICK BAKING and CAKE settings). SLIGHT
- Lighter crust setting.
- Regular crust setting.
TIMER key
Use this key when you would like to delay the completion of your bread. To set the Timer, determine when you would like. your bread to be ready, then set the Timer to reflect the time difference between the present time and the time you determined. Each press of (4) advances in increments by 10 minutes, and each press of (v) moves time backward by 10 minutes. Once the set time exceeds the maximum time of 13:00 (13 hours), the Display returns to the minimum time.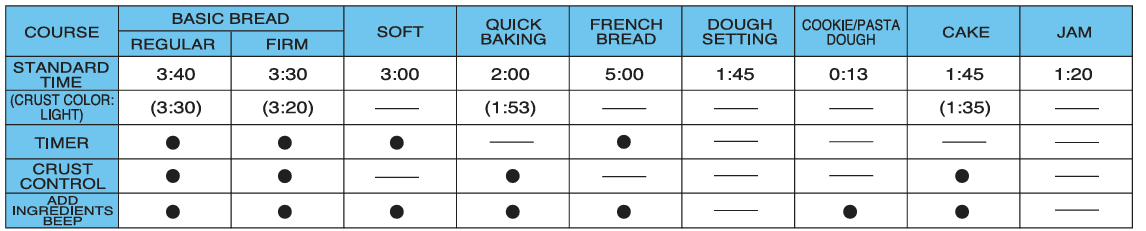
HOW TO USE THE TIMER
You can use the Timer to complete baking at a desired time. The Timer can be set in 10-minute intervals for a maximum setting of up to 1013 hours.
- Press the MODE SELECT key to choose the setting.
- Use the TIMER key to set your desired time.
- Press the START/RESET key and make sure that the operation lamp turns on. The Display reads time in units of 1-minute increments.
Note
- The Timer can be used with only Basic, Soft, and French courses,
- Do not use Timer settings for recipes that contain milk, juice, vegetables, eggs, etc., as they can easily spoil.
ACCESSORIES
Measuring Cup: The supplied Measuring Cup is for measuring liquids only. It measures 1 cup when filled to the brim. Please use a nested measuring cup to measure the dry ingredients (please see below).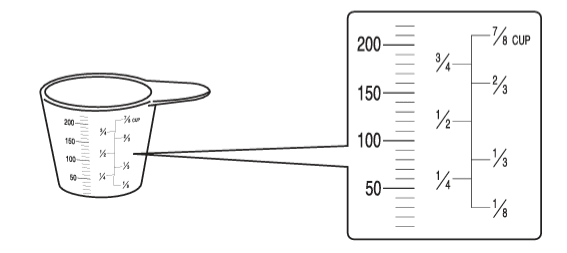
Measuring Spoon: The supplied Measuring Spoon may be used to measure yeast, sugar, salt, dry milk, and spices. The large side measures 1 tablespoon; the small side measures 1 teaspoon. The halfway mark on each measures one-half tablespoon and one-half teaspoon, respectively.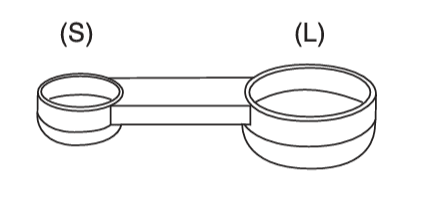
How to Measure the Ingredients
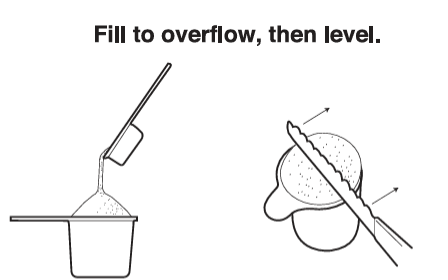
Dry Ingredients:
- Spoon the dry ingredients into the cup, filling it to overflow. Do not press or shake down.
- Level with a straight object such as the back of a knife by sweeping off the excess ingredients. To measure 3/4 cup of flour, fill and level the 1/2 cup and the 1/4 measuring cups. DO NOT attempt to measure 3/4 cup of flour by filling a 1 cup measuring cup to the 3/4 line. Spices and small amounts of dry and liquid ingredients are measured in the Measuring Spoon which comes with the Home Bakery. Be sure to level off the same way.

Liquid:
- The liquid should be poured into the cup while the cup is placed on a flat surface and measured at eye level.
Measuring ingredients
It is important that the content every time to bake the best possible result. Dry ingredients such as flour and sugar need to be measured in “nested” measuring cups (the type that fit inside each other). They come as 1/4, 113, 112, and 1 cup. Liquid measuring cups are usually made of transparent glass or plastic marking the gradations. The Home Bakery comes equipped with a measuring cup and spoon.
USE THE MEASURING CUP FOR LIQUIDS ONLY: It measures up to 1 cup when filled to the very brim. The measuring spoon has a small and a large side. The large side measures 1 tablespoon for the op and 112 tablespoons or 1-112 teaspoons to the halfway mark on that side. The smaller ide of tne measuring spoon measures 1 teaspoon to the top and 112 teaspoons to he hall mark.
BEFORE BAKING
- Active Dry Yeast feeds on sugar and ferments it, thus causing the dough to iso. Active Dry Yeast (simply dried granules of yeast) is made of tiny plants that change food (especially gluten and sugar) into bubbles of carbon dioxide. As these bubbles expand, the bread rises. The recipes developed for the Home Bakery use “Fleischmann’s Active Dry Yeast” or *Floschmann’s Rapid Rise Yeast. Active Dry Yeast should be kept in the freezer or refrigerator, Please be sure that fresh yeast is used. Using old yeast is not recommended and may adversely affect the outcome of your bread.
- All-purpose flour is a blend of refined wheat flour, especially suitable for making cakes, croissants, and pizzas.
- Bread Flour is a type of wheat flour made from hard wheat that includes all of the gluten from the grain. Since bread flour has a higher gluten and protein content than all-purpose flour, it is well-suited for use in yeast breads. Gluten gives structure and height to the loaf; thus, bread flour rises better than other flour. It produces a higher loaf and a broad that has a coarser texture,
- Butter and Oil tenderize the texture of yeast bread, and French bread gets its unique crust and texture from the lack of added oil. However, breads that call for oil stay fresh longer. Buter should be measured and cut into small pieces. The recipes developed for the Home Bakery use unsalted butter; however, regular butter or margarine can be substituted for unsalted butter.
- Cracked Wheat is very coarse in texture. It comes from what Kemels cut in angular fragments. I give whole-grain breads a nutty flavor and crunchy texture.
- Eggs add richness and velvety texture to bread dough. Use large eggs in these recipes.
- Gluten is an elastic protein found mainly in wheat flour (all flour contains some gluten). Gluten is an important element in all yeast breads, as it gives bread its structure or framework. Flours with a high gluten content make the best bread flour. Homogenized Milk & Buttermilk add texture and flavor. You may substitute homogenized milk or buttermilk for dry milk, but the loaf may come out shorter, and the crust may be darker than dry milk breads.
- Salt is necessary when making yeast bread. It not only adds flavor but also controls the growth of yeast, which helps the bread rise. Too much salt can kill the yeast, but too little lets the dough rise so fast it may fall before baking is complete. Salt also keeps the bread from getting stale too quickly. Seven-Grain Cereal Blend is a blend of cracked wheat, oats, bran, rye, com meal, flax seeds, and hulled millet. Sugar is important for the color and flavor of bread, as well as to feed the yeast. Recipes that call for sugar require granulated sugar. Do not substitute powdered sugar or brown sugar unless indicated. Vital Wheat Gluten (also called vital gluten or wheat gluten) is the dried gluten protein obtained from high-protein, hard-wheat flour by rinsing off most of the starch. Adding gluten to bread recipes helps improve the strength, texture, and height of the loaf. It is especially useful in recipes that call for wheat bread flour or low-gluten flour.
- “Whole Wheat Flour, ground from the entire wheat kernel, is heavier and richer in nutrients.
BASIC STEPS
Attach the Kneading Blade to the Baking Pan, precisely measure the ingredients and add them to the Baking Pan in the following order:
Water (or other liquids) p
Bread flour, sugar, dry milk, salt, and butter. OZ
Make a depression in the middle of the flour and sprinkle yeast in it. Make sure the yeast does not touch any liquid. )

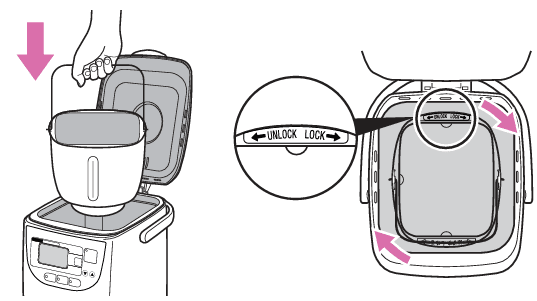
Set the Baking Pan and close the Lid.
Set the Baking Pan into the bread machine.
Turn the Baking Pan clockwise to lock in position.
Fold down the Handle and close the Lid.

- Plug the bread machine into an outlet.
- Start baking.
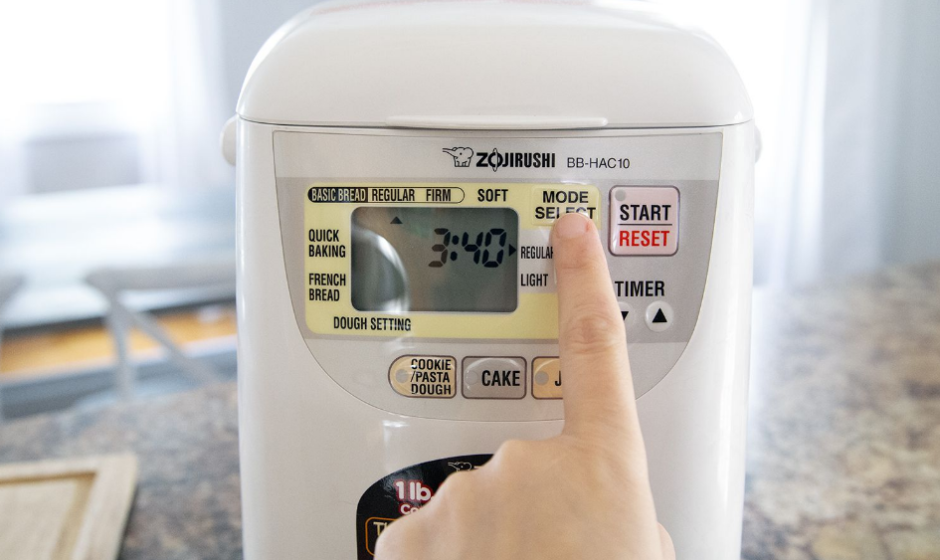
- Check that the arrow ( A) is set to BASIC BREAD REGULAR. Press the CRUST CONTROL key to choose the desired crust color: Regular or Light.
- Press the START/RESET key.
A beep will sound and the Operation lamp will turn on. After the resting process has completed, kneading will start.- During the resting process, the Kneading Blade will not turn,
- The completion time will depend on the selected crust color. Regular : 3 hours 40 minutes, Light : 3 hours 30 minutes. (The remaining time until completion will be indicated by 1-minute intervals)
- Please refer to p.6 when using the Timer.
- When the ADD indicator flashes and beeps, add additional ingredients such as raisins or nuts.

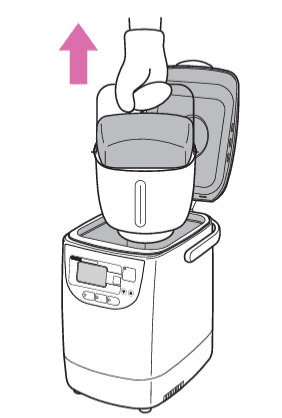
Remove the Baking Pan.
When baking is complete, a beep will sound and “COMPLETE” will be displayed. Press and hold the START/RESET key until you hear a beep and then open the Lid. Use oven mitts to hold the Handle. Turn the Baking Pan counterclockwise to remove.

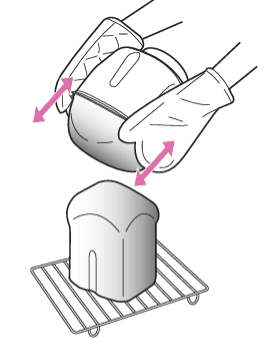
Remove the Bread.
Turn the Baking Pan upside down, hold the Handle and shake the loaf out. Place the bread on a rack to cool down and to release moisture from the bottom of the bread.

Be careful not to burn yourself
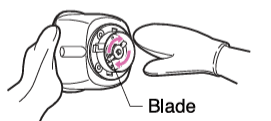
Some breads might be difficult to remove depending on the condition of completion.
If the Kneading Blade becomes stuck in the bread, use a rubber spatula to remove, as the Kneading Blade may still be hot.
- When removing breads with hard crusts like French bread, twist the blade under the Baking Pan several times.

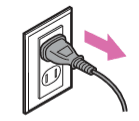
- After use.
Unplug the unit from the electrical outlet by holding the Power Plug.

Tips on Using Your Home Bakery
- The recipes on the following pages are unique and were created for the Home Bakery Mini by Zojirushi. Each one features ingredients that best complement a particular loaf of bread, and each was tested in our machines. When creating your own yeast bread recipes or baking an old favorite, use this book as a guide for converting portions from your recipe to the Home Bakery. These portion guidelines will result in a heavier and somewhat coarser dough.
- Liquid ingredients should be placed into the Baking Pan first, then the dry ingredients. The yeast should be added last and sprinkled on the dry ingredients so that the yeast does not come in contact with any liquid. Again, check our recipes for guidelines on how much of these ingredients you can add to your dough. Be aware that additions like these tend to make doughs heavier and somewhat coarser in texture.
- If the room temperature is above 77°F, it is recommended to use refrigerated liquids. The flour should be fresh and at room temperature. Changes in humidity or baking in high altitudes may require ingredient adjustments. Humidity tends to make dough moist. High altitudes tend to make the loaves rise too quickly. For humidity, try adding an extra tablespoon of flour to improve the consistency. Repeat if necessary until the dough forms a nice ball. For high altitudes, decrease the amount of yeast by approximately 1/2 teaspoon and decrease the sugar slightly. For recipes using the timer cycle, milk or eggs, or other perishables should not be used for food safety reasons.
Tips on Dark Breads
Bread made with whole grain flours, such as whole wheat or rye, require a bit more tender loving care to ensure that they achieve the height of deliciousness. Notice that some whole grain breads may also call for substantial amounts of bread flour, too. That’s because the darker flours need to be “lightened” with white flour for the best-tasting, best-looking loaf.
How to Store (Breads and Cakes)
- If you do not eat them immediately after baking, store them in a plastic bag to prevent them from drying.
- When you store them in a freezer, allow them to cool down, then pack in a plastic wrap or in a plastic bag.
- When storing dough, allow it to deflate, divide it into appropriate sizes, round it, and pack it in a plastic wrap and store it in a freezer. Remove from the freezer to the refrigerator one day prior to baking. After it becomes soft enough, shape it, allow a second rise, and then bake it.
Others
- When using dry fruits with seeds, remove the seeds in advance. Crush nuts to smaller than 1/5 inch diameter before adding to the dough to prevent the bakery machine from breaking.
- Ingredients may not easily mix depending on the type of ingredients you are using, humidity, and/or season.
For more manuals by Zojirushi, visit ManualsLibraryy
Zojirushi BB-HAC10 Programmable Mini Breadmaker-FAQs
How long does it take to bake a loaf with the Zojirushi BB-HAC10?
The quick course can bake a loaf in about 2 hours and 20 minutes, while standard settings may take longer depending on the recipe.
What temperature should the water be when using the breadmaker?
It’s best to use lukewarm water around 68°F (20°C) and adjust according to room temperature or seasonal changes.
What is the capacity of the BB-HAC10 breadmaker?
The BB-HAC10 is designed for 1-pound loaves, making it ideal for small households or individual use.
How long does homemade bread typically last?
Homemade bread stays fresh for 2–3 days at room temperature, and may last longer if properly stored in a cool, dry place or refrigerated.
Can I leave the bread in the machine overnight?
It’s not recommended. Leaving the bread in the machine after baking may cause sogginess due to condensation. It’s best to remove it immediately after the cycle ends.
In what order should I add ingredients to the breadmaker?
Typically, add liquids first, followed by dry ingredients, and yeast last to prevent premature activation.
Does the breadmaker consume a lot of electricity?
Not at all. Breadmakers are energy-efficient and usually use less electricity than a conventional oven.
Can the Zojirushi BB-HAC10 be left on to keep bread warm?
The breadmaker doesn’t have a warming feature like a rice cooker. It’s best to remove the bread once it’s baked.