Acer Predator Helios 500 Gaming Laptop
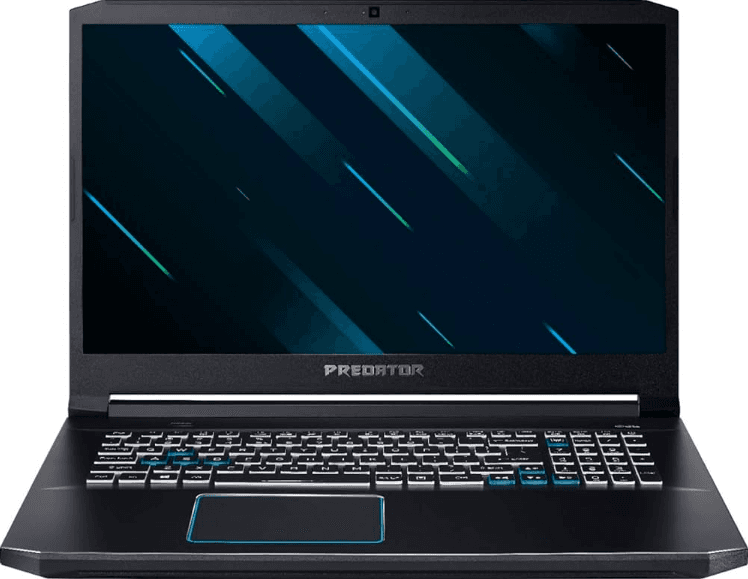
YOUR PREDATOR NOTEBOOK TOUR
After setting up your computer as illustrated in the Setup Guide, let us show you around your new Predator computer.
Screen view
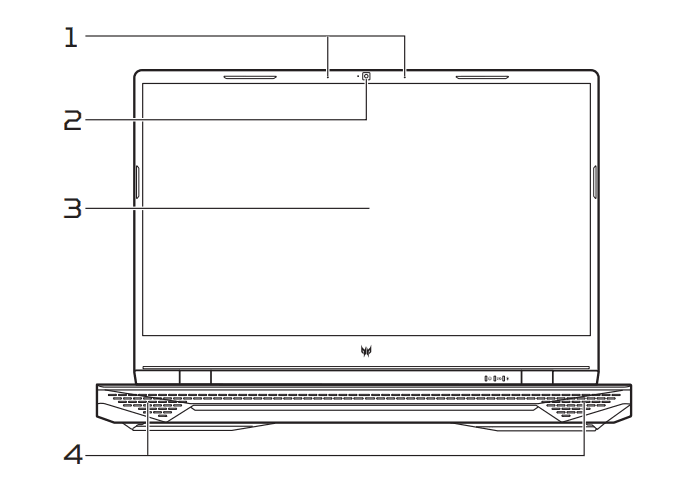
- Microphones: Internal digital microphones for sound recording.
- Webcam: A webcam for video communication. A light next to the webcam indicates that the webcam is active.
- Screen: Displays computer output.
- Speakers: Deliver stereo audio output.
Keyboard view
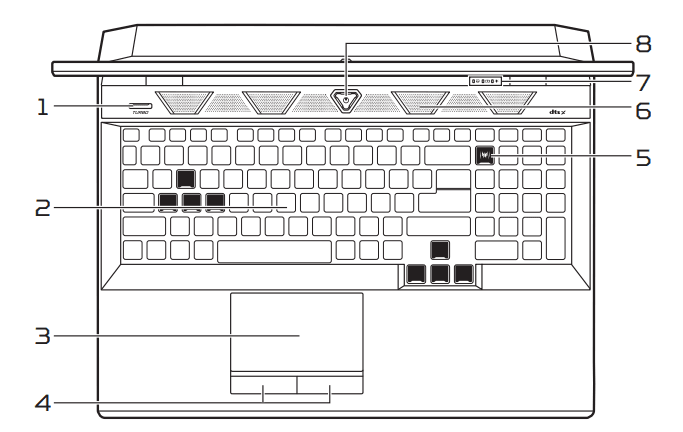
- TURBO key: Switches overclocking and fan speed level.
- Keyboard: For entering data into your computer. See “Using the keyboard” on page 21.
- Touchpad: Touch-sensitive pointing device.
- Click buttons: The left and right buttons function like the left and right mouse buttons.
(left and right)  PredatorSense key: Launches the PredatorSense application.
- Ventilation and cooling fan: Allows the computer to stay cool. Do not cover or obstruct the openings.
 Hard drive indicator: Indicates when the computer’s hard drive is active.
 Battery indicator:
Indicates the computer’s battery status.- Charging: The light shows amber when the battery is charging.
- Fully charged: The light shows blue when in AC mode.
 Power indicator: Indicates the computer’s power status.
 Power button: Turns the computer on and off.
Left view

- Ventilation and cooling fan:
Allows the computer to stay cool. Do not cover or obstruct the openings.  USB Type-C / Thunderbolt 4 ports:
Connect to USB devices with a USB Type-C connector. Supports Thunderbolt™ 4 and displays. USB port with power-off charging:
Connects to USB devices. HDMI 2.1 port:
Supports high-definition digital video connections. Mini DisplayPort:
Connects to an external display device.
USB Type-C information
- USB 3.2 Gen 2 with transfer speeds up to 10 Gbps.
- Supports DisplayPort™ audio/video output.
- Compatible with Thunderbolt™ 4.
- Delivers up to 3 A at 5 V DC for USB charging.
USB 3.2 Gen 2 information
- USB 3.2 Gen 2 compatible ports are blue.
- Compatible with USB 3.2 Gen 2 and earlier devices.
- For optimal performance, use USB 3.2 Gen 2-certified devices.
- Defined by the USB 3.2 Gen 2 specification (SuperSpeed USB).
Right view

 Headphone/ speaker jack:
Connects to audio devices (e.g., speakers, headphones) Mic-in jack: Connects to an external microphone for recording audio.
 USB ports with power-off charging:
Connect to USB devices. Ethernet (RJ-45) port:
Connects to an Ethernet 10/ 100/1000Mbps/2.5Gbps-based network.
Pull the lip down to open the port fully.- Ventilation and cooling fan:
Allows the computer to stay cool. Do not cover or obstruct the openings.  Kensington lock slot:
Connects to a Kensington-compatible security lock.
USB 3.2 Gen 2 information
- USB 3.2 Gen 2 compatible ports are blue.
- Compatible with USB 3.2 Gen 2 and earlier devices.
- For optimal performance, use USB 3.2 Gen 2-certified devices.
- Defined by the USB 3.2 Gen 2 specification (SuperSpeed USB).
Rear view
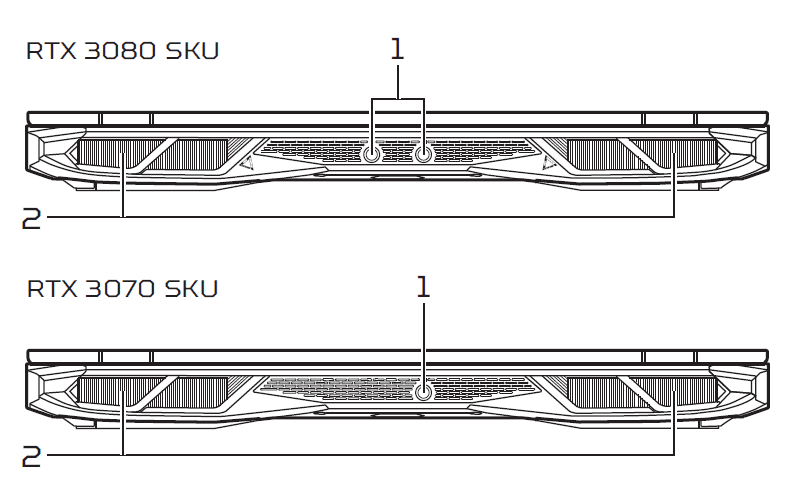
 DC-in jack: Connects to an AC adapter.
Note:
• Please press the AC adapter into the tunnel to the power connector. You will feel a click indicating it is connected. Then, check the light of battery indicator shows amber while charging.
• Please always plug in the AC adaptor while operating in high performance.
- Ventilation and cooling fan:
Allows the computer to stay cool. Do not cover or obstruct the openings.
Base view
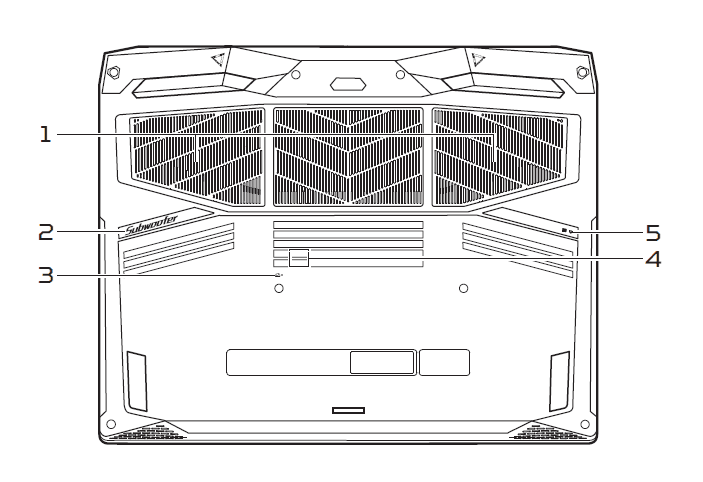
- Ventilation and cooling fan:
Allows the computer to stay cool. Do not cover or obstruct the openings. - Subwoofers: Delivers enhanced bass audio.
 Battery reset pinhole:
Simulates removing and reinstalling the battery. Insert a paperclip into the hole and press for four seconds. SIM card slot (only for 5G SKU):
Remove the screws from the base door, then insert a nano SIM card into the slot. To boot up the device with 5G function, insert the SIM card before boot up. Main storage and memory compartment:
Houses the computer’s main storage and memory. You may upgrade your computer’s main storage and memory. To reduce compatibility risk, Acer recommends asking an approved service center to do this.
USING THE KEYBOARD
The keyboard has full-sized keys, a numeric keypad, separate cursor, lock, Windows keys and hotkeys.
Lock keys
The keyboard has lock keys that you can use to turn keyboard functions on and off.
- Caps Lock
When Caps Lock is on, all alphabetic characters typed are in uppercase. - Num Lock
When Num Lock is on, the keypad is in numeric mode. The keys function as a calculator (complete with the arithmetic operators +, -, *, and /). Use this mode when you need to do a lot of numeric data entry. - Scroll Lock
When Scroll Lock is on, the screen moves one line up or down when you press the up or down arrow keys, respectively. Scroll Lock does not work with some applications.
Windows keys
The keyboard has two keys that perform Windows-specific functions.
 Windows key
Pressed alone, it returns to the Start screen or returns to the last open app. Application key
This key has the same effect as clicking the right mouse button.
RECOVERY
If you are having trouble with your computer, and the frequently asked questions (see Got a question? on page 82) do not help, you can recover your computer. This section describes the recovery tools available on your computer. Predator provides Acer Care Center, which allows you to reset your PC, refresh your PC, backup files/data or create a factory default backup. If you cannot access Acer Care Center, click Settings in the Start menu, select Update & Security and then click Recovery.
Note:
Acer Care Center varies depending on the model or Operating System.
Creating a file history backup
Recovery Management allows you to quickly and easily back up your files and restore them if the originals are lost, damaged, or deleted.
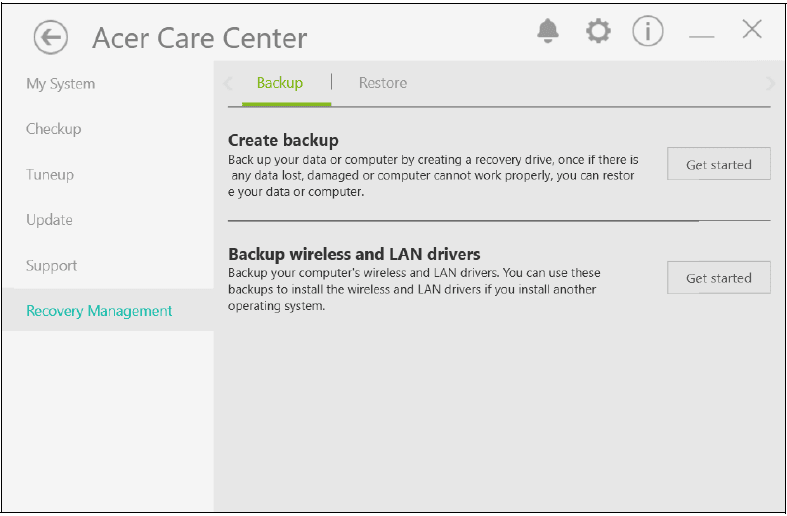
- From Start, select Care Center, then Recovery Management.
- Select the Backup tab and click Get started for Create backup to open the Backup window.

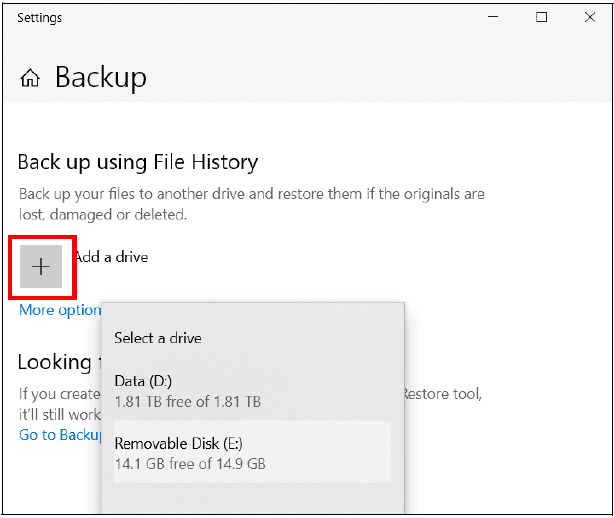
- Plug in the USB drive (or a portable external hard drive) and click + to add a drive. Select the USB drive from the drop-down list.

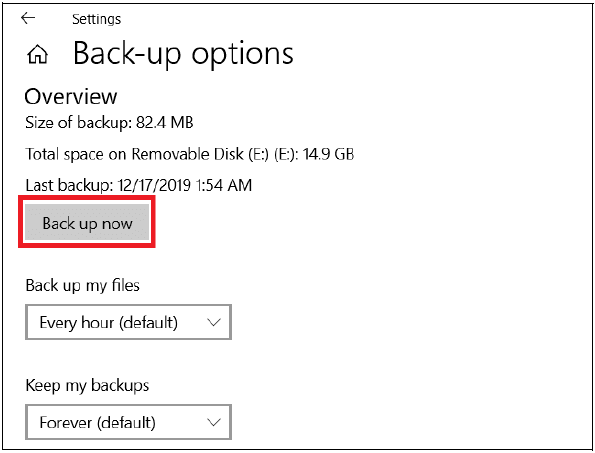
- Click More options to select backup options which best fit your needs, such as scheduling the backup interval, how long you want to keep those backups (default is Forever), and which folders to back up or exclude. Click Backup now to continue.

- Follow the process until it completes.
- Unplug the USB drive (or a portable external hard drive) and label it clearly.
Important
Write a unique, descriptive label on the backup, such as ‘File History Recovery Backup’. Make sure you keep the backup in a safe place that you will remember.
Creating a factory default backup
Recovery Drive allows you to quickly and easily back up your operating system, installed apps, and data.
- Type “Recovery Drive” in the search box and then open it.
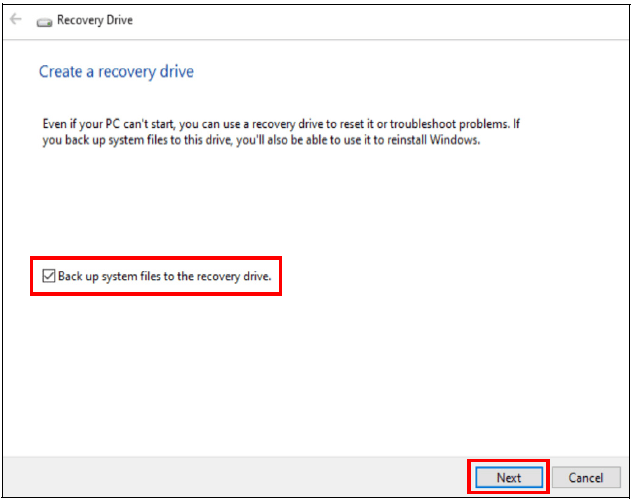
- Make sure the backup system files to the recovery drive are selected and click Next.

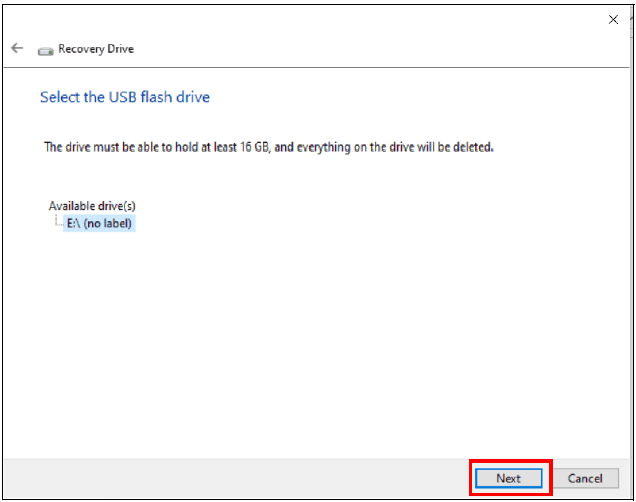
- Plug in the USB drive and wait for the PC to detect the USB drive, then click Next.

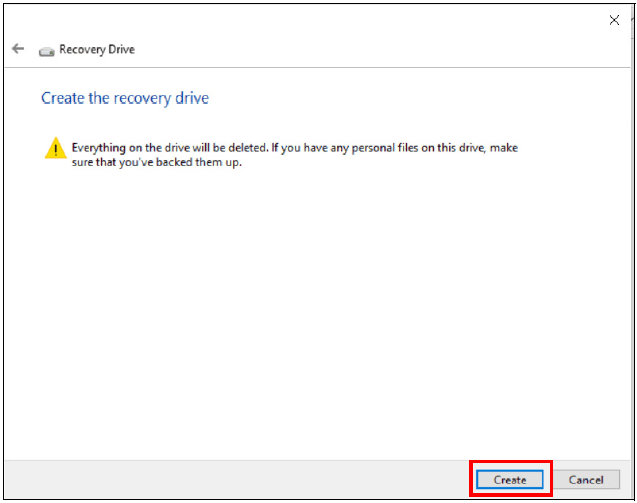
- Everything on the drive will be deleted. Click Create to continue.

- You will be shown the backup progress on the screen.
- Follow the process until it completes.
- Unplug the USB drive and label it clearly.
Important
Write a unique, descriptive label on the backup, such as ‘Windows Recovery Backup’. Make sure you keep the backup in a safe place that you will remember.
Note
Since the recovery backup requires at least 8 GB of storage after formatting, it is recommended to use a USB drive with a capacity of 16 GB or larger.
Backing up your wireless and LAN drivers
Back up your wireless and LAN drivers. You can use these backups to install the wireless and LAN drivers if you install another operating system.
- From Start, select Care Center then Recovery Management.
- Select the Backup tab and click Get started for Backup wireless and LAN drivers. Choose a folder to save your drivers and select OK.
- You will be shown the backup progress on the screen.
Restoring your computer
Recovery Management allows you to quickly and easily restore your computer to its default status. You can choose to keep your files or remove them before reinstalling Windows.
Reset this PC and keep my files
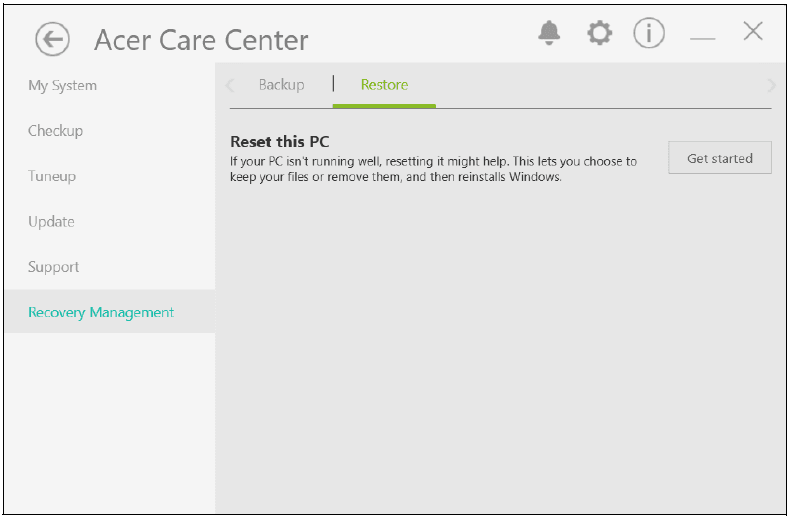
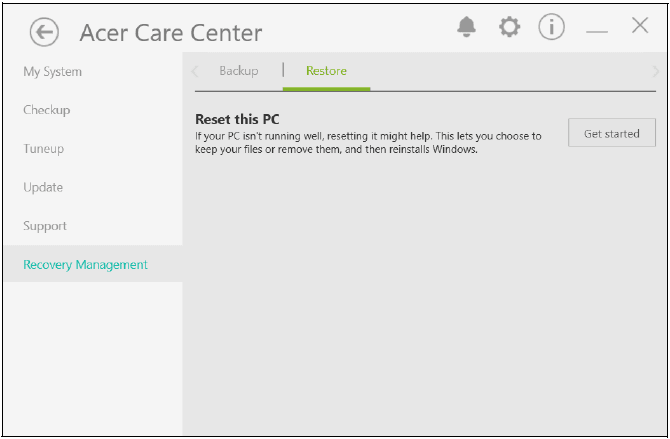
- From Start, select Care Center, then Recovery Management.
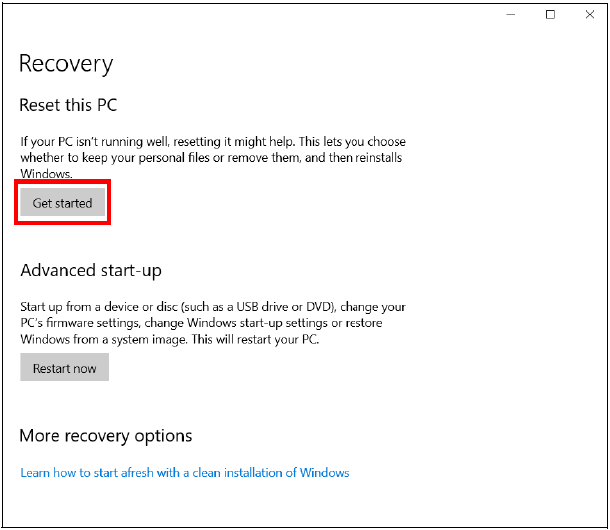
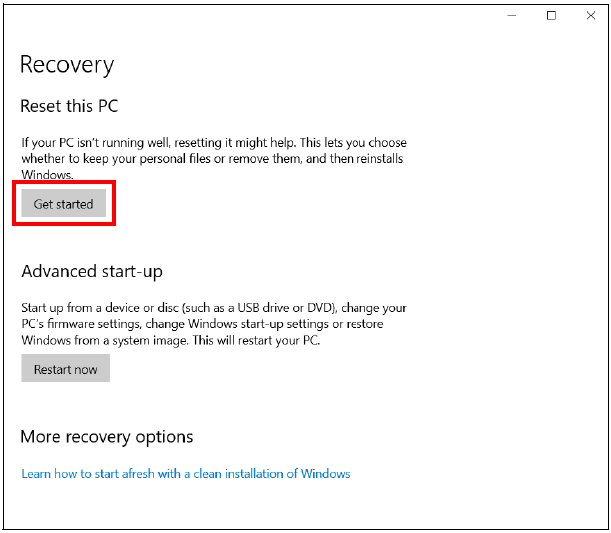
- Select the Restore tab and click Get started to open the Recovery window.


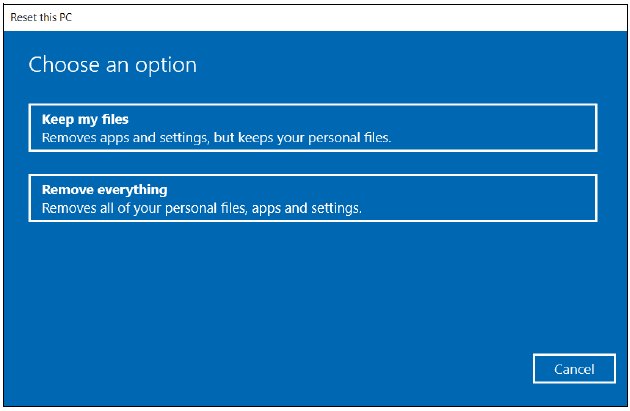
- Click Get started to choose an option. Select Keep my files to refresh your PC and reinstall your operating system without removing your files. Click Next to continue.
 Important
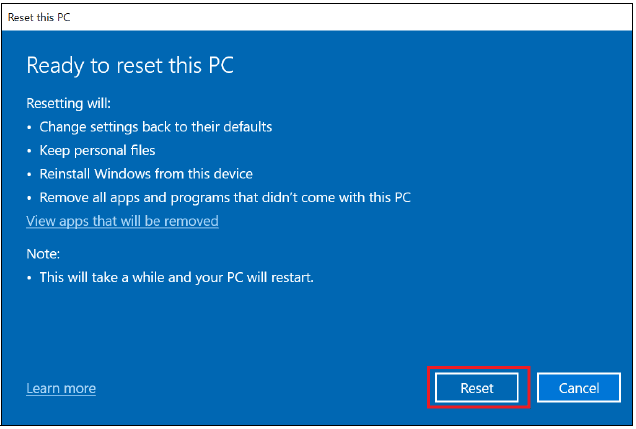
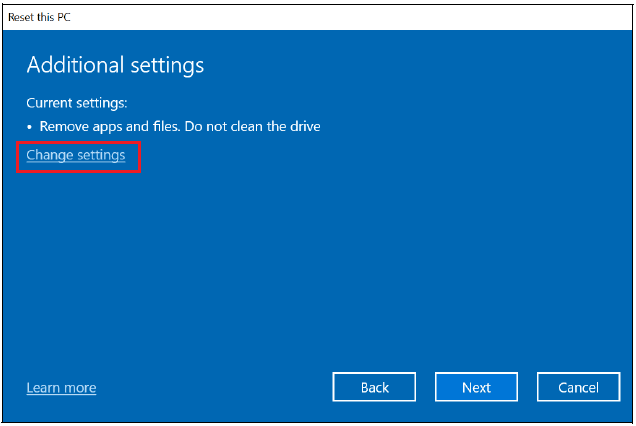
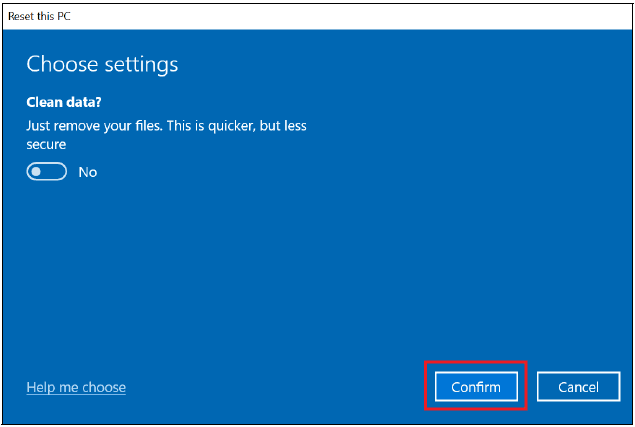
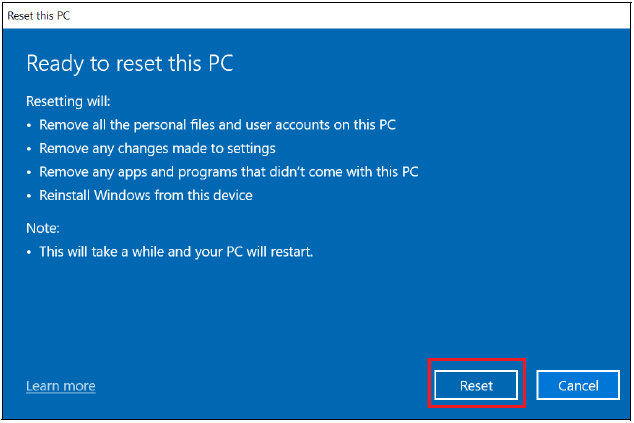
If you have apps installed on your PC, they will be removed. If you’d like not to restore apps and settings that came with your PC, go to Change settings and turn off the option to not restore preinstalled apps that came with this PC before proceeding with the restore process. Click Confirm to continue. - Resetting the PC will reinstall Windows, change settings back to their factory defaults and remove all preinstalled apps and programs without removing your personal files. Click Reset to continue. This will take a while and your PC will restart.

- You will be shown the reset progress on the screen. The screen will turn off during the reset process.
- The screen will turn back on when it is installing Windows. Your PC will restart several times during the reset process.
- Follow the process until it completes.
- When your PC has completed the reset process, Windows will be reset back to its factory default settings without removing your personal files.
Reset this PC and remove everything
- From Start, select Care Center then Recovery Management.
- Select the Restore tab and click Get Started to open the Recovery window.


- Click Get started to choose an option. Select Remove everything to reset your PC back to its factory default.

- Click Change settings to choose the restore settings that best fit your needs. Then click Confirm to continue.


- Make sure all settings are properly made, and click Next to continue.WarningTurning on “Clean data” will remove all of your personal files and accounts, along with pre-existing drivers that may affect your Windows installation.
- Click Reset to continue.

- You will be shown the reset progress on the screen. The screen will turn off during the reset process.
- The screen will turn back on when it is installing Windows. Your PC will restart several times during the reset process.
- Follow the process until it completes.
- When your PC has completed the reset process, Windows will use factory default settings.
USING A BLUETOOTH CONNECTION
Bluetooth is a technology enabling you to transfer data wirelessly over short distances between many different types of devices. Bluetooth-enabled devices include computers, cell phones, tablets, wireless headsets, and keyboards.
To use Bluetooth, you must ensure the following:
- Bluetooth is enabled on both devices.
- Your devices are “paired” (or connected).
Enabling and disabling Bluetooth
The Bluetooth adapter must be enabled on both devices. For your computer, this may be an external switch, a software setting, or a separate Bluetooth dongle plugged into the computer’s USB port (if no internal Bluetooth adapter is available).
Note
Please check your device’s owner’s manual to determine how to turn on its Bluetooth adapter.
Enable Bluetooth and add a device
Every new device must first be “paired” with your computer’s Bluetooth adapter. This means it must first be authenticated for security purposes. You only need to pair once. After that,
simply turning on the Bluetooth adapter of both devices will connect them. Bluetooth on your computer is disabled by default. To enable your computer’s Bluetooth adapter, do the following:
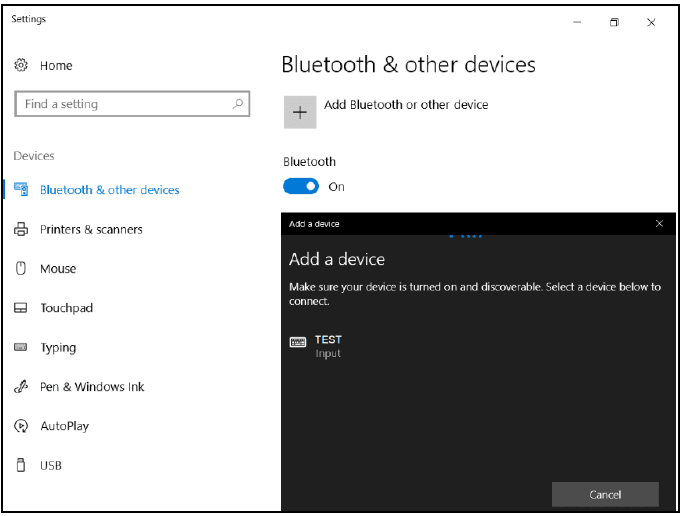
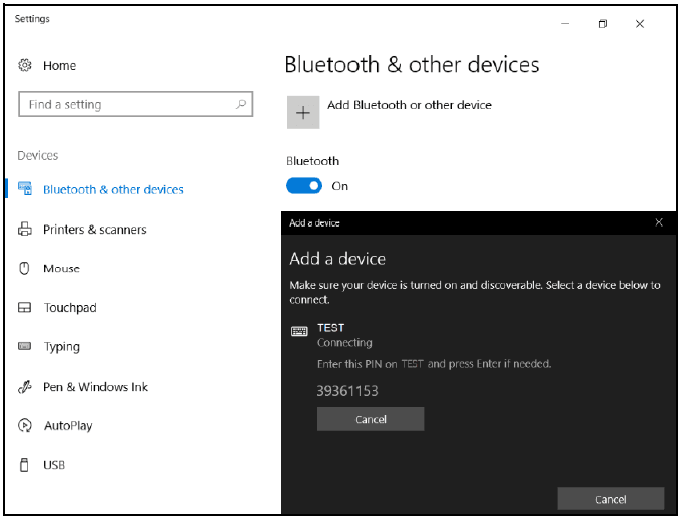
- Press the Windows key or select the Windows Start button > Settings > Devices > Bluetooth & other devices, and click the toggle under Bluetooth to enable/disable it.
- Click on Add Bluetooth or other device, then select the device that you want to add.
- Your computer will automatically start searching for devices, as well as make itself visible to other devices.
- Select the device you wish to pair from the list of discovered devices.

- After pairing, if there is a code displayed on the screen, enter that code on the device to proceed with the connection.

Note
Some devices using older versions of the Bluetooth technology require both devices to enter a PIN. In the case of one of the devices not having any inputs (as in a headset), the passcode is hardcoded into the device (usually “0000” or “1234”). Consult your device’s user manual for more information.
You can also enter the Bluetooth settings by selecting the Notifications icon in the lower right-hand corner of the screen to open the Notifications pane. From here, you can enable or disable Bluetooth or right-click on Bluetooth > Go to Settings to enter the Bluetooth settings.
CONNECTING TO THE INTERNET
This chapter includes general information on types of connections and getting connected to the internet. For detailed information, please refer to Network connections on page 97.
Your computer’s built-in network features make it easy for you to connect your computer to the internet. First, though, in order to connect to the internet from home, you’ll need to sign up for internet services from an ISP (Internet Service Provider) — usually a phone or cable company — that will have to go to your home or office to set up internet service. The ISP will install a small box, a router or modem, that will allow you to connect to the internet.
Connecting to a wireless network
Connecting to a wireless LAN
A wireless LAN (or WLAN) is a wireless local area network, which can link two or more computers without using wires. Once connected to the WLAN, you can access the internet. You can also share files, other devices, and even your internet connection itself.
Your computer’s wireless connection is turned on by default, and Windows will detect and display a list of available networks during setup. Select your network and enter the password if required.
Warning
Using wireless devices while flying in an aircraft may be prohibited. All wireless devices must be switched off before boarding an aircraft and during take-off, as they may be dangerous to the operation of the aircraft, disrupt communications, and even be illegal. You may turn on your computer’s wireless devices only when informed that it is safe to do so by the cabin crew.
Predator notebook computers feature a Flight mode hotkey that turns the network connection on or off. You can use the network management options to turn your wireless network
on/off or control what is shared over the network. To connect to a wireless network, please follow the steps.
- Ensure you have a wireless router/access point and a current internet connection through the ISP of your choice. Make a note of the wireless network’s name and password (if necessary). If you are trying to connect to a public network (such as at a coffee shop), make sure you have the wireless network’s name.
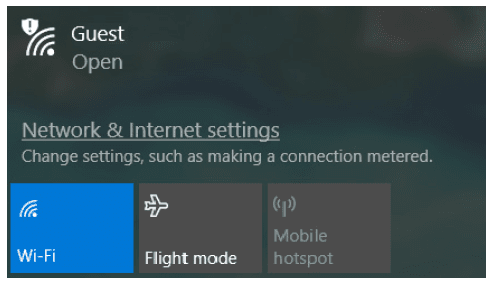
- Click the Network icon in the notification area.

- You will see a list of available wireless networks. Select the one you wish to use

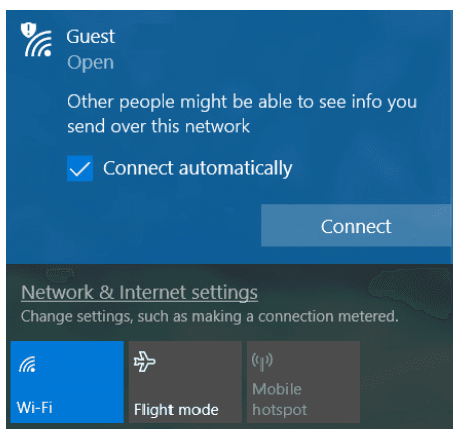
- Once you select a wireless network, select Connect.

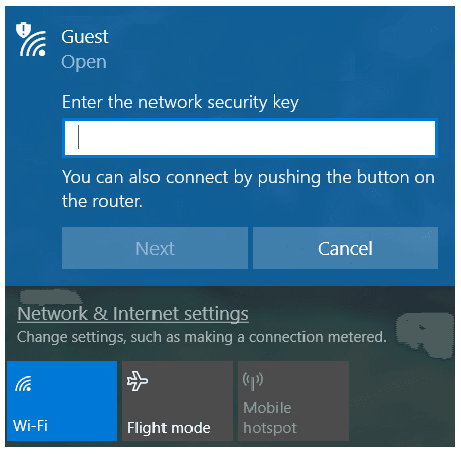
- If required, enter the network’s password.

Connecting with a cable
Built-in network feature
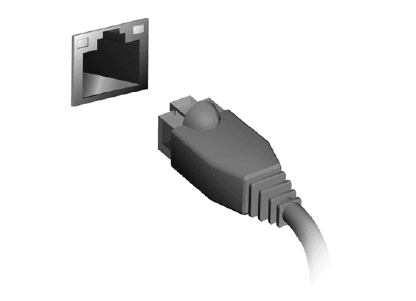
If your computer has a network port, plug one end of a network cable into the network port on your computer, and the other end into a port on your router (refer to the image below.) Then, you’ll be ready to get online.
Connecting to a cellular network
If your computer has a SIM slot, you can connect to the internet using a cellular phone network. To do this, you must have a compatible SIM card and a data contract with your cellular provider. Contact your cellular provider for more information on connecting to the internet using a cellular network.
For more manuals by Acer, visit ManualsLibraryy
Acer Predator Helios 500 Gaming Laptop- FAQs
What is the boot key for the Predator laptop?
Press the F12 key repeatedly as soon as the laptop powers on to access the Boot Menu.
How much RAM does the Predator Helios come with?
The Helios 300 model typically comes with 16GB DDR5 RAM, but configurations may vary by model.
What is the Acer Predator Helios?
The Predator Helios series are high-performance gaming laptops featuring top-tier components like Intel Core i9 CPUs and GeForce RTX 4090 GPUs, designed for immersive gaming and AI-powered tasks.
Is the Predator laptop good for programming?
Yes, models like the Helios 300 offer powerful processors and ample RAM, making them great for coding and software development.
How do I enable XMP in the BIOS on a Predator laptop?
Restart your laptop, press Del to enter BIOS, go to Advanced > CPU and Chipset Configuration, enable XMP, then save and reboot.
What is the maximum RAM capacity for the Predator Helios 500?
The Helios 500 supports up to 64GB of RAM across four memory slots.
Can I upgrade the RAM in my Predator Helios laptop?
Yes, the RAM is upgradeable. You can add more memory as long as it matches the supported specs.
Does the Predator Helios run on Windows?
Yes, it comes with Windows 11 and includes 3 months of PC Game Pass, giving access to a wide library of games.


 Important