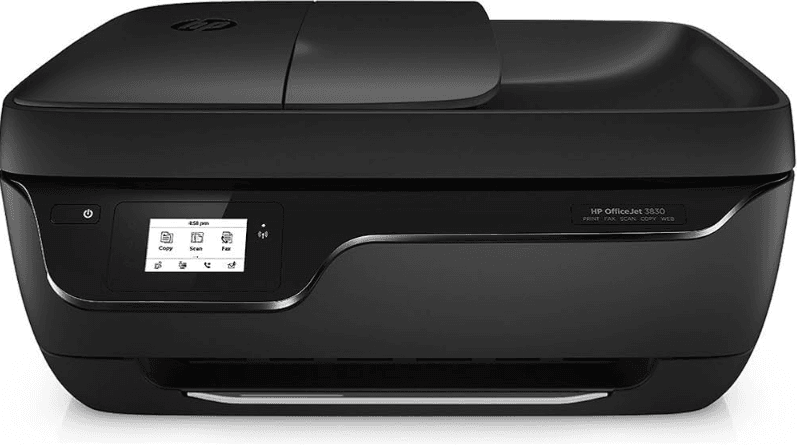
HP OfficeJet 3830 All-in-One Series Color Printer

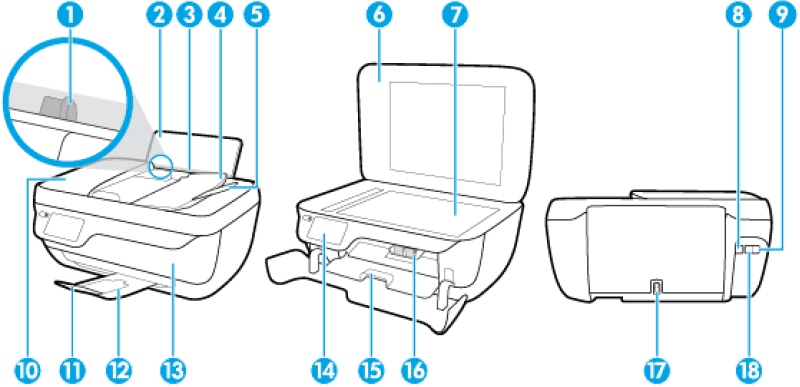
Printer parts
- Paper-width guide
- Input tray
- Input tray shield
- Document feeder tray
- Document feeder tray extender
- Scanner lid
- Scanner glass
- USB port
- Fax port (2-EXT)
- Document feeder
- Output tray extender (also referred to as the tray extender)
- Output tray
- Front door
- Control panel
- Cartridge access door
- Ink cartridges
- Power connection
- Fax port (1-LINE)
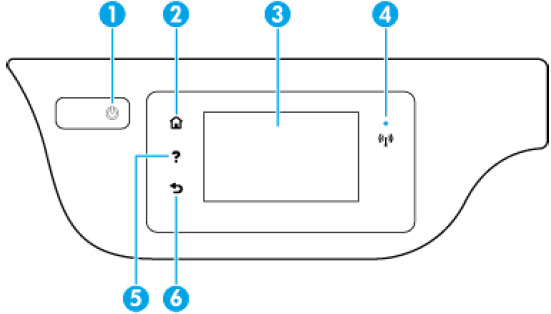
Overview of buttons and lights
- Power button: Turns the printer on or off.
- Home button: Returns to the Home screen, the screen that is displayed when you first turn on the printer.
- Control panel display: Touch the screen to select menu options, or scroll through the menu items.
- Wireless light: Indicates the status of the printer’s wireless connection. Solid blue light indicates that a wireless connection has been established, and you can print. Slow blinking light indicates that wireless is on, but the printer is not connected to a network. Make sure your printer is within the range of the wireless signal. Fast blinking light indicates a wireless error. Refer to the message on the printer display. If wireless is turned off, the wireless light is off and the display screen shows Wireless Off.
- Help button: Opens the Help menu for the current operation.
- Back button: Returns to the previous screen.
Load media
Select a paper size to continue.
To load full-size paper
- Pull out the input tray.
- Slide the paper-width guide to the left.
- Insert a stack of paper into the input tray with the short edge down and the print side up, and slide the stack of paper down until it stops.
- Slide the paper-width guide to the right until it stops at the edge of the paper.
- Pull out the output tray and the tray extender.
To load small-sized paper
- Pull out the input tray.
- Slide the paper-width guide to the left.
- Insert a stack of photo paper into the far-right side of the input tray with the short edge down and the print side up, and slide the stack of paper down until it stops.
- Slide the paper-width guide to the right until it stops at the edge of the paper.
- Pull out the output tray and the tray extender.
To load envelopes
- Pull out the input tray.
- Slide the paper-width guide to the left.
- Insert one or more envelopes into the far-right side of the input tray and slide the stack of envelopes down until it stops. The side to be printed on should face up. The flap should be on the left side and facing down.
- Slide the paper-width guide to the right against the stack of envelopes until it stops.
- Pull out the output tray and the tray extender.
Paper basics
The printer is designed to work well with most types of office paper. It is best to test a variety of print paper types before buying large quantities. Use HP paper for optimum print quality. Visit the HP website at www.hp.com for more information about HP paper.
This section contains the following topics:
- Recommended papers for printing
- Order HP paper supplies
Recommended papers for printing
If you want the best print quality, HP recommends using HP papers that are specifically designed for the type of project you are printing.
Depending on your country/region, some of these papers might not be available.
Photo printing
HP Premium Plus Photo Paper
HP Premium Plus Photo Paper is HP’s highest-quality photo paper for your best photos. With HP Premium Plus Photo Paper, you can print beautiful photos that are instant-dry, so you can share them right off the printer. It is available in several sizes, including A4, 8.5 x 11 inches, 4 x 6 inches (10 x 15 cm), 5 x 7 inches (13 x 18 cm), and in two finishes – glossy or soft gloss (semi-gloss). Ideal for framing, displaying, or gifting your best photos and special photo projects. HP Premium Plus Photo Paper delivers exceptional results with professional quality and durability.
HP Advanced Photo Paper
This glossy photo paper features an instant-dry finish for easy handling without smudging. It resists water, smears, fingerprints, and humidity. Your prints have a look and feel comparable to a store-processed photo. It is available in several sizes, including A4, 8.5 x 11 inches, 10 x 15 cm (4 x 6 inches), 13 x 18 cm (5 x 7 inches). It is acid-free for longer-lasting documents.
HP Everyday Photo Paper
Print colorful, everyday snapshots at a low cost, using paper designed for casual photo printing. This affordable photo paper dries quickly for easy handling. Get sharp, crisp images when you use this paper with any inkjet printer. It is available in glossy finish in several sizes, including A4, 8.5 x 11 inches, 5 x 7 inches, and 4 x 6 inches (10 x 15 cm). It is acid-free for longer-lasting documents.
HP Photo Value Packs
HP Photo Value Packs conveniently package original HP ink cartridges and HP Advanced Photo Paper to save you time and take the guesswork out of printing affordable, lab-quality photos with your HP printer. Original HP inks and HP Advanced Photo Paper have been designed to work together so your photos are long-lasting and vivid, print after print. Great for printing out an entire vacation’s worth of photos or multiple prints to share.
Business documents
HP Premium Presentation Paper 120g Matte or HP Professional Paper 120 Matt
This paper is a heavy two-sided matte paper perfect for presentation, proposals, reports, and newsletters. It is heavyweight for an impressive look and feel.
HP Brochure Paper 180g Glossy or HP Professional Paper 180 Glossy
These papers are glossy-coated on both sides for two-sided use. They are the perfect choice for near-photographic reproductions and business graphics for report covers, special presentations, brochures, mailers, and calendars.
HP Brochure Paper 180g Matte or HP Professional Paper 180 Matte
These papers are matte-coated on both sides for two-sided use. They are the perfect choice for near-photographic reproductions and business graphics for report covers, special presentations, brochures, mailers, and calendars.
Everyday printing
All the papers listed for everyday printing feature ColorLok Technology for less smearing, bolder blacks, and vivid colors.
HP Bright White Inkjet Paper
HP Bright White Inkjet Paper delivers high-contrast colors and sharp text. It is opaque enough for two-sided color usage with no show-through, which makes it ideal for newsletters, reports, and flyers.
HP Printing Paper
HP Printing Paper is a high-quality multifunction paper. It produces documents that look and feel more substantial than documents printed on standard multipurpose or copy paper. It is acid-free for longer-lasting documents.
HP Office Paper
HP Office Paper is a high-quality multifunction paper. It is suitable for copies, drafts, memos, and other everyday documents. It is acid-free for longer lasting documents.
HP Office Recycled Paper
HP Office Recycled Paper is a high-quality multifunction paper made with 30% recycled fiber.
Order HP paper supplies
The printer is designed to work well with most types of office paper. Use HP paper for optimum print quality.
To order HP papers and other supplies, go to www.hp.com. At this time, some portions of the HP website are available in English only.
HP recommends plain papers with the ColorLok logo for printing and copying of everyday documents. All papers with the ColorLok logo are independently tested to meet high standards of reliability and print quality, and produce documents with crisp, vivid color, bolder blacks and shorter dry-time than ordinary plain papers. Look for papers with the ColorLok logo in a variety of weights and sizes from major paper manufacturers.
Sleep mode
Power usage is reduced while in Sleep mode. After the initial setup of the printer, the printer will enter Sleep mode after 5 minutes of inactivity. The Power button light is dimmed in Sleep mode.
To change the time to Sleep mode.
- From the Home screen, touch Setup.
- Touch Power Handling.
- Touch Sleep Mode, and then touch the desired option.
Quiet Mode
Quiet Mode slows down printing to reduce overall noise without affecting print quality. Quiet Mode only works for printing with Normal print quality on plain paper. To reduce printing noise, turn on Quiet Mode. To print at normal speed, turn Quiet Mode off. Quiet mode is off by default.
NOTE: In Quiet Mode, if you print on plain paper with the Draft or Best print quality, or if you print photos or envelopes, the printer works in the same way as when Quiet Mode is off.
You can create a schedule by selecting the time when the printer prints in Quiet Mode. For example, you can schedule the printer to be in Quiet Mode from 10 p.m. to 8 a.m. every day. Quiet Mode is off by default.
Turn Quiet Mode on or off
To turn Quiet Mode on or off from the printer control panel
- From the Home screen, touch Setup.
- Touch Preferences, and then touch Quiet Mode.
- Touch On or Off next to Quiet Mode.
To turn Quiet Mode on or off from the printer software (Windows)
- Open the HP printer software.
- Click the Quiet Mode tab.
- Click On or Off.
- Click Save Settings.
To turn Quiet Mode on or off from the Embedded Web Server (EWS)
- Open the EWS.
- Click the Settings tab.
- In the Preferences section, select Quiet Mode, and then select On or Off.
- Click Apply.
Create a schedule for Quiet Mode.
To create a schedule for Quiet Mode from the printer control panel
- From the Home screen, touch Setup.
- Touch Preferences, and then touch Quiet Mode.
- Touch Off next to Quiet Mode to turn it on, and then touch OK to confirm.
- Touch off next to Schedule, and then change the start time and end time of the schedule.
Solve a problem
Jams and paper-feed issues
What do you want to do?
Clear a paper jam
Solve paper jam issues.
Use an HP online troubleshooting wizard.
Instructions for clearing paper jams and resolving issues with paper or the paper feed.
NOTE: The HP online troubleshooting wizards may not be available in all languages.
Read the general instructions in the Help for clearing paper jams
Paper jams can occur in several locations.
To clear a paper jam from the input tray
- Pull the paper gently out of the input tray.
- Make sure there is no foreign object in the paper path, and then reload paper. NOTE: The input tray shield can prevent foreign debris from falling into the paper path and causing serious paper jams. Do not take down the input tray shield.
- Touch OK on the printer control panel display to continue the current job.
To clear a paper jam from the output tray
- Pull the paper gently out of the output tray.
- Touch OK on the printer control panel display to continue the current job.
To clear a paper jam from the cartridge access area
- Press the Power button to turn off the printer.
- Close the output tray extender, and then rotate the output tray clockwise to stow it in the printer.
- Open the front door of the printer.
- Open the cartridge access door.
- If the print carriage is in the center of the printer, slide it to the right.
- Remove the jammed paper.
- Close the cartridge access door, and then close the front door.
- Pull out the output tray and the tray extender.
- Press the Power button to turn on the printer.
Solve paper-feed problems
What kind of problem are you having?
The paper is not picked up from the input tray
- Make sure the paper is loaded in the input tray.
- Adjust the paper-width guide in the input tray to fit snugly against all paper. Make sure the paperwidth guide does not bend the paper in the input tray.
- Make sure the paper in the input tray is not curled. Uncurl the paper by bending it in the opposite direction of the curl.
Pages are skewing.
- Make sure the paper is loaded in the far-right side of the input tray and the paper-width guide is fit against the left side of the paper.
- Load paper into the printer only when it is not printing.
Multiple pages are being picked up
- Adjust the paper-width guide in the input tray to fit snugly against all paper. Make sure the paper-width guide does not bend the paper in the input tray.
- Make sure the input tray is not overloaded with paper.
- Make sure the pieces of the loaded paper are not sticking together.
- Use HP paper for optimum performance and efficiency.
Printing issues
What do you want to do?
Fix problems with the page not printing (unable to print)
- HP Print and Scan Doctor
The HP Print and Scan Doctor is a utility that will try to diagnose and fix the issue automatically.
NOTE: This utility is only available for the Windows operating system.
- Troubleshoot problems with print jobs not printing.
Use an HP online troubleshooting wizard.
Get step-by-step instructions if the printer is not responding or printing.
NOTE: The HP Print and Scan Doctor and the HP online troubleshooting wizards may not be available in all languages.
Read the general instructions in the Help for issues unable to print.
To resolve print issues (Windows)
Make sure that the printer is turned on and that there is paper in the input tray. If you are still unable to print, try the following in order:
- Check for error messages from the printer display and resolve them by following the on-screen instructions.
- If your computer is connected to the printer with a USB cable, disconnect and reconnect the USB cable. If your computer is connected to the printer with a wireless connection, confirm that the connection is working.
- Verify that the printer is not paused or offline.
To verify that the printer is not paused or offline
Depending on your operating system, do one of the following:
- Windows 8.1 and Windows 8: Point to or tap the upper-right corner of the screen to open the Charms bar, click the Settings icon, click or tap Control Panel, and then click or tap View devices and printers.
- Windows 7: From the Windows Start menu, click Devices and Printers.
- Windows Vista: From the Windows Start menu, click Control Panel, and then click Printers.
- Windows XP: From the Windows Start menu, click Control Panel, and then click Printers and Faxes.
Either double-click the icon for your printer, or right-click the icon for your printer and select See what’s printing to open the print queue.
On the Printer menu, make sure there are no check marks next to Pause Printing or Use Printer Offline.
If you make any changes, try to print again.
- Verify that the printer is set as the default printer.
- Restart the print spooler.
Fix ink smears on printouts.
If a printout shows smears of ink, for subsequent prints, try using the Clean Page Smear function from the printer display. This process takes several minutes to complete. Full-size plain paper needs to be loaded and will be moved back and forth during the cleaning. Mechanical noises are normal at this time.
- Load a Letter or A4 unused plain white paper into the input tray.
- From the Home screen, touch Setup.
- Touch Tools, touch Clean Page Smears, and then follow the on-screen instructions.
Fax issues
Run the fax test report first to see if there is a problem with your fax setup. If the test passes and you are still having problems faxing, check the fax settings listed in the report to verify that the settings are correct.
Run the fax test
You can test your fax setup to check the status of the printer and to make sure it is set up correctly for faxing. Perform this test only after you have completed the fax setup on the printer. The test does the following:
- Tests the fax hardware
- Verifies that the correct type of phone cord is connected to the printer
- Checks that the phone cord is plugged into the correct port
- Checks for a dial tone
- Test the status of your phone line connection
- Checks for an active phone line
For more Manuals by HP, visit ManualsLibraryy
HP OfficeJet 3830 All-in-One Series Color Printer-FAQs
How do I connect my HP OfficeJet 3830 to Wi-Fi?
Go to the printer’s Settings > Network > Wireless Setup Wizard. Select your Wi-Fi network name and enter the password to connect.
Does the HP OfficeJet 3830 have a USB port?
Yes, it features a USB 2.0 port for connecting directly to a computer. It also supports Wi-Fi connectivity for wireless printing.
Why does my printer say it’s offline?
This could be due to a loose cable, paper jam, or software issue. Check connections, restart your printer, or reinstall the printer driver if needed.
Can I print without Wi-Fi?
Yes. Use the HP Wireless Direct feature to print directly from your smartphone or tablet without needing Wi-Fi or internet access.
How do I scan a document using the printer?
Place your document on the scanner glass or in the ADF (for multiple pages). Use the printer’s screen or the HP Smart app to start scanning.
Do all printers have USB ports?
Many modern printers, including the HP OfficeJet 3830, come with USB ports for easy connection to computers or USB flash drives.
How do I fix an error message on my HP printer?
Turn the printer off and back on. If the issue remains, unplug it for 30 seconds and restart. Persistent errors may indicate a hardware issue.
What is the WPS button on my router?
WPS (Wi-Fi Protected Setup) allows you to connect your printer to Wi-Fi without typing the password. Just press the WPS button on your router and follow the printer’s instructions.
Does this printer support Bluetooth?
The HP OfficeJet 3830 supports Wi-Fi Direct but not Bluetooth. For wireless printing, use Wi-Fi or the HP Smart app.


