
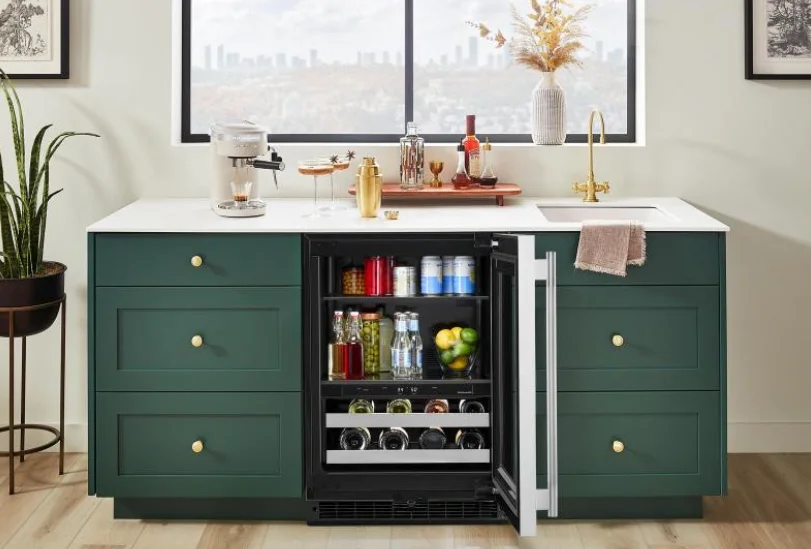

KitchenAid Beverage Center with Metal-Front Racks
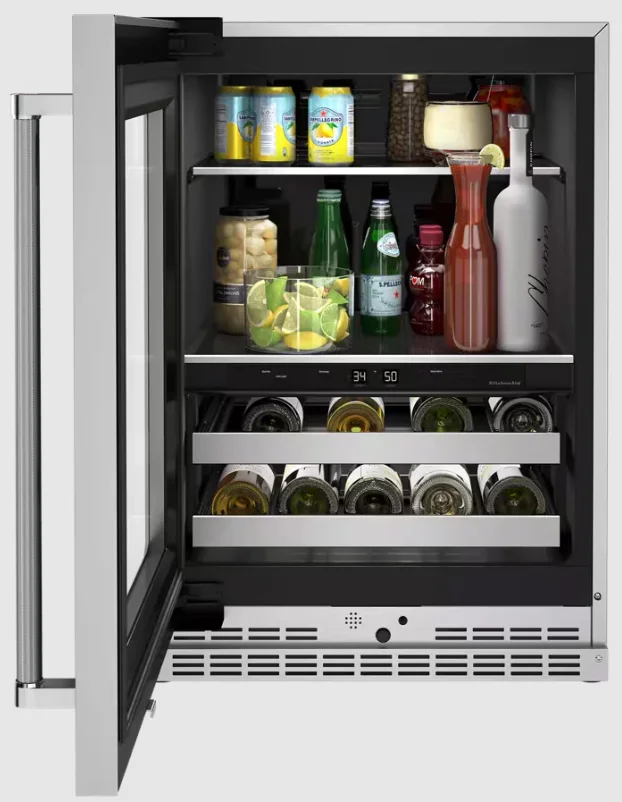
IMPORTANT SAFETY INSTRUCTIONS
WARNING: To reduce the risk of fire, electric shock, or injury when using your beverage center, follow these basic precautions:
- Plug into a grounded 3-prong outlet.
- Do not remove ground prong.
- Do not use an adapter.
- Do not use an extension cord.
- Disconnect power before servicing.
- Replace all parts and panels before operating.
- Remove doors from your old beverage center.
- Use a non-flammable cleaner.
- Do not store or use petrol, flammable liquids or gas in the vicinity of this or other electrical appliances. The fumes can cause fires or explosions.
- Do not store explosive substances such as aerosol cans with a flammable propellant in this beverage center.
- Do not use or place electrical devices inside the beverage center compartments if they are not of the type expressly authorized by the manufacturer.
- Use two or more people to move and install the beverage center.
- This appliance is not intended for use by persons (including children) with reduced physical, sensory or mental capabilities, or a lack of experience and knowledge, unless they have been given supervision or instruction concerning use of the appliance by a person responsible for their safety.
- Children should be supervised to ensure that they do not play with the appliance.
- To avoid the risk of children becoming trapped and suffocated, do not allow them to play or hide inside the beverage center.
- If the power supply cord is damaged, it must be replaced by the manufacturer or its service agent or a similarly qualified person.
- Keep ventilation openings, in the appliance enclosure or in the built-in structure, clear of
obstruction. - Do not use mechanical devices or other means to accelerate the defrosting process, other than those recommended by the manufacturer
- Do not damage the refrigerant circuit.
SAVE THESE INSTRUCTIONS
Proper Disposal of Your Old Beverage Center
WARNING: Risk of child entrapment. Before you throw away your old Beverage Center:
- Take off the door.
- Leave the shelves in place so that children may not easily climb inside.
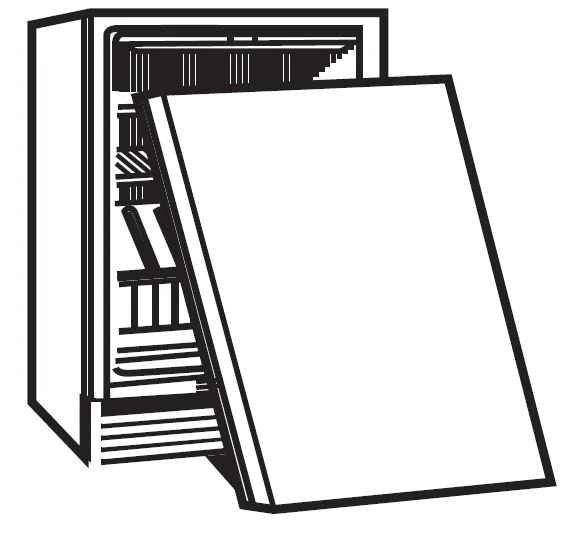
IMPORTANT: Child entrapment and suffocation are not problems of the past. Junked or abandoned beverage centers are still dangerous – even if they will sit for “just a few days.” If you are getting rid of your old beverage centers, please follow these instructions to help prevent accidents.
Important information to know about disposal of refrigerants: Dispose of the refrigerator in accordance with Federal and Local regulations. Refrigerants must be evacuated by a licensed, EPA-certified refrigerant technician in accordance with established procedures.
INSTALLATION REQUIREMENTS
Tools and Parts
Gather the required tools and parts before starting installation.
Tools and parts needed:
- Phillips screwdriver.
- Custom Overlay Door Panel – Refer to “Custom Overlay Panel Preparation”.
- Custom handle and mounting hardware (optional).
Parts supplied:
- M4 x 30 flathead screws (8).
Location Requirements
IMPORTANT: This appliance is intended to be used in household and similar applications such as:
- Staff kitchen areas in shops, offices and other working environments;
- Farm houses and by clients in hotels, motels, and other residential-type environments;
- Bed and breakfast type environments;
- Catering and similar non-retail applications.
NOTES:
- For the beverage center to be flush with the front of the base cabinets, remove any baseboards or moldings from the rear of the opening. See “Product Dimensions” and later in this section, “Opening Dimensions”.
- It is recommended that you do not install the beverage center near an oven, radiator, or other heat source.
- Do not install in a location where the temperature will fall below 55 °F (13 °C). For best performance, do not install the beverage center behind a cabinet door or block the base grille.
Opening dimensions:
- Height dimensions are shown with the leveling legs extended to the minimum height.
NOTE: When leveling legs are fully extended, add 5/8” (15 mm) to the height dimensions. See “Product Dimensions.” - If the floor of the opening is not level with the kitchen floor, shim the opening to make it level with the kitchen floor.
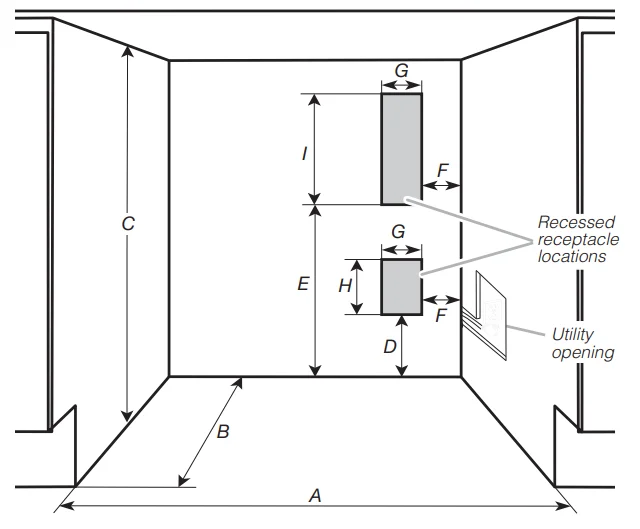
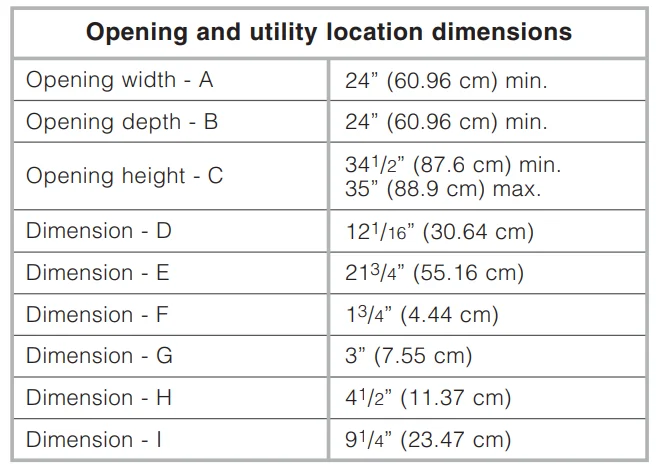
For flush installation, the power outlet can be installed in adjacent cabinetry with a cutout on the power cord side for routing of the power cord. The power outlet can also be recessed on the back wall behind the unit, as per the recommended receptacle locations in the above illustration.
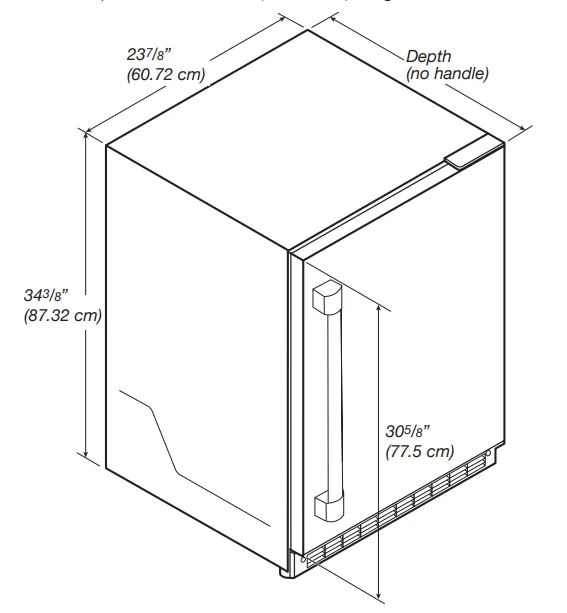
Product Dimensions
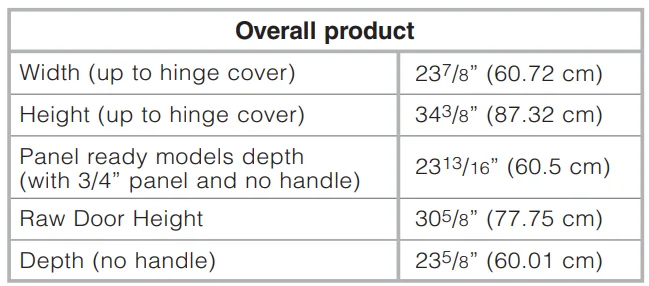
NOTE: The power cord is 60” (152.4 cm) long.
Custom Overlay Panel
NOTE: For standard stainless steel or glass door models, skip these instructions and go to the “Electrical Requirements” section.
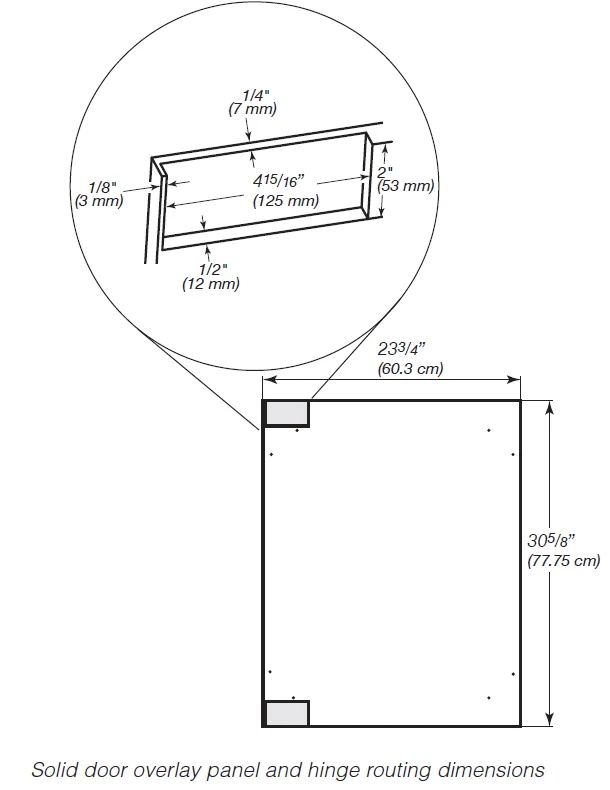
If you plan to install a custom overlay panel, you will need to create the panel yourself or consult a qualified cabinet maker or carpenter. Refer to the dimension drawings for panel specifications.
IMPORTANT:
- The thickness of the overlay panel must be 3/4” (19 mm).
- Custom solid door overlay panel must not weigh more than 20 lb (9.07 kg).
- Custom glass door overlay panel must not weigh more than 10 lb (4.54 kg).
- Overlay panels weighing more than recommended may cause damage to your appliance.
Solid door overlay panel – Preparation:
Create the custom overlay panel using the dimensions shown in the illustration “Solid door overlay panel and hinge routing dimensions”. Route shaded areas to a 1/2” (12 mm) depth as
shown.
IMPORTANT: The following graphic shows a custom panel for a door with the hinges installed on the right-hand side. If your beverage center has the hinges installed on the left-hand side, rotate the custom frame 180° so the hinge markings will be on the left.
Glass door overlay panel – Preparation:
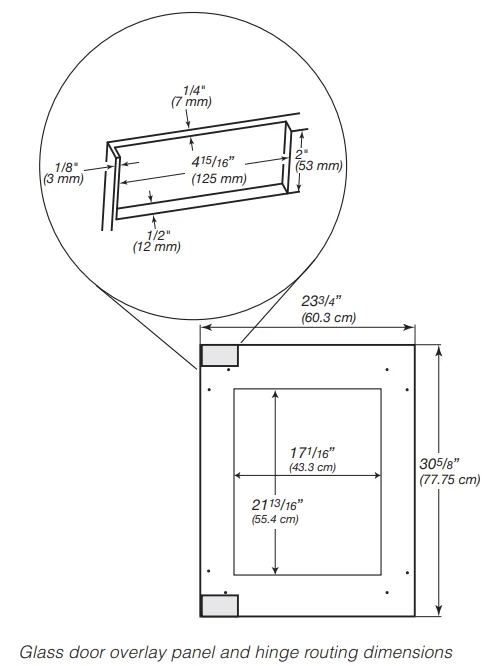
Create the custom overlay panel using the dimensions shown in the illustration “ Glass door overlay panel and hinge routing dimensions”. Route shaded areas to a 1/2” (12 mm) depth as shown.
IMPORTANT: The following graphic shows a custom panel for a door with the hinges installed on the right-hand side. If your beverage center has the hinges installed on the left-hand side, rotate the custom frame 180° so the hinge markings will be on the left.
Handle (optional)
Custom handles are typically attached to the custom overlay door panel only. Refer to the instructions received with the KitchenAid handle kits to install these handles on custom wood panels. The custom handle needs to be installed on the door panel with countersunk holes and installed before the custom overlay door panel has been installed on the beverage center door.
Electrical Requirements
Before you move your beverage center into its final location, it is important to make sure you have the proper electrical connection.
Recommended grounding method:
A 115 V, 60 Hz, AC only, 15 A or 20 A fused, grounded electrical supply is required. It is recommended that a separate circuit serving only your beverage center be provided. Use an outlet that cannot be turned off by a switch. Do not use an extension cord.
NOTE: Before performing any type of installation, cleaning, or removing a light bulb, unplug the beverage center or disconnect power.
INSTALLATION INSTRUCTIONS
Unpack the Beverage Center
Before using your beverage center, all packaging materials should be removed and the interior should be cleaned.
- Remove tape and glue residue from surfaces before turning on the beverage center. With your fingers, rub a small amount of liquid dish soap over any adhesive and wipe with warm water to remove.
- Do not use sharp instruments, rubbing alcohol, flammable fluids, or abrasive cleaners to remove tape or glue. These can damage the surfaces of your beverage center. For more information, refer to the “Beverage Center Safety” section.
- Dispose of and/or recycle all packaging materials.
- After all packaging materials have been removed, clean the inside of your beverage center. Refer to the cleaning instructions in the “Cleaning” section.
NOTE: For standard stainless steel or glass door models, skip to the “Door Closing” section.
Custom Overlay Panel Installation
IMPORTANT:
- Create a custom overlay panel according to the specifications in the “Custom Overlay Panel” section.
- KitchenAid is not responsible for the removal or addition of molding or decorative panels that would not allow access to the beverage center for service.
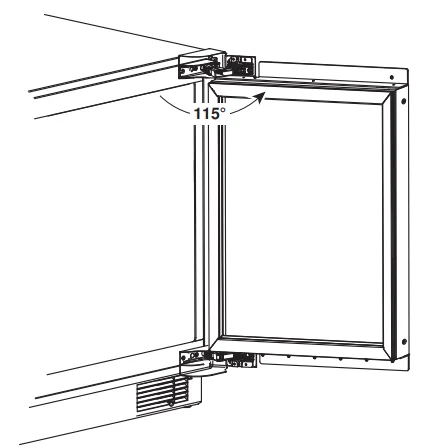
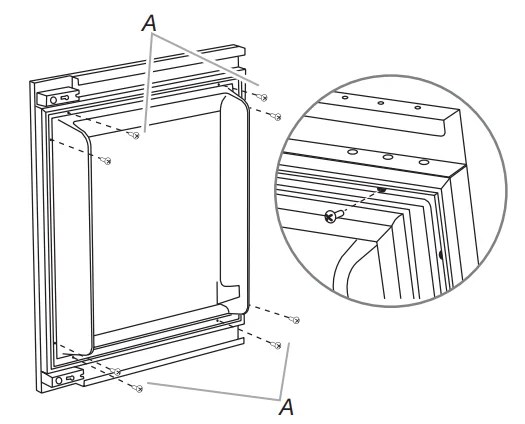
- Open the door completely to 115°.

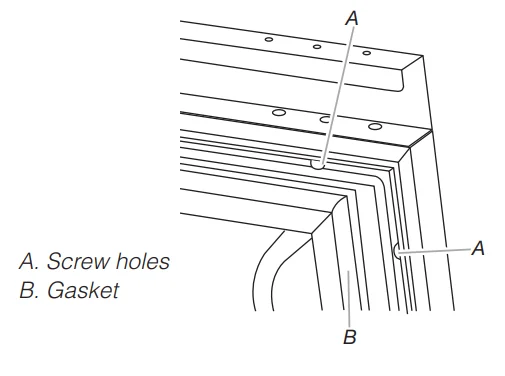
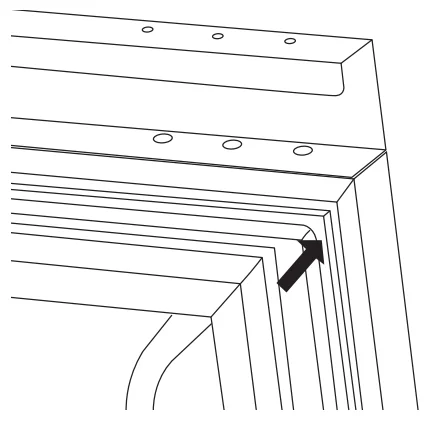
- Remove the gasket from the corners of the door, pulling gently until the two screw holes in each corner of the door can be seen.
NOTE: The gasket does not have to be removed from the door, only the corners.
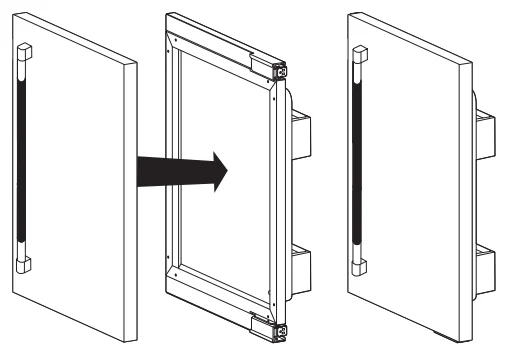
- Using two people, hold the custom overlay panel against the door. Be sure that the top and bottom hinges fit accurately into the routing on the back of the custom wood panel.

NOTE: The handle needs to be installed before the custom overlay door panel has been installed on the beverage center door. - Fasten the custom panel to the door using two wood screws (provided in the installation kit) at each corner.

- Press the gasket firmly back into it’s original position.

Installation and Door Closing
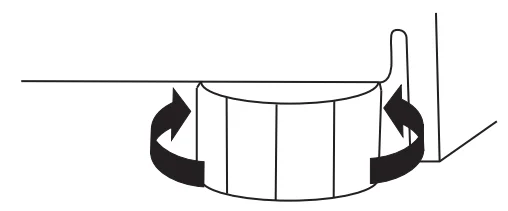
Your beverage center has four leveling legs. If your beverage center seems unsteady or you want the door to close more easily, adjust the beverage center’s tilt using the instructions below.
- Plug into a grounded 3-prong outlet.
When moving your Beverage Center:
Your beverage center is heavy. When moving the beverage center for cleaning or service, be sure to cover the oor with cardboard or hardboard to avoid oor damage. Always pull the beverage center straight out when moving it. Do not wiggle or “walk” the beverage center when trying to move it, as oor damage could occur. - Move the beverage center into its final location.
- Turn the leveling legs to the right to lower the beverage center, or turn the leveling legs to the left to raise it. It may take several turns of the leveling legs to adjust the tilt of the beverage center.
NOTE: Having someone push against the top of the beverage center takes some weight off the leveling legs. This makes it easier to adjust the leveling legs.
- Open the door and check that it closes as easily as you like. If not, tilt the beverage center slightly more to the rear by turning both front leveling screws to the right. It may take several more turns, and you should turn both leveling legs the same amount.
USING BEVERAGE CENTER
Controls

NOTES:
- When the beverage center is turned on for the first time, the temperature defaults to the recommended setting.
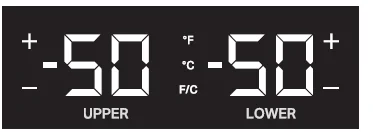
- There are two adjustable temperature controls, one for each compartment.
- The left temperature and preset touch pads control the temperature of the upper compartment.
- The right temperature and preset touch pads control the temperature of the lower compartment.
- Turning Control On/Off
 The first time that the beverage center is plugged in, the control will be in Cool Off mode. Cool On and Cool Off will be the only options that display. Press COOL ON for 3 seconds to turn on the beverage center. All menus and recommended temperature settings will be displayed.
 - Auto Light Option

Features a proximity sensor in the base grille that automatically ramps on the LED interior display lighting when motion is detected. When motion is no longer detected, the interior display light will turn off after 2 minutes.- Press the AUTO LIGHT option to activate this feature.
- When the AUTO LIGHT is not activated, the interior display light will only turn on when the door is opened.
NOTE: Leaving the light on for an extended period of time will slightly increase the temperature of the beverage center.
- Control Lock

A selectable feature that locks all controls except for Cool On and Cool Off. To activate Lock Mode, press and hold LOCK for 3 seconds. After the countdown, all other displays will turn off and become unavailable except Cool On, Cool Off, and Lock. - Using Presets
For your convenience, your beverage center also has controls that are preset to the recommended storage temperature for specific beverages. Pressing any preset option will set the temperature to the recommended temperature for the specified beverage:- Beverage: 34 °F (1 °C)
- Party: 37 °F (3 °C)
- Red wine: 64 °F (17 °C)
- White wine: 50 °F (10 °C)
- Sweet wine: 42 °F (5 °C)
- Champagne: 46 °F (7 °C)
- Adjusting the Temperatures

To adjust set point temperatures, press “+” (plus) or “-” (minus) until the desired temperature setting is reached. The control is set correctly when the beverages are as cold as you like it.
NOTES:- The set point for the beverage center is 37 °F (3 °C for the upper compartment and 50 °F (10 °C) for the lower compartment. The set point range for the upper compartment is 33 °F to 40 °F (0 °C to 4 °C) and 42 °F to 64 °F (5 °C to 17 °C) for the lower compartment.
- Wait at least 24 hours between adjustments for the product to acclimate. Recheck the temperatures before making further adjustments.
- Viewing Celsius/Fahrenheit Temperatures

Press the F/C touch pad to toggle between displaying the temperature in degrees Fahrenheit and degrees Celsius. The corresponding indicator will illuminate. - Sabbath Mode
 Allows the door of the beverage center to be opened or closed during the Sabbath or other religious holidays without directly turning on or off any lights, digital readouts, solenoids, fans, valves, icons, tones, alarms or the compressor. By selecting this feature, the temperature set points remain unchanged, but the control panel lights, interior lights, and control audio turn off. For the most efficient beverage center operation, it is recommended to exit the Sabbath Mode when it is no longer required.
- Press and hold SABBATH for 3 seconds to turn on the feature. After the 3-second countdown, the feature will activate, and all other displays will turn off.
- Press and hold SABBATH for 3 seconds to turn off the feature and turn on the display.
- Over Temperature Alarm

The Over Temperature feature is designed to let you know when the beverage center temperature rises above 70 °F (21 °C) for 4 hours or longer. The audio alarm will shut off automatically when the temperature returns to normal. To let you know an Over Temperature condition occurred, the indicator light will continue to flash until the Reset Alarm touch pad is pressed. If the over-temperature condition is still present when an Over Temp reset is performed, the indicator light will continue to reactivate every 4 hours until the beverage center temperature is below 70 °F (21 °C).
NOTE: These features will not appear on your control unless your beverage center is over-temperature and the alarm requires a reset. - Max Cool
Plummets internal temperatures to their lowest point for 24 hours.- Press “+” and “F/C” at the same time to turn on the feature. The feature will activate.
- Press “+” and “F/C” at the same time to turn off the feature. The feature will activate.
If it is not turned off as indicated, after 24 hrs it will be deactivated by itself.
- Door Open Alarm
Helps avoid food and beverage spoilage by giving an audio and visual alert if the door is left open for 5 minutes. If the door is open longer than 5 minutes, an alarm will sound every 2 minutes until the door is closed or any control is pressed. - Showroom Mode
This mode is used only when the beverage center is on display in a retail store. To activate Showroom Mode, press and hold both Cool On and Sabbath for 3 seconds. If you unintentionally turn on Showroom Mode, Cool Off will light up on the display, and the controls will appear to work. Exit Showroom Mode by pressing and holding COOL ON and SABBATH at the same time for 3 seconds.
 The first time that the beverage center is plugged in, the control will be in Cool Off mode. Cool On and Cool Off will be the only options that display. Press COOL ON for 3 seconds to turn on the beverage center. All menus and recommended temperature settings will be displayed.
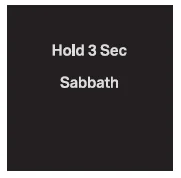 Allows the door of the beverage center to be opened or closed during the Sabbath or other religious holidays without directly turning on or off any lights, digital readouts, solenoids, fans, valves, icons, tones, alarms or the compressor. By selecting this feature, the temperature set points remain unchanged, but the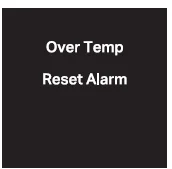
Normal Sounds
Your new beverage center may make sounds that your old one didn’t make. Because the sounds are new to you, you might be concerned about them. Most of the new sounds are normal. Hard surfaces, such as the flooring and surrounding structures, can make the sounds seem louder. The following describes the kinds of sounds and what may be making them.
- Your beverage center is designed to run more efficiently to keep your beverages at the desired temperatures and to minimize energy usage. The high-efficiency compressor and fans may cause your beverage center to run longer than your old one. You may also hear a pulsating or high-pitched sound from the compressor or fans adjusting to optimize performance.
- Rattling noises may come from the flow of refrigerant or items stored inside the beverage center.
- As each cycle ends, you may hear a gurgling sound due to the refrigerant flowing in your beverage center.
- You may hear water running into the drain pan when the beverage center is defrosting.
- You may hear clicking sounds when the beverage center starts or stops running.
Stocking the Beverage Center
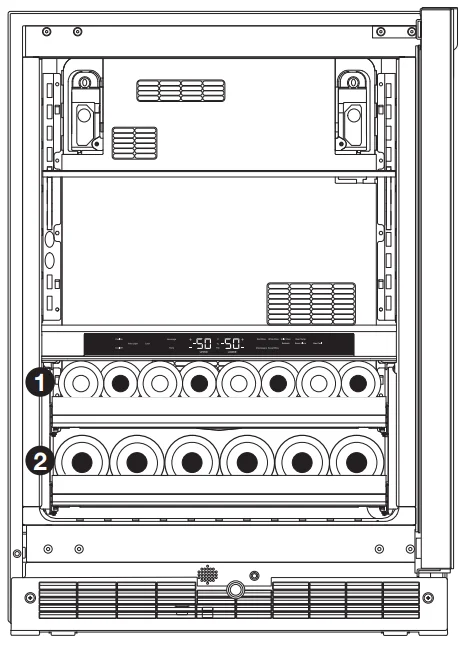
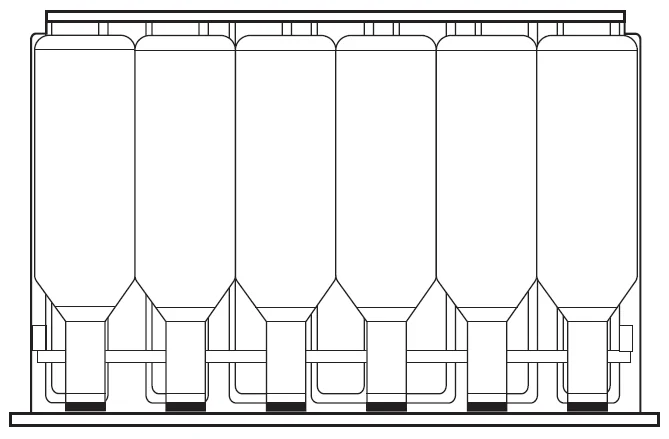
- Rack 1: For storing up to eight 750 ml wine bottles [diameter less than or equal to 31/8” (80 mm)].
- Rack 2: For storing up to 6 wine bottles [diameter up to 31/8” (80 mm)].
To stock the Beverage Center Shelves:
Place juices, sodas, or other canned beverages on the glass shelves.
To stock the Beverage Center – Rack 1:
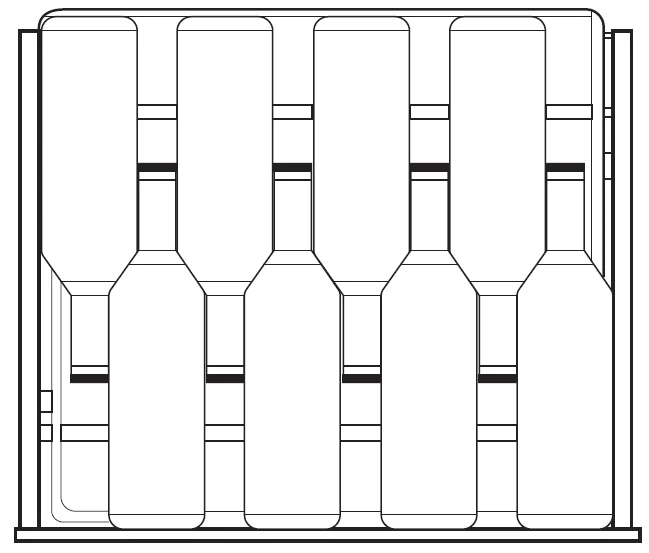
NOTE: The wine rack can be stocked with the bottles facing either direction; however, to optimize storage, adjacent bottles should be facing in opposite.
- Starting on the left-hand side, place the first bottle on the bottom of the rack with the neck of the bottle facing the front of the beverage center.
- Place the next bottle on its side with the neck of the bottle facing the back of the beverage center. Alternate the direction of the bottles in this manner until the display rack is full.
To stock the Beverage Center – Rack 2:
- Starting from the left-hand side of the bottom rack, place the first bottle with the neck of the bottle facing the front of the beverage center.
- Continue to place the remaining bottles facing in the same direction.
CARE AND CLEANING
Cleaning
Clean the beverage center once a month to avoid the buildup of odors. Wipe up spills immediately.
To clean your Beverage Center:
- Unplug the beverage center or disconnect power.
- Empty and remove all shelves and racks from inside the beverage center.
- Hand wash, rinse, and dry removable parts and interior surfaces thoroughly. Use a clean sponge or soft cloth and a mild detergent in warm water.
- To avoid damaging wooden tines and trim pieces, wipe them off with a clean sponge or soft cloth and warm water. Do not use detergent or immerse the entire rack in water when cleaning.
- Do not use abrasive or harsh cleaners such as window sprays, scouring cleansers, flammable fluids, cleaning waxes, concentrated detergents, bleaches, or cleansers containing petroleum products on plastic parts, interior and door liners, or gaskets. Do not use paper towels, scouring pads, or other harsh cleaning tools. These can scratch or damage materials.
- To help remove odors, you can wash interior walls with a mixture of warm water and baking soda [2 tbs to 1 qt (26 g to 0.95 L) of water].
- Wash stainless steel and painted metal exteriors with a clean sponge or soft cloth and a mild detergent in warm water. Do not use abrasive or harsh cleaners, or cleaners containing chlorine. These can scratch or damage materials. Dry immediately with a soft, dry cloth to absorb any remaining water.
NOTE: To keep your stainless steel beverage center looking like new and to remove minor scuffs or marks, it is recommended that you use the manufacturer’s approved Stainless Steel Cleaner and Polish. To order the cleaner, refer to the “Accessories” section.
IMPORTANT:- This cleaner is for stainless steel parts only!
- Do not allow the Stainless Steel Cleaner and Polish to come into contact with any plastic parts such as the trim pieces, dispenser covers, or door gaskets. If unintentional contact does occur, clean the plastic part with a sponge and mild detergent in warm water. Dry immediately with a soft, dry cloth to absorb any remaining water.
- Replace the racks.
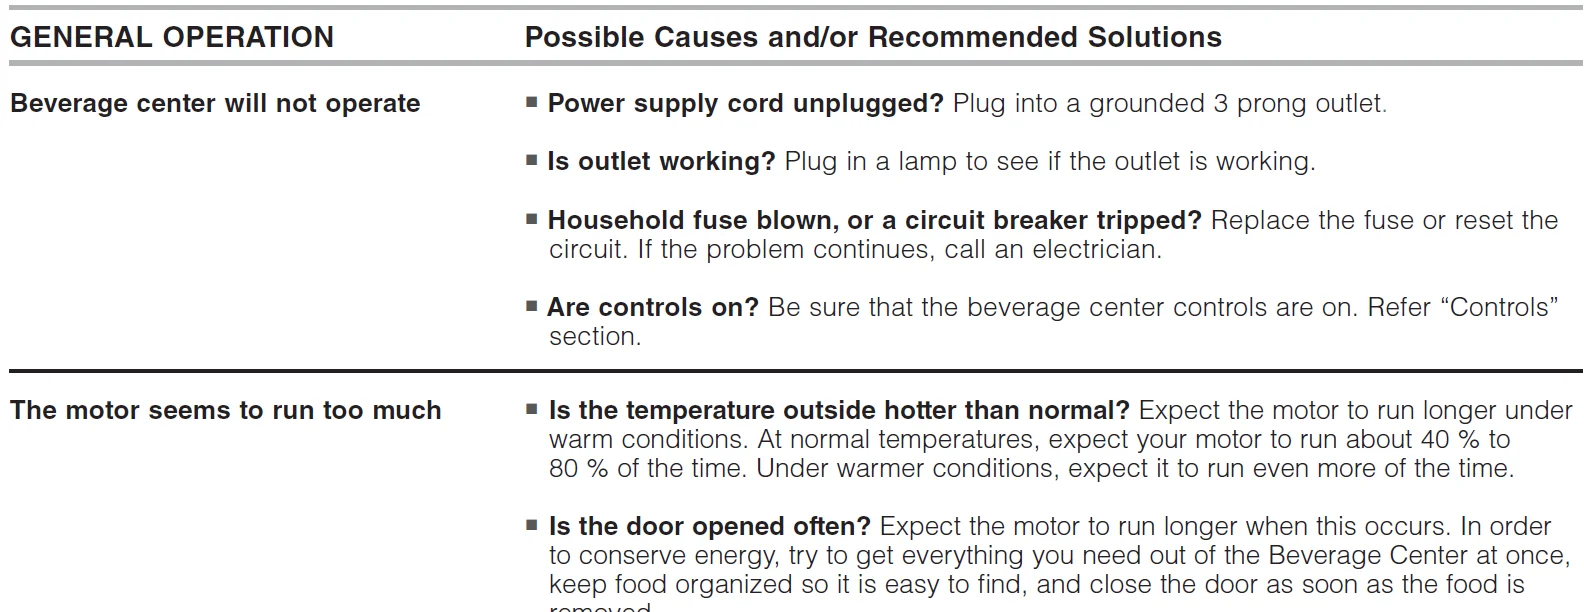
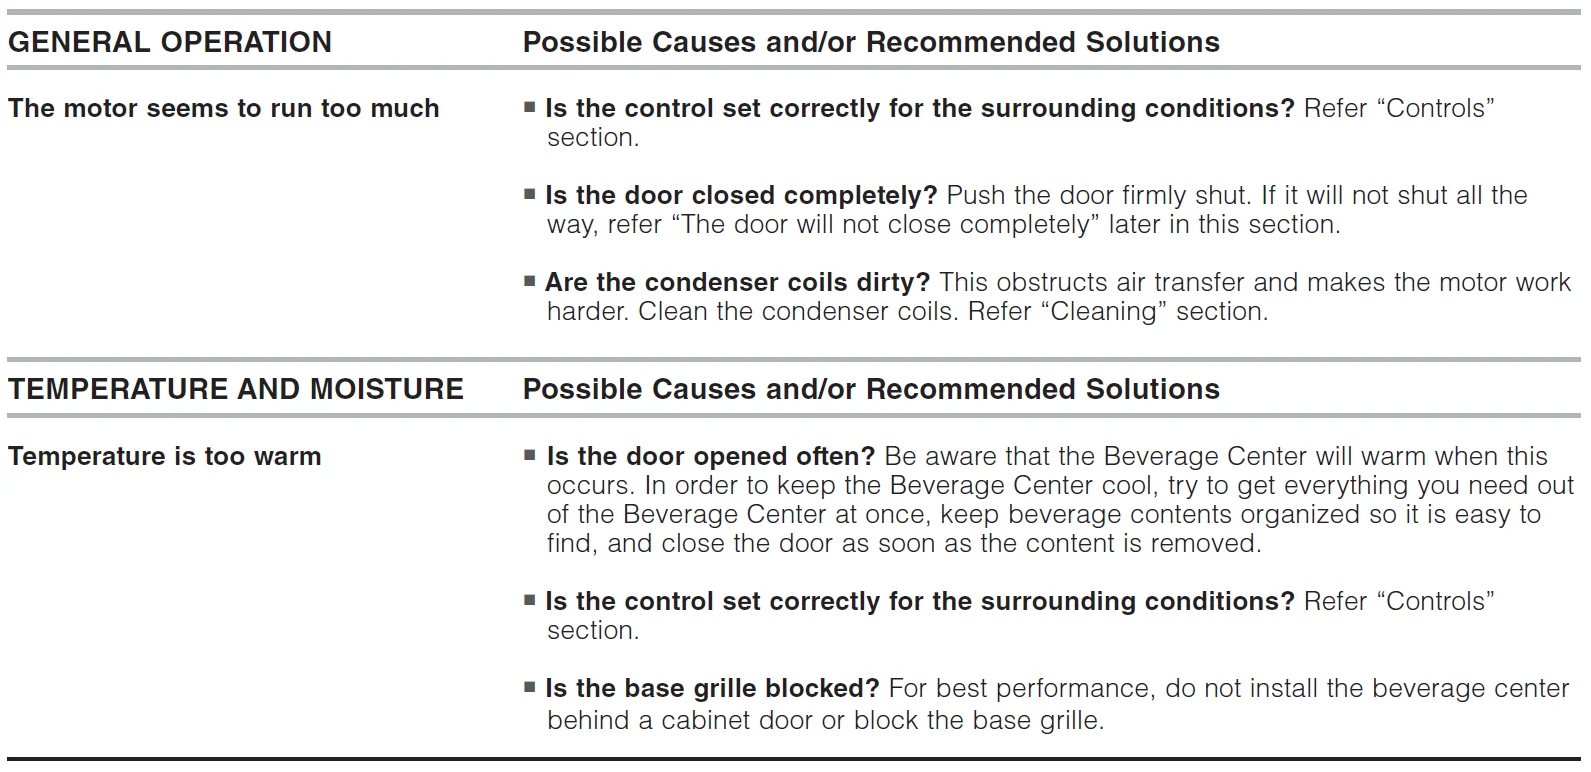
Troubleshooting
For more manuals by KitchenAid, visit ManualsLibraryy
KitchenAid Beverage Center with Metal-Front Racks-FAQs
What is the KitchenAid Beverage Center with Metal-Front Racks used for?
The KitchenAid Beverage Center is designed to store drinks like soda, water, juice, beer, and wine at the proper cooling temperature. Its metal-front racks provide a stylish appearance while helping organize bottles and cans neatly inside the unit.
Are KitchenAid appliances considered premium quality?
Yes, KitchenAid is widely known as a premium appliance brand. It focuses on elegant designs, durable construction, and advanced cooling features that appeal to homeowners looking for both performance and modern kitchen style.
Can the beverage center store wine bottles safely?
Yes, the beverage center can store wine bottles along with other beverages. The adjustable racks and temperature controls help maintain suitable cooling conditions to preserve flavor and freshness.
Does the KitchenAid Beverage Center operate quietly?
Most KitchenAid beverage centers are designed for quiet performance. The cooling system minimizes vibration and noise, making the appliance suitable for kitchens, entertainment rooms, offices, or home bars.
What is the difference between a beverage center and a regular refrigerator?
A beverage center is specially designed for drinks and usually offers adjustable shelves, precise temperature settings, and compact storage. Regular refrigerators are intended for general food storage and may not provide the same beverage-focused organization.
Where should I install the KitchenAid Beverage Center?
The unit works best in a well-ventilated indoor area away from direct sunlight and heat sources. It can often be installed under counters or used as a freestanding appliance depending on the model specifications.
Are the metal-front racks removable?
Yes, many KitchenAid beverage center models include removable or adjustable metal-front racks. This makes it easier to clean the interior and customize storage space for different bottle or can sizes.
How do I clean the beverage center properly?
Use a soft cloth with mild soap and warm water to clean the interior and exterior surfaces. Avoid harsh chemicals or abrasive cleaners, as they may damage the finish and shelves.
Is KitchenAid owned by Whirlpool?
Yes, KitchenAid is part of the Whirlpool Corporation family. However, KitchenAid products are positioned as more premium appliances with upgraded styling and enhanced features.