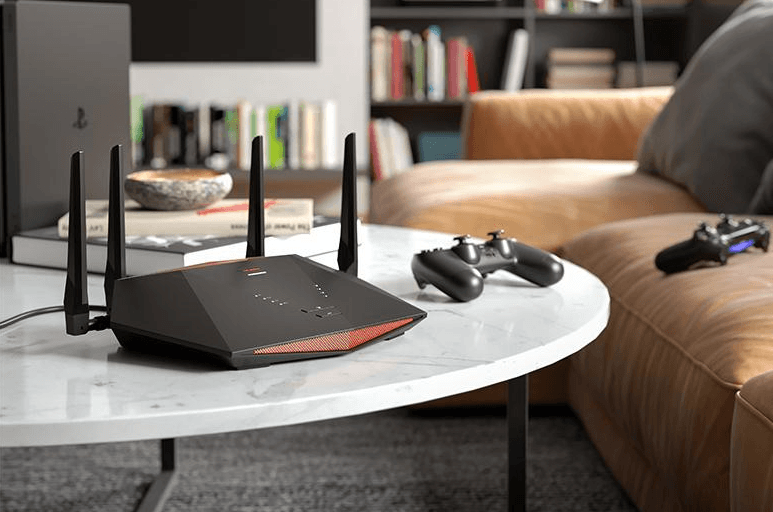
NETGEAR XR1000 Nighthawk Pro Gaming WiFi 6 Router
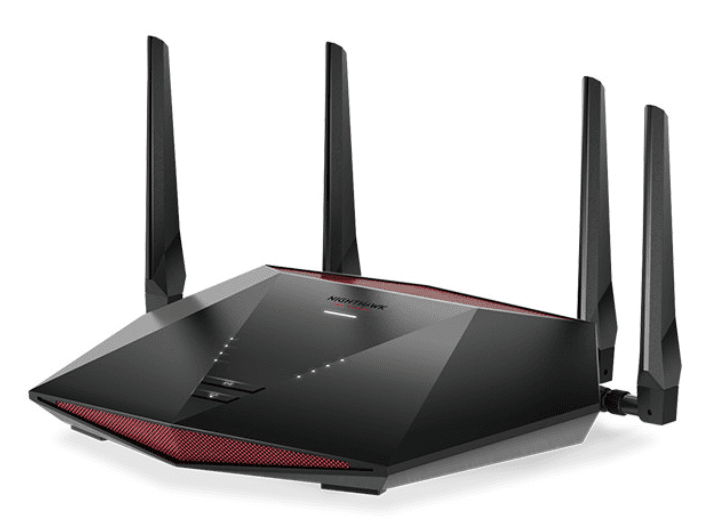
Hardware Setup
Unpack Your Router
Your package contains the Nighthawk Pro Gaming router, four antennas, a power adapter, and a flat Ethernet cable. The package also contains the installation guide (not shown in the following figure).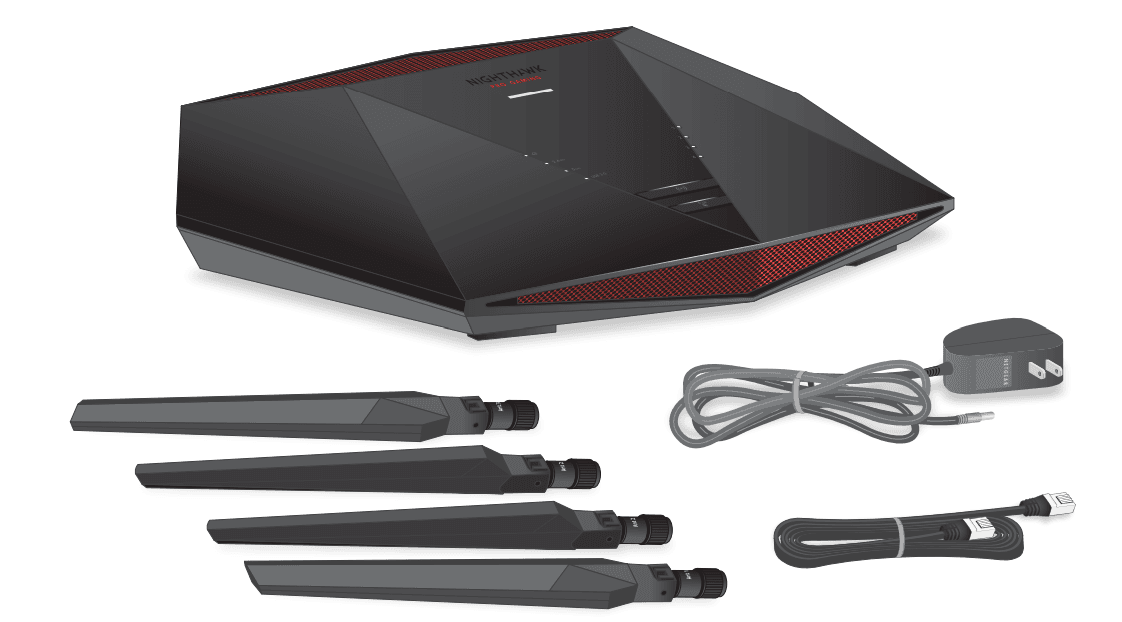
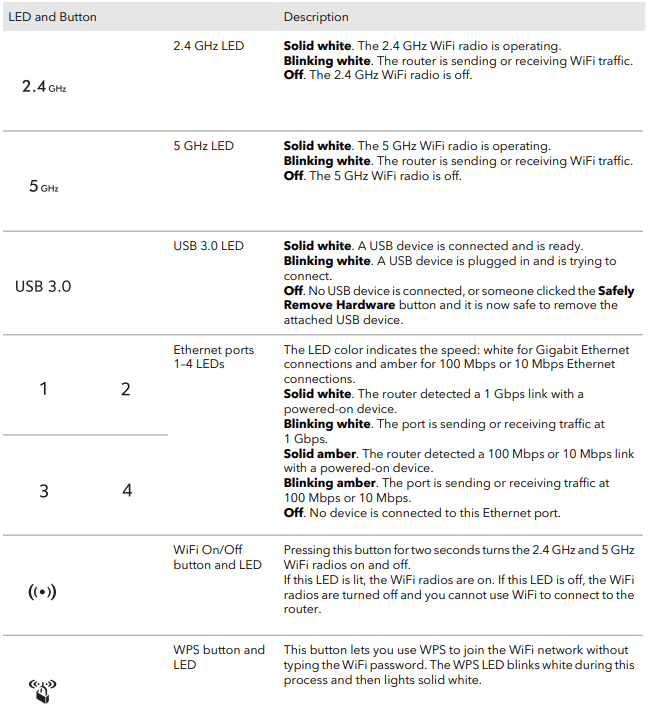
LEDs and Buttons on the Top Panel
The status LEDs, WiFi On/Off button with LED, and WPS button with LED are on the top panel.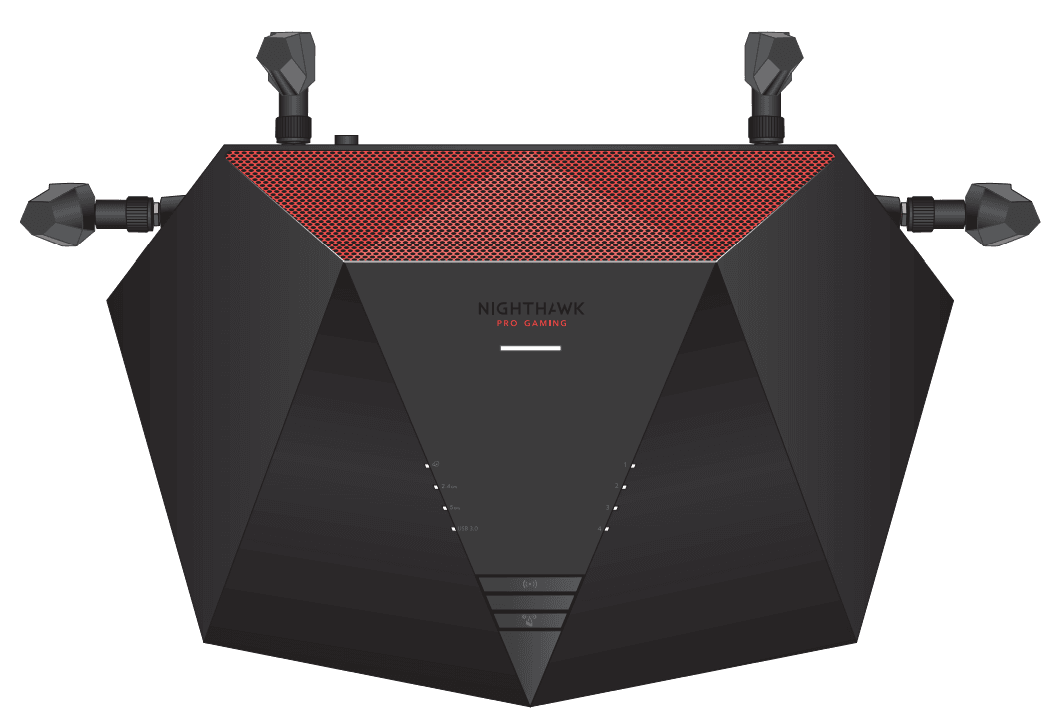
LED descriptions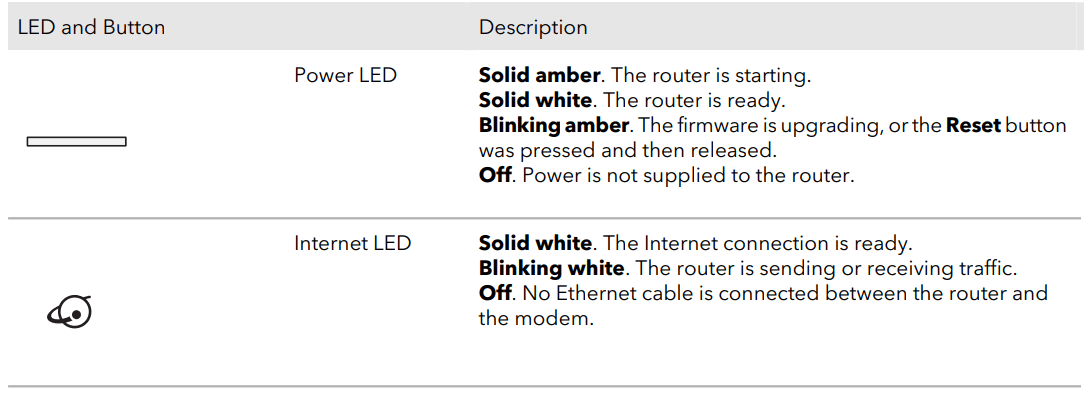
Back Panel
The following figure shows the back panel connectors and buttons.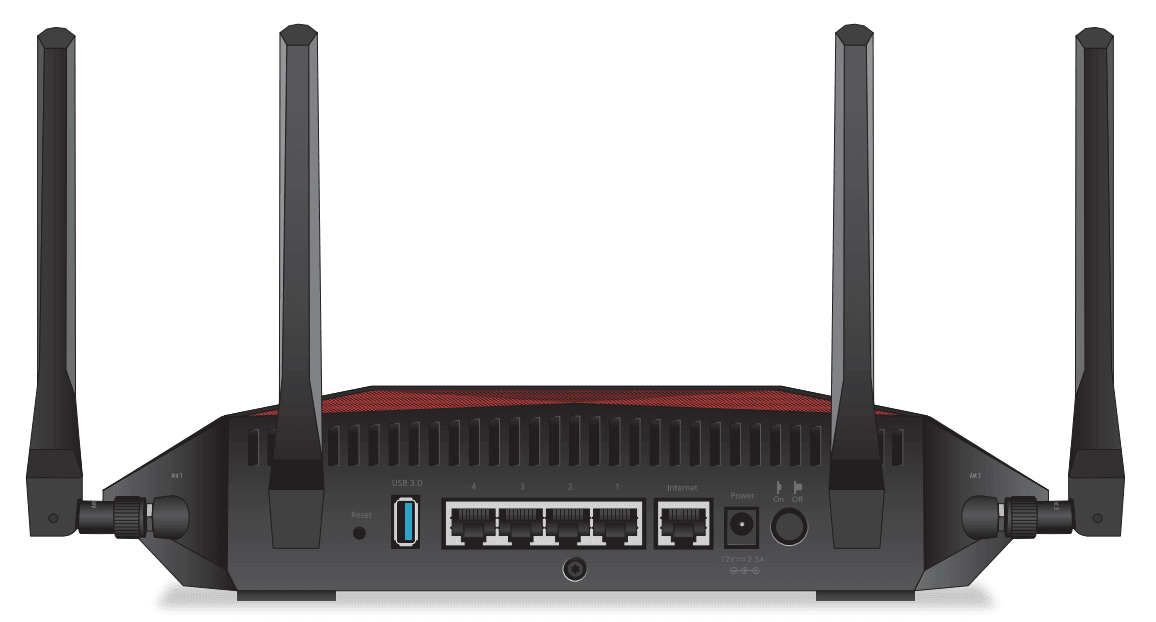
Viewed from left to right, the back panel contains the following components:
- Reset button. You can press the Reset button to reset the router to the factory default settings. If you press and hold the Reset button until the Power LED starts blinking amber, the router restarts and returns to its factory settings. For information about the factory settings, see Factory Settings on page 228.
- USB 3.0 port. You can connect a USB storage device to the USB 3.0 port.
- Ethernet ports. You can connect a LAN device to each of the four Gigabit Ethernet RJ-45 LAN ports numbered 1 through 4.
- Internet port. Connect the yellow Gigabit Ethernet RJ-45 WAN port to a modem such as a cable modem or DSL modem.
- DC power connector. Connect the power adapter that came in the product package to the DC power connector.
- Power the On/Off button. Press the Power On/Off button to provide power to the router.
Note: For information about the antennas, see Attach the Antennas on page 15.
Attach the Antennas
The router comes with four antennas.
- One antenna is marked Ant 1 for the antenna post, which is marked Ant 1 on the right-side panel.
- Two antennas marked Ant 2 for the two antenna posts marked Ant 2 on the back panel.
- One antenna marked Ant 3 for the antenna post marked Ant 3 on the right-side panel.

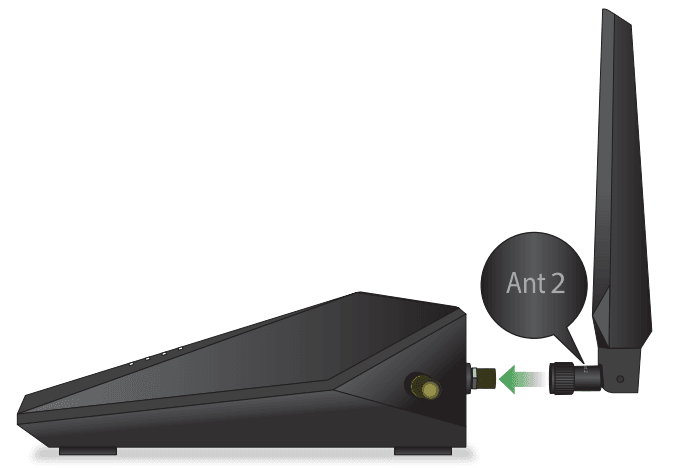
To attach the antennas:
- Align the antennas with the antenna posts on the router. Observe the markings on the antenna and on the antenna post. Connect each antenna to its corresponding antenna post. The antennas marked Ant 2 can be attached to either antenna post marked Ant 2 on the back panel.
- Attach the antennas on the threaded antenna posts.
- For the best WiFi performance, place the antennas in a vertical position, as shown in the previous figures.
Position Your Router
The router lets you access your network anywhere within the operating range of your WiFi network. However, the operating distance or range of your WiFi connection can vary significantly depending on the physical placement of your router. Position your router according to the following guidelines:
- Place your router near the center of the area where your computers and other devices operate, and within line of sight to your WiFi devices.
- Make sure that the router is within reach of an AC power outlet and near Ethernet cables for wired computers.
- Place the router in an elevated location, minimizing the number walls and ceilings between the router and your other devices
- Place the router away from electrical devices such as these:
- Ceiling fans
- Home security systems
- Microwaves
- Computers
- Bases of cordless phones
- 2.4 GHz and 5 GHz cordless phones
- Place the router away from large metal surfaces, large glass surfaces, insulated walls, and items such as these:
- Solid metal doors
- Aluminum studs
- Fish tanks
- Mirrors
- Brick
- Concrete surfaces
The following factors might limit the range of your WiFi:
- The thickness and number of walls the WiFi signal passes through.
- Other WiFi access points in and around your home might affect your router’s signal. WiFi access points are WiFi routers, WiFi repeaters, WiFi range extenders, and any other device that emits a WiFi signal for network access.
Connect to the Network and Access the Router
Connect to the Router Network
You can connect to the router network using a wired, WiFi, or WPS connection.
Note: If you set up your computer to use a static IP address, change the settings so that it uses Dynamic Host Configuration Protocol (DHCP). Connect to the router using a wired connection You can connect your computer to the router using an Ethernet cable and join the router’s local area network (LAN).
To connect your computer to the router with an Ethernet cable:
- Make sure that the router is receiving power (its Power LED is lit).
- Connect an Ethernet cable to an Ethernet port on your computer.
- Connect the other end of the Ethernet cable to an Ethernet port on the router. Your computer connects to the local area network (LAN).
Connect to the router’s WiFi network
You can connect WiFi-enabled devices to the router’s WiFi network using the router’s WiFi network name and password.
To connect to the WiFi network:
- Make sure that the router is receiving power (its Power LED is lit).
- On your WiFi-enabled device, open your device’s WiFi network management settings.
- Find and select the router’s WiFi network name (SSID). The router WiFi network name (SSID) is on the router label.
- Enter the router network key (password). The router network key (password) is on the router label. Your device connects to the WiFi network.
WiFi Connection Using WPS
You can connect to the router’s WiFi network with Wi-Fi Protected Setup (WPS) or you can find and select the WiFi network.
To use WPS to connect to the WiFi network:
- Make sure that the router is receiving power (its Power LED is lit).
- Check the WPS instructions for your computer or mobile device.
- Press the WPS button on the router.
- Within two minutes, on your computer or mobile device, press its WPS button or follow its instructions for WPS connections. Your computer or mobile device connects to the WiFi network.
Types of Logins
Separate types of logins serve different purposes. You must understand the difference so that you know which login to use and when. Several types of logins are associated with the router:
- ISP login. The login that your ISP gave you logs you into your Internet service. Your service provider gave you this login information in a letter or some other way. If you cannot find this login information, contact your service provider.
- WiFi network key or password. Your router is preset with a unique WiFi network name (SSID) and password for WiFi access. This information is on the router label.
- Router login. This logs you into the router web interface from a web browser as admin.
Use a Web Browser to Access the Router
When you connect to the network (either with WiFi or with an Ethernet cable), you can use a web browser to access the router to view or change its settings. When you access the router, the software automatically checks to see if your router can connect to your Internet service.
Automatic Internet Setup
You can set up your router automatically, or you can use a web browser to access the router and set up your router manually. Before you start the setup process, get your ISP information and make sure that the computers and devices in the network are using the settings described here.
When your Internet service starts, your Internet service provider (ISP) typically gives you all the information needed to connect to the Internet. For DSL service, you might need the following information to set up your router:
- The ISP configuration information for your DSL account
- ISP login name and password
- Fixed or static IP address setting (special deployment by ISP; this setting is rare)
If you cannot locate this information, ask your ISP to provide it. When your Internet connection is working, you no longer need to launch the ISP login program on your computer to access the Internet. When you start an Internet application, your router automatically logs you in.
Note: During the setup process with the installation assistant, after you are connected to the Internet, you are prompted to register your product with NETGEAR. If you already have a NETGEAR account, you can use your existing account. If you do not yet have a free NETGEAR account, you can create one.
Specify Your Internet Settings
Use the Internet Setup Wizard
You can use the Setup Wizard to detect your Internet settings and automatically set up your router. The Setup Wizard is not the same as the pages that display the first time you connect to your router to set it up.
To use the Setup Wizard:
- Launch a web browser from a computer or mobile device that is connected to the router network.
- Enter http://www.routerlogin.net. A login window opens.
- Enter the router admin username and password. The user name is admin. The password is the one that you specified the first time that you logged in. The username and password are case-sensitive.
The Dashboard displays. - Select Settings > Setup > Setup Wizard. The Setup Wizard page displays.
- Select the Yes radio button. If you select the No radio button, after you click the Next button, you are taken to the Internet Setup page (see Manually Set Up the Internet Connection on page 27).
- Click the Next button. The Setup Wizard searches your Internet connection for servers and protocols to determine your Internet configuration.
Manually Set Up the Internet Connection
You can view or change the router’s Internet connection settings. Specify an Internet Connection Without a Login. To specify the Internet connection settings:
- Launch a web browser from a computer or mobile device that is connected to the router network.
- Enter http://www.routerlogin.net. A login window opens.
- Enter the router admin username and password. The user name is admin. The password is the one that you specified the first time that you logged in. The username and password are case-sensitive.
The Dashboard displays. - Select Settings > Setup > Internet Setup. The Internet Setup page displays.
- The Does your Internet connection require a login? section, leave the No radio button selected.
- If your Internet connection requires an account name or hostname, click the Edit button in the Account Name section and enter the account name.
- If your Internet connection requires a domain name, type it in the Domain Name (If Required) field. For the other sections on this page, the default settings usually work, but you can change them.
- Select an Internet IP Address radio button:
- Get Dynamically from ISP. Your ISP uses DHCP to assign your IP address. Your ISP automatically assigns these addresses.
- Use Static IP Address. Enter the IP address, IP subnet mask, and the gateway IP address that your ISP assigned. The gateway is the ISP router to which your router connects.
- Select a Domain Name Server (DNS) Address radio button:
- Get Automatically from ISP. Your ISP uses DHCP to assign your DNS servers. Your ISP automatically assigns this address.
- Use These DNS Servers. If you know that your ISP requires specific servers, select this option. Enter the IP address of your ISP’s primary DNS server. If a secondary DNS server address is available, enter it also.
- Select a Router MAC Address radio button:
- Use Default Address. Use the default MAC address.
- Use Computer MAC Address. The router captures and uses the MAC address of the computer that you are now using. You must use the one computer that the ISP allows.
- Use This MAC Address. Enter the MAC address that you want to use.
- Click the Apply button. Your settings are saved.
- Click the Test button to test your Internet connection. If the NETGEAR website does not display within one minute, see You Cannot Access the Internet on page 221.
Optimize Gaming and Customize the Quality of Service Settings
View the Automatically Generated Ping Graph for a Connection
By default, the Auto Ping Host option is enabled. That means that for a connection between your device and another device, a ping graph is automatically generated, showing the connection quality. For more information about the Auto Ping Host option, see Manage the Geo-Filter Map Settings on page 57. To view the automatically generated ping graph for a connection:
- Launch a web browser from a computer or mobile device that is connected to the router network.
- Enter http://www.routerlogin.net. A login window opens.
- Enter the router admin username and password. The user name is admin. The password is the one that you specified the first time that you logged in. The username and password are case-sensitive.
The Dashboard displays. - Select Geo-Filter. The page that displays shows a map. A ping graph automatically displays when you are in a game. Otherwise, you can manually click any icon on the map to load a ping graph for that connection. In the Auto Ping pane, the following information displays for the connection:
- Ping. The connection quality from your device to the device at the other end of the connection. The connection quality is measured in milliseconds (ms). The lower the value in ms, the better:
- 50 ms or lower. Very good for online gaming.
- 50 ms–100 ms. Good for online gaming.
- 100 ms–150 ms. Acceptable for online gaming.
- 150 ms or higher. Unfavorable for online gaming.
- Ping. The connection quality from your device to the device at the other end of the connection. The connection quality is measured in milliseconds (ms). The lower the value in ms, the better:
- Host Tick Rate. The number of packets sent per second from the host of your game (usually a server) to you. The higher the tick rate, the better.
- Client Tick Rate. The number of packets per second that your device is sending to the host of your game.
- Send Rate. The amount of data per second that the host of your game sends to your device.
- Receive Rate. The amount of data per second that your device is sending to the host of your game.
Add a Device to the Geo Filter
You can add a device to the Geo-Filter. To add a device to the Geo-Filter:
- Launch a web browser from a computer or mobile device that is connected to the router network.
- Enter http://www.routerlogin.net. A login window opens.
- Enter the router admin username and password. The user name is admin. The password is the one that you specified the first time that you logged in. The username and password are case-sensitive.
The Dashboard displays. - Select Geo-Filter. The page that displays shows a map.
- Click the ADD DEVICE button. The Add Device window opens and displays the detected devices.
- Select your device.
- Click NEXT.
- Select a game. If your device is a console, console services display. If your device is not a console, non-console services display.
- Click NEXT: If your device is a console, filtering mode is enabled for the device, which means that the router blocks connections outside your distance radius to force your device to use a host or server inside your radius. We recommend this setting for console games. If your device is a not console, filtering mode is disabled for the device, which means that the router does not block connections outside of your distance radius. We recommend this setting for most computer games that don’t require filtering.
- Either override the suggested filter mode or click the CONTINUE button. Your device is added.
- Click the FINISH button. The Add Device window closes.
Note: For information about using the device with the Geo-Filter, see Use the Geo-Filter by Setting Your Home Area and the Distance Radius on page 46 or Use the Geo-Filter by Drawing Areas on page 49.
Ping Game Servers and Track Pings Over Time
You can ping the servers for your favorite games to determine the best servers to connect to and the ones to avoid. For each server for a specific game, your connection quality is displayed on a world map. You can also build a ping history for your favorite servers so that you can monitor the quality of the servers you play on over time. This information can help you define your Geo-Filter settings so that you can play on the best (lag-free) servers and block servers with poor connections. For more information, see Decrease lag by Using the Geo Filter on page 46.
Ping Game Servers for a Specific Game
You can ping the game servers for a specific game to determine the best servers to connect to for that game. You can also schedule a ping to occur on a regular basis for a selected server, enabling the router to establish a ping history for the server and allowing you to track pings over time. You can assemble your own custom lists of servers so that the router can ping them as a group, separately from the game-based lists they came from. You can also track a server separately from other game servers. To ping game servers for a specific game and add a server to a custom ping list:
- Launch a web browser from a computer or mobile device that is connected to the router network.
- Enter http://www.routerlogin.net. A login window opens.
- Enter the router admin username and password. The user name is admin. The password is the one that you specified the first time that you logged in. The username and password are case-sensitive.
The Dashboard displays. - Select Ping Heatmap. The page that displays shows a map.
- From the Select Ping Target menu, select a game. If your game is not listed, you can add a custom ping list (see Add a Custom Ping List on page 78). The detected servers display on the map, with the ping time in ms listed above each server. Green indicates servers with the best connection time, yellow with a moderate connection time, and red with the worst connection time. A collection of servers might display as a cluster, which you can expand by clicking on the cluster. Tip: If the map view is too small, increase the size of the map. You can do so by using your mouse or by moving the vertical slider up in the direction of the + sign. To move the map to the continent in which the best servers are located, click and hold the map and then move it with your mouse. If you schedule ping tracking (see Step 9), you can select a time span from the Slider Timespan menu to the right below the map and move the slider below the map to view a specific period within the selected period. Doing so lets you compare the pings to the servers for the game over time.
- To manually ping the servers again for the same game, click the PING AGAIN button. The information on the map is updated. By default, manual pings are saved in the ping history.
- To view information about one server and open the ping history pane for that server, do one of the following.
- Use the map. On the map, click the server. At the bottom of the page, the ping history pane opens, displaying information about the server.
- Use the menu. Do the following:
- To the right of the colored bar above the map, click the menu icon. A pane with the IP addresses displays. These are the IP addresses of all servers that were pinged for the specific game.
- Click the IP address of the server. At the bottom of the page, the ping history pane opens, displaying information about the server.
- To close the pane with IP addresses, click the > button. The ping history pane shows the current ping time for the server. If you pinged the server before, the pane shows the average ping time, indicated by the dotted line, and the current ping time, indicated by a white arrow at the right. You can select a time span from the Slider Timespan menu to the right below the map and move the slider below the map to view a specific period within the selected period. Doing so lets you compare the pings to the specific server over time.
- To add the server on the ping history pane to an existing or new custom ping list, do one of the following:
- Add the server to an existing custom ping list. Do the following:
- Click the ADD TO LIST button.
The Add to Lists window opens and shows the list names that you already added (see Add a Custom Ping List on page 78). - Select the check box for a list.
- Click the SAVE button.
The server is added to the existing list.
- Click the ADD TO LIST button.
- Add the server to a new custom ping list. Do the following:
- Click the ADD TO LIST button. The Add to Lists window opens.
- Click the ADD NEW LIST button The Custom List window opens.
- Type a name for the list. The name helps you to identify the list. ADDRESS button is not relevant in this task. For more information about this button, see Add a Custom Ping List on page 78.
- To allow the router to schedule pings, click the clock icon. In the Tracking window that displays, from the menu at the top, select how often the router must ping the server. Then, select the days on which the router must ping the server. Finally, click the DONE button.
- Click the SAVELIST button. The Add to Lists window displays again.
- Select the check box for the list that you just added.
- Click the SAVE button. The server is added to your new list.
- Add the server to an existing custom ping list. Do the following:
- To schedule pings for the servers for the same game so you can track the pings over time, do the following:
- Above the map, click the clock icon. The Tracking window opens.
- From the menu at the top, select how often the router must ping the servers.
- Select the days on which the router must ping the servers.
- Click the SAVE button. The pings are scheduled. Next to the clock icon, the time of the next scheduled ping is shown. For information about viewing the ping history, see View the Ping History for One or More Servers for a Specific Game on page 80.
Troubleshooting
Quick tips
This section describes tips for troubleshooting some common problems. Sequence to restart your network If you must restart your network, follow this sequence:
- Turn off and unplug the modem.
- Turn off the router.
- Plug in the modem and turn it on. Wait two minutes.
- Turn on the router and wait two minutes.
Check the power adapter and Ethernet cable connections
If the router does not start, make sure that the power adapter cable is securely plugged in. If the Internet connection or LAN connections do not function, make sure that the Ethernet cables are securely plugged in. The Internet LED on the router is lit if the Ethernet cable connecting the router and the modem is plugged in securely and the modem and router are turned on. If one or more powered-on computers are connected to the router by an Ethernet cable, the corresponding numbered router LAN port LEDs light.
Check the Network Settings
Be sure that the network settings of your device are correct. Wired devices and devices that are connected over WiFi must use network IP addresses on the same network as the router. The simplest way to do this is to configure each device to obtain an IP address automatically using DHCP. Some service providers require you to use the MAC address of the device that was initially registered on the account. You can view the MAC address on the Device Manager page (see View and Manage Devices Currently on the Network on page 83).
Check the WiFi Settings
Be sure that the WiFi settings in your device and the router match exactly. The WiFi network name (SSID) and WiFi security settings of the router and WiFi computer must match exactly.
Troubleshoot With the LEDs
By default, the router is set with standard LED settings. If you changed the standard LED settings and want to troubleshoot with the LEDs, change the LED settings back to the standard LED settings (see Turn of the Router LEDs on page 168). Standard LED Behavior When the Router Is Powered On After you turn on power to the router, verify that the following sequence of events occurs:
- When power is first applied, verify that the Power LED is lit.
- After about two minutes, verify the following:
- The Power LED is solid white.
- The Internet LED is solid white.
- The WiFi LED is solid white unless you turn off the WiFi radios.
For more manuals by NETGEAR, visit ManualsLibraryy
NETGEAR XR1000 Nighthawk Pro Gaming WiFi 6 Router-FAQs
How fast is the Nighthawk XR1000 router?
The XR1000 delivers ultra-fast speeds over 1Gbps, ideal for 4K/8K streaming, VR/AR gaming, and more, with strong, reliable WiFi coverage both indoors and outdoors.
What do the two buttons on the Nighthawk router do?
The WiFi button toggles the wireless signal on or off, and the WPS button lets you connect devices to your network securely without entering a password.
How far does the Nighthawk router’s signal reach?
Depending on the model, Nighthawk routers can cover up to 2,500 sq. ft., supporting dozens of connected devices with stable performance.
What is a gaming router used for?
Gaming routers like the XR1000 prioritize gaming traffic, reduce lag, and provide a stable connection for smoother online gameplay.
How many devices can the Nighthawk XR1000 handle?
The XR1000 supports up to 25 connected devices, maintaining high speeds and low latency even during heavy usage.
What does router mode mean on the Nighthawk?
In router mode, the device controls your entire network. In AP (Access Point) mode, it extends an existing WiFi network, acting as a signal booster.
What is a dual-band router?
A dual-band router uses two frequency bands — 2.4GHz for long-range and 5GHz for faster speeds — giving you more flexibility and reducing interference.
Is the XR1000 good for gaming?
Yes. The XR1000 is designed for gamers, offering up to 93% ping reduction, low latency, and advanced features for a superior gaming experience.

