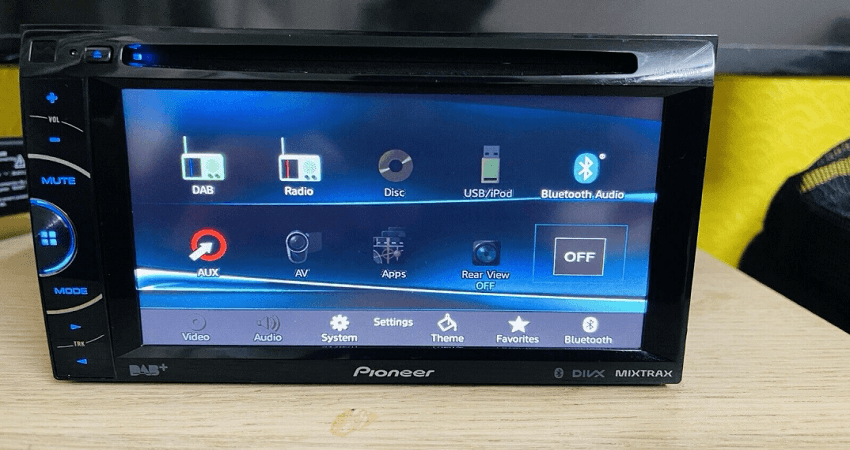
Pioneer AVH-200BT Multimedia DVD Car Stereo
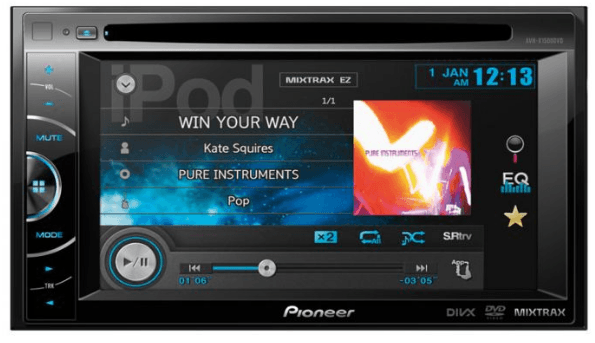
Head unit
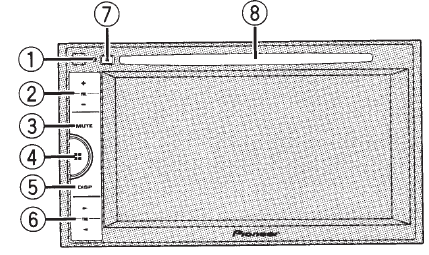
- RESET
For details refer to Resetting the microprocessor on page 34. - +/- (VOLUME/VOL)
- MUTE
Press to mute. Press again to unmute. - Home button
Displaying the home display. - DISP
Turn the information display off.  (TRK)
(TRK) (eject)
- Disc loading slot
Home display
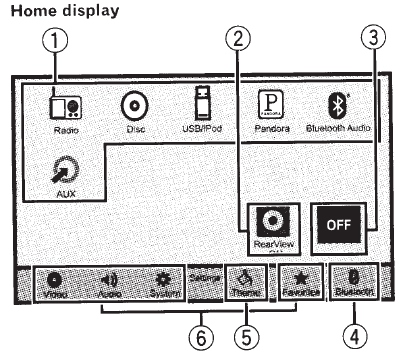
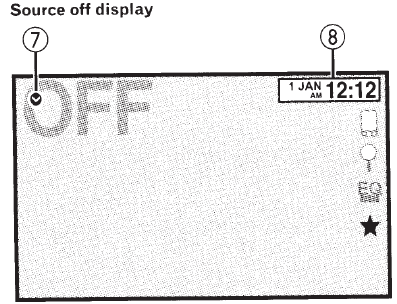
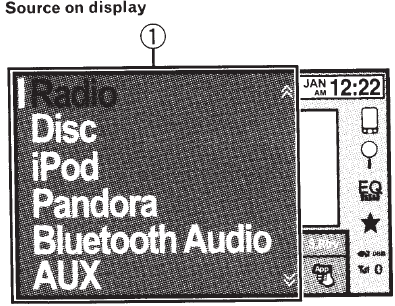
- Source icon
Selecting a favorite source. When the source 1con is not displayed. 1t can be displayed by pressing the home key or touching it .
. - Rearview key
Displaying the rear view image. For details refer to Using the Rear view on page 7. - Source off key
Turning the source off. - Bluetooth key
Displaying the Bluetooth connect1on menu. - Theme key
Displaying the Theme menu. - Menu icon
Displaying the menu. - Source key
Displaying the source menu. - Clock key
Switching to clock adjustment display.
Selecting a source
Availab le source modes
- Radio- Radio tuner
- Disc- Built-in DVD and CD player
- USB. iPod. or USB MTP- USB/i Pod / MTP
- Pandora- Pandora® internet radio
- Bluetooth Audio – Built-in Bluetooth aud1o (AV H-200BT)
- AUX- AUX
Selecting a source
Using the touch panel keys on the home display
- Touch the source icon and then touch the desired source name.
- When the source icon 1s, is not displayed. 1t can be displayed by touching the screen.
- While operating the menu. you cannot select a source by touching the source icon.
Adjusting the volume
- Press+/- (VOLUME/VOL) to adjust the volume.
Optional remote control
The remote control CD-R33 is sold separately. For details concerning operations, see their mote control manual.
Common operations
Operating the scroll icon and the scrubber bar
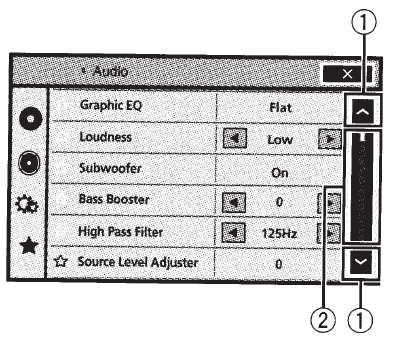
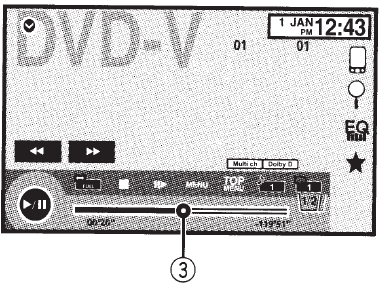
- Scroll icon
It appears when selectable items are hidden. Touch the scroll icon to view any hidden items. - Scrubber bar
It appears when items cannot only be displayed on a single page. Drag the scrubber bar to view any h hidden items Also, you can drag the list to view any hidden items. - Playback point
Specify the playback point Drag the playback point on the screen.
Activating the touch panel keys
Touch panel keys
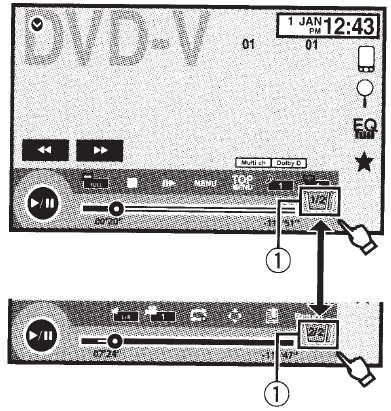
- Tab key
Switching the touch panel keys on the display.
Using the rear view
A rearview camera sold separately is required for using the rear view mode. The be lo w functions are available.
- Rear view camera
This unit can be set to display the rear view image automatically when you move the shift lever to the REVERSE (R} position. - Camera for rear view mode
The rear view can be turned on to display at all times. The rearview camera needs to be set to a setting other than Off to turn on rear view mode.
Using the rear monitor
Connecting a rear monitor, sold separately, to this unit allows images and videos to be viewed from the rear seats.
Tuner
Tuner operations
Touch panel keys
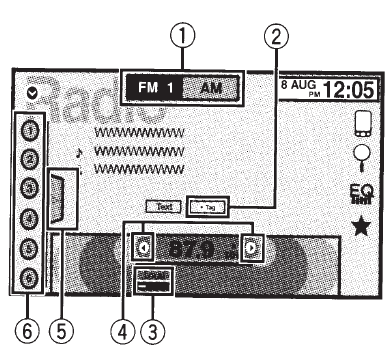
- Band key
Selecting a band (FM1. FM2 or FM3) by touching the left icon. Switch to the AM band by touching the right icon. The icon for the selected band is highlighted. - Tag key
Saving song information (tag) from the broadcasting station to your iPod. - local key
Setting the local seek level. - Tuning key
Tuning up or down manually. Touch and hold down for more than two seconds to skip stations. Seek tuning starts as soon as you release. Touch again to cancel seek tuning. - list key
Displaying the preset channel list. - Preset channel key
Selecting a preset channel.
Basic operations
Switching the preset enables using the buttons
- Press
 (TRK).
Seek tuning using the buttons
- Press and hold
 (TRK).
Storing and recalling stations
You can easily store up to six stations for each band as presets.
- Display the preset screen.
Refer to Tuner operations on page 9. The preset screen appears 1n the d1splay. - Touch and hold down one of the preset tuning keys to store the selected frequency in the memory. The selected radio station frequency has been stored in the memo1y
- Touch the appropriate preset tuning key to select the desired station.
Storing the strongest stations
BSM (best stations memory) automatically stores the six strongest stations in the order of their signal strength. Storing broadcast frequencies with BSM may replace broadcast frequencies you have saved using the preset tuning keys.
Tuner
- Display the preset screen.
Refer to Tuner operations on page 9. The preset screen appears m the display. - Touch BSM to turn BSM on.
The six strongest broadcast f requenc1es will be stored under preset tuning keys in order of their signal strength. To cancel the storage process. touch Cancel.
Disc (CD/DVD)
Introducing movie operations
You can use this unit to view OVD/ DVD-R/DVORW/ CD/ CD-R/CD -RW movie files.
Touch panel keys
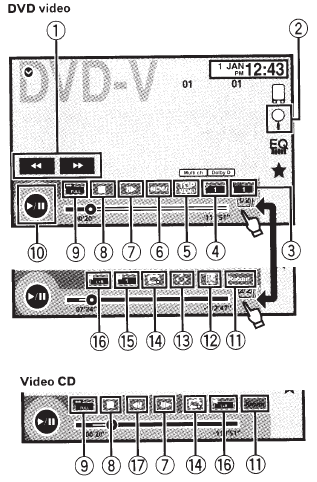
When playing a disc containing a mixture of various media file types
- Fast forward key/Reverse key
Fast forward mg or reversing Touch to change the fast to forward and reverse speed. - Search key
Starting the search function. - Switch subtitle language key
With OVDs/ OivX files featuring multi-subtitle recordings. you can switch between subtitle language and playback. - Switch audio language key
With OVOs/ D1vX files that provide audio playback in different languages and different audio systems (Dolby® Dig ital. DTS. etc.) . you can switch between languages/audio systems during playback. Depending on the setting. the v1deo may not be played back with the audio system used to record the OVO. - TOP MENU key
Returning to the top menu during OVO playback. - MENU key
Displaying the DVO menu during OVO playback. Slow-motion playback key Moving the selection ahead one frame at a time during playback. Touch and hold down the key for more than two seconds to slow down the playback speed. Touching the key increases the playback speed over four incremental settings during slow-motion playback from DVO v ideo/Video CO. - Stop key
Stopping playback. If you resume playback, playback will start from the point where you stopped. Touch the key again to stop playback completely. - Screen mode key
Changing the screen mode. Refer to Changing the wide-screen mode on page 8. - Pause and play key
Pausing playback. Returning to normal playback during the pause. stopped slow motion or frame-by-frame playback. - Return key
Returning to the specified scene to which the OVO currently being played has been pre-programmed to return. This function cannot be used if a specified scene has not been preprogrammed on the OVO disc. - Bookmark key
During playback. touch the point at which you want to resume playback the next time the disc is loaded.- You can set one bookmark per OVO video. You can set up to f iv e bookmarks total.
- To clear the bookmark on a disc. touch and hold the key during the playback.
- The oldest bookmark is replaced by the new one.
- Arrow key
Displaying arrow keys to o per at e the OVO menu. - Repeat key
Selecting the repeat range. - Viewing angle key
With OVOs featuring multi-angle (scenes shot from multiple angles) recordings, you can switch between viewing angles during playback. - Audio output key
Switching the audio output. when playing video discs recorded with LPCM aud 1o. - Slow key
Speeding down the playback speed in four steps, during slow motion playback on video CD.- There is no sound during slow-motion playback.
- Images during slow-motion playback may be unclear for some discs.
- Reverse slow-motion playback is not available.
- Media key
Switching between media file types to play on OVD/CO.
Sound playback operations
You can use this unit to listen to DVD-R/DVD-RW/ CD/CD-R/ CD-RW sound files.
Touch panel keys
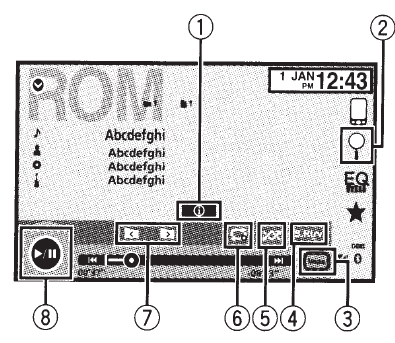
- Information key
Switching the text information to display on this unit when playing MP3/WMNAAC files. - Search Key
Displaying a list of track titles/ file names to select songs on a CD. Displaying the file name li st to select the files. - Media key
Switch1ng between me dia fi le t y pes on a DVD or CD. - Sound retriever key
Refer to Using Sound Retriever on page 7. - Random key
Playing songs in random order. - Repeat key
Selecting the repeat ra ng e. - Previous folder key/Next folder key
Selecting a folder. - Pause and play key
Pausing and starting playback.
Switching the media file type
When playing digital media containing a mixture of various med1a f1le types. su ch as DivX. M PEG- 1. MPEG-2, MPEG-4 and MP3. you can switch between media file types to play.
- Touch Media to switch media file types.
CO-DA (audio data)-Music/ROM (compressed audio) – Video (O DivX. M PEG- 1. MPEG-2. MPEG-4 vide o files)
Random play (shuffle)
- Touch the random key.
- On-Playback files in random order with Ill the repeat range. Folder and Disc.
- Off-Cancel random play.
Repeating playback
- Touch the repeat key.
- Disc- Play through the current disc
- Chapter – Repeat the current chapter·
- Title- Repeat the current title
- Track- Repeat the current track
- File- Repeat the current file
- Folder- Repeat the current folder
- Disc/All- Repeat all fries in the current disc
- All- Repeat all files
USB
Touch panel keys
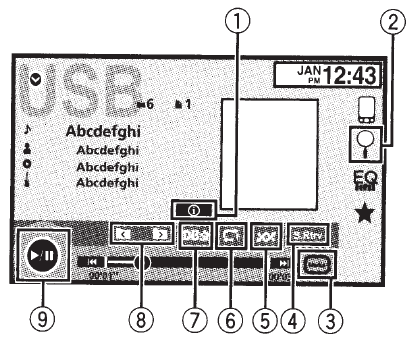
- Information key
Switching the text information to display on this unit when playing M P3/ WMNAAC/WAV files. - Search Key
Displaying the file name list to select the files. - Media key
Switching between media file types to play on USB - Sound retriever key
Refer to Using Sound Retriever on page 7. - Random key
Playing songs in random order. - (DB key
Creating a database that enables searches by artist name, genre, and other options. Refer to Music browse mode on page 17. - Previous folder key/Next folder key
Selecting a folder. - Pause and play key
Pausing and starting playback.
Bluetooth telephone
Calling a number in the phone book
The contacts on your phone will normally be transferred automatically when the phone is connected. If it is not. use your phone menu to transfer the contacts. The visibility of this unit should be on when you use the phone menu. Refer to the Switching visible unit on page 33. After finding the number you want to call in the phone book, you can select the entry and make the call.
- Touch the phone book key to switch to the phone book mode.
- Select the phone number list.
The detailed phone number list of the selected entry is displayed. - Select the phone number.
- If you want to store the phone number. touch and hold the list.
- Touch the off-hook key to make the call. Touch the on-hook key to end the call.
Setting up the video player
Setting the subtitle language
You can set a desired subtitle language. When available, the subtitles will be displayed in the selected language.
- Press the home button to switch to the home display.
- Touch the video setup key to open the video setup menu.
- Touch Subtitle Language on the Video Setup menu. A subtitle language menu is displayed.
- Touch the desired language. The subtitle language is set.
Setting the multi-angle DVD display
The angle icon can be set so it appears on scenes where the angle can be switched.
- Press the home button to switch to the home display.
- Touch the video setup key to open the video setup menu.
- Touch Multi Angle on the Video Setup menu to turn the angle icon display on or off.
Setting the aspect ratio
There are two kinds of display: a widescreen display that has a width-to-height ratio (TV aspect ratio) of 16:9. and regular display that has a TV aspect of 4: 3. Be sure to select the correct TV aspect for the display connected to V OUT.
- When using the regular display. select either Letter Box or Pan Scan. Selecting 16:9 may result in an unnatural picture.
- If you select the TV aspect ratio. The unit’s display will change to the same setting.
System settings
Switching the auxiliary setting
Activate this setting when using an auxiliary device connected to this unit.
- Press the home button to switch to the home display.
- Touch the system key to open the system menu.
- Touch AUX Input on the system menu to turn AUX Input on or off.
Changing the picture adjustment {Brightness, Contrast, Color, Hue, Dimmer and Temperature)
You can adjust the Brightness (brightness) and contrast (contrast). Color (color) , Hue (hue), Dimmer (dimmer). and Temperature (temperature) for each source and rearview camera.
- You cannot adjust the color and Hue for the audio source.
- Press the home button to switch to the home display.
- Touch the system key to open the system menu.
- If you are adjusting the Picture Adjustment, select the unit.
For more manuals by Pioneer visit, ManualsLibraryy
Pioneer AVH-200BT Multimedia DVD Car Stereo-FAQs
How do I connect my DVD player to external speakers?
Use RCA stereo cables to connect the AUDIO OUT jacks on the DVD player to the AUDIO INPUT jacks on your speaker system, typically found on the back of the subwoofer.
Where can I find my 4-digit radio code?
Check the glovebox or vehicle handbook under the stereo or security section. The code may also be printed on a small card inside the handbook.
How do I reboot my car stereo?
Press and hold the power button for at least 10 seconds. Alternatively, use a paperclip or pen to press the system reset button, often a small hole near the volume knob.
Where is the reset button on a Pioneer radio?
It is usually a small hole on the front panel, behind the removable faceplate, or under a rubber flap below the touchscreen.
What is PCM on a Pioneer receiver?
PCM (Pulse-Code Modulation) is a method of converting analog audio into digital audio, differing from Dolby Digital, which is a compressed audio format.
How do I connect my phone to my car stereo?
Use an AUX cable to connect your phone’s headphone jack to the stereo’s AUX input. Then, select the AUX input using the “Input” or “Source” button on your stereo.
How do I clear Bluetooth memory on my stereo?
Go to your Android device’s Settings > Apps > Show System Apps > Bluetooth > Storage, then tap “Clear Cache” to remove saved connections.
Can I use Bluetooth and Android Auto at the same time?
Yes, but Bluetooth is only used for phone calls while Android Auto is active. For streaming music and navigation, you need a Wi-Fi connection or mobile data.
Why is my DVD player not producing sound?
Ensure your TV or stereo is set to the correct input, is not muted, and has the volume at an audible level. Try playing a different disc to rule out disc issues.

