
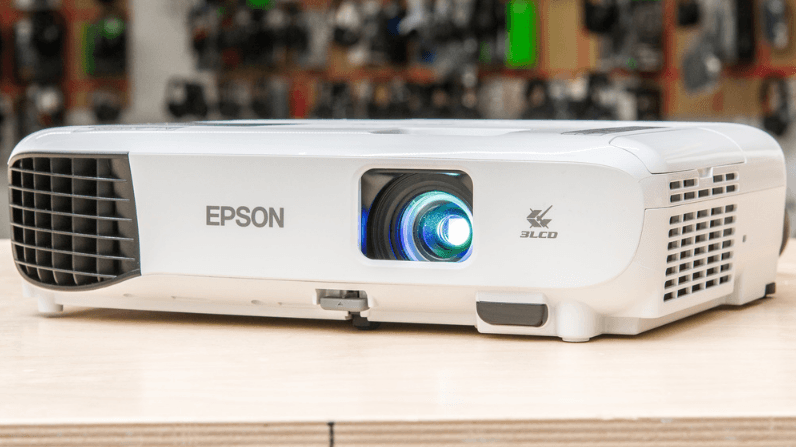
Epson VS260 3-Chip 3LCD XGA Projector
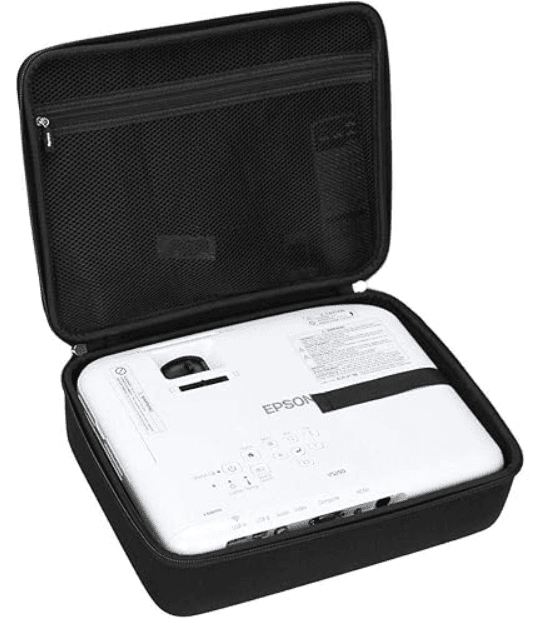
Product Box Contents
Save all the packaging in case you need to ship the projector. Always use the original packaging (or equivalent) when shipping
Make sure your projector boxes include all of these parts:

- Projector
- Remote control
- Remote control batteries (two AA alkaline)
- Power cord
- Soft carrying case (not available with VS260)
Note: French control panel stickers are included for Canada.
Additional Components
Depending on how you plan to use the projector, you may need to obtain additional components.
Note: To connect a Mac that does not include a compatible video output port, you need to obtain an adapter that allows you to connect to an input port on the projector. Contact Apple for compatible adapter options. To connect a smartphone or tablet, you may need to obtain an adapter that allows you to connect to the projector. This allows you to mirror your smartphone or tablet screens, watch movies, and more. Contact your device manufacturer for compatible adapter options.
Unless listed as available from Epson in this table, see your local computer or electronics dealer for purchase information.


Additional Projector Software and Manuals
After connecting and setting up the projector, install the projector software as necessary. You may need to install it from a software CD, if included, or download the software and manuals as necessary.
You can install the projector software programs listed here and view their manuals for instructions on using them.
Note: If you still need help after checking this manual and the sources listed here, you can use the Epson PrivateLine Support service to get help fast (U.S. and Canada only). For details, see “Where to Get Help.”
Note: Software not available for EX3280/VS260.
Projector Software
Epson Projector Management (Windows only)
Manual
Epson Projector Management Operation Guide
Description
Lets you update firmware and monitor and control your projector through the network.
You can download the latest software and documentation from the Epson website. Go to epson.com/support (U.S.) or epson.ca/support (Canada) and select your projector.
Projector Software
Epson iProjection (Windows/Mac)
Manual
Epson iProjection Operation Guide (Windows/Mac)
Description
Lets you project the computer screens of users over a network.
You can download the latest software and documentation from the Epson website. Go to epson.com/support (U.S.) or epson.ca/support (Canada) and select your projector.
Projector Software
Epson iProjection app
Manual
Instructions are included with the app (instructions included with the app available only in English)
Description
Let’s you project from an iOS device, an Android device, or a Chromebook if your projector is connected to a network that includes a wireless access point.
Visit epson.com/iprojection (U.S.) or epson.ca/iprojection (Canada) for more information. (Software available only in English.)
Manual
Open Source Software License
Description
You can download this document from the Epson website. Go to epson.com/support (U.S.) or epson.ca/support (Canada) and select your projector. (Document available only in English.)
Optional Equipment and Replacement Parts
You can purchase screens, other optional accessories, and replacement parts from an Epson authorized reseller. To find the nearest reseller, call 800-GO-EPSON (800-463-7766) in the U.S. or 800-807-7766 in Canada. Or you can purchase online at epsonstore.com (U.S. sales) or epsonstore.ca (Canadian sales).
Note: Availability of accessories varies by country.
Epson offers the following optional accessories and replacement parts for your projector:

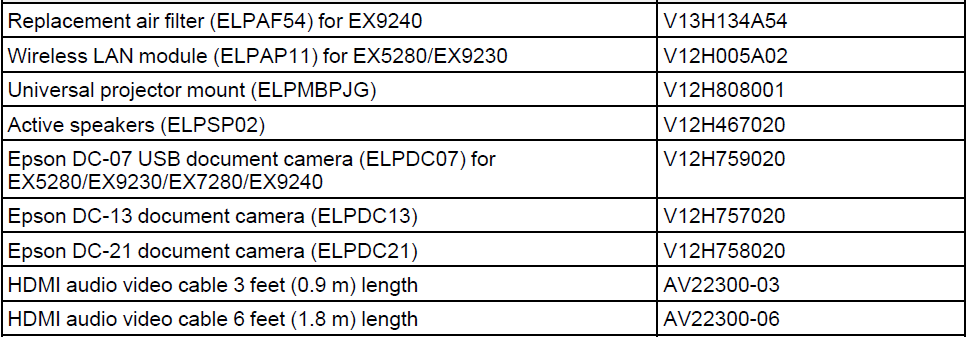
In addition to the accessories listed above, 1-year and 2-year extended service plans are available.
Warranty and Registration Information (U.S. and Canada)
Your projector comes with a basic warranty that lets you project with confidence. For details, see the warranty brochure that came with your projector.
Note: Availability varies by region.
Register your product online at this site: epson.com/webreg
Registering also lets you receive special updates on new accessories, products, and services.
Notations Used in the Documentation
Follow the guidelines in these notations as you read your documentation:
- Warnings must be followed carefully to avoid bodily injury.
- Cautions must be observed to avoid damage to your equipment.
- Notes contain important information about your projector.
- Tips contain additional projection information.
Where to Go for Additional Information
Need quick help on using your projector? Here’s where to look for help:
- Built-in help system
Press the Home button on the remote control, select Help, and press Enter to get quick solutions to common problems. - epson.com/support (U.S.), epson.ca/support (Canada), or latin.epson.com/support (Caribbean)
View FAQs (frequently asked questions) and email your questions to Epson technical support 24 hours a day. - If you still need help after checking this manual and any other sources listed here, you can use the
Epson PrivateLine Support service to get help fast (U.S. and Canada only). For details, see “Where to Get Help.”
Projector Part Locations
Check the projector part illustrations to learn about the parts of your projector.
- Projector Parts – Front/Top
- Projector Parts – Rear
- Projector Parts – Base
- Projector Parts – Control Panel
- Projector Parts – Remote Control
Parent topic: Introduction to Your Projector
Projector Parts – Front/Top
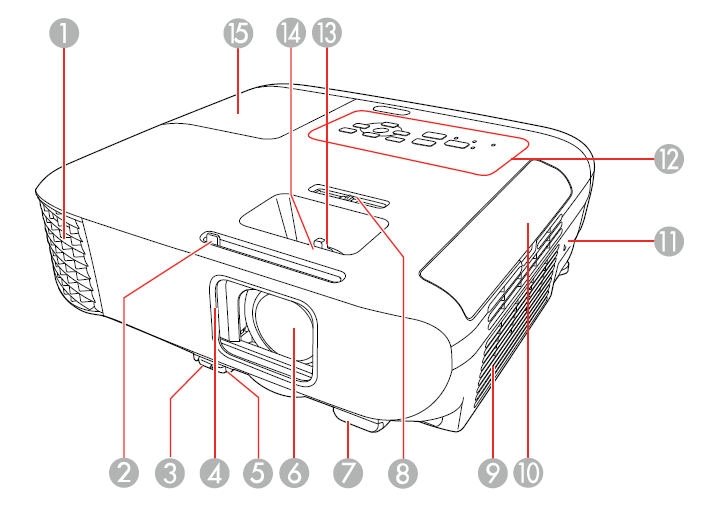
- Exhaust vent
- A/V Mute slide lever (EX5280/EX9230/EX7280/EX9240)
- Foot release lever
- Lens cover
- Front adjustable foot
- Lens
- Remote control receiver
- Horizontal keystone slider (EX5280/EX9230/EX7280/EX9240)
- Air filter/intake vent
- Air filter cover
- Kensington security lock slot
- Control panel
- Zoom ring (EX5280/EX9230/EX7280/EX9240)
- Focus ring
- Lamp cover
Projector Parts – Rear
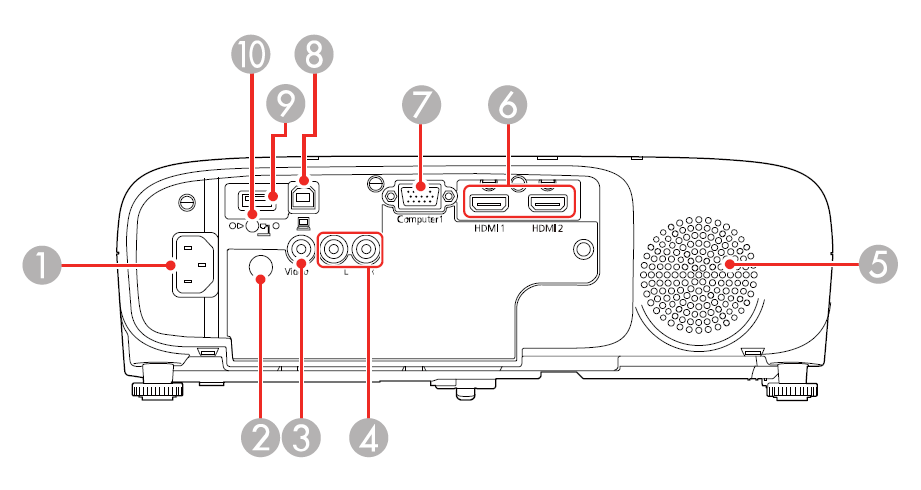
- AC input
- Remote receiver
- Video port (EX5280/EX9230/EX7280/EX9240)
- L and R audio ports (EX5280/EX9230/EX7280/EX9240)
- Speaker
- HDMI ports
- Computer port
- USB-B port
- USB-A port (EX5280/EX9230/EX7280/EX9240)
- Wireless LAN module cover screw (EX5280/EX9230)
Note: The availability of some ports depends on your projector model.
Projector Parts – Base
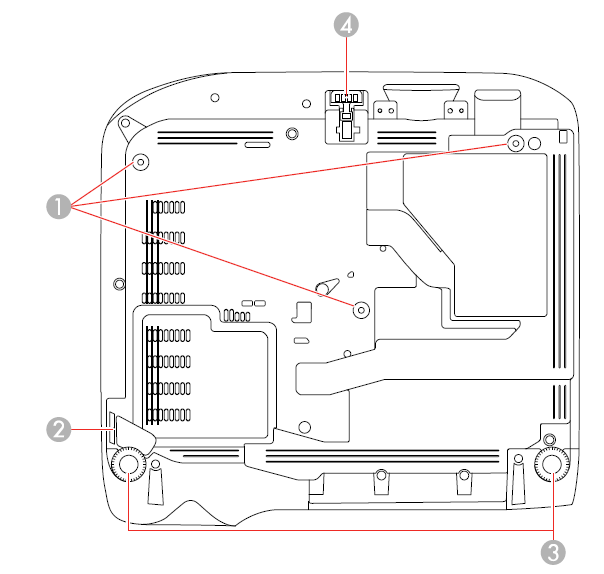
- Ceiling mount holes (3)
- Security cable attachment point
- Rear feet
- Front adjustable foot
Note: Use M4×9mm screws for mounting the projector.
Projector Parts – Control Panel
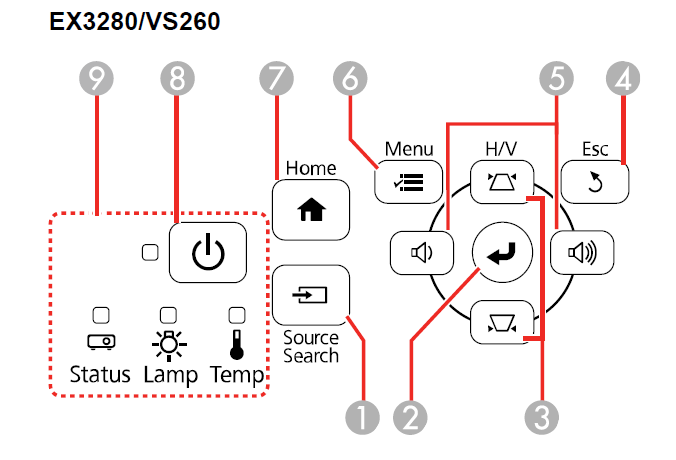
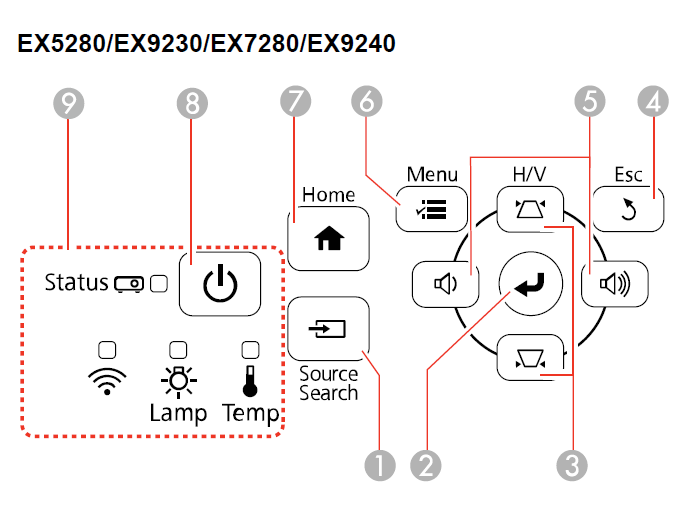
- Source Search button (searches for connected video sources)
- Enter button (selects options)
- Vertical keystone adjustment buttons (displays the adjustment screen and adjusts the screen shape) and arrow buttons
- Esc button (cancels/exits functions)
- Volume buttons (adjust speaker volume), horizontal keystone adjustment buttons, and arrow buttons
- Menu button (accesses projector menu system)
- Home button (displays Home screen)
- Power button
- Status lights
Projector Parts – Remote Control
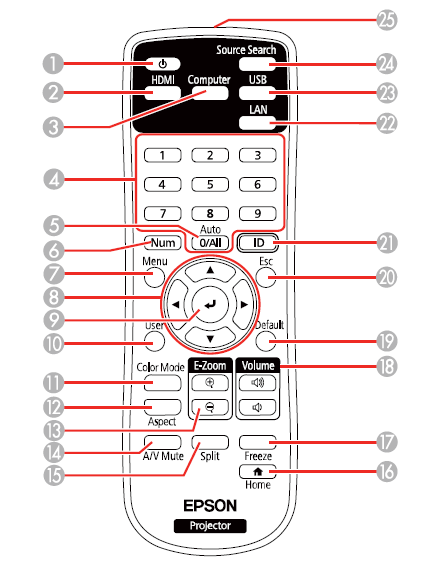
- Power button
- HDMI buttons (cycles through connected HDMI sources)
- Computer button (cycles through connected computer sources)
- Numeric buttons (enter numbers when you hold down the Num button)
- Auto button (automatically adjusts position, tracking, and sync settings when projecting from a computer using a VGA cable)
- Num button (when held down, switches numeric buttons to number function)
- Menu button (accesses projector menu system)
- Arrow buttons (move through on-screen options)
- Enter button (selects options)
- User button (customizable for different functions)
- Color Mode button (selects display modes)
- Aspect button (selects the image aspect ratio)
- E-Zoom +/– buttons (zoom into and out of the image)
- A/V Mute button (turns off picture and sound)
- Split button (splits the screen between two image sources)
- Home button (accesses source selection, projector help information, and other features)
- Freeze button (stops video action)
- Volume up/down buttons (adjust speaker volume)
- The default button (returns a selected setting to its default)
- Esc button (cancels/exits functions and controls wireless mouse functions)
- ID button (selects which projector you want to control)
- LAN button (cycles through connected network sources; no functionality for EX3280/VS260)
- USB button (cycles through connected USB sources)
- Source Search button (searches for connected sources)
- Remote control signal emitter (emits remote control signals)
Setting Up the Projector
Follow the instructions in these sections to set up your projector for use.
- Projector Placement
- Projector Connections
- Installing Batteries in the Remote Control
- Opening the Lens Cover
Projector Placement
You can place the projector on almost any flat surface to project an image.
You can also install the projector in a ceiling mount if you want to use it in a fixed location.
Keep these considerations in mind as you select a projector location:
- Place the projector on a sturdy, level surface or install it using a compatible mount.
- Place the projector parallel to the screen.
- Leave plenty of space around and under the projector for ventilation, and do not place it on top of or next to anything that could block the vents.
- Position the projector within reach of a grounded electrical outlet or extension cord.
- Projector Setup and Installation Options
- Projection Distance
Parent topic: Setting Up the Projector
Projector Setup and Installation Options
You can set up or install your projector in the following ways: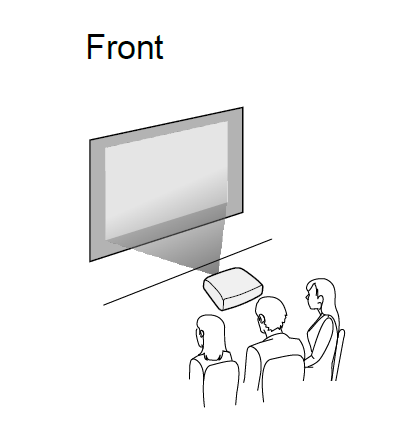
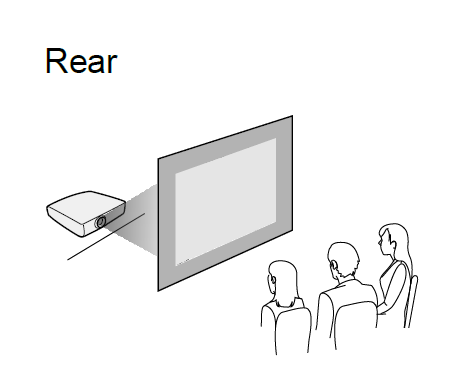
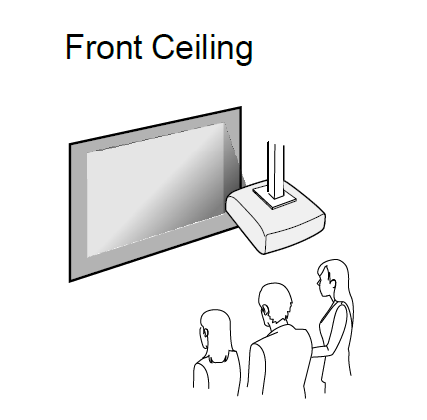
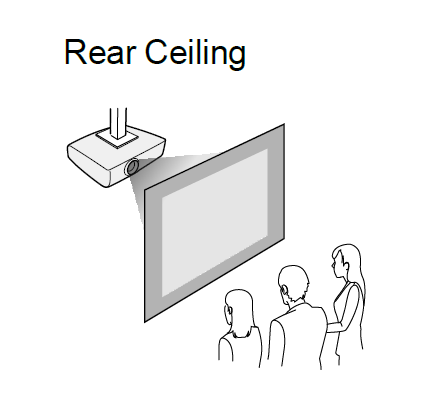
Wherever you set up the projector, make sure to position it squarely in front of the center of the screen, not at an angle, if possible.
If you project from the ceiling or the rear, be sure to select the correct Projection option in the projector’s menu system.
Projection Distance
The distance at which you place the projector from the screen determines the approximate size of the image. The image size increases the farther the projector is from the screen, but can vary depending on the zoom factor, aspect ratio, and other settings.
Use the tables here to determine approximately how far to place the projector from the screen based on the size of the projected image. (Conversion figures may have been rounded up or down.) You can also use the Projection Distance Calculator here (U.S.) or here (Canada).
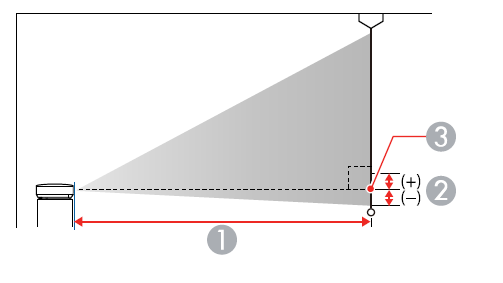
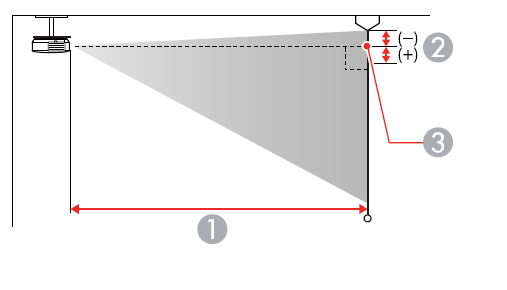
- Projection distance
- Distance from the center of the lens to the base of the image
- Center of the lens
Projector Connections
See these sections to connect the projector to a variety of projection sources.
Caution: If you will use the projector at altitudes above 4921 feet (1500 m), turn on High Altitude Mode to ensure the projector’s internal temperature is regulated properly.
- Connecting to Computer Sources
- Connecting to Video Sources
- Connecting to External USB Devices
- Connecting to a Document Camera
Parent topic: Setting Up the Projector
Related references
- Additional Components
- Projector Setup Settings – Extended Menu
Connecting to Computer Sources
Follow the instructions in these sections to connect a computer to the projector.
- Connecting to a Computer for USB Video and Audio
- Connecting to a Computer for VGA Video and Audio
- Connecting to a Computer for HDMI Video and Audio
Parent topic: Projector Connections
Connecting to a Computer for USB Video and Audio
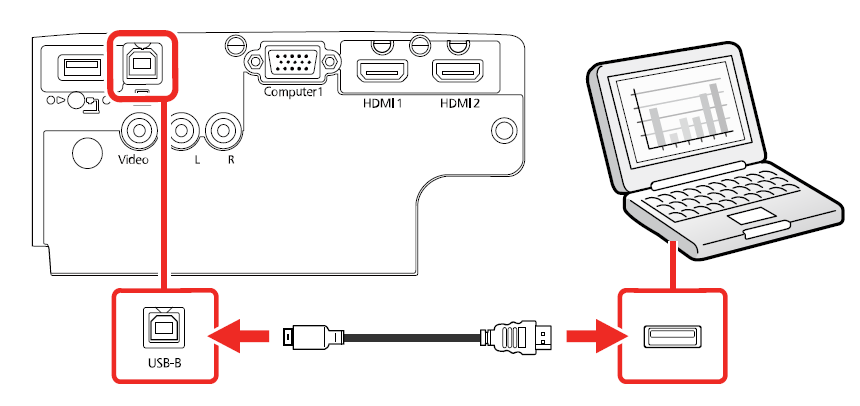
If your computer meets the system requirements, you can send video and audio output to the projector through the computer’s USB port (preferably USB 2.0). Connect the projector to your computer using a USB cable.
Note: An HDMI connection is recommended for projecting content requiring high bandwidth.
- Turn on your computer.
- Connect the cable to your projector’s USB-B port.

- Connect the other end to any available USB port on your computer.
- Do one of the following:
- Windows 10/Windows 8.x: Click EPSON_PJ_UD when it appears on the desktop, then select Run EPSON_UDSE.EXE in the dialog box that appears to install the Epson USB Display software.
- Windows 7/Windows Vista: Select Run EMP_UDSE.EXE in the dialog box that appears to install the Epson USB Display software.
- Mac: The USB Display setup folder appears on your screen. Select USB Display Installer and follow the on-screen instructions to install the Epson USB Display software.
Follow any on-screen instructions. You need to install this software only the first time you connect the projector to the computer.
The projector displays the image from your computer’s desktop and outputs sound, if your presentation contains audio.
Connecting to a Computer for VGA Video and Audio
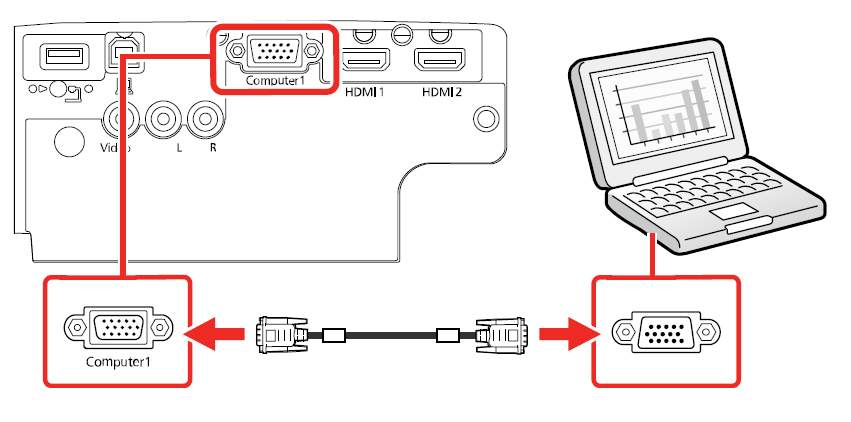
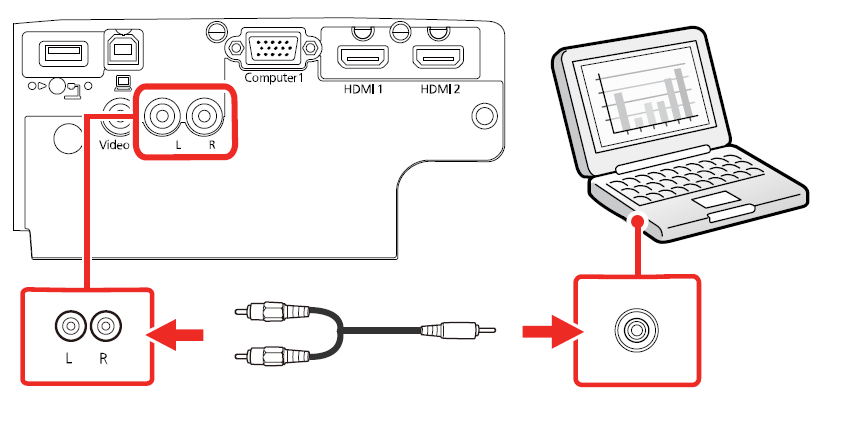
You can connect the projector to your computer using a VGA computer cable. You can play sound through the projector’s speaker system by connecting a commercially available 3.5 mm stereo mini-jack audio cable.
Note: To connect a Mac that includes only a Mini DisplayPort, Thunderbolt port, or Mini-DVI port for video output, you need to obtain an adapter that allows you to connect to the projector’s VGA video port. Contact Apple for compatible adapter options.
- If necessary, disconnect your computer’s monitor cable.
- Connect the VGA computer cable to your computer’s monitor port.
- Connect the other end to the Computer port on the projector.

- Tighten the screws on the VGA connector.
- Connect an audio cable to your laptop’s headphone or audio out jack, or your desktop’s speaker or audio out port.
- Connect the other end to the projector’s L and R audio ports.

Connecting to a Computer for HDMI Video and Audio
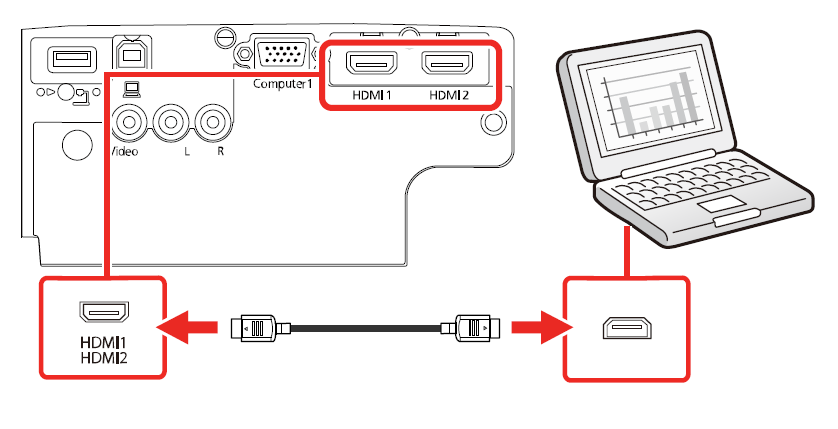
If your computer has an HDMI port, you can connect it to the projector using an optional HDMI cable.
Note: To connect a Mac that includes only a Mini DisplayPort, Thunderbolt port, or Mini-DVI port for video output, you need to obtain an adapter that allows you to connect to the projector’s HDMI port. Contact Apple for compatible adapter options. Older Mac computers (2009 and earlier) may not support audio through the HDMI port.
- Connect the HDMI cable to your computer’s HDMI output port.
- Connect the other end to one of the projector’s HDMI ports.

Note: The projector converts the digital audio signal sent from your computer into a mono analog signal for the internal speaker or a stereo analog signal if you are connecting to external speakers. (Make sure the HDMI audio playback device on your computer’s audio settings is set to EPSON PJ.)
Note: If you have problems hearing audio through the HDMI connection, connect one end of an optional RCA audio cable to the projector’s L and R audio ports and the other end to your computer’s audio out port. Then select the audio port you connected to as the HDMI Audio Output setting in the Extended menu.
Parent topic: Connecting to Computer Sources
Connecting to Video Sources
Follow the instructions in these sections to connect video devices to the projector.
- Connecting to an HDMI Video Source
- Connecting to a Composite Video Source
Parent topic: Projector Connections
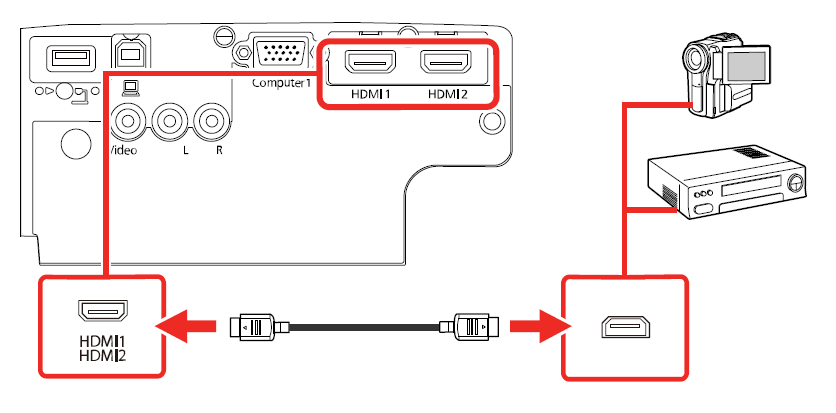
Connecting to an HDMI Video Source
If your video source has an HDMI port, you can connect it to the projector using an optional HDMI cable. The HDMI connection provides the best image quality.
Caution: Do not turn on the video source before connecting it to the projector. Doing so could damage the projector.
- Connect the HDMI cable to your video source’s HDMI output port.
- Connect the other end to one of the projector’s HDMI ports.

Note: The projector converts the digital audio signal sent from your video source into a mono analog signal for the internal speaker or a stereo analog signal if you are connecting to external speakers.
Note: If you have problems hearing audio through the HDMI connection, connect one end of an optional RCA audio cable to the projector’s L and R audio ports and the other end to your computer’s audio out port. Then select the audio port you connected to as the HDMI Audio Output setting in the Extended menu.
Parent topic: Connecting to Video Sources
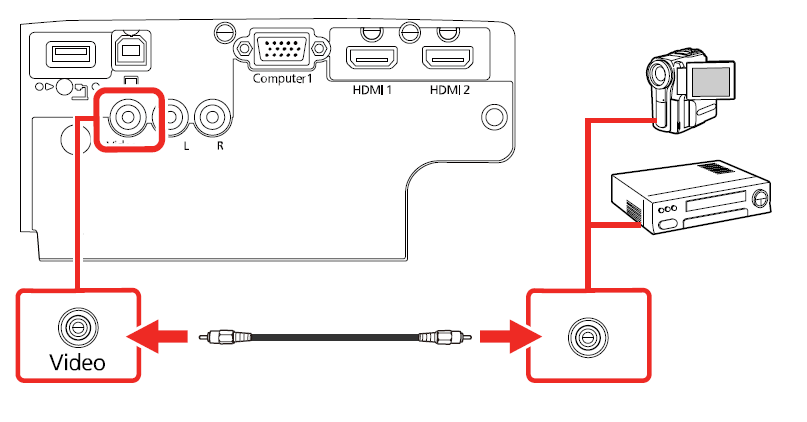
Connecting to a Composite Video Source
If your video source has a composite video port, you can connect it to the projector using an optional RCA-style video or A/V cable.
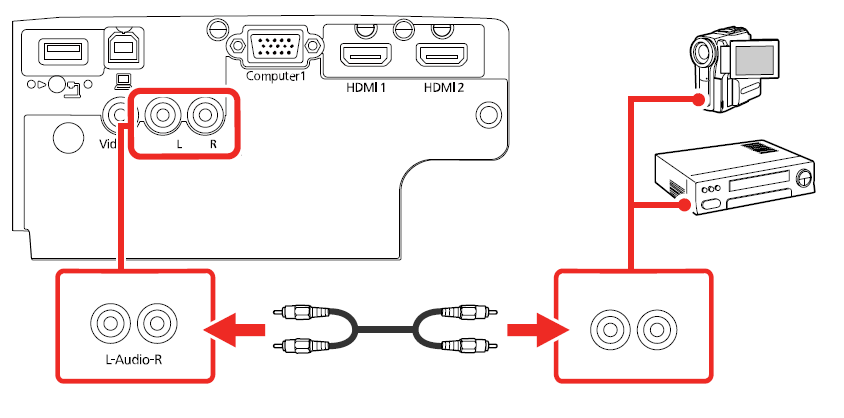
You can play sound through the projector’s speaker system by connecting a commercially available RCA audio cable. Make sure the audio cable is labeled “No Resistance.”
- Connect the cable with the yellow connector to your video source’s yellow video output port.
- Connect the other end to the projector’s Video port.

- Connect the audio cable to your video source’s audio-out ports.
- Connect the other end to the projector’s L and R audio ports.

Connecting to External USB Devices
Follow the instructions in these sections to connect external USB devices to the projector.
- USB Device Projection
- Connecting a USB Device or Camera to the Projector
- Selecting the Connected USB Source
- Disconnecting a USB Device or Camera From the Projector
USB Device Projection
You can project images and other content without using a computer or video device by connecting any of these devices to your projector:
- USB flash drive
- Digital camera or smartphone
- USB hard drive
Note: Digital cameras or smartphones must be USB-mounted devices, not TWAIN-compliant devices, and must be USB Mass Storage Class-compliant.
Note: USB hard drives must meet these requirements: - USB Mass Storage Class-compliant (not all USB Mass Storage Class devices are supported)
- Formatted in FAT16 or FAT32
- Self-powered by their own AC power supplies (bus-powered hard drives are not recommended)
- Does not have multiple partitions
You can project slide shows from image files on a connected USB device.
Connecting a USB Device or Camera to the Projector
You can connect your USB device or camera to the projector’s USB-A port and use it to project images and other content.
- If your USB device came with a power adapter, plug the device into an electrical outlet.
- Connect the USB cable (or USB flash drive) to the projector’s USB-A port.
 Note: Do not connect a USB hub or a USB cable longer than 10 feet (3 m), or the device may not operate correctly.
 - Connect the other end of the cable (if applicable) to your device.
Selecting the Connected USB Source
You can switch the projector’s display to the source you connected to the USB-A port.
- Make sure the connected USB source is turned on, if necessary.
- Press the USB button on the remote control.
Parent topic: Connecting to External USB Devices
Disconnecting a USB Device or Camera From the Projector
When you finish presenting with a connected USB device or camera, you must prepare to disconnect the device from the projector.
- If the device has a power button, turn off and unplug the device.
- Disconnect the USB device or camera from the projector.
Connecting to a Document Camera
You can connect a document camera to your projector to project images from the camera.
Note: The connection method varies depending on your document camera model. For additional features supported by software, connect your document camera to your computer using the camera’s USB port instead of connecting the camera to the projector. See the document camera manual for details.
Parent topic: Projector Connections
Related references
- Optional Equipment and Replacement Parts
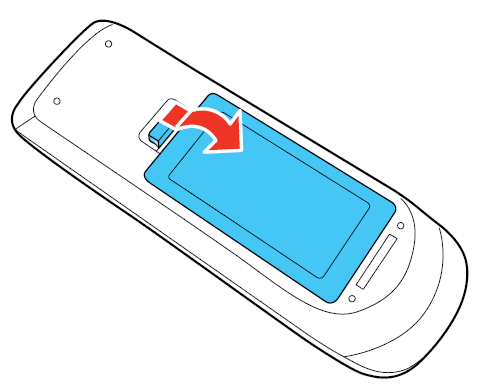
Installing Batteries in the Remote Control
The remote control uses the two AA batteries that came with the projector.
Caution: Use only the type of batteries specified in this manual. Do not install batteries of different types, or mix new and old batteries.
- Remove the battery cover.

- Insert the batteries with the + and – ends facing as shown.
 Warning: Make sure the batteries are inserted in the correct positions. If the batteries are not inserted correctly, they could explode or leak, causing a fire, injury, or damage to the product
 - Replace the battery cover and press it down until it clicks into place.
 Warning: Dispose of used batteries according to local regulations. Do not expose batteries to heat or flame. Keep batteries out of the reach of children; they are choking hazards and are very dangerous if swallowed.
Opening the Lens Cover
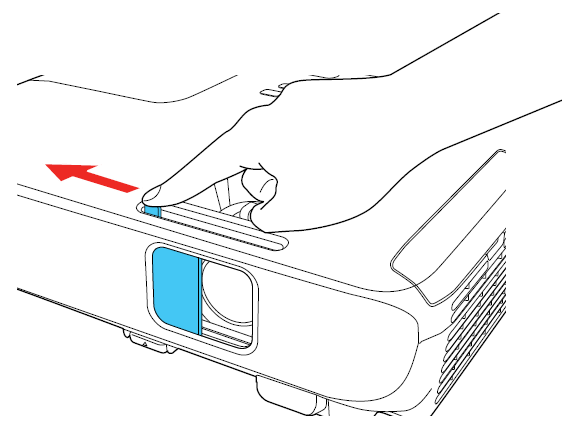
To open the projector’s lens cover, slide the A/V Mute slide lever until it clicks into the open position (EX5280/EX9230/EX7280/EX9240).
Maintaining and Transporting the Projector
Follow the instructions in these sections to maintain your projector and transport it from place to place.
- Projector Maintenance
- Transporting the Projector
Projector Maintenance
Your projector needs little maintenance to keep working at its best.
You may need to clean the lens periodically, and clean the air filter and air vents to prevent the projector from overheating due to blocked ventilation.
The only parts you should replace are the lamp, air filter, and remote control batteries. If any other part needs replacing, contact Epson or an authorized Epson servicer.
Warning: Before cleaning any part of the projector, turn it off and unplug the power cord. Never open any cover on the projector, except as specifically explained in this manual. Dangerous electrical voltages in the projector can injure you severely.
Warning: Do not try to service this product yourself, except as specifically explained in this manual. Refer all other servicing to qualified servicers.
- Cleaning the Lens
- Cleaning the Projector Case
- Air Filter and Vent Maintenance
- Projector Lamp Maintenance
- Replacing the Remote Control Batteries
Technical Specifications
General Projector Specifications
Type of display Resolution
Poly-silicon TFT active matrix
- EX3280/EX5280/VS260:
1024 × 768 pixels (XGA) - EX7280:
1280 × 800 pixels (WXGA) - EX9230/EX9240:
1920 × 1080 pixels (Full HD)
Lens
- EX3280/VS260:
F=1.44
Focal length: 16.7 mm - EX5280/EX9230/EX7280:
F=1.49 to 1.72
Focal length: 16.9 mm to 20.28 mm - EX9240:
F=1.51 to 1.99
Focal length: 18.2 mm to 29.2 mm
Color reproduction
Full color, up to 1 billion colors
Projector Dimension Specifications
EX3280/VS260:
- Width 11.9 inches (302 mm)
- Height 3 inches (77 mm)
- Depth 9.2 inches (234 mm)
- Weight 5.3 lb (2.4 kg)
EX5280:
- Width 11.9 inches (302 mm)
- Height 3 inches (77 mm)
- Depth 9.2 inches (234 mm)
- Weight 5.5 lb (2.5 kg)
EX9230:
- Width 11.9 inches (302 mm)
- Height 3.4 inches (87 mm)
- Depth 9.8 inches (249 mm)
- Weight 5.6 lb (2.5 kg)
EX7280:
- Width 11.9 inches (302 mm)
- Height 3.4 inches (87 mm)
- Depth 9.2 inches (234 mm)
- Weight 5.7 lb (2.6 kg)
EX9240:
- Width 12.2 inches (309 mm)
- Height 3.5 inches (90 mm)
- Depth 11.1 inches (282 mm)
- Weight 6.8 lb (3.1 kg)
Note: Height values exclude projector feet. Weight values are approximate.
For more manuals by Epson, visit ManualsLibraryy

 Note: Do not connect a USB hub or a USB cable longer than 10 feet (3 m), or the device may not operate correctly.
 Warning: Make sure the batteries are inserted in the correct positions. If the batteries are not inserted correctly, they could explode or leak, causing a fire, injury, or damage to the product
 Warning: Dispose of used batteries according to local regulations. Do not expose batteries to heat or flame. Keep batteries out of the reach of children; they are choking hazards and are very dangerous if swallowed.