SAMSUNG 27-inch Essential S36GD FHD Curved Monitor
Safety Precautions
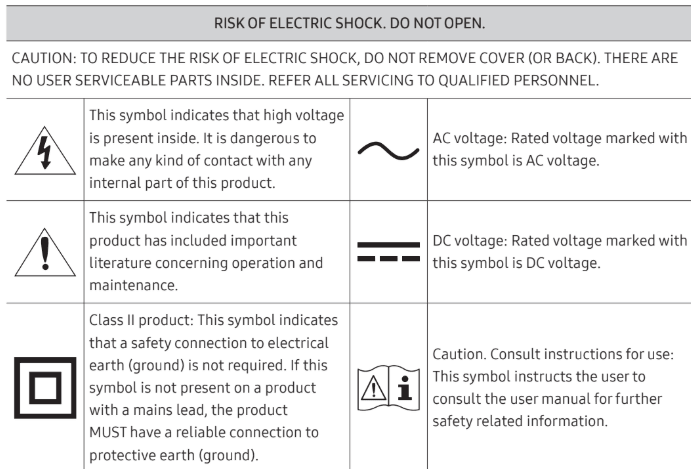
Electricity and Safety
Warning
- Do not use a damaged power cord or plug, or a loose power socket.
- Do not use multiple products with a single power socket.
- Do not touch the power plug with wet hands.
- Insert the power plug all the way in so it is not loose.
- Connect the power plug to a grounded power socket (type 1 insulated devices only).
- Do not bend or pull the power cord with force. Be careful not to leave the power cord under a heavy object.
- Do not place the power cord or product near heat sources.
- Clean any dust around the pins of the power plug or the power socket with a dry cloth.
Caution - Do not disconnect the power cord while the product is being used.
- Only use the power cord provided with your product by Samsung. Do not use the power cord with other products.
- Keep the power socket where the power cord is connected unobstructed. The power cord must be disconnected to cut off power to the product when an issue occurs.
- Hold the plug when disconnecting the power cord from the power socket.
Installation
Warning
- DO NOT PLACE CANDLES, INSECT REPELLANTS OR CIGARETTES ON TOP OF THE PRODUCT. DO NOT INSTALL THE PRODUCT NEAR HEAT SOURCES.
- Do not install the product in poorly ventilated spaces such as a bookcase or closet.
- Install the product at least 10cm away from the wall to allow ventilation.
- Keep the plastic packaging out of the reach of children. Children may suffocate.
- Do not install the product on an unstable or vibrating surface (insecure shelf, sloped surface, etc.) The product may fall and become damaged and/or cause an injury. Using the product in an area with excess vibration may damage the product or cause a fire.
- Do not install the product in a vehicle or a place exposed to dust, moisture (water drips, etc.), oil, or smoke.
- Do not expose the product to direct sunlight, heat, or a hot object such as a stove. The product lifespan may be reduced or a fire may result.
- Do not install the product within the reach of young children. The product may fall and injure children.
- Edible oil, such as soybean oil, can damage or deform the product. Do not install the product in a kitchen or near a kitchen counter.
Correct posture to use the product
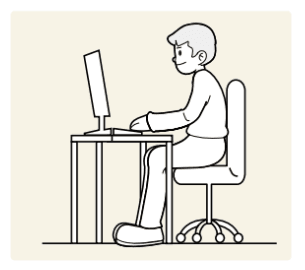
Use the product in the correct posture as follows
- Straighten your back.
- Allow a distance of 45 to 50cm between your eye and the screen, and look slightly downward at the screen.
- Keep your eyes directly in front of the screen.
- Adjust the angle so light does not reflect on the screen.
- Keep your forearms perpendicular to your upper arms and level with the back of your hands.
- Keep your elbows at about a right angle.
- Adjust the height of the product so you can keep your knees bent at 90 degrees or more, your heels attached to the floor, and your arms lower than your heart.
- Do the Eye excercises or blink frequently, then eye fatigue will be relieved.
Attaching the Stand

- Insert the stand neck into the stand base in the direction shown in the figure. Check that the stand neck is firmly connected.
- Tightly fasten the connecting screw at the bottom of the stand base.
- Hold the back of the monitor as shown in the figure. Push the assembled stand into the main body in the direction of the arrow as shown in the figure.

- Stand up the monitor and remove the package.
- Stand assembly is complete.
- Caution: Do not arbitrarily remove the panel film. If not observed, the warranty service may be
restricted.
Removing the Stand

- Place the protective Styrofoam (cushion) included in the package on the floor and place the product facing down on the Styrofoam, as shown in the image. If Styrofoam is unavailable, use a thick sitting mat. While holding the monitor with one hand, pull the stand neck with your other hand to in detach the stand as shown in the figure.
- Turn the connecting screw at the bottom of the stand base to separate it.
- Remove the stand neck from the stand base by pulling it in the direction of the arrow as shown in the figure.
Precautions for moving the product
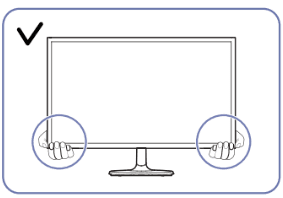
- Hold the lower corners or edges of the product when moving it.
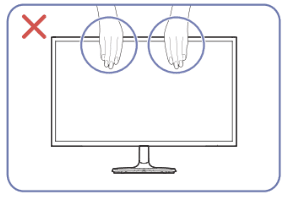
- Do not directly apply pressure on the screen.
- Do not hold the screen when moving the product.
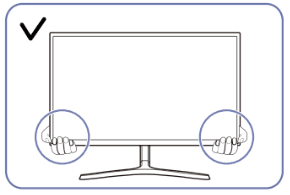
- Hold the lower corners or edges of the product when moving it.
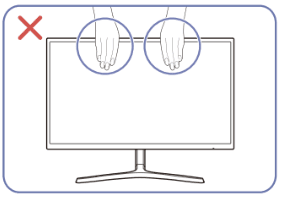
- Do not directly apply pressure on the screen.
- Do not hold the screen when moving the product.
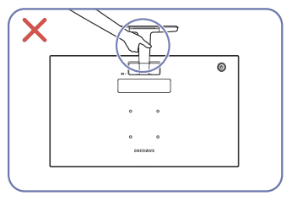
- Do not hold the product upside down only by the stand.
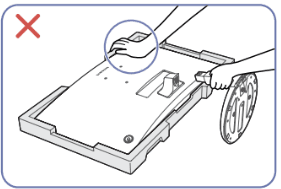
- Do not press down on the product. There is a risk of damaging the product.
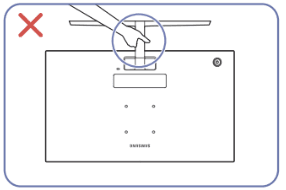
- Do not hold the product upside down only by the stand.
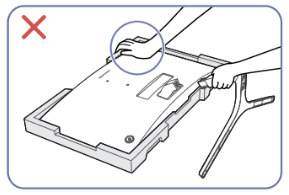
- Do not press down on the product. There is a risk of damaging the product.
Checking the space around the product
Make sure to have enough space for ventilation when placing the product. An internal temperature rise may cause fire and damage the product. Maintain enough space around the product as shown in the diagram when installing the product.

Adjusting the Product Tilt
The colour and shape of parts may differ from what is shown. Specifications are subject to change without notice to improve quality.
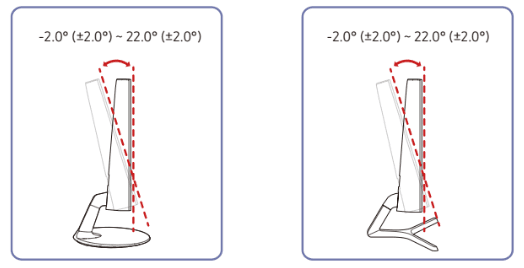
- You can adjust the product tilt.
- Hold the lower part of the product and adjust the tilt carefully.
Anti-theft Lock
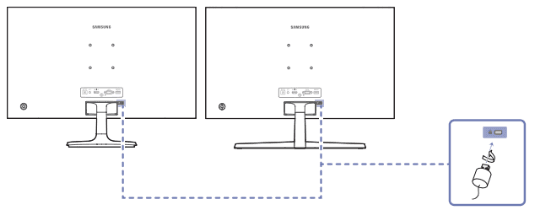
- Fix the cable of your anti-theft locking device to a heavy object such as a desk.
- Put one end of the cable through the loop on the other end.
- Insert the locking device into the anti-theft lock slot at the back of the product.
- Lock the locking device.
- An anti-theft locking device can be purchased separately.
- Refer to the manuals provided with your anti-theft locking device for details.
- Anti-theft locking devices can be purchased at electronics retailers or online
Installing the Wall Mount
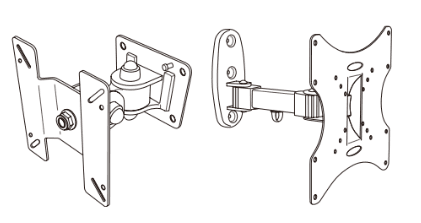
- The wall mount kit allows you to mount the product on the wall.
- Purchase a compatible wall-mount kit to use with the product.
- For detailed information on installing the wall mount, see the instructions provided with the wall mount.
- We recommend you contact a technician for assistance when installing the wall mount bracket.
- Samsung is not responsible for any damage to the product or injury to yourself or others if you select to install the wall mount on your own.
Wall Mount Kit Specifications (VESA)
Install your wall mount on a solid wall perpendicular to the floor. Before attaching the wall mount to surfaces other than plaster board, please contact your nearest dealer for additional information. If you install the product on a slanted wall, it may fall and result in severe personal injury. Samsung wall mount kits contain a detailed installation manual and all parts necessary for assembly are provided.
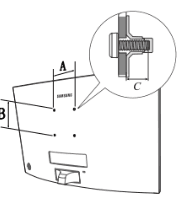
- Do not use screws that are longer than the standard length or do not comply with the VESA standard screw specifications. Screws that are too long may cause damage to the inside of the product.
- For wall mounts that do not comply with the VESA standard screw specifications, the length of the screws may differ depending on the wall mount specifications.
- Do not fasten the screws too firmly. This may damage the product or cause the product to fall, leading to personal injury. Samsung is not liable for these kinds of accidents.
- Samsung is not liable for product damage or personal injury when a non-VESA or non-specified wall mount is used or the consumer fails to follow the product installation instructions.
- Do not mount the product at more than a 15 degree tilt.
- Standard dimensions for wall mount kits are shown in the table below.
- This apparatus is intended to be supported by UL listed Wall Mount Bracket.
- Only supports horizontal orientation, does not support left and right rotation.
Control Panel
The colour and shape of parts may differ from what is shown. Specifications are subject to change without notice to improve quality.
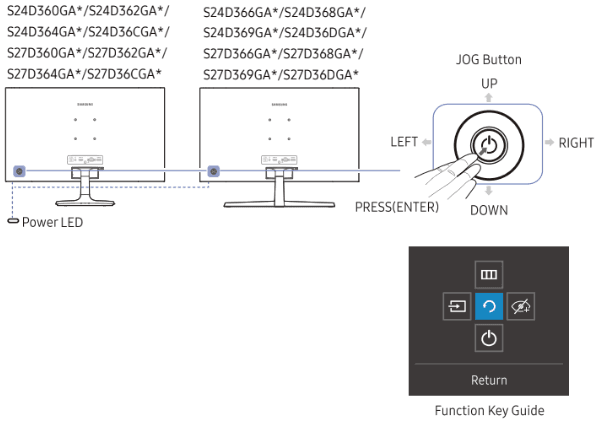
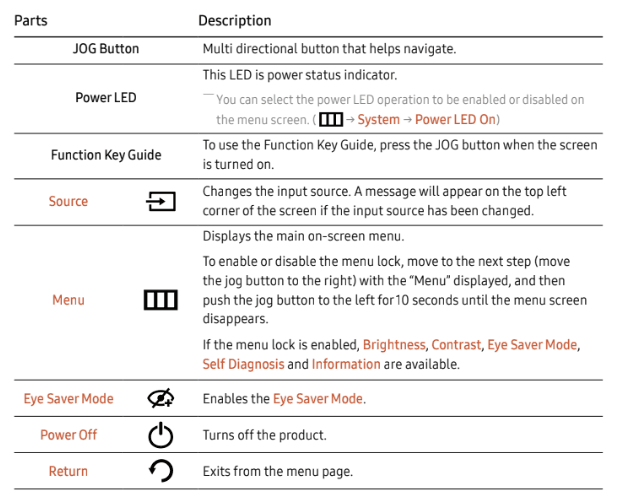
Direct Key Guide
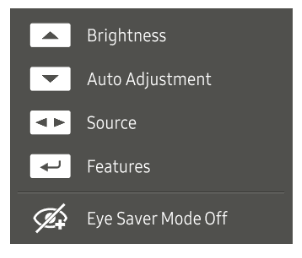
Analog mode option
- UP: Adjust Brightness, Contrast, Sharpness.
- DOWN: Adjust Auto Adjustment.
Changing the resolution in Display Properties will activate the Auto Adjustment function. This function is only available in Analog mode. - LEFT/RIGHT: Adjust Source.
- PRESS(ENTER): Display Function Key Guide.
Read below before connecting the product.
- Before connecting the product, check the shapes of both ports of the supplied signal cables and the shapes and locations of the ports on the product and external device.
- Before connecting the product, make sure you remove the power cords from both the product and the external device to prevent damage to the product due to a short circuit or over current.
- After all signal cables have been properly connected, connect the power cords back to the product and the external device.
- After connecting is completed, make sure you read the manuals to acquaint yourself with the product functions, precautions and other information required to use the product properly.
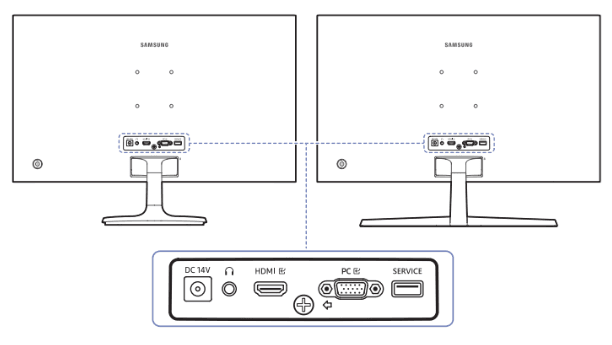
Ports
The functions available may vary depending on the product model. The colour and shape of parts may differ from what is shown. Specifications are subject to change without notice to improve quality. Refer to the actual product.

Connecting and Using a PC
Select a connection method suitable for your PC.
Connection Using the D-SUB Cable (Analogue Type)

Connection Using the HDMI Cable

Connection Using an HDMI-DVI Cable

Connecting the Power
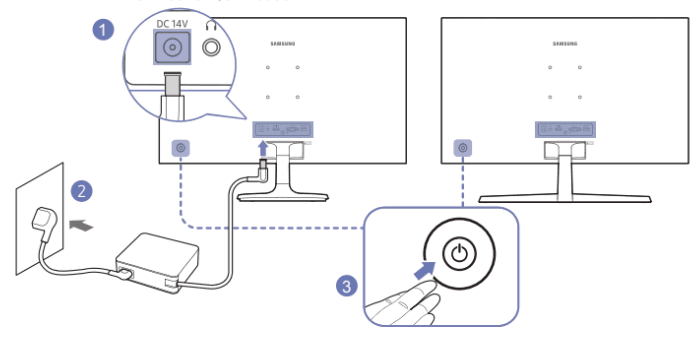
- Connect the power cable to the AC/DC adapter. Then, connect the AC/DC adapter to the DC 14V port on the back of the product. Rated power consumption for adapters differs depending on the model. Use an adapter that meets the power consumption specification of the model.
- Next, connect the power cable to the power outlet.
- Press the JOG button on the back of the product to turn it on.
| Picture Mode | This menu provides an optimum picture quality suitable for the environment where the product will be used. ֜ This menu is not available when Eco Saving Plus is enabled. ֜ This menu is not available when Game Mode is enabled. ֜ This menu is not available when Eye Saver Mode is enabled. In PC mode
|
| In AV mode When the external input is connected through HDMI PC/AV Mode is set to AV, Picture Mode has four automatic picture settings (Dynamic, Standard, Movie and Custom) that are preset at the factory. You can activate either Dynamic, Standard, Movie or Custom. You can select Custom which automatically recalls your personalised picture settings.
֜ The input source is 480p, 576p, 720p or 1080p and product can display normally (Not every model can support all of these signals.). | ||
| Brightness | You can adjust the general brightness of the picture. (Range: 0~100) A higher value will make the picture appear brighter. ֜ This menu is not available when Picture Mode is set to Dynamic Contrast mode. ֜ This menu is not available when Eco Saving Plus is enabled. ֜ This menu is not available when Eye Saver Mode is enabled. | |
| Contrast | Adjust the contrast between the objects and background. (Range: 0~100) A higher value will increase the contrast to make the object appear clearer. ֜ This option is not available when Picture Mode is in Cinema or Dynamic Contrast mode. ֜ This menu is not available when Game Mode is enabled. | |
| Sharpness | Make the outline of objects more clear or blurry. (Range: 0~100) A higher value will make the outline of objects clearer. ֜ This option is not available when Picture Mode is in Cinema or Dynamic Contrast mode. ֜ This menu is not available when Game Mode is enabled. |
| Color | Adjust the tint of the screen.
֜ This menu is not available when Picture Mode is set to Cinema or Dynamic Contrast mode. ֜ This menu is not available when Game Mode is enabled. ֜ This menu is not available when Eye Saver Mode is enabled. | |
| Black Level | If a DVD player or set-top box etc is connected to the product via HDMI, image quality degradation (contrast/colour degradation, black level, etc.) may occur, depending on the connected source device. In such case, Black Level can be used to adjust the image quality.
֜ This function is only available in HDMI mode. ֜ Black Level may not be compatible with some source devices. ֜ The Black Level feature is only activated at a certain AV resolution, such as 480p @ 60 Hz, 576p @ 50 Hz, 720p @ 60 Hz and 1080p @ 60 Hz. | |
| Eye Saver Mode | Set to an optimum picture quality suitable for eye relaxation. TÜV Rheinland “Low Blue Light Content” is a certification for products which meet requirements for lower blue light levels. When Eye Saver Mode is ‘High‘, the blue light that wavelength is around 400nm will decrease, and it will provide an optimum picture quality suitable for eye relaxation. At the same time, the blue light level is lower than in the default settings, and it was tested by TÜV Rheinland and certified as it met the requirements of TÜV Rheinland “Low Blue Light Content” standards. | |
| Game Mode | Configure the product screen settings for game mode. Use this feature when playing games on a PC or when a game console such as PlayStation™ or Xbox™ is connected. ֜ This menu is not available when Eye Saver Mode is enabled. ֜ When the product turns off, enters power-saving mode or changes input sources, Game Mode turns Off even if it is set to On. ֜ If you want to keep Game Mode enabled all the time, select Always On. |
| Response Time | Accelerate the panel response rate to make video appear more vivid and natural. ֜ Use Standard mode when not playing a video or game. | |
| Screen Ratio | Change the picture size. In PC mode
In AV mode
֜ The function may not be supported depending on the ports provided with the product. ֜ Changing the Screen Ratio is available when the following conditions are satisfied. ֜ The input source is 480p, 576p, 720p or 1080p and product can display normally (Not every model can support all of these signals.). ֜ This can only be set when the external input is connected through HDMI PC/AV Mode is set to AV. | |
Screen Adjustment | Adjust the position of the screen or increase the picture quality. ֜ This function is only available in Analog mode.
|
OnScreen Display
| Transparency | Set the transparency for the menu windows. | |
| Position |
| |
| Language | Set the menu language. ֜ A change to the language setting will only be applied to the onscreen menu display. | |
| Display Time | Set how long the menu window will remain on screen for when it is not in use. |
System
| Volume | Change the Volume setting. ֜ Excessive sound pressure from ear-/headphones can cause hearing damage/hearing loss. | |
| Eco Saving Plus | Reduce energy consumption compared to consumption at the maximum brightness level.
֜ This option is not available when Picture Mode is in Dynamic Contrast mode. ֜ This menu is not available when Game Mode is enabled. ֜ This menu is not available when Eye Saver Mode is enabled. |
| Off Timer Plus | Off Timer |
– This option is only available when Off Timer is set to On. ֜ For products for the market in some regions, the Off Timer is set to automatically activate 4 hours after the product powers on. This is done in accordance with power supply regulations. If you do not want the timer to activate, go to → System → Off Timer Plus and set Off Timer to Off. |
| Eco Timer |
– This option is only available when Eco Timer is set to On. | |
| PC/AV Mode | Set PC/AV Mode to AV. The picture size will be enlarged. This option is useful when you view a movie. ֜ Products with a display area of 16:9 or 16:10 are only supported. | |
| Source Detection | Select either Auto or Manual as the method to recognise input source. | |
| Key Repeat Time | Control the response rate of a button when the button is pressed. Acceleration, 1 sec or 2 sec can be selected. If No Repeat is selected, a command responds only once when a button is pressed. | |
| Power LED On | Configure the settings to enable or disable the power LED located at the lower part of the product.
|
Support
| Self Diagnosis | Perform this test when you experience a problem with your monitor’s picture. ֜ Never turn off the power nor change the input source during self diagnosis. If possible, try not to interrupt testing. | |
| Software Update | Update software using an update file on a USB device.
| |
| Select → Support → Software Update. | ||
― To perform software update by using a USB device, first format the USB device to FAT32. ― When updating by a USB device, be sure to use the device whose version of USB 3.0 or lower. ― When performing update, make sure that only one BIN file (.bin) is saved in the root directory. ― If the No USB devices detected. Please check and try again. message is displayed, this is probably due to the following reasons. ― A USB device is not connected to the SERVICE port. ― The files in the connected USB device are not compatible formats. ― There are no valid update files found in the connected USB device. (There are no update files saved in the memory or the file names are incorrect.) ― The update will not start if the downloaded software does not match the software installed on the monitor. To check the software for consistency, |
FOR MORE MANUALS BY Samsung, VISIT ManualsLibraryy
SAMSUNG 27-inch Essential S36GD FHD Curved Monitor-FAQ’s
Does the Samsung S36GD monitor have built-in speakers?
No, this monitor does not have built-in speakers or an audio jack.
How do I adjust the volume on the Samsung 27-inch curved monitor?
Use the joystick control under the monitor:
1. Press it to open the On-Screen Display (OSD).
2. Navigate to Settings > System > Sound, and then adjust the volume slider.
How do I turn on the monitor manually?
Press the jog controller (a multi-directional button) under the screen. It also functions as the power button.
Do Samsung monitors support 120Hz refresh rate?
Some Samsung monitors do, such as the 49” Curved Ultrawide model. Check the specifications of your specific model to confirm.
Can I play sound from my Samsung curved monitor?
If your model has built-in speakers, go to the Sound settings and select TV Speaker. Adjust the volume there as needed.
Does the Samsung 27” curved model have built-in speakers?
Some specific 27-inch curved models like LS27C390EAWXXL include built-in speakers and headphone ports. Check your model’s full specs to confirm.
How can I mute or unmute my Samsung monitor?
Check the sound output settings of your connected device. Adjust the volume slider or switch to the correct speaker output.
How can I check if my monitor has built-in speakers?
Refer to the monitor’s spec sheet, the manufacturer’s website, or look at online reviews for confirmation.

