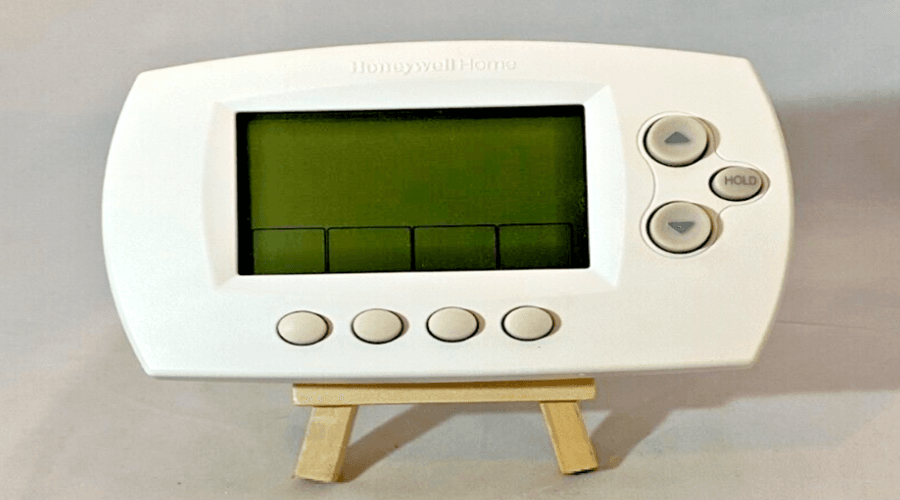
Honeywell Smart Series RTH6500WF Programmable Thermostat
Features of your thermostat
With your new thermostat, you can:
- Connect to the Internet to monitor and control your heating/cooling system
- View and change your heating/cooling system settings
- View and set temperature and schedules
- Receive alerts via email and get automatic upgrades
Your new thermostat provides:
- Smart Response Technology
- Compressor protection
- Heat/cool auto changeover
Controls and home screen quick reference
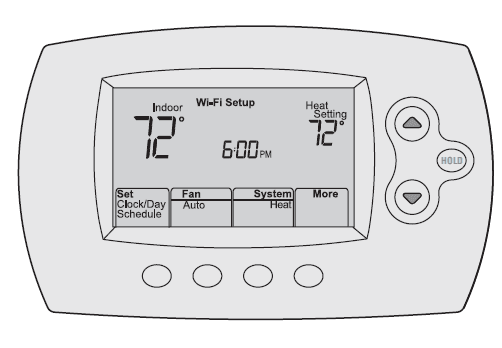
Once your thermostat is installed, it will display the home screen. Portions of this display will change depending on how you are viewing it.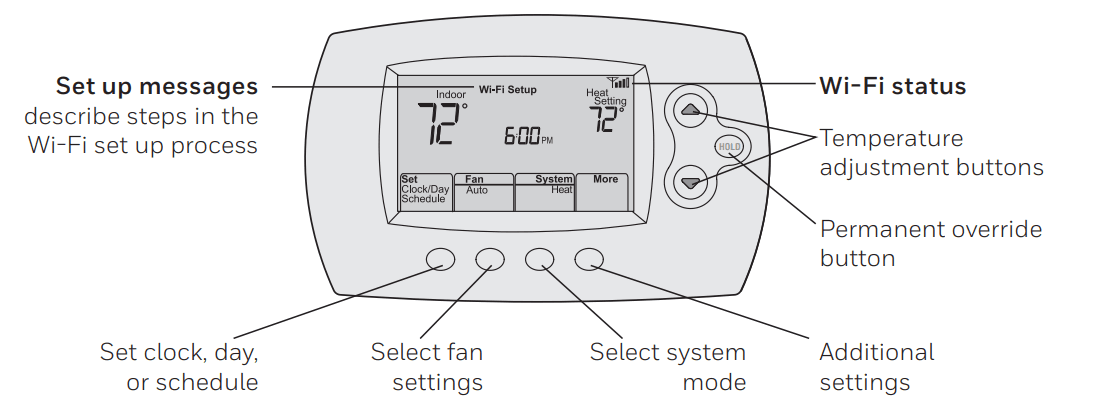
The screen lights when you press any button. It stays lit for 8 seconds after you complete changes.
Preset energy-saving schedules
This thermostat is pre-set with energy-saving program settings for four time periods. Using the default settings can reduce your heating/cooling expenses if used as directed. Savings may vary depending on geographic region and usage. To change the settings, see page 15.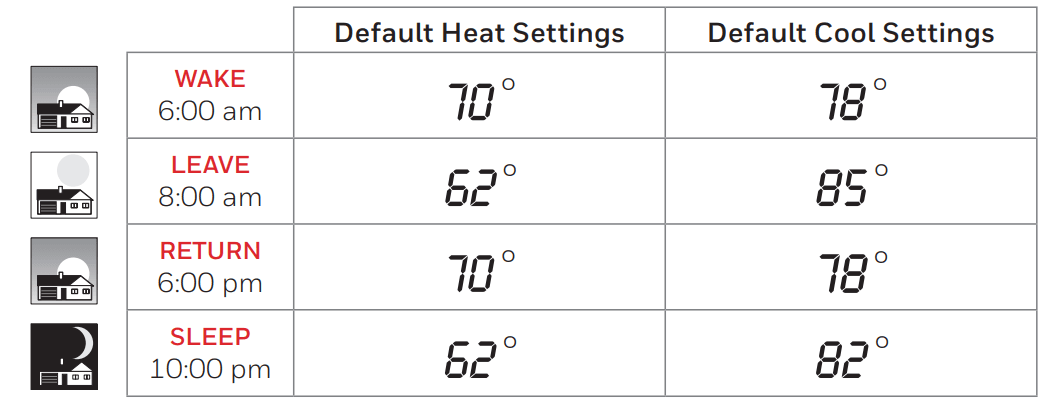
Setting up your thermostat
Setting up your programmable thermostat is easy. It is preprogrammed and ready to go as soon as it is installed and registered.
- Install your thermostat.
- Connect your home Wi-Fi network.
- Register online for remote access.
![]() Before you begin, you may want to watch a brief installation video. Use the QR Code® at the front of this guide, or go to honeywellhome.com/support
Before you begin, you may want to watch a brief installation video. Use the QR Code® at the front of this guide, or go to honeywellhome.com/support
Installing your thermostat
You might need the following tools to install this thermostat:
- No. 2 Phillips screwdriver
- Small pocket screwdriver
- Pencil
- Level (optional)
- Drill and bits (3/16” for drywall, 7/32” for plaster) (optional)
- Hammer (optional)
- Electrical tape (optional)
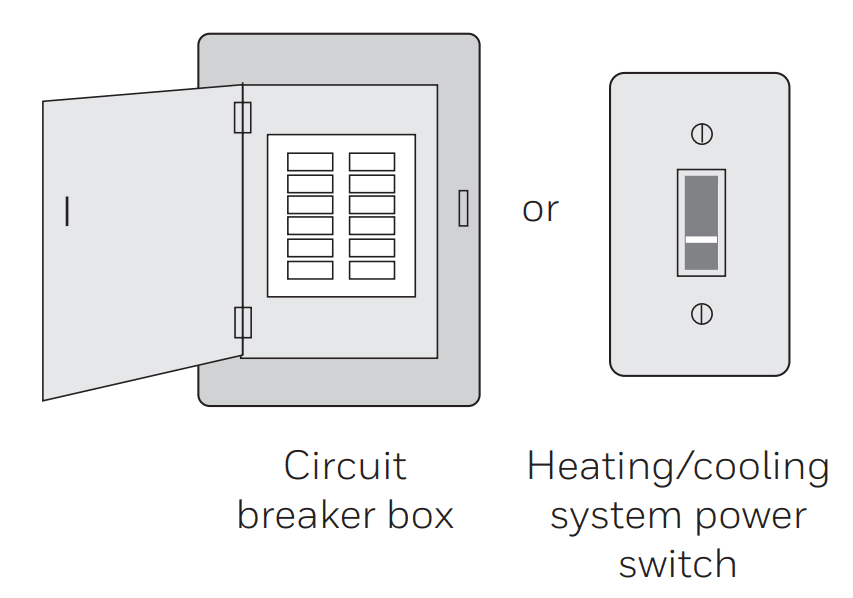
- Switch OFF power to your heating/cooling system.
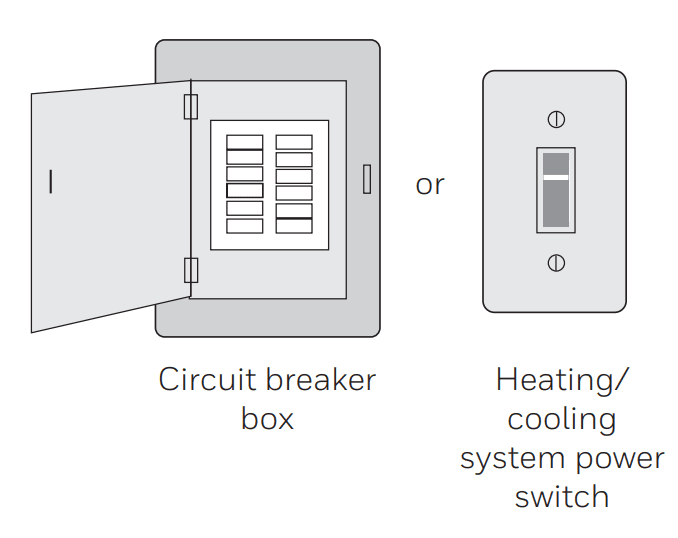
Important! To protect your equipment, switch OFF the power to your heating/cooling system at the breaker box or the system switch.
Installing your thermostat
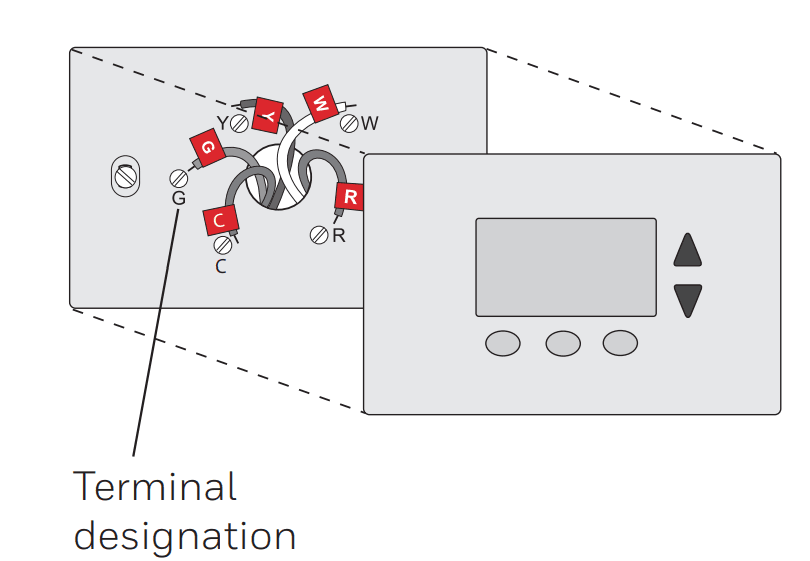
- Remove the old thermostat faceplate and leave the wires connected.
- Take a picture of the wire connections for later reference.
- If no wire is connected to a terminal labeled C or no C terminal exists on the old thermostat, view the Alternate Wiring videos at honeywellhome.com/wifi-thermostat


- Label wires.
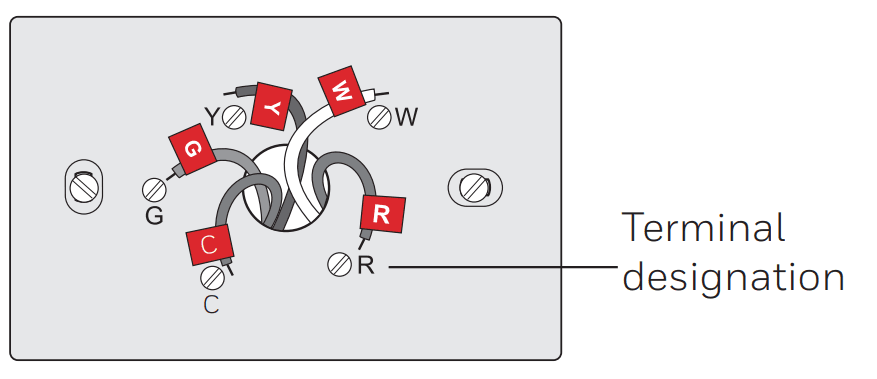
Do not label by wire color. Use the supplied sticky tags to label each wire as you disconnect it. Label wires according to the old thermostat terminal designations, not by wire color.
Note: If no tag matches a wire terminal label, write the terminal label on a blank tag. - Remove wallplate.
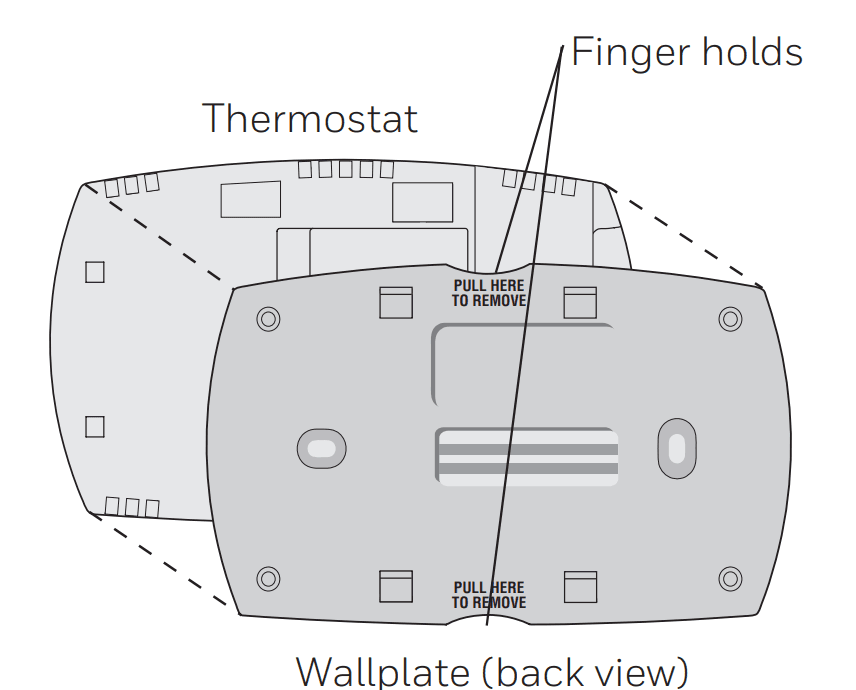
Remove the old wallplate from the wall after all wires have been labeled and disconnected. - Separate the thermostat and its wallplate.
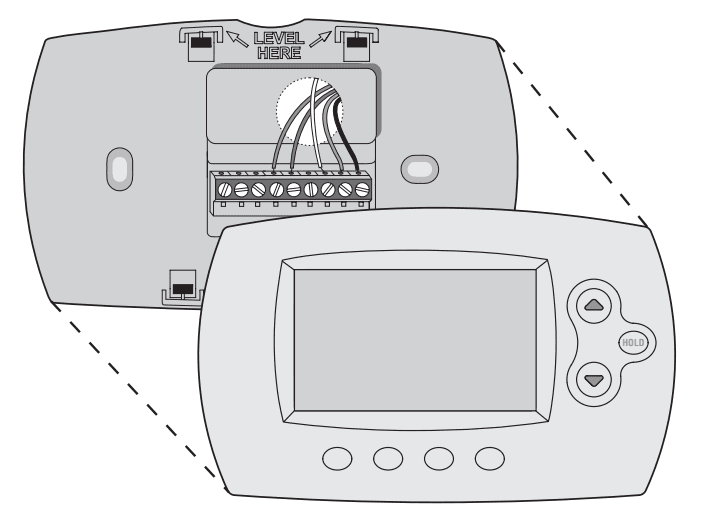
On your new thermostat, grasp the finger holds on the top and bottom of the wallplate with one hand and the thermostat (front) with the other hand. Pull pieces apart.
Installing your thermostat
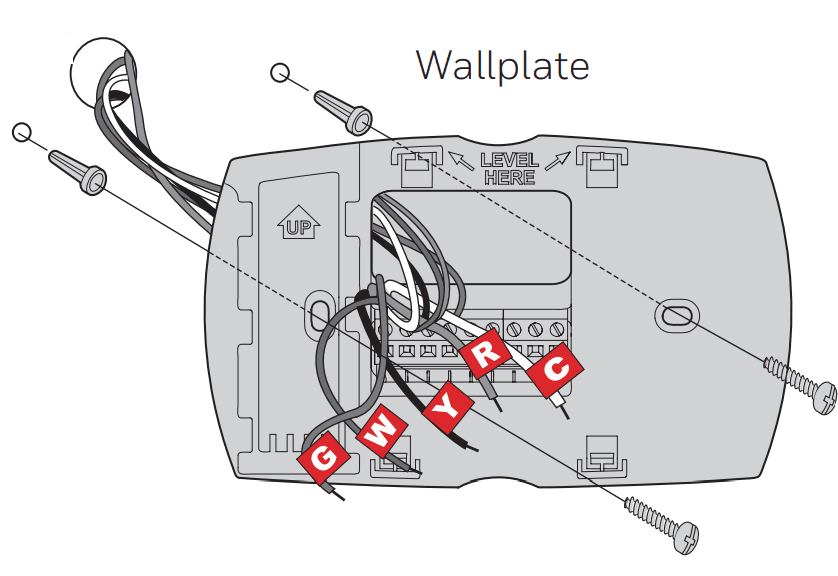
- Mount wallplate for thermostat. Mount your new wallplate using screws and anchors included with the thermostat.
If necessary:- Drill 3/16-in holes for drywall.
- Drill 7/32-in holes for plaster.
Note: You may be able to use your existing wall anchors. Hold the wallplate up to the existing anchors to check for alignment
Important! The thermostat requires a C wire to operate. The C, or common, wire brings 24 VAC power to the thermostat. Many older mechanical or battery-operated thermostats do not require a C wire. If you don’t have a C wire, try:
- Looking for an unused wire that is pushed into the wall. Connect that wire to C and check that it is connected to the 24 VAC common at your heating/cooling system.
Note: Not all heating/cooling systems label the 24 VAC common C. Check your system manual or contact the manufacturer to find out which terminal is the 24 VAC common.
Wiring
For conventional heating/cooling systems (natural gas, oil or electric furnace, air conditioner), see page 5. See “Glossary” on page 23 for further definition. For a heat pump system, see page 7. See “Glossary” on page 23 for further definition.
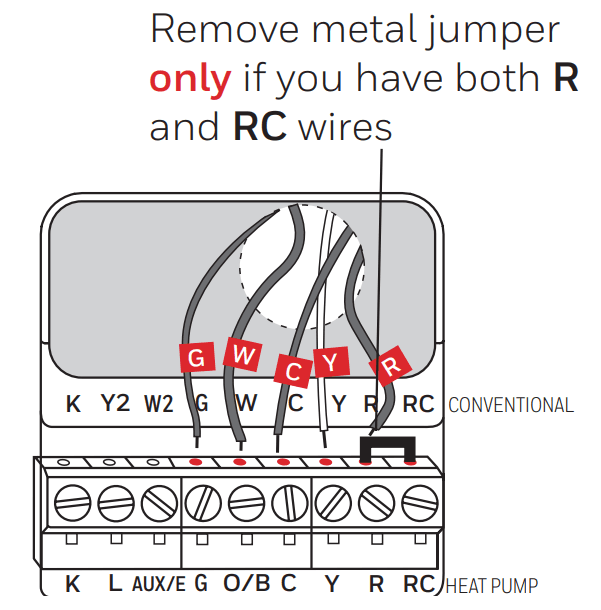
Wiring (conventional system)
- Wire the thermostat to your conventional system.
- Starting with the C Wire, match the sticky tag on the wire to the terminal labels.
You must have a C wire. - Loosen the screw, insert the wire on the inside edge of the terminal, then tighten the screw.
- Verify wire is firmly secured by gently pulling on the wire.
- Repeat steps a–c for all other wires.
- Push any excess wire back into the wall opening after all wires are installed.
- Continue to page 8.
- Starting with the C Wire, match the sticky tag on the wire to the terminal labels.
Wiring (heat pump system only)
- Wire the thermostat to your heat pump.
- Starting with the C Wire, match the sticky tag on the wire to the terminal labels.
You must have a C wire. - Loosen the screw, insert the wire on the inside edge of the terminal, then tighten the screw.
- Verify that the wire is firmly secured by gently pulling on the wire.
- Repeat steps a–c for all other wires.
- Push any excess wire back into the wall opening after all wires are installed.
- Continue to page 8.
Note: If the old thermostat has separate wires on AUX and E, place both wires into the E/AUX terminal. If the old thermostat has a wire on AUX with a jumper to E, place the wire on the E/AUX terminal. No jumper is required.
- Starting with the C Wire, match the sticky tag on the wire to the terminal labels.
 Note: The wiring for your application might be different from the wiring shown above.
Alternate wiring (conventional system)
Use this if your wire labels don’t match the terminal labels.
Note: You must have a C wire or equivalent.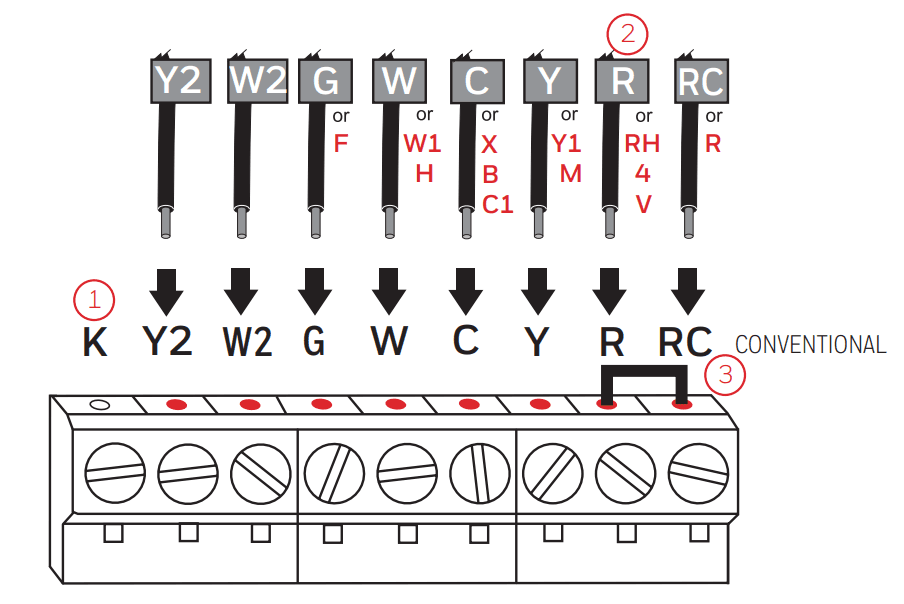
Alternate wiring key (conventional system)
- Do not use the K terminal. For future use.
If your old thermostat had both R and RH wires, remove the metal jumper. - Connect the R wire to the RC terminal, and the RH wire to the R terminal.
- Remove metal jumper connecting R and RC only if you must connect both R and RC.
Installing your thermostat
Alternate wiring (heat pump system only)
Use this if your wire labels don’t match the terminal labels.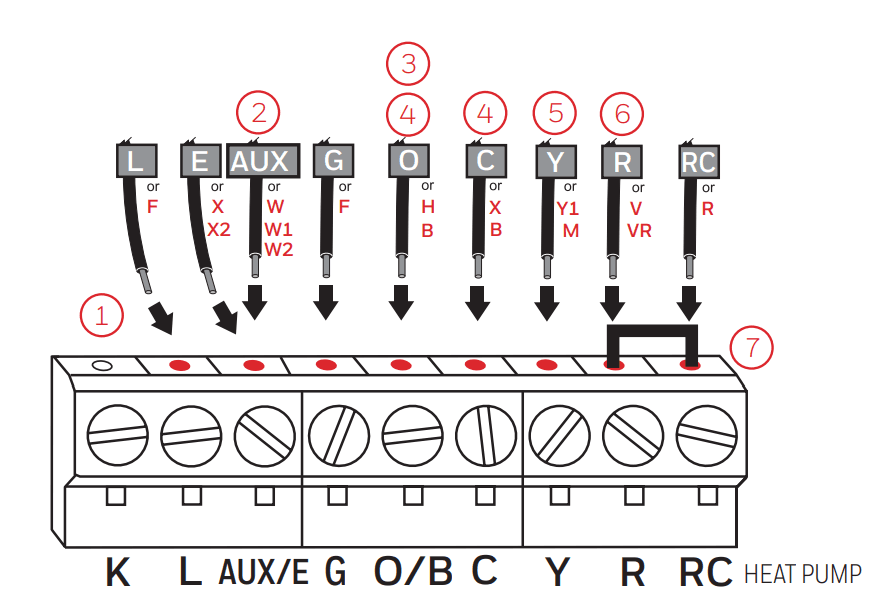
Alternate wiring key (heat pump system only)
- Do not use the K terminal. For future use.
- If the old thermostat has separate wires on AUX and E, place both wires into the E/AUX terminal. If the old thermostat has a wire on AUX with a jumper to E, place the wire on the E/AUX terminal. No jumper is required.
- If your old thermostat had an O wire and not a B wire, attach the O wire to the O/B terminal.
- If your old thermostat had separate O and B wires, attach the B wire to the C terminal. If another wire is attached to the C terminal, check honeywellhome.com for help. Attach the O wire to the O/B terminal.
- If your old thermostat had separate Y1, W1, and W2 wires, check honeywellhome.com for help.
- If your old thermostat had both V and VR wires, check honeywellhome.com for help.
- Leave metal jumper between R and RC terminals in place.
Installing your thermostat
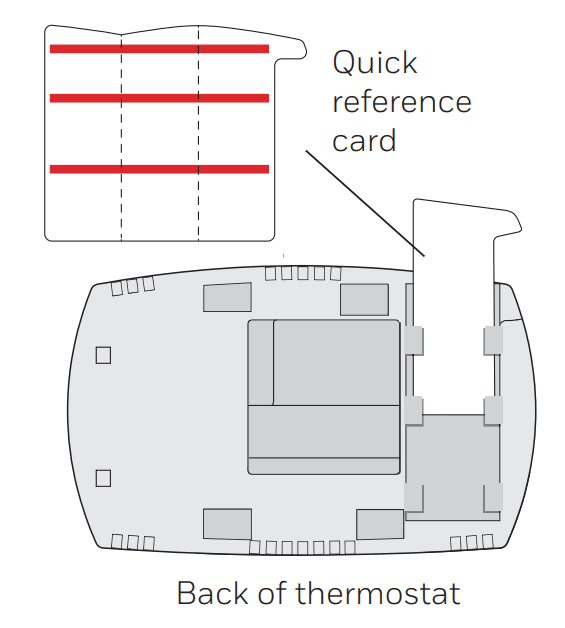
- Insert a quick reference card. Fold a quick reference card along score lines, and slide it into the slot on the back of the thermostat.

- Attach thermostat to wallplate. Align the thermostat to the wallplate and then snap into place.
- Switch the heating/cooling system ON.
Important!- Verify that the C wire is connected to the thermostat and at the heating/cooling system.
- Make sure the heating/cooling system door is firmly secured.
- Switch power back ON for your heating/cooling system at the breaker box or its power switch.
Installing your thermostat
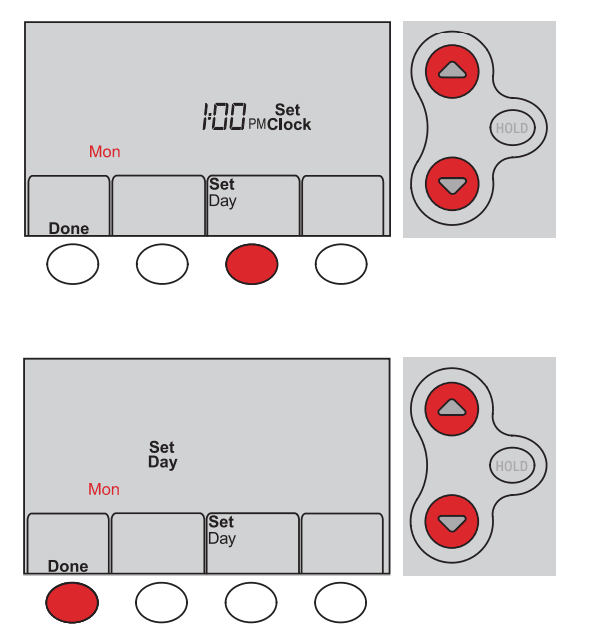
- Set the clock to the current day and time.
- Press
 to set the clock.
 - Press Set Day.
- Press
 to select the day of the week.
 - Press Done to save. (Press and hold
 button to quickly change a setting.)
- Press
- Determine your heating/cooling system type.
- If your system type is a conventional single stage (natural gas-powered single stage with a/c), continue to “Connecting to your Wi-Fi network” on page 10.
- If your system is:
- Conventional multistage heat and cool
- Any type of heat pump
- Hydronic
- Other
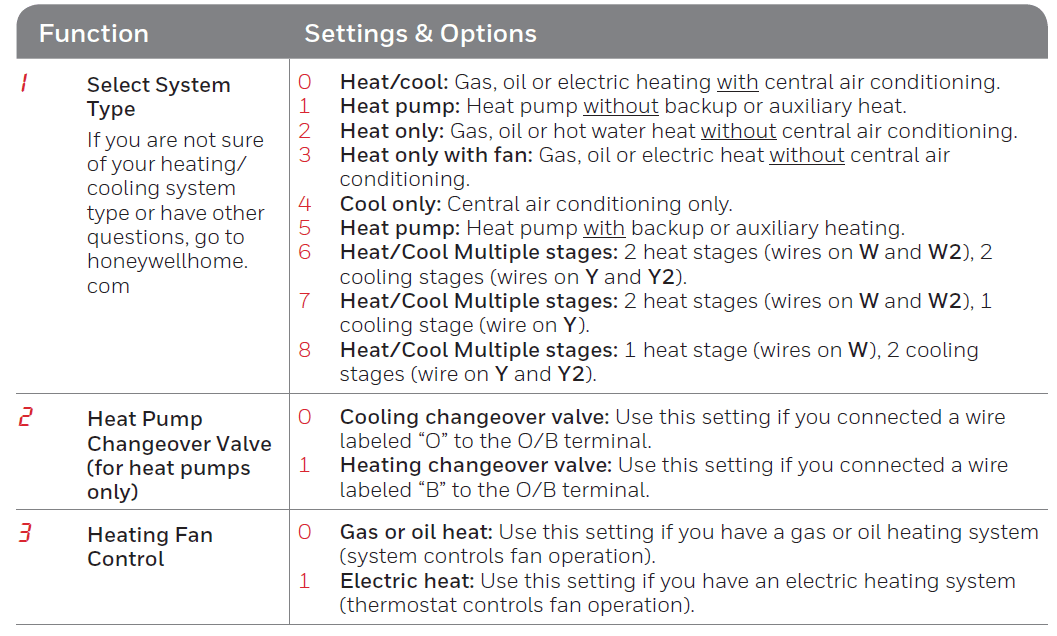
You MUST change the system type by setting system function 1. See page 18 to match your thermostat to your system type.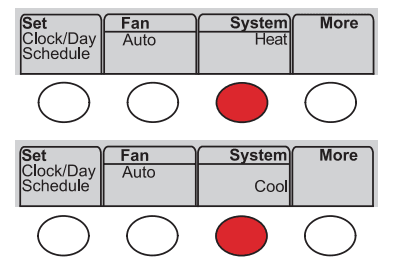
Congratulations! Your thermostat is operational.
- Test your thermostat
- Press the System button to change to heating or cooling and begin operation.
- For remote access to your thermostat, continue to “Connecting to your Wi-Fi network” on page 10.
Connecting to your Wi-Fi network
To complete this process, you must have a wireless device connected to your home wireless network. Any of these device types will work:
- Tablet (recommended)
- Laptop (recommended)
- Smartphone
- Connect to your thermostat.
- Make sure the thermostat displays
Wi-Fi Setup. - On the wireless device (laptop, tablet, smartphone), view the list of available Wi-Fi networks.
- Connect to the network called NewThermostat_123456 (the number will vary).
Note: If you are asked to specify a home, public, or office network, select Home Network.
- Make sure the thermostat displays
- Join your home network.
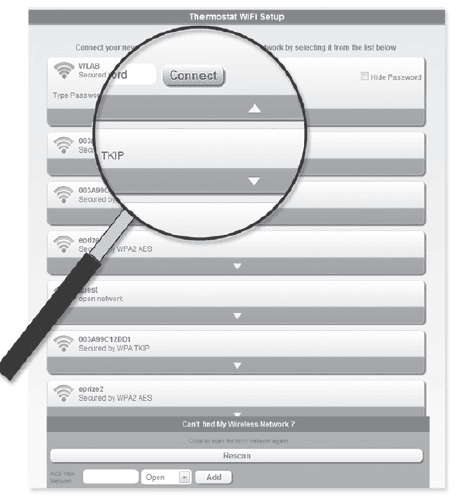
- Open your web browser to access the Thermostat Wi-Fi Setup page. The browser should automatically direct you to the correct page; if it does not, go to http://192.168.1.1
- Find the name of your home network on this page and select it.
Note: Some routers have enhanced features such as guest networks; use your home network. - Complete the instructions for joining your Wi-Fi network and click on the Connect button. (Depending on your network setup, you may see an instruction such as Enter Password for your home network.)
Note: If you did not correctly connect to the thermostat, you may see your home router page. If so, return to Step 1.
Smart Response Technology
This feature allows the thermostat to “learn” how long the heating/cooling system takes to reach programmed temperature settings, so the temperature is reached at the time you set.
For example: Set the Wake time to 6:00 am, and the temperature to 70°. The heat will come on before 6:00 am, so the temperature is 70° by 6:00 am.
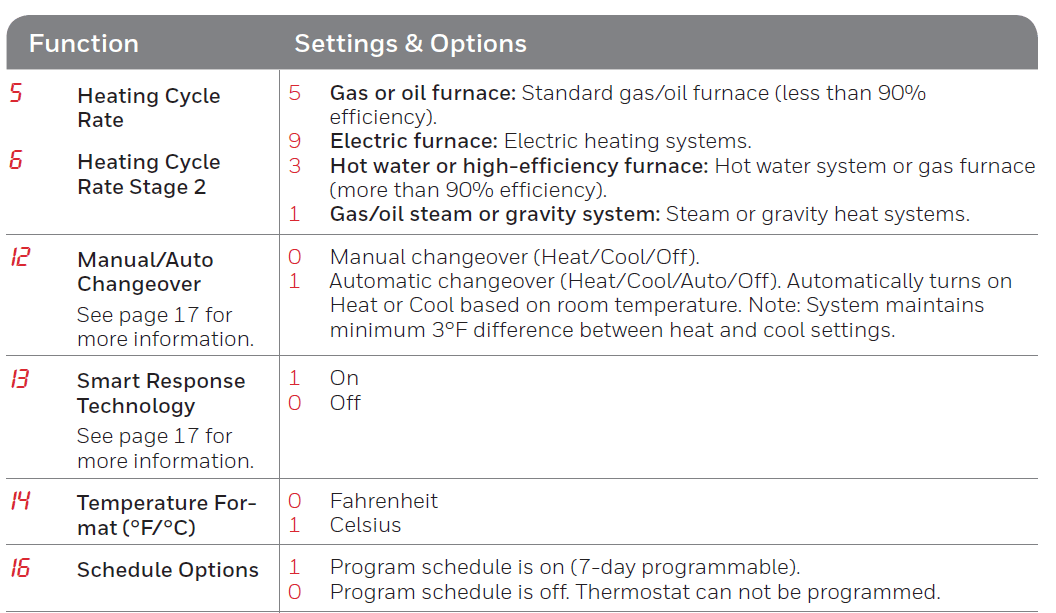
Note: System setting function 13 controls Smart Response Technology. See “Smart Response Technology” on page 19.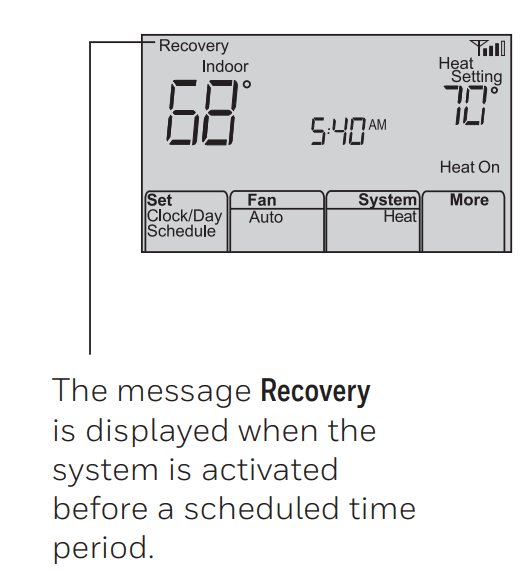
Compressor protection
This feature forces the compressor to wait a few minutes before restarting, to prevent equipment damage. 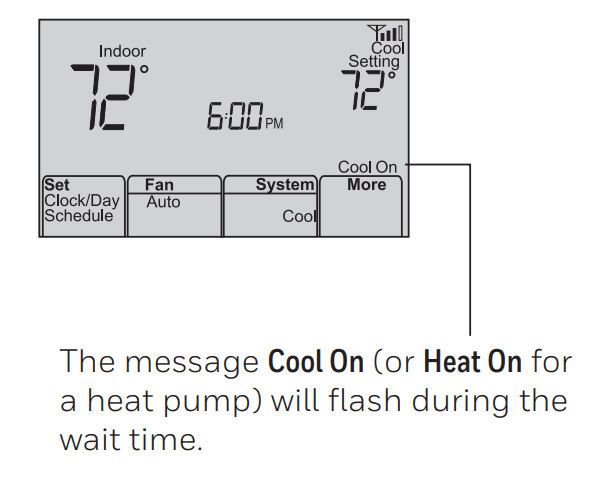
Auto changeover
This feature is used in climates where both air conditioning and heating are used on the same day. When the system is set to Auto, the thermostat automatically selects heating or cooling depending on the indoor temperature. Heat and cool settings must be at least 3 degrees apart. The thermostat will automatically adjust settings to maintain this 3-degree separation. Note: System setting function 12 controls Auto changeover. See “Manual/Auto Changeover” on page 19.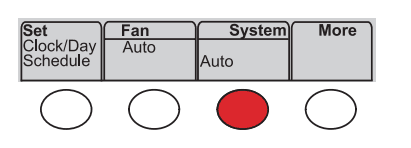
Setting functions and options
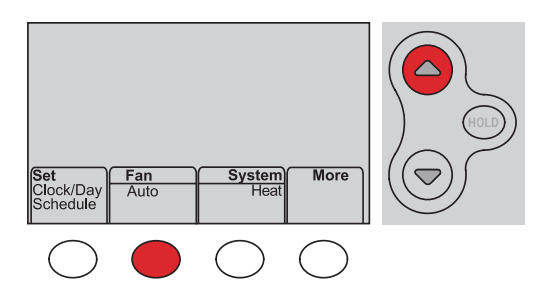
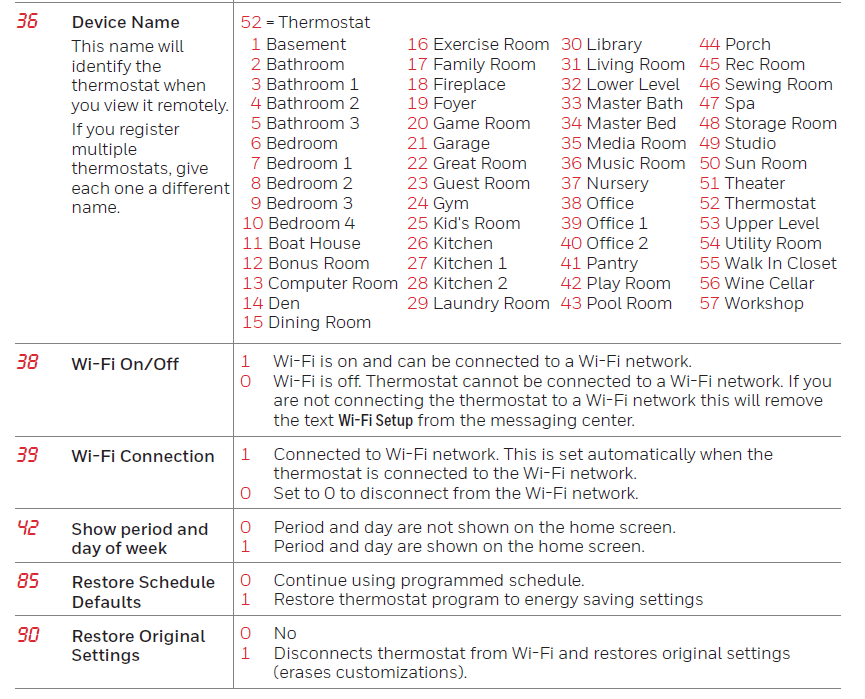
You can change options for a number of system functions. Available functions depend on the type of system you have. The functions, along with available options are described on pages 18–19. This thermostat is pre-set for a single-stage heating/cooling system. Setting function 1 for a heat pump will adjust the default settings.
- Press Fan and
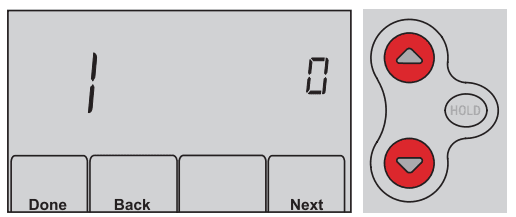
 simultaneously and hold for approximately 3 seconds. The screen will change to display two numbers and the button designations will be Done, Back, blank, Next.
 - Press Next until you see the function number the larger number on the left—you want to set.
- Change options for any function by pressing
 until the correct option (smaller number on the right) is displayed.
 - Repeat Steps 2 and 3 until you have set all functions that you wish to change.
- When you have made all changes, press Done to save and exit
System setup
Frequently asked questions
Q: Will my thermostat still work if I lose my Wi-Fi connection?
A: Yes, the thermostat will operate your heating and/or cooling system with or without Wi-Fi.
Q: How do I find the password to my router?
A: Contact the manufacturer of the router or check the router documentation.
Q: Why am I not seeing my Wi-Fi setup page?
A: You are probably connected only to your router, not to your thermostat. Try connecting to the
thermostat again.
Q: Why isn’t my thermostat connecting to my Wi-Fi router even though it is very close to the thermostat?
A: Verify that the password entered for the Wi-Fi router is correct.
Q: Where can I find my MAC ID and MAC CRC codes?
A: The MAC ID and MAC CRC numbers are included on a card packed with the thermostat or on the back of the thermostat (visible when removed from the wallplate). Each thermostat has a unique MAC ID and MAC CRC.
Q: My thermostat is unable to register to the Total Connect Comfort website.
A: Verify that the thermostat is correctly enrolled on your home Wi-Fi network. The message center will display Wi-Fi Setup or Register at Total Connect. You might also see the Wi-Fi Signal strength icon. Verify that the Wi-Fi router has a good internet connection. On your computer, verify that you can open the site at mytotalconnectcomfort.com If you cannot open the site, switch off the internet modem for a few seconds, then power it back on.
Q: I registered on the Total Connect Comfort website but was unable to log in using my new account.
A: Check your email and ensure that you received an activation email. Follow the instructions to activate your account and then log in to the website.
Q: I have signed up on the Total Connect Comfort website and have not received a confirmation email.
A: Check for the email in your Junk or Deleted folder.
Q: Is there a way to extend the signal strength?
A: Most standard routers can be set up to be a repeater. You can also purchase and install a
Wi-Fi repeater.
For more FAQs, see honeywellhome.com/support
Troubleshooting
Lost Signal
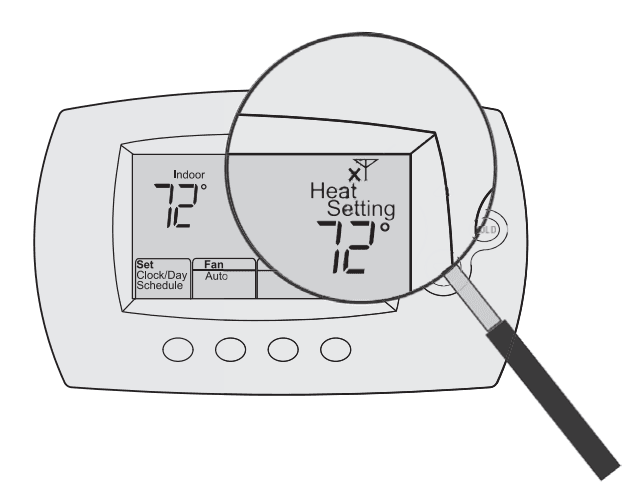
If the no-Wi-Fi indicator displays in place of the Wi-Fi strength indicator in the upper right-hand corner of the home screen:
- Check another device to be sure Wi-Fi is working in your home; if not, call your Internet Service Provider.
- Move the router.
- Restart the thermostat: remove it from the wallplate, wait 10 seconds, and snap it back onto the wallplate. Return to Step 1 of Connecting to your Wi-Fi network.
Error Codes
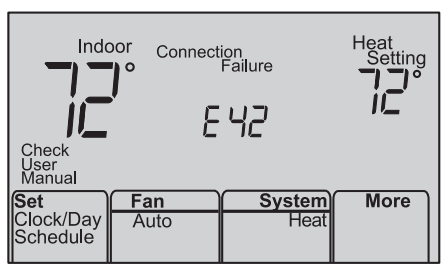
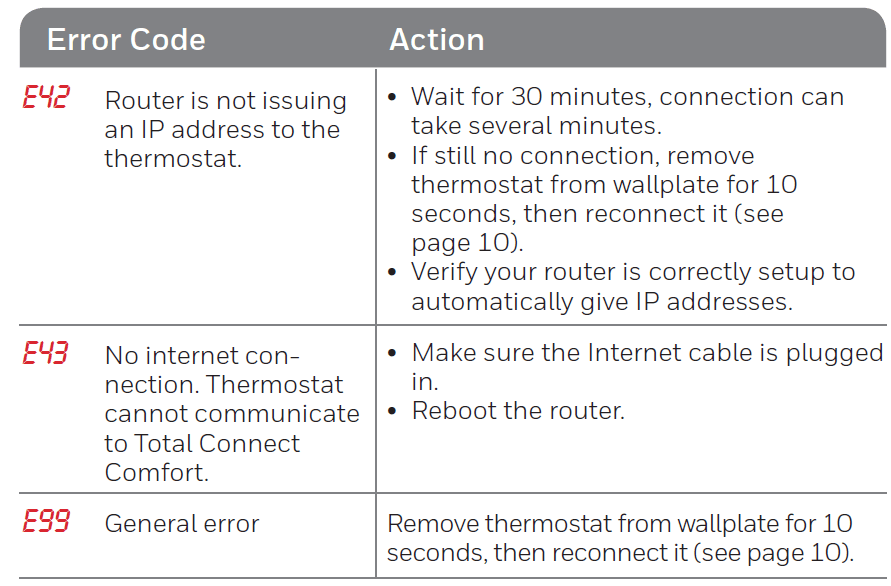
For certain problems, the thermostat screen will display a code that identifies the trouble. Initially, error codes are displayed alone in the time area of the screen; after a few minutes, the home screen is displayed and the code alternates with the time.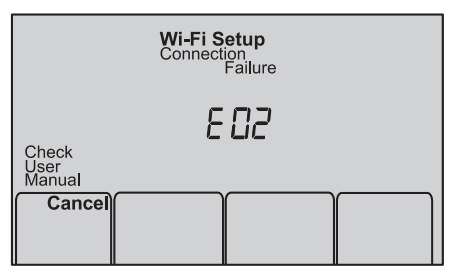

TROUBLESHOOTING
If you have difficulty with your thermostat, please try the following suggestions. Most problems can be corrected quickly and easily.
Display is blank
- Check the circuit breaker and reset it if necessary.
- Make sure the power switch at the heating and cooling system is on.
- Make sure the furnace door is closed securely.
- Make sure the C wire is connected (see page 6).
Cannot change a system setting to Cool
- Check Function 1: System Type to make sure it is set to match your heating and cooling equipment (see page 18).
The fan does not turn on when heat is required
- Check Function 3: Heating Fan Control to make sure it is set to match your heating equipment (see page 18).
Cool On or Heat On is flashing on the screen
- The compressor protection feature is engaged. Wait 5 minutes for the system to restart safely, without damage to the compressor.
Heat pump issues cool air in heat mode, or warm air in cool mode
- Check Function 2: Heat Pump Changeover Valve to make sure it is properly configured for your system (see page 18).
The heating or cooling system does not respond
- Press System to set the system to Heat. Make sure the temperature is set higher than the Inside temperature.
- Press System to set the system to Cool. Make sure the temperature is set lower than the Inside temperature.
- Check the circuit breaker and reset it if necessary.
- Make sure the power switch at the heating & cooling system is on.
- Make sure the furnace door is closed securely.
- Wait 5 minutes for the system to respond.
The heating system is running in cool mode
- Check Function 1: System Type to make sure it is set to match your heating and cooling equipment (see page 18).
Heating and cooling equipment are running at the same time
- Check Function 1: System Type to make sure it is set to match your heating and cooling equipment (see page 18).
- Grasp and pull the thermostat away from the wall plate. Check to make sure bare wires are not touching each other.
- Check thermostat wiring is correct.
Regulatory information
FCC Compliance Statement (Part 15.19) (USA only)
This device complies with Part 15 of the FCC Rules. Operation is subject to the following two conditions:
- This device may not cause harmful interference, and
- This device must accept any interference received, including interference that may cause undesired
operation.
FCC Warning (Part 15.21) (USA only)
Changes or modifications not expressly approved by the party responsible for compliance could void the
user’s authority to operate the equipment.
FCC Interference Statement (Part 15.105 (b)) (USA only)
This equipment has been tested and found to comply with the limits for a Class B digital device, pursuant to Part 15 of the FCC Rules. These limits are designed to provide reasonable protection against harmful interference in a residential installation. This equipment generates uses and can radiate radio frequency energy and, if not installed and used in accordance with the instructions, may cause harmful interference to radio communications. However, there is no guarantee that interference will not occur in a particular installation. If this equipment does cause harmful interference to radio or television reception, which can be determined by turning the equipment off and on, the user is encouraged to try to correct the interference by one of the following measures:
- Reorient or relocate the receiving antenna.
- Increase the separation between the equipment and the receiver.
- Connect the equipment to an outlet on a circuit different from that to which the receiver is connected.
- Consult the dealer or an experienced radio/TV technician for help.
Thermostats
To comply with FCC and Industry Canada RF exposure limits for general population/ uncontrolled exposure, the antenna(s) used for these transmitters must be installed to provide a separation distance of at least 20 cm from all persons and must not be co-located or operating in conjunction with any other antenna or transmitter.
RSS-GEN
Under Industry Canada regulations, this radio transmitter may only operate using an antenna of type and maximum (or lesser) gain approved for the transmitter by Industry Canada. To reduce potential
radio interference to other users, the antenna type and its gain should be so chosen that the equivalent
isotropically radiated power (e.i.r.p.) is not more than that necessary for successful communication.
Operation is subject to the following two conditions:
- this device may not cause interference, and
- this device must accept any interference, including interference that may cause undesired operation of the device.
For more manuals by Honeywell, visit ManualsLibraryy
Honeywell Smart Series RTH6500WF Programmable Thermostat-FAQs
How do I reset my Honeywell RTH6500WF WiFi thermostat?
To reset WiFi, remove the thermostat faceplate from the wall, wait 30 seconds, then reattach it. The thermostat will attempt to reconnect to the previously paired WiFi network.
Does the RTH6500WF thermostat have a battery?
No, the Honeywell RTH6500WF operates without batteries.
Why is my Honeywell thermostat not connecting to WiFi?
If your thermostat is offline, try resetting your WiFi router. Ensure your network is a standard home network (not a guest or business network) and operates on a 2.4 GHz band, as the thermostat does not support 5 GHz networks.
Why is my Honeywell thermostat flashing “Cool On” or “Heat On”?
A blinking “Cool On” or “Heat On” means the thermostat has activated a 5-minute delay to protect your system. Wait for it to resume normal operation.
What happens if the power goes out?
After a short power outage, the thermostat will automatically reconnect to WiFi and resume communication with your smart device.
What is a 7-day programmable thermostat?
A 7-day thermostat allows you to set a unique temperature schedule for each day of the week. Other models include:
1. 5-2 Day: One setting for weekdays, another for weekends.
2. 5-1-1 Day: Separate settings for weekdays, Saturday, and Sunday.
Will my Honeywell thermostat work without batteries?
Yes, it operates using direct AC power without requiring batteries.
Can a smart thermostat work without WiFi?
Yes, a smart thermostat can function without WiFi, but you will only be able to adjust temperature manually without remote access or smart features.
How does the Honeywell thermostat detect temperature?
It considers both air temperature and the radiant temperature of surrounding objects (walls, furniture) for a more accurate reading.

