
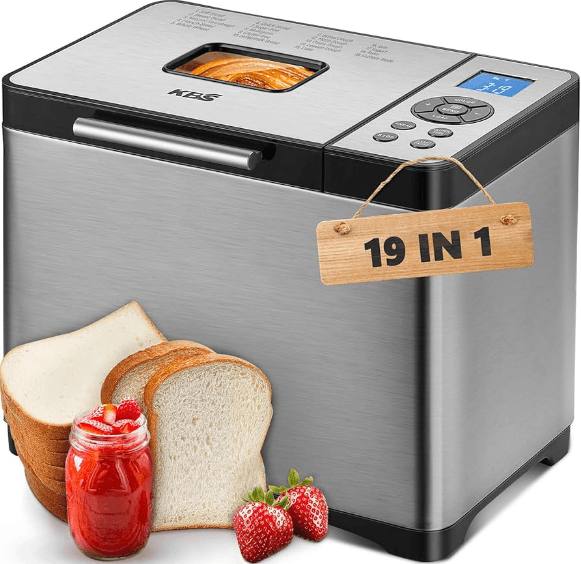
KBS MBF-020 Automatic Bread Maker
IMPORTANT SAFEGUARDS
SAVE THESE INSTRUCTIONS FOR HOUSEHOLD USE ONLY
When using electrical appliances, basic safety precautions should always be followed, including the following:
- Read all instructions, product labels, and warnings before using this bread maker.
- Do not touch hot surfaces; carry the unit by handles. Always use oven mitts when handling hot material, and allow metal parts to cool before cleaning. Allow the bread maker to cool thoroughly before putting in or taking off parts.
- When the unit is not in use and before cleaning, unplug the bread maker from a wall outlet. Let the bread maker cool down thoroughly before assembling or disassembling it.
- To protect against the risk of electrical shock, do not immerse the appliance or plugs in water or other liquids.
- Close supervision is always necessary when this or any appliance is used near children or incapacitated persons.
- Do not allow anything to rest on the power cord. Do not plug in the cord where people may walk or trip on it. Unplug this bread maker from the wall outlet before you go out for a trip or long excursion.
- Do not operate this or any appliance with a frayed or damaged cord, or plug, or after the appliance malfunctions or is dropped or has been damaged in any manner.
- Do not let the cord dangle over the edge of a table or counter or touch hot surfaces. Do not place on an unsteady or cloth-covered surface.
- Avoid contact with moving parts.
- Do not use attachments not recommended by the manufacturer. They may cause fire, electric shock, or injury.
- Do not use outdoors or for commercial purposes.
- Do not place the appliance near a hot gas or electric burner, or in a heated oven.
- Keep the power cord away from the hot surface of this bread maker. Do not put any flammable objects on the hot surface of this bread maker.
- Place this bread maker a minimum of 2 inches away from the wall or any other object.
- Do not use this bread maker for anything other than its intended use.
- When plugging or unplugging this bread maker, be sure not to touch the plug blades with your fingers.
- To unplug, press and hold the Stop/Pause button for 1 to 3 seconds, grip the plug and pull from the wall outlet. Never pull on the cord.
- If the electric circuit is overloaded with other appliances, your bread maker may not operate properly. This bread maker should be operated on a separate electrical circuit from other operating appliances.
- Extreme caution must be used when moving an appliance containing hot oil or other hot liquids.
- Always attach the plug to the appliance first, then plug the cord into the wall outlet. To disconnect, turn any control to “off”, then remove the plug from the wall outlet.
PARTS AND FEATURES
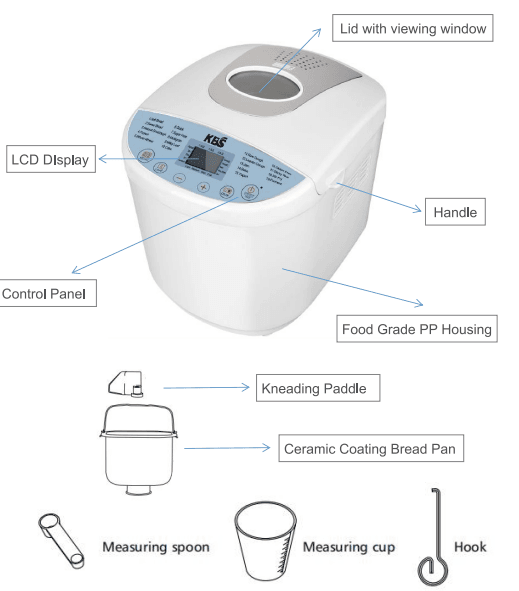
To Remove Bread Pan:
Using the bread pan handle, turn the bread pan counterclockwise to unlock it. Lift up and remove the bread pan from the baking chamber.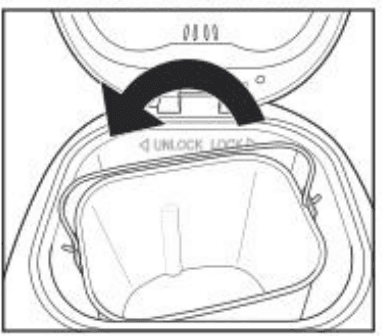
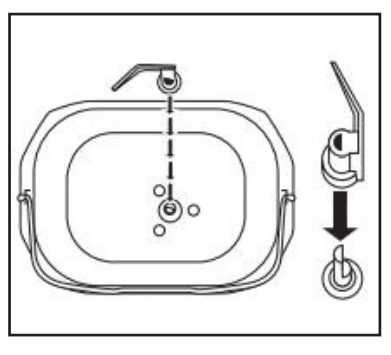
To Attach the Kneading Blade:
CONTROL PANEL
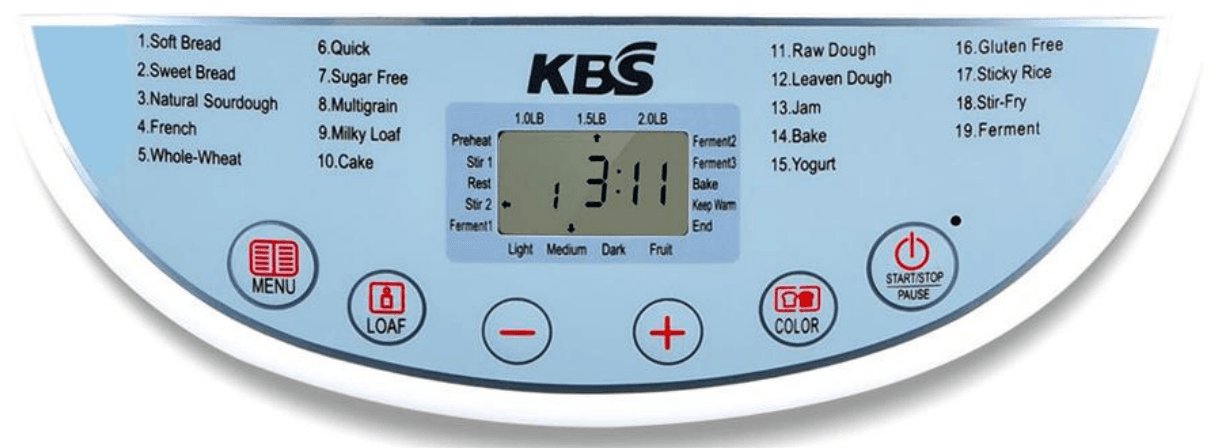
Default Setting
The bread maker does not have a separate on/off switch. Simply plug in and switch on at the socket. After switching on the Bread maker, the LCD in the display screen will be illuminated, and you will hear a beep. “1, 3:11” appears in the display screen, “1 “means Menu 1: Soft bread. And the arrow points to
MEDIUM/750g, this is the default setting so it will show this every time you turn on the machine.
START/STOP/PAUSE/PAUSE
For starting and stopping the selected programme. To START a programme, press the START/STOP/PAUSE button once. A short beep will be heard, and two dots in the time display begin to flash. The programme will start. To PAUSE a programme, press the START/STOP/PAUSE button to interrupt the programme at any time (to add ingredients, etc.) The machine will pause. To continue the programme, simply press the START/STOP/PAUSE button again. To STOP a programme, press the START/STOP/PAUSE button for approx 3 seconds until you hear a beep. The beep indicates that the programme has been switched off. The display screen will show the default setting again (1, 3:11-arrow pointing to MEDIUM/750g).
MENU
The MENU button is used to set your selected programme. Press the MENU button repeatedly to scroll through the menu – the number of programmes will show in the display screen accompanied by short beeps. Select your programme by pressing the screen repeatedly. When you see the number of the programme you require together with the programme time, stop pressing.
COLOR
Press the COLOR button to select a LIGHT, MEDIUM or DARK coloured crust. Crust is only adjustable in Cycles 1 ~10, 14.
LOAF SIZE
Press the LOAF SIZE button to move the arrow to 1, 1.5- or 2-lb. loaf size.
TIME + and TIME –
(DELAYING THE START TIME) (Maximum delay time is 15 hours) The Delay Function is only adjustable in Cycles 1~12, 15~11. If you want to delay the start time so that the bread cooks overnight and is ready to eat in the morning:
Example:
- It is 8.30 pm and you want your bread ready at 7 am the following day-i.e. in 10 hours and 30 minutes.
- Select your programme, loaf size and crust color.
- Press TIME+ or TIME-to add the time until 10.30 appears on the display screen. The time is set in increments of 10 minutes. Remember to include the operation time of your chosen programme.
- Press the START/STOP button to activate the delay function: The dots will flash and the numbers
will count down to show you the remaining time. The bread will be ready for you at 7 am.
DO NOT USE THE DELAY TIME WHEN USING INGREDIENTS THAT WOULD SPOIL, SUCH AS
EGGS, MILK, CREAM OR CHEESE.
OTHER FEATURES
AUDIBLE ALERT TO TELL YOU WHEN TO ADD ADDITIONAL INGREDIENTS. Part way through each programme (after approximately 30 minutes, but it will vary according to the programme you have selected), the machine will beep 10 times. This tells you that you can add additional ingredients such as fruit, olives, nuts, etc. The beeps are very clear and can be easily heard, calling you back to the machine.
KEEP WARM
The Bread Maker will keep the bread warm for 60 minutes after baking. (Not with DOUGH programme) At the end of the programme, the bread maker will beep and the display screen will show 0:00, indicating that the machine is in keep warm mode.
POWER FAILURE BACKUP SYSTEM
The Bread maker is equipped with a power failure backup system and memory. If the power system is interrupted during the course of bread making, the process of making bread will be continued automatically within 15 minutes, even without pressing the START/STOP button. If the interruption time exceeds 15 minutes, the memory cannot be kept, and you must discard the ingredients in the bread pan and start again. If the dough has not entered the rising phase when the power supply breaks off, you can press the START/STOP button directly to continue the programme from the beginning.
PARTS AND FEATURES
How to operate an “empty bake” and for the very first using. When the Bread Maker is used for the first time, it may emit a slight burning smell when first switched on. This is completely normal with a new heating element. You will need to operate the Bread Maker empty for the very first use. This will also show you how easy the Bread Maker is to use.
To do this:
- Wash the bread pan and kneading paddle in hot, soapy water, rinse and dry thoroughly.
- Place the Bread Maker on a flat, dry surface.
- Position the bread pan in the baking chamber, holding it at a slight angle and turning it clockwise until it clicks into place.
- Fix the kneading paddle onto the drive shaft.
- Close the lid.
- Switch on at the socket
- The Bread Maker will beep, and the display screen will show the default setting 1,3:11
- Press the MENU button the programme numbers will scroll through. Stop pressing at programme number 14, 0:50 (BAKE). If you go past the number you require, simply keep pressing until programme 11 comes round again.
- Select programme 14 (BAKE) and press START/STOP.
- The bread maker will begin to count down, and you can follow this on the display screen. Leave the Bread maker to BAKE for 10 minutes. You will hear some intermittent clicks during this time.
- Press the START/STOP button firmly to stop the programme.
- Open the Bread Maker and allow cooling completely.
- Lift out the kneading paddle, then remove the bread pan by turning anti-clockwise and lifting out.
- Wash, rinse and dry the bread pan and kneading paddle again and replace.
You are now ready to make your first loaf.
Detailed Instructions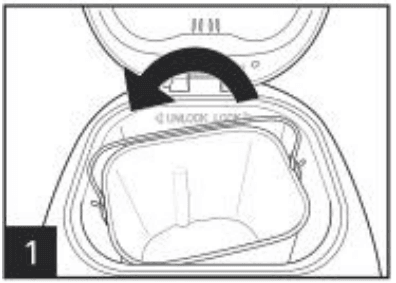
Using the bread pan handle, turn the bread pan counter-clockwise and then pull it out of the appliance.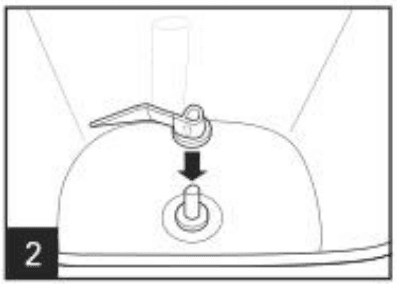
Push the kneading paddle onto the drive shaft inside the bread pan. CAUTION! Falling Object Hazard. Breadmaker can wobble and walk during the kneading cycle. Always position it in the center of the counter away from the edge.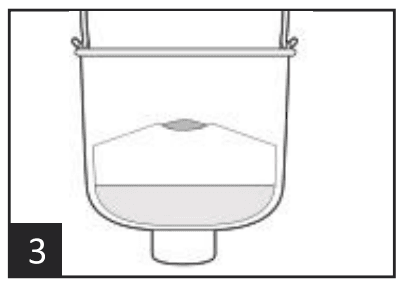
- LAST: Yeast. MUST be separate from wet ingredients
- SECOND: Dry ingredients (sugar,salt, shortening, flour)
- FIRST: Liquid ingredients—room temperature
- First, liquid ingredients should be at room temperature or as specified in the recipe.
- Second, dry ingredients. Add the flour gently and make sure it is evenly distributed over the liquid. If you tip it onto the liquid too fiercely, the liquid may seep up through the flour and affect the action of the yeast. This is particularly important if you are using the time delay.
- Last, yeast. The yeast must be kept separate from the wet ingredients and salt. Create a small hole in the dry ingredients using your finger or a spoon and place the yeast in the hole. Make sure the yeast is fresh—check the use-by date
 Using the bread pan handle, turn the bread pan counter-clockwise and then pull it out of the appliance.
- Plug in the appliance. A beep will be heard, and the display will default to Cycle .
- Press the CYCLE button until your desired cycle is displayed.
- Press the LOAF SIZE button to move the arrow to 1-, 1.5- or 2-Ib. loaf size.
- Press the CRUST button to move the arrow to the desired setting: Light, Medium, or Dark crust.
- If desired, set the DELAY TIMER with the + and- buttons. (The Delay Function is only adjustable in
Cycles 1712, 1617)NOTE: Do not use this feature when using dairy, eggs, etc. - Press the START/STOP/PAUSE button to begin the cycle. Breadmaker will beep once, and the “:” in the digital display will begin to flash, indicating the timer is counting down. The kneading paddle will begin to mix your ingredients. If the Delay Timer is activated, the kneading paddle
will not mix ingredients until the cycle is set to begin. - For add-ins (nuts, raisins), the machine will beep at the start of the second kneading. Open the lid and pour in your add-ins. This timing varies by cycle.
- Once the cycle is complete, the machine will beep 10 times and shift to the Keep Warm setting for 1 hour.
- To stop the machine, press the START/STOP/PAUSE button for 2 seconds, and the Keep Warm setting will end. Unplug the power cord and then open the lid using oven mitts.
- Let the bread pan cool down slightly before removing the bread. Using oven mitts, carefully turn the bread pan counterclockwise to unlock and lift up on the handle to remove from the machine.
- Using oven mitts, turn the bread pan upside down (with the bread pan handle folded down) onto a wire cooling rack or clean cooking surface and gently shake until bread falls out. Use a nonstick spatula to gently loosen the sides of the bread from the bread pan.
- If the kneading paddle remains in the bread, gently pry it out using the hook(or a spatula or small utensil). When not in use or when operation is complete, unplug the power cord.
Storing
Homemade bread does not contain any preservatives, so it should be eaten within 2-3 days of baking. If you are not eating it immediately, wrap it in foil or place it in a plastic bag and seal. Store remaining bread in a sealed plastic bag for up to three days at room temperature. To store for a longer time, place the sealed plastic bag in the refrigerator for up to 10 days.
- Crispy, French-style bread will soften on storage, so it is best left uncovered until sliced.
- If you wish to freeze your bread, slice the loaf before freezing so you can take out just the slices you need.
Tips: Bread Basics for Ingredients Flour
- All-Purpose Flour
Flour that contains no baking powder, suitable for “quick” breads or bread made with the Quick
settings. Bread flour is better suited for yeast breads.
- Bread Flour
Bread flour is the most important ingredient of making bread and is recommended in most yeast-bread recipes. It has a high gluten content and can keep the size of the bread from collapsing after rising. Flour varies by region. For example, American flour is milled from hard spring wheat; Canadian flour is milled from hard winter wheat.
- Self-Rising Flour
Flour that contains baking powder, used especially for making cakes. Do not use self-rising flour in
combination with yeast.
- Whole-Wheat Flour
Whole-wheat flour is ground from the entire wheat kernel. Bread made with all or part whole-wheat flour will have higher fiber and nutritional content. Whole-wheat flour is heavier and, as a result, loaves may be smaller in size and have a heavier texture.
Yeast
Yeast is a living organism and should be kept in the refrigerator to remain fresh. It needs carbohydrates found in sugar and flour as nourishment. Yeast used in bread maker recipes will be sold under several different names: Bread machine yeast (preferred), active-dry yeast, and instant yeast. Before using, check the expiration date of the yeast. Return to refrigerator immediately after each use.
Sugar
Sugar is “food” for the yeast and also increases the sweet taste and color of bread. It is very important for the color and flavor of the bread. White sugar is normally used; however, brown sugar, powdered sugar, or cotton sugar may also be called for in some recipes. Do not substitute with powdered sugar, brown sugar, or other artificial sweeteners unless indicated.
Salts
Salt in bread is NOT just a matter of taste! Salt restrains the growth of the yeast and improves elasticity
and structure. If you reduce or eliminate salt from the bread, it will rise excessively – if you use too much
salt, the loaf will not rise enough. Use common table salt.
Butter
Butter makes breads soft and glossy. Measured and cut into small pieces.
Tips for successful baking
- Ingredients: Always use fresh ingredients.
- Measurements: Measure ingredients accurately. Bread and yeast are very delicate and will not rise and bake properly if the ingredients are measured inaccurately.
- Liquids First: Always place liquid ingredients in the baking pan first to allow the Home Bakery to knead properly.
- Room Temperature: If the room temperature is over 77°F (25°C), we recommend using refrigerated liquids. Flour should be fresh and at room temperature.
- Humidity: Humidity tends to make dough moister. Try adding an extra tablespoon of flour to improve the dough consistency. Repeat if necessary until the dough forms a nice ball.
- High Altitude: For baking in high altitudes, decrease the amount of yeast by approximately 1/2 teaspoon, and decrease the sugar slightly.
MEASUREMENTS
- Accessories: Measurement Cup & Measurement Spoon
- Measurement and conversion chart
- Liquid: Use only liquid measuring cups with the cups/ounces marked clearly on the side. After filling the measuring cup, place it on a flat surface and view it at eye level to make sure the amount of liquid is exact. Liquids must be room temperature.
Fluid Ounce(s) Cup Tablespoon(s) Teaspoons 8 1 16 48 7 7/8 14 46 6 3/4 12 32 5 5/8 10 30 4 1/2 8 24 3 3/8 6 18 2 1/4 4 12 1 1/8 2 6 1 3 1/2 1 1/2
- Liquid: Use only liquid measuring cups with the cups/ounces marked clearly on the side. After filling the measuring cup, place it on a flat surface and view it at eye level to make sure the amount of liquid is exact. Liquids must be room temperature.
- Dry ingredients: Fill a dry measuring cup with a spoon and then level off the measurement with the back of a knife or a spatula to make sure the measurement is exact. Never use the cup to scoop the ingredients directly from the container (for example, flour). By scooping, you could add up to one tablespoon of extra ingredients. Do not pack down.
1 cup of: Ounces Grams All-purpose flour 4.4 125 Bread flour 4.5 128 Whole-wheat flour 4.2 119 Rye flour 3.6 102
CLEANING & CARE
Regular maintenance of your appliance will keep it safe and in proper operational order. Before cleaning, always disconnect the appliance from the mains supply. Wash removable parts in warm, soapy water, then rinse and dry all parts. Allow the bread maker and all accessories to cool completely before is assembling and cleaning.
PROGRAMME
- Soft white Bread
Ingredients 1LB 1.5LB 2LB Water 0.833 cup 1 1/4 cup 1 2/3 cup Butter/Margarine 1 1/3 Tbsp 2 Tbsp 3 Tbsp White Flour 2cups / 256g 3cups / 384g 4cups / 512g Sugar 1 1/3 Tbsp 2 Tbsp 2 2/3 Tbsp Salt 1 tsp 1/2 tsp 2 tsp Active Dry Yeast 1 tsp 1 1/2 tsp 2 tsp Dry Milk 1 Tbsp 1 1/2 Tbsp 2Tbsp - Sweet Bread
- Portuguese Sweet Bread
Ingredients 1.5LB Milk 1 cup Egg 1 Margarine 2 Tbsp White Sugar 1/3 cup Salt 3/4 tsp Bread Flour 3cups / 384g Active Dry Yeast 2 1/2 tsp - Cinnamon Raisin Bread
Ingredients 1.5LB Milk 1 cup Egg 1 Margarine 2Tbsp White Sugar 1/3 cup Salt 3/4 tsp Bread Flour 3cups / 384g Active Dry Yeast 2 1/2 tsp Note:
Add all ingredients, except raisins, in the order given above, or as directed in your bread machine manual. Set the bread maker on the Sweet Bread setting. Add the raisins at the signal, or about 5 minutes before the kneading cycle has finished.
- Portuguese Sweet Bread
TECHNICAL SPECIFICATION
| Item No. | MBF-020 |
| Rating Voltage | AC120V-60Hz |
| Rating Power | 6″’11’1 |
| Rating capacity | 1000g (2LB) |
TROUBLE SHOOTING
If you experience difficulties when operating the bread maker, review the troubleshooting information in this section to find a solution. If you are unable to find a solution, please feel free to contact KBS Customer Service E-mail: byran@jmkbs.com for additional help.
Operation
| Problem | Possible Issues | Solution |
|
Bread Maker fails to mix flour and water | Check if the plug into the outlet | Press “Start/Stop” and the Bread Maker begins to work |
| Check if the operation is delayed | Indicator”:” is flashing, and the countdown begins to work | |
| Damage of Parts | Send To Maintenance Department | |
|
Abnormal Sound | There is a litter of hard stuff or crumbs in the barrel | Remove anything found inside the unit before re-start |
| Lock the Barrel into position | Replace the bread barrel into its position | |
|
Abnormal Smell/Taste | Wire cord damaged | Keep the wire cord away from heated objects |
| Something left on heating tube | Remove the matter left on the heating tube | |
| LED indicates “LLL” | The temperature inside the unit is lower than 14°F | Use the unit under the environment at14°F- 104°F |
| LED indicates “HHH” | The temperature inside the unit is higher than 122°F | Use an electric fan to cool it or naturally cool to be at room temperature |
| LED indicates “EEO” or ” EE1″ | Defect with sensor | Sent to Maintenance Department |
|
Bread is partly raw | Bread is raw | less water or water temperature is high |
| The rate of material is wrong | Refer to Recipes Recommended |
For more manuals by KBS, visit ManualsLibraryy
KBS MBF-020 Automatic Bread Maker-FAQs
How does the KBS automatic bread maker work?
The machine automatically warms ingredients, mixes the dough with a paddle, lets it rise using temperature control, and then bakes it—all in a few hours.
What baking setting should I use for bread?
Bake at 200°C (180°C fan) for 30–35 minutes. The bread is done when the base sounds hollow when tapped. If not, bake for 10 more minutes outside the pan.
What does the toaster setting dial do?
The dial adjusts how long heat is applied. Lower numbers mean less toasting time, while higher numbers toast the bread longer.
What’s a common downside of bread machines?
The kneading paddles often stay in the loaf while baking, which can leave a small hole in the bottom of the bread.
How do I reset the KBS bread maker?
Hold the “Start/Stop” button for 2–3 seconds until it beeps. Then unplug and replug the machine to return to the default cycle.
How can I test if my bread machine works properly?
Start a cycle without the pan—the motor should run quietly. Then test the bake mode—the coil should heat up within a minute (don’t touch it).
How do I safely turn off the bread maker?
Press the START/STOP button, unplug the machine, and let it cool down for 10–20 minutes before using it again.
Why isn’t my bread maker kneading the dough?
It could be on a delayed start cycle or the pan might not be seated correctly. Double-check the placement and settings.

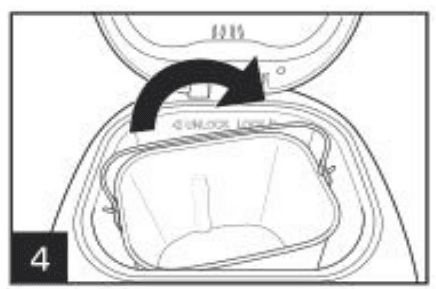 Using the bread pan handle, turn the bread pan counter-clockwise and then pull it out of the appliance.